
Categorías populares
¿Buscas un hilo?


Comentarios / Preguntas (25)
![]() Margaret Jones escribió:
Margaret Jones escribió:
I'm new to crocheting and I have looked everywhere for an explanation of this part that I don't understand: '1 sc in every row and 1 sc in every sc mid on top of foot' Can you please help me? How many rows? How do I do '1sc in every sc mid on top of foot'? A video would be great and you gave one further up, but it was for a different slipper. Thank you
30.03.2020 - 10:35DROPS Design respondió:
Dear Mrs Jones, this video shows for another slipper pattern (time code 1:56) how to crochet around the opening of foot, ie how to crochet 1 sc in each sc andn 1 sc in every sc from mid upper foot. Happy crocheting!
30.03.2020 - 11:35
![]() Pamela Thurston escribió:
Pamela Thurston escribió:
This is one of the easiest patterns I've ever done.
18.02.2020 - 16:09
![]() Deborah Lillard escribió:
Deborah Lillard escribió:
They used to make a liquid that you could put on yarn slippers that stopped them from being so "slick". Would you happen to know anything about this product or anything like it?
20.11.2019 - 05:37DROPS Design respondió:
Dear Mrs Lillard, please contact your DROPS store - even per mail or telephone - for any further information on this liquid, they might be able to help you. Happy crocheting!
20.11.2019 - 08:15
![]() Marina Currie escribió:
Marina Currie escribió:
Please mail me the stuff and pattern by postal mail.
18.11.2019 - 10:12DROPS Design respondió:
Dear Mrs Curie, our pattern can only be printed or saved as a .PDF file if using a virtual printer. Happy crocheting!
18.11.2019 - 11:01
![]() Sarah escribió:
Sarah escribió:
Hi! I am trying to understand the pattern, i gave Watch the video, following every step. The toe part fits my 6 years old.. normal? Am using Loops & Treads with a 6.5mm crochet... Should i change crochet? Tks
30.04.2019 - 13:22DROPS Design respondió:
Dear Sarah, is your tension right? You should have 7 dc (UK-English) = 10 cm in width with DROPS Polaris - We are able to provide free patterns thanks to our yarns sold throughout the world. You will therefore understand that we can only recomand you to contact your DROPS Store - even per mail or telephone - for any further help & assistance. Thank you for your comprehension.
30.04.2019 - 15:02
![]() Sue escribió:
Sue escribió:
Can you suggest a substitute yarn? Thank you
20.08.2018 - 20:55DROPS Design respondió:
Dear Sue, you can use the yarn converter, which you can find in the materials section, to select a substitute yarn for this pattern.
20.08.2018 - 21:06
![]() Karen Whybrow escribió:
Karen Whybrow escribió:
Hi there, I have worked the mid back with 1 row sl sts through both layers, which places me at the bottom of the heel and am unsure how to get from the bottom of the heel, to the position to be able to work around the entire slipper. Could you please advise?
21.06.2018 - 07:57DROPS Design respondió:
Dear Mrs Whybrow, you now cut the yarn and join it again to crochet the edge around opening of slipper. Happy crocheting!
21.06.2018 - 08:38
![]() Jere Neal escribió:
Jere Neal escribió:
I would love to make the slippers, but I and some I might make the slippers for are Senior Citizens and slippers made with yarn are very slippery. Is there something I can use on the bottom of the slipper to make it NOT slippery?
23.05.2018 - 05:53DROPS Design respondió:
Hi Jere, You can buy and sew on soles, which you can get in craft stores or hobby stores. This could solve your problem. Happy knitting!
23.05.2018 - 07:46
![]() Hannah Seymore escribió:
Hannah Seymore escribió:
I need help making a gauge swatch with this pattern, it says DROPS CROCHET HOOK size 10 mm / N/15 – or size needed to get 7 sc = width 10 cm / 4''. How many rows does this mean? I'm a beginner so I'm not quite sure how to do this!
27.04.2018 - 13:10DROPS Design respondió:
Dear Mrs Seymore, the number of rows is not that important here, you will adjust to the length, but you should have 7 sc = 4" in width to get the correct measurements around foot. Happy crocheting!
27.04.2018 - 13:15
![]() Hannah Seymore escribió:
Hannah Seymore escribió:
ROUND 3 (WS): Turn piece, work sc and inc 4 sc evenly = 13-14-16 sc. Work 5-5-7 rounds with 1 sc in every sc (last row is worked from RS). When working the 5-5-7 rounds with 1 sc in every sc, do you chain one after joining the round with a slip stitch at the end of each round?
03.04.2018 - 05:33DROPS Design respondió:
Dear Mrs Seymore, you will replace 1st sc at the beg of row with 1 chain, and finish each row with 1 sl st in the first ch at the beg of row - see CROCHET INFO. Happy crocheting!
03.04.2018 - 10:18
|
|
Easy Peasy#easypeasyslippers |
|
|
|
|
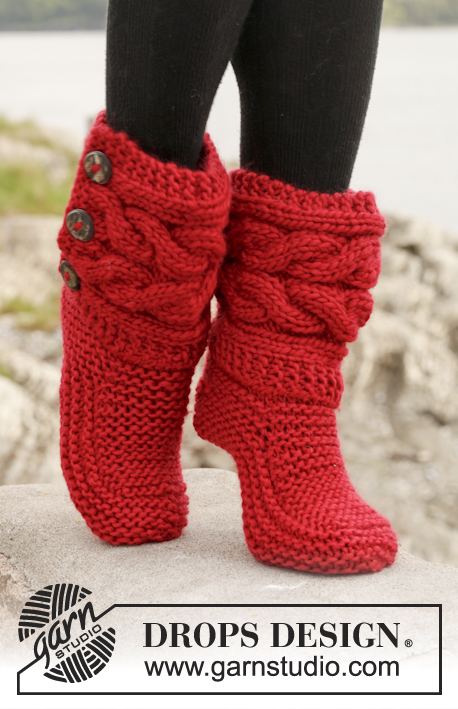
Pantuflas a ganchillo DROPS, en “Polaris”.
DROPS 150-25 |
|
|
CÍRCULO MÁGICO: Cuando la pieza es trabajada en redondo, empezar con esta técnica para evitar que se formen agujeros en el centro. Sostener el extremo del hilo con la mano izquierda y hacer un bucle alrededor del dedo índice izquierdo (de izquierda a derecha). Sostener el bucle con el pulgar izquierdo y el dedo índice. * Insertar la ag a través del bucle, levantar el hilo proveniente del ovillo, pasar el hilo a través del bucle, hacer una lazada alrededor de la ag y extraer la lazada a través del pt en la ag = 1 p.b. *, repetir de *a* hasta tener 5-6-8 p.b. alrededor del bucle, terminar con 1 p.bjs en el primer p.b. Continuar como se explica en el patrón – AL MISMO TIEMPO, tirar de la punta del hilo para cerrar el bucle y el agujero habrá desaparecido. INFORMACIÓN PARA LA ELABORACIÓN DEL TRABAJO: Sustituir el primer p.b. del inicio de la hilera con 1 cad. Terminar cada hilera con 1 p.bjs en la cad del inicio de la vta. Es decir, cuando la pieza es trabajada en redondo, se trabaja alternando por el LD y por el LR y asegurar con 1 p.bjs en la 1ª cad de la vta. ------------------------------------------------------ PANTUFLA: La pantufla es trabajada en ag de ganchillo tamaño 10 mm con 1 hilo Polaris. Empezar trabajando a partir de la punta del pie. Primero trabajar en redondo – leer INFORMACIÓN PARA LA ELABORACIÓN DEL TRABAJO arriba, y después continuar de ida y vuelta. PIE: Hacer un CÍRCULO MÁGICO – ver explicación arriba. VUELTA 1 (LR): Virar la pieza, hacer p.b. y aum 4 p.b. distribuidos equitativamente = 9-10-12 p.b. – ver INFORMACIÓN PARA LA ELABORACIÓN DEL TRABAJO arriba. VUELTA 2 (LD): Virar la pieza y hacer 1 p.b. en cada p.b. VUELTA 3 (LR): Virar la pieza, hacer p.b. y aum 4 p.b. distribuidos equitativamente = 13-14-16 p.b. Hacer 5-5-7 vtas con 1 p.b. en cada p.b. (la última vta es trabajada por el LD). TALÓN: Ahora trabajar de ida y vuelta sobre 10-11-13 p.b. Hacer 10-12-14 hileras con p.b. de ida y vuelta. La pantufla mide aprox 22-24-26 cm en total. Unir al centro e la parte de atrás con 1 hilera de p.bjs a través de ambas partes. Después, trabajar alrededor de toda la pantufla de la manera sig: 1 p.b. en cada hilera y 1 p.b. en cada p.b. al centro de la parte de arriba del pie. Cortar y asegurar el hilo. Hacer la otra pantufla. |
|
¿Terminaste este patrón?Entonces, etiqueta tus fotos con #dropspattern #easypeasyslippers o envíalas a la galería #dropsfan. ¿Necesitas ayuda con este patrón?Encontrarás 6 videos tutoriales, un espacio para comentarios/preguntas y más visitando la página del patrón en garnstudio.com © 1982-2026 DROPS Design A/S. Todos los derechos reservados. Este documento, incluyendo todas sus sub-secciones, está protegido por los derechos de autor (copyright). Lee más acerca de lo que puedes hacer con nuestros patrones en la parte de abajo de cada patrón de nuestro sitio. |


Con más de 40 años en el diseño de modelos de punto y de ganchillo, DROPS Design ofrece una de las más vastas colecciones de patrones gratuitos en el internet - traducidos en 17 idiomas. Al día de hoy, contamos con 324 catálogos y 12290 patrones - de los cuales 11679 están traducidos en español.
Nosotros trabajamos con mucho esmero para brindarte lo mejor que las labores de punto y ganchillo tienen para ofrecer,inspiración y consejos, así como hilos de magnífica calidad a precios increíbles! Te gustaría usar nuestros patrones para otro fin además del uso personal? Puedes leer acerca de lo que estás permitida a hacer en el texto de Copyright en la parte de abajo de todos nuestros patrones. Felices labores!
Escribe un comentario sobre DROPS 150-25
¡Nos encantaría saber qué piensas acerca de este patrón!
Si quieres escribir una pregunta referente al patrón, por favor asegúrate de elegir la categoría correcta en el formulario debajo, para acelerar el proceso de respuesta. Los campos obligatorios están marcados con un *.