
Suositut kategoriat
Etsitkö tiettyä lankaa?


Kommentit / Kysymykset (26)
![]() Margaret Jones kirjoitti:
Margaret Jones kirjoitti:
I'm new to crocheting and I have looked everywhere for an explanation of this part that I don't understand: '1 sc in every row and 1 sc in every sc mid on top of foot' Can you please help me? How many rows? How do I do '1sc in every sc mid on top of foot'? A video would be great and you gave one further up, but it was for a different slipper. Thank you
30.03.2020 - 10:35DROPS Design vastasi:
Dear Mrs Jones, this video shows for another slipper pattern (time code 1:56) how to crochet around the opening of foot, ie how to crochet 1 sc in each sc andn 1 sc in every sc from mid upper foot. Happy crocheting!
30.03.2020 - 11:35
![]() Pamela Thurston kirjoitti:
Pamela Thurston kirjoitti:
This is one of the easiest patterns I've ever done.
18.02.2020 - 16:09
![]() Deborah Lillard kirjoitti:
Deborah Lillard kirjoitti:
They used to make a liquid that you could put on yarn slippers that stopped them from being so "slick". Would you happen to know anything about this product or anything like it?
20.11.2019 - 05:37DROPS Design vastasi:
Dear Mrs Lillard, please contact your DROPS store - even per mail or telephone - for any further information on this liquid, they might be able to help you. Happy crocheting!
20.11.2019 - 08:15
![]() Marina Currie kirjoitti:
Marina Currie kirjoitti:
Please mail me the stuff and pattern by postal mail.
18.11.2019 - 10:12DROPS Design vastasi:
Dear Mrs Curie, our pattern can only be printed or saved as a .PDF file if using a virtual printer. Happy crocheting!
18.11.2019 - 11:01
![]() Sarah kirjoitti:
Sarah kirjoitti:
Hi! I am trying to understand the pattern, i gave Watch the video, following every step. The toe part fits my 6 years old.. normal? Am using Loops & Treads with a 6.5mm crochet... Should i change crochet? Tks
30.04.2019 - 13:22DROPS Design vastasi:
Dear Sarah, is your tension right? You should have 7 dc (UK-English) = 10 cm in width with DROPS Polaris - We are able to provide free patterns thanks to our yarns sold throughout the world. You will therefore understand that we can only recomand you to contact your DROPS Store - even per mail or telephone - for any further help & assistance. Thank you for your comprehension.
30.04.2019 - 15:02
![]() Sue kirjoitti:
Sue kirjoitti:
Can you suggest a substitute yarn? Thank you
20.08.2018 - 20:55DROPS Design vastasi:
Dear Sue, you can use the yarn converter, which you can find in the materials section, to select a substitute yarn for this pattern.
20.08.2018 - 21:06
![]() Karen Whybrow kirjoitti:
Karen Whybrow kirjoitti:
Hi there, I have worked the mid back with 1 row sl sts through both layers, which places me at the bottom of the heel and am unsure how to get from the bottom of the heel, to the position to be able to work around the entire slipper. Could you please advise?
21.06.2018 - 07:57DROPS Design vastasi:
Dear Mrs Whybrow, you now cut the yarn and join it again to crochet the edge around opening of slipper. Happy crocheting!
21.06.2018 - 08:38
![]() Jere Neal kirjoitti:
Jere Neal kirjoitti:
I would love to make the slippers, but I and some I might make the slippers for are Senior Citizens and slippers made with yarn are very slippery. Is there something I can use on the bottom of the slipper to make it NOT slippery?
23.05.2018 - 05:53DROPS Design vastasi:
Hi Jere, You can buy and sew on soles, which you can get in craft stores or hobby stores. This could solve your problem. Happy knitting!
23.05.2018 - 07:46
![]() Hannah Seymore kirjoitti:
Hannah Seymore kirjoitti:
I need help making a gauge swatch with this pattern, it says DROPS CROCHET HOOK size 10 mm / N/15 – or size needed to get 7 sc = width 10 cm / 4''. How many rows does this mean? I'm a beginner so I'm not quite sure how to do this!
27.04.2018 - 13:10DROPS Design vastasi:
Dear Mrs Seymore, the number of rows is not that important here, you will adjust to the length, but you should have 7 sc = 4" in width to get the correct measurements around foot. Happy crocheting!
27.04.2018 - 13:15
![]() Hannah Seymore kirjoitti:
Hannah Seymore kirjoitti:
ROUND 3 (WS): Turn piece, work sc and inc 4 sc evenly = 13-14-16 sc. Work 5-5-7 rounds with 1 sc in every sc (last row is worked from RS). When working the 5-5-7 rounds with 1 sc in every sc, do you chain one after joining the round with a slip stitch at the end of each round?
03.04.2018 - 05:33DROPS Design vastasi:
Dear Mrs Seymore, you will replace 1st sc at the beg of row with 1 chain, and finish each row with 1 sl st in the first ch at the beg of row - see CROCHET INFO. Happy crocheting!
03.04.2018 - 10:18
|
|
Easy Peasy#easypeasyslippers |
|
|
|
|
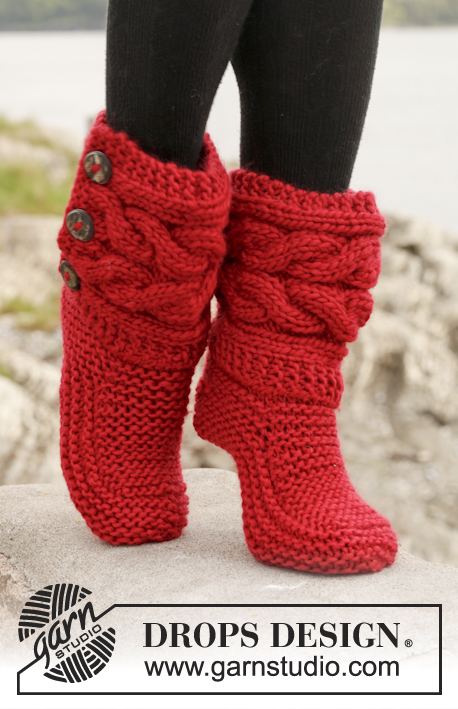
Virkatut DROPS tohvelit ”Polaris”-langasta.
DROPS 150-25 |
|
|
ALOITUSYMPYRÄ: Aloita virkkaaminen tällä tekniikalla, jottei työn alkuun jäisi reikä: Pidä kiinni langanpäästä ja kierrä lanka kerran vasemman käden etusormen ympärille (vasemmalta oikealle). Pidä muodostunut silmukka vasemman käden peukalon ja etusormen välissä. *Vie koukku silmukkaan, ota kerän lanka koukulle, tee langankierto koukulle ja vedä langankierto koukulla olevan s:n läpi = 1 ks*, toista *-* kunnes silmukassa on 5-6-8 ks, virkkaa lopuksi 1 ps ensimmäiseen ks:aan. Jatka virkkaamista ohjeen mukaisesti ja kiristä SAMALLA langan avulla silmukka umpeen. VIRKKAUSINFO: Jokaisen kerroksen ensimmäinen ks korvataan 1 kjs:lla. Joka kerroksen lopuksi virkataan 1 ps krs:n ensimmäiseen kjs:aan. Eli kun virkkaat suljettua virkkausta, virkkaa vuorotellen työn oikealta ja nurjalta puolelta, ja sulje krs:t 1 ps:lla krs:n ensimmäiseen kjs:aan. ---------------------------------------------------------- TOHVELI: Virkataan koukulla nro 10 ja 1-kertaisella Polaris-langalla. Aloita virkkaaminen kärjestä. Virkkaa aluksi suljettua virkkausta (lue VIRKKAUSINFO yllä), jatka sitten virkkaamalla tasovirkkausta. JALKAOSA: Tee ALOITUSYMPYRÄ (ks. selitys yllä). 1.KRS (nurja puoli): Käännä työ ja lisää tasavälein 4 ks = 9-10-12 ks (ks. VIRKKAUSINFO yllä). 2.KRS (oikea puoli): Käännä työ ja virkkaa 1 ks jokaiseen ks:aan. 3.KRS (nurja puoli): Käännä työ ja lisää tasavälein 4 ks = 13-14-16 ks. Virkkaa 5-5-7 krs:n ajan 1 ks jokaiseen ks:aan (viimeinen krs virkataan työn oikealta puolelta). KANTAPÄÄ: Virkkaa nyt tasovirkkausta ensimmäisten 10-11-13 ks:n kohdalla. Virkkaa ks:ita 10-12-14 krs:n ajan. Kun tohvelin pituus on n. 22-24-26 cm, aseta työ kaksinkerroin ja virkkaa tohveli yhteen keskeltä takaa (= virkkaa ps:ita molempien kerrosten läpi). Virkkaa sitten reunus tohvelin aukon reunoihin seuraavasti: 1 ks jokaiseen kerrokseen ja 1 ks jokaiseen keskellä jalan päällä olevaan ks:aan. Katkaise lanka ja päättele langanpäät. Virkkaa toinen tohveli samoin. |
|
Oletko tehnyt tämän mallin?Tägää tällöin kuviasi #dropspattern #easypeasyslippers tai lähetä kuvat #dropsfan galleriaan. Tarvitsetko apua tämän ohjeen kanssa?Löydät 6 ohjevideota, kommentteja/kysymyksiä ja muuta osoitteessa www.garnstudio.com © 1982-2025 DROPS Design A/S. Pidätämme kaikki oikeudet. Tämä tiedosto ja kaikki sen alatiedostot on suojattu tekijänoikeuslailla. Lue lisää siitä, mitä voit tehdä ohjeillamme, verkkosivujemme jokaisen ohjeen alaosasta. |


DROPS Design on toiminut neule- ja virkkausalalla yli 40 vuotta ja meillä on yksi kaikkein laajin valikoima ilmaisia ohjeita verkossa - käännettynä 17 kielelle. Tänään meiltä löytyy 314 lehteä ja 11821 ohjetta - joista 11217 ohjetta on käännetty suomeksi.
Työskentelemme ahkerasti, jotta voisimme antaa teille kaikkein parhaimpia neule- ja virkkausohjeita, inspiraatiota ja neuvoja sekä korkealaatuisia lankoja todella edulliseen hintaan! Haluaisitko käyttää ohjeitamme muuhun kuin henkilökohtaiseen käyttöön? Voit lukea säännöistä ohjeiden Tekijänoikeus -tekstissä, joka löytyy kaikkien ohjeidemme alapuolelta. Hauskoja hetkiä käsitöiden parissa!
Lisää kommentti ohjeeseen DROPS 150-25
Haluamme mielellämme kuulla mielipiteesi tästä ohjeesta!
Mikäli haluat esittää kysymyksen, valitse oikea kategoria alla olevasta valikosta - tällä tavoin saat vastauksen nopeammin. Pakolliset kentät on merkitty tähdellä *.