
Categorías populares
¿Buscas un hilo?


Comentarios / Preguntas (119)
![]() Carol Cooley escribió:
Carol Cooley escribió:
Thank for your helpful comments. Naturally I would consider ordering from yourselves as you make it very easy to find a substitute. I cannot say the same about Captcha which is always a struggle, with blurred small images and often using items a non-USA person would not necessarily recognize. At my time of life anything to m ake life easier helps. Have a nice day. Is that last image a store front or garage?
26.05.2019 - 09:01
![]() Carol Cooley escribió:
Carol Cooley escribió:
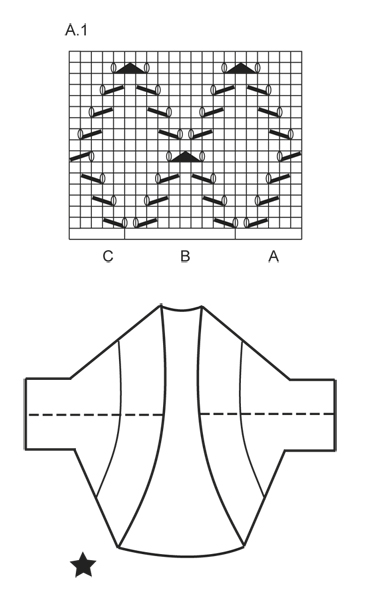
Is there either another similar pattern or has this one being rewritten please? *Cassie by DROPS Design Knitted DROPS bolero with lace pattern in ”Big Merino”. Size: S - XXXL* I use mainly acrylic as wool can irritate, alpaca-etc are ok. Any low cost substitutes for wool are welcomed for a practice piece. Maybe garter and st.st to start off then go ahead for lace. Thank you.
14.05.2019 - 13:29DROPS Design respondió:
Dear Carol, you can find many patterns for bloeros on our site with the search word "bolero". https://www.garnstudio.com/search.php?action=search&w=bolero&c=0&k=0&y=0&lang=en You have to understand that these patterns are written to suppoirt DROPS yarns, we cannot make alterations or suggestions for other yarns, sorry. Happy Crafting!
25.05.2019 - 10:27
![]() Pam escribió:
Pam escribió:
I'm having trouble with row 15 could you please write it in full for me
10.05.2019 - 20:07DROPS Design respondió:
Hi Pam, Row 15 reading from right to left, so from the right side, - K4, 1 yarn over, slip 1 stitch, knit 2 together and pass the slipped stitch over the knitted together stitches, 1 yarn over, K7, 1 yarn over, slip 1 stitch, K2 together and pass the slipped stitch over the knitted together stitches, 1 yarn over and finally K4. Happy knitting!
11.05.2019 - 11:47
![]() Ava Goei-Vujovich escribió:
Ava Goei-Vujovich escribió:
I have tried a sample swatch: using 21 stitches and interpreting A1. Its a total of 21 stitches but using your explanation above: first row in A: K3, K2 tog, YO - then B: YO, slip 1 as if to K, K1, psso, K5, K2 tog, YO, K1, and C: YO, slip 1 as if to K, K1, psso, K3. I end up with 23 sts and not 21 sts
07.03.2019 - 12:40DROPS Design respondió:
Dear Mrs Goei-Vujovich, on first row A.1A is worked as follows: K3, K2 tog, YO, K1 (= 6 sts), then work B over the next 10 sts: YO, slip 1 as if to K, K1, psso, K5, K2 tog, YO, K1, then work C: YO, slip 1 as if to K, K1, psso, K3 (= 5 sts) = 21 sts in total. You can insert a marker between each repeat to make sure you always get the correct number of sts in each part of the diagram. Happy knitting!
07.03.2019 - 14:19
![]() Ava Goei-Vujovich escribió:
Ava Goei-Vujovich escribió:
I don't understand why a K1 is added at the end of section B - there isn't a K1 added at the end of section A if I am to read the diagram explanation as shown in A1 Row 1. I understand B is a 10 sts repeat: *YO, slip 1 as if to K, K1, psso, K5, K2 tog, YO, K1*, repeat from *-*.
07.03.2019 - 12:35
![]() Ava Goei-Vujovich escribió:
Ava Goei-Vujovich escribió:
First row in A: K3, K2 tog, YO = 6sts. then B: YO, slip 1 as if to K, K1, psso, K5, K2 tog, YO, K1 = 12 sts (repeat B), and work C: YO, slip 1 as if to K, K1, psso, K3 = 5sts. B should only be multiples of 10, not 12.
07.03.2019 - 11:35DROPS Design respondió:
Dear Mrs Goei-Vujovich, when working B you decrease 1 stitch 2 times (slip 1, K1, psso + K2 tog) and increase with 2 YOs = number of sts is the same = 10 sts. See previous answer for whole repeats on the row. Happy knititng!
07.03.2019 - 12:19
![]() Ava Goei-Vujovich escribió:
Ava Goei-Vujovich escribió:
I believe your reply at 9:43 is incorrect. I have just tried in in a total of 21 stitches for a A,B,C section. It makes the entire section of section B : 12 stitches for a standard repeat when it should be 10! Standard repeat of 10 stitches and section C is 5.
07.03.2019 - 11:27DROPS Design respondió:
Dear Mrs Goei-Vujovich, B is a 10 sts repeat: *YO, slip 1 as if to K, K1, psso, K5, K2 tog, YO, K1*, repeat from *-*. And you will work: 3 sts in garter st, A.1A (= 6 sts), repeat A.1B a total of 9-10-11-12 times (= over the 90-100-110-112 next sts), work A.1C (= 5 sts) and finish with 3 sts in garter st. Happy knitting!
07.03.2019 - 12:18
![]() Ava Goei-Vujovich escribió:
Ava Goei-Vujovich escribió:
In section B, row 1, I start off with a *1 YO, sl1, K1, psso, k5, k2tog, 2 YO*, and then repeat from* to * for the next 90-100-etc stitches, until the last 5 stitches of that row?
07.03.2019 - 06:16DROPS Design respondió:
Hi Ava, You are right, apart from at the end of the sequence it is 1 YO, K1, 1 YO, not 2 YOs. This sequence is repeated until the last 8 stitches, finishing with A.1 C (5 stitches) and 3 stitches in garter stitch. Happy knitting!
07.03.2019 - 08:06
![]() Ava Goei-Vujovich escribió:
Ava Goei-Vujovich escribió:
Agree not a well worded pattern & diagram explanations. In section A, I K2tog (4 & 5th stitch together), then immediately following: do I do 2 times YO followed by a sl1, K1, psso?
07.03.2019 - 06:07DROPS Design respondió:
Dear Mrs Goei-Vujovich, on first row in A.1, work A.1A as follows: K3, K2 tog, YO - then work B: YO, slip 1 as if to K, K1, psso, K5, K2 tog, YO, K1 (repeat B), and work C: YO, slip 1 as if to K, K1, psso, K3. On row 15, work the last 2 sts in A tog with the next st in B, then work the last 2 sts in B with next st in next B / in C. Happy knitting!
07.03.2019 - 09:43
![]() Marcia Ebert escribió:
Marcia Ebert escribió:
I have started knitting this pattern and realize that there are directions for knitting the RS but not for wrong side. Is this done in stockinette stitch except for pattern stitches? Garter stitch is the border stitches but what do you do on the wrong side in the middle. It looks like every other row of the pattern stitch on the diagram is plain so is it purl on the wrong side. Is this correct?
21.01.2019 - 04:51DROPS Design respondió:
Hi Marcia, All the rows in the diagram show the stitches from the right side, so between the lace pattern you work stocking stitch (knit from the right side and purl from the wrong side). Happy knitting!
21.01.2019 - 07:01
|
|||||||||||||||||||
Cassie#cassiebolero |
|||||||||||||||||||
 |
 |
||||||||||||||||||
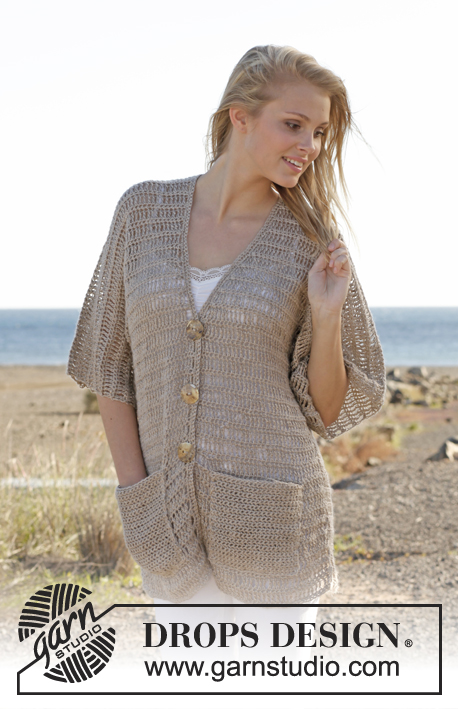
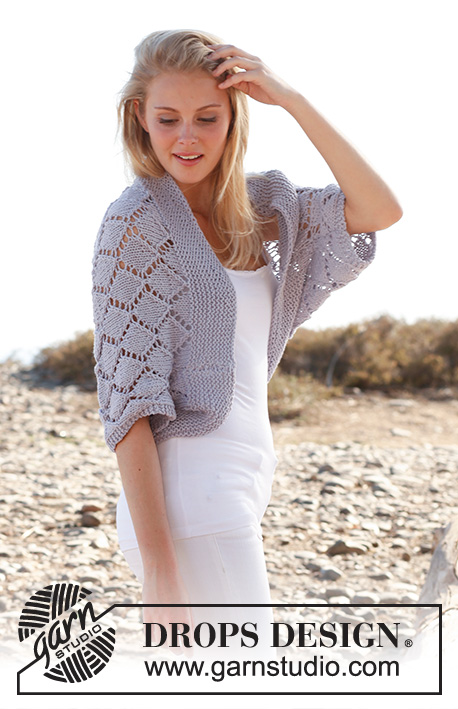
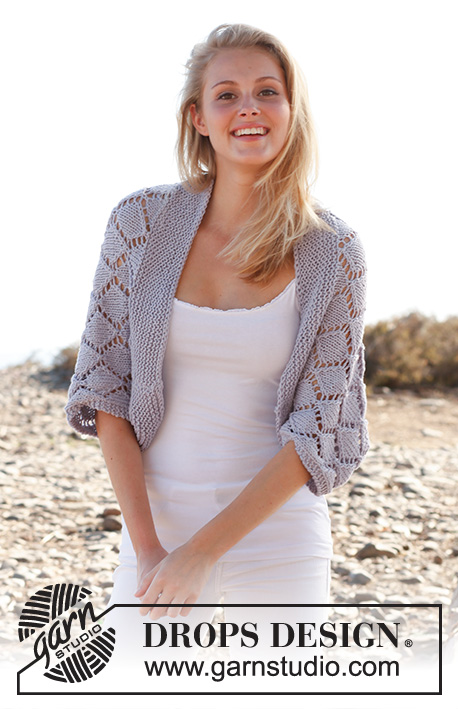
Bolero de punto DROPS con patrón de calados, en “Big Merino”. Talla: S – XXXL.
DROPS 146-16 |
|||||||||||||||||||
|
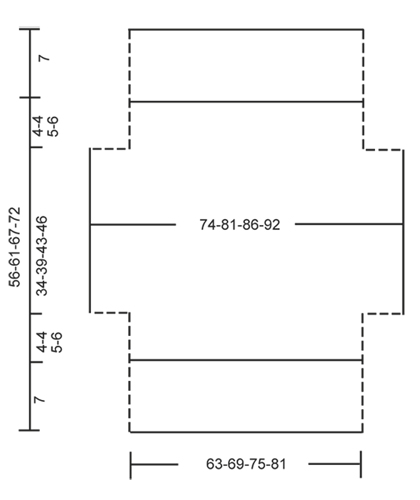
PT MUSGO (de ida y vuelta en la ag): Tejer todas las hileras de derecho. 1 surco = 2 hileras tejidas de derecho. PATRÓN: Ver diagrama A.1, el diagrama muestra todas las hileras en el patrón vistas por el LD. ------------------------------------------------------ BOLERO: Tejido de ida y vuelta en ag circular para tener espacio suficiente para todos los pts. Mon 107-117-127-137 pts en ag circular tamaño 5 mm con Big Merino. Tejer en pt musgo hasta que la pieza mida 7 cm. Después tejer de la manera sig, por el LD: 3 pts en PT MUSGO – ver explicación arriba, A.1A (= 6 pts), A.1B sobre los 90-100-110-120 pts sig, terminar con A.1 C (= 5 pts) y 3 pts en PT MUSGO. Continuar A.1 con 3 pts en pt musgo en cada lado. RECUERDE MANTENER LA MISMA TENSIÓN DE TEJIDO DE LA MUESTRA! Cuando la pieza mida 11-11-12-13 cm, mon 10 nuevos pts al final de las 2 hileras sig para la manga = 127-137-147-157 pts. Tejer de la manera sig: 3 pts en pt musgo, A.1A (= 6 pts), A.1 B sobre los 110-120-130-140 pts sig, terminar con A.1 C (= 5 pts) y 3 pts en PT MUSGO. NOTA! Continuar A.1 para que calce correctamente antes de los aum para la manga. Cuando la manga mida 45-50-55-59 cm, rem 10 pts al inicio de las 2 hileras sig = 107-117-127-137 pts. Tejer de la manera sig: 3 pts en pt musgo, A.1A (= 6 pts), A.1B sobre los 90-100-110-120 pts sig, terminar con A.1 C (= 5 pts) y 3 pts en pt musgo. Cuando la pieza mida 49-54-60-65 cm, tejer en pt musgo sobre todos los pts. Rem cuando la pieza mida 56-61-67-72 cm. TERMINACIÓN: Hacer las costuras laterales y debajo de las mangas en una, a 1 pt del pt de orillo – ver la línea punteada en el esquema. |
|||||||||||||||||||
Explicaciones del diagrama |
|||||||||||||||||||
|
|||||||||||||||||||
 |
|||||||||||||||||||
 |
|||||||||||||||||||
¿Terminaste este patrón?Entonces, etiqueta tus fotos con #dropspattern #cassiebolero o envíalas a la galería #dropsfan. ¿Necesitas ayuda con este patrón?Encontrarás 15 videos tutoriales, un espacio para comentarios/preguntas y más visitando la página del patrón en garnstudio.com © 1982-2026 DROPS Design A/S. Todos los derechos reservados. Este documento, incluyendo todas sus sub-secciones, está protegido por los derechos de autor (copyright). Lee más acerca de lo que puedes hacer con nuestros patrones en la parte de abajo de cada patrón de nuestro sitio. |
|||||||||||||||||||


Con más de 40 años en el diseño de modelos de punto y de ganchillo, DROPS Design ofrece una de las más vastas colecciones de patrones gratuitos en el internet - traducidos en 17 idiomas. Al día de hoy, contamos con 324 catálogos y 12290 patrones - de los cuales 11675 están traducidos en español.
Nosotros trabajamos con mucho esmero para brindarte lo mejor que las labores de punto y ganchillo tienen para ofrecer,inspiración y consejos, así como hilos de magnífica calidad a precios increíbles! Te gustaría usar nuestros patrones para otro fin además del uso personal? Puedes leer acerca de lo que estás permitida a hacer en el texto de Copyright en la parte de abajo de todos nuestros patrones. Felices labores!
Escribe un comentario sobre DROPS 146-16
¡Nos encantaría saber qué piensas acerca de este patrón!
Si quieres escribir una pregunta referente al patrón, por favor asegúrate de elegir la categoría correcta en el formulario debajo, para acelerar el proceso de respuesta. Los campos obligatorios están marcados con un *.