
Categorías populares
¿Buscas un hilo?


Comentarios / Preguntas (123)
![]() Hettyh escribió:
Hettyh escribió:
Wordt de hals niet af gewerkt?
13.07.2014 - 09:14
![]() Mette Krogh-Larnkjær escribió:
Mette Krogh-Larnkjær escribió:
Hej igen. Tak for svaret, når jeg hækler som beskrevet både i svaret og i opskriften, så får jeg alt for mange masker, for så øges der med 2 masker i hver side hver gang. Jeg har lige pillet et helt ærme op, for jeg opdagede det først ved den sidste udtagning. Jeg må jo forsøge mig frem, men forstår stadig ikke helt hvordan man laver udtagning med en maske for opskriften siger jo egentlig 2 hvis man følger udtagningstippet.
20.06.2014 - 13:07DROPS Design respondió:
Det skal stemme med opskriften. Men skriv gerne en kommentar om hvordan du løste det, så kan vi eft skrive det tydeligere i opskriften.
05.09.2014 - 12:21
![]() Mette Krogh-Larnkjær escribió:
Mette Krogh-Larnkjær escribió:
Har en udfordring med udtagning. Hvordan går man det nemmest når man skal øge med 1 m i et mønster med 2 m hvoraf den ene er luftmaske?
18.06.2014 - 07:13DROPS Design respondió:
Hej Mette. Du skal tage ud ved at haekle 1 st + 1 lm i den den yderste st i hver side. Dvs, hvis du fölger diagrammet saa haekler du bare 1 lm + 1 st i den yderste m ekstra. Du skal ikke haekle 1 st + 1 lm (altsaa i den raekkefölge, for saa kan jeg forestille mig det bliver kompliceret). God fornöjelse.
19.06.2014 - 13:30
![]() Jackie escribió:
Jackie escribió:
Hi there! Thanks again for the clarification. I think I understand, but I just want to list out what I think the pattern is for the beginning of the back piece - hopefully you can clarify! After finishing A.1A, and continuing to read the pattern to complete A.1B, do I repeat only the stiches specified between the brackets (noting section B), and then go back to the bottom once I reach the top of the bracket that is labeled section A1? Thanks for all of your help!
31.05.2014 - 16:42DROPS Design respondió:
Dear Jackie, after A.1A (=ch3, 1 dc), repeat M.1B = *ch1, skip 1ch, 1 dc in next ch, ch1, skip 1ch, 1 dc in next ch, ch1, skip 1ch, 1 dc in next ch* until 2 sts remain on row, and finish with A.1C(=1ch, skip 1 ch, 1dc in next ch). then turn and start 2nd row starting from the left towards the right. Happy crocheting!
16.06.2014 - 10:05
![]() Jackie escribió:
Jackie escribió:
Hi there! I absolutely love this pattern but I am having trouble understanding how to read the diagram - do I read horizontally or vertically? I feel as though it may zig-zag, but this is the first time I have seen a pattern like this before. Your help is much appreciated! Thank you so much :)
28.05.2014 - 00:06DROPS Design respondió:
Dear Jackie, start reading diagram from the bottom corner on the right side towards the right (RS rows), on WS rows, read from the left towards the right - the 3 ch at beg of rows = 1st dc (= A.1A from RS, A.1C from WS), repeat A.1B on the middle sts. Happy crocheting!
28.05.2014 - 09:08
![]() Chiara escribió:
Chiara escribió:
Buongiorno vorrei capire se sto sbagliando qualcosa nella realizzazione di questo capo. Sto facendo il dietro. Nel passaggio dallo schema A1 allo schema A2 il lavoro passa kentamente ma inesorabilmente dopo 13 righe da 60 cm a 72 cm in larghezza, nonostante abbia mantenuto lo stesso numero di maglie come nella spiegazione. Ho provato anche a rifare lo schema A2 con un uncinetto più piccolo, il 3,5, ma nulla è cambiato. Che cosa sto sbagliando? Potete aiutarmi? Grazie
22.05.2014 - 08:15DROPS Design respondió:
Buongiorno Chiara. Per risolvere il suo problema può riprendere, a intervalli regolari, un numero inferiore di m nel passaggio tra lo schema A.1 e lo schema A.2. Buon lavoro!
22.05.2014 - 13:06
![]() Susanne escribió:
Susanne escribió:
LES ØKETIPS. Gjenta økningen på hver 7.-5.-4½.-3½.-3½.-3.cm 5-7-8-9-9-10 ganger til (totalt 6-8-9-10-10-11 økninger) = 57-61-65-69-71-75 st/lm Jeg har økt 4 ganger på hver side og har 61 masker der nå. Men skal jeg telle med lm også? Er det riktig å kun øke 4 ganger på hver side? eller er det å øke 8 ganger på hver side?? trenger svar så raskt som mulig : ) takk på forhånd
06.05.2014 - 11:01DROPS Design respondió:
Du har 45 m öger 8 gange i hver side = 16 m 45 + 16 = 61 m God fornöjelse!
07.05.2014 - 09:13
![]() Jane escribió:
Jane escribió:
My comfortable measurements underarm to underarm is 64cm making it 128cm in total. The 126cm is closest, but I would have to downsize making it slightly tighter. Would perhaps going for the next size up (138cm) be more of a sensible decision? Any advise would be happily received as I have no clue which way to go. Thank you in advance.
07.10.2013 - 23:32DROPS Design respondió:
Dear Jane, check if these 2 cm tighter can fit or not, so that you can rather decide to make smaller size or larger size. Do not hesitate to get help from your local store, they also can help you. Happy crocheting!
08.10.2013 - 09:50
![]() Jane escribió:
Jane escribió:
Would it be fair to say that a US size XXL is equivilent to a UK size 18?
06.10.2013 - 23:22DROPS Design respondió:
Dear Jane, you will see at the bottom of the pattern a measurement chart. Compare the measurements (in cm) to one of your similar garment to find the correct size. The measurements are taken flat, from side to side. Happy crocheting!
07.10.2013 - 09:51
![]() A.v.Rooij escribió:
A.v.Rooij escribió:
Heb dit patroon uitgeprobeerd en dan kom het volgende tegen, als je het onderste gedeelte klaar hebt krijg je bij het tweede gedeelte veel meer volume,hoe los je dit op(door steken te minderen?
24.05.2013 - 06:35DROPS Design respondió:
Het gedeelte A.1 zou dezelfde breedte krijgen als A.2. Er blijft hetzelfde aantal steken op de toer en zorg ervoor dat u bij het beginnen van A.2 ook 1 stk haakt in elke l l van A.1 (zie teltekening).
29.05.2013 - 16:18
|
|||||||
Donna#donnasweater |
|||||||
 |
 |
||||||
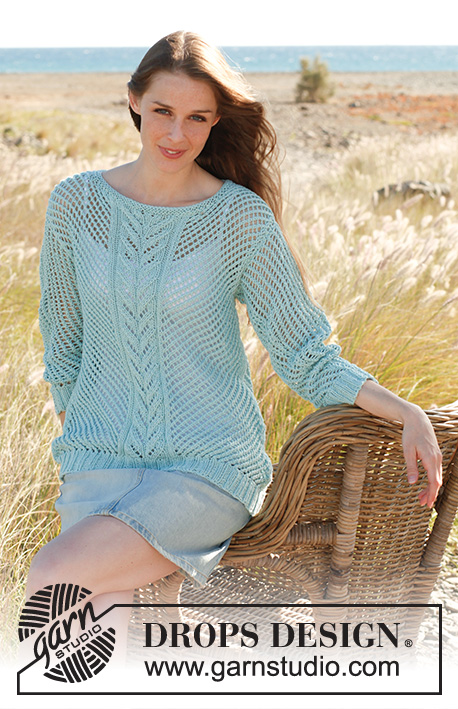
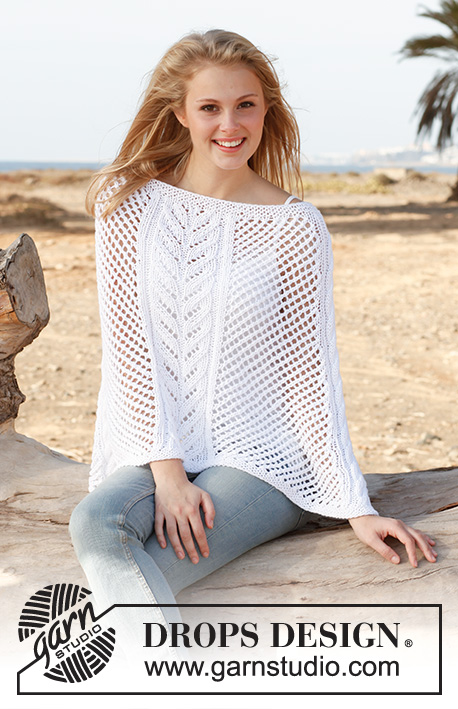
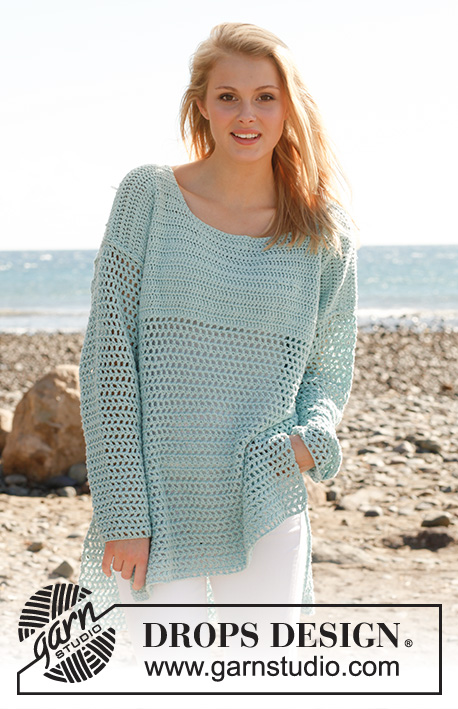
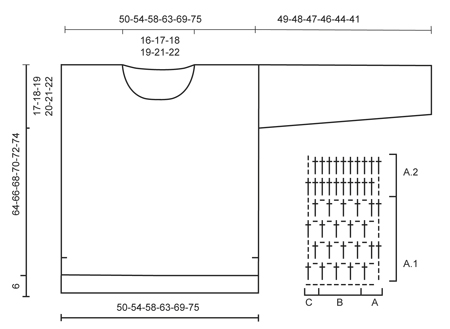
Pulóver en ganchillo DROPS, en “Cotton Light”. Talla: S – XXXL.
DROPS 145-19 |
|||||||
|
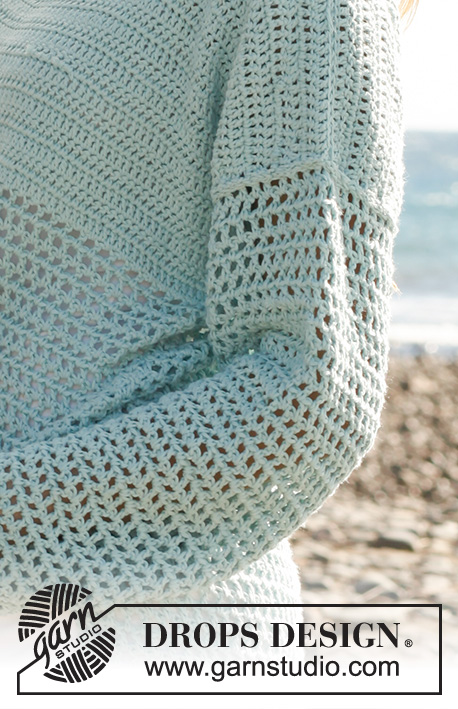
PATRÓN: Tejer de acuerdo a A.1 y A.2. TIP PARA DISMINUCIÓN: Virar cuando tenga 1 p.a. restante = 1 p.a. dism. TIP PARA AUMENTO: Aum haciendo 1 p.a. + 1 cad adicional en el p.a. más externo en cada lado. Trabajar los pts aum gradualmente en A.1. ------------------------------------------------------ ESPALDA: Trabajada de ida y vuelta. La pieza de la espalda es trabajada 6 cm más larga que la pieza del frente. Mon una hilera con 88-94-102-110-120-130 cad FLOJAS (es importante que las cad sean flojas para evitar que quede una orilla apretada) en ag de ganchillo tamaño 4 mm con Cotton Light. Virar y hacer 1 p.a. en la 6ª cad a partir de la ag (A.1A ahora ha sido hecho – ver el Diagrama). Trabajar A.1B sobre las 80-86-94-102-112-122 cad sig, y terminar con A.1C en las últimas 2 cad. Después continuar trabajando de acuerdo a A.1. Cuando la pieza mida 47-48-49-50-51-52 cm, trabajar de la manera sig: A.2A, repetir A.2B hasta que resten 2 p.a./cad, trabajar A.2C = 85-91-99-107-117-127 p.a. Continuar con A.2 hasta el fin. Cuando la pieza mida 53-54-55-56-57-58 cm, insertar 1 marcapuntos en cada lado (marca el inicio de la sisa). Cuando la pieza mida 68-70-72-74-76-78 cm, los 27-29-31-33-35-37 p.a. centrales no se trabajan más = 29-31-34-37-41-45 p.a. restantes en cada hombro. Ahora terminar cada hombro por separado. Continuar con A.2, cortar y asegurar el hilo cuando la pieza mida 70-72-74-76-78-80 cm. DELANTERO: Empezar y trabajar como lo hizo en la pieza de la espalda hasta que la pieza mida 41-42-43-44-45-46 cm – NOTA: La pieza de la espalda debe ser 6 cm más larga que la pieza del delantero – por ello, las diferentes medidas. Ahora continuar de la manera sig: A.2A, repetir A.2B hasta que resten 2 p.a./cad, trabajar A.2C = 85-91-99-107-117-127 p.a. Continuar con A.2 hasta el fin. Cuando la pieza mida 47-48-49-50-51-52 cm, insertar 1 marcapuntos en cada lado (marca el inicio de la sisa). Cuando la pieza mida 56-58-60-62-64-66 cm, los 23-25-27-29-31-33 p.a. centrales no se trabajan más. Ahora terminar cada hombro por separado, al mismo tiempo dism 1 p.a. en cada hilera en el lado del escote 2 veces en total – leer TIP PARA DISMINUCIÓN = 29-31-34-37-41-45 p.a. restantes en cada hombro. Continuar con A.2, cortar y asegurar el hilo cuando la pieza mida 64-66-68-70-72-74 cm. MANGA: Trabajar la manga de ida y vuelta. Mon una hilera con 48-48-50-52-54-56 cad FLOJAS (es importante que las cad sean flojas para evitar que quede una orilla apretada) en ag de ganchillo tamaño 4 mm con Cotton Light. Virar y hacer 1 p.a. en la 6ª cad a partir de la ag (A.1A ahora ha sido hecho). Trabajar A.1B sobre los 40-40-42-44-46-48 cad sig, y terminar con A.1C en las últimas 2 cad = 45-45-47-49-51-53 p.a./cad. Después continuar trabajando de acuerdo a A.1. Cuando la pieza mida 8 cm, aum 1 pt en cada lado – LEER TIP PARA AUMENTO! Repetir este aum a cada 7-5-4½-3½-3½-3 cm 5-7-8-9-9-10 veces más (6-8-9-10-10-11 aum en total) = 57-61-65-69-71-75 p.a./cad. Cortar y asegurar el hilo cuando la pieza mida 49-48-47-46-44-41 cm (medidas más cortas en las tallas más grandes debido a una mayor anchura de hombros). TERMINACIÓN: Hacer las costuras de los hombros. Coser las mangas – a partir del hombro y descendiendo hasta el marcapuntos en la pieza del delantero y de la espalda. Hacer las costuras debajo de las mangas y las costuras laterales en una, parar cuando resten 26 cm en la pieza de la espalda y 20 cm en la pieza del delantero = abertura. |
|||||||
Explicaciones del diagrama |
|||||||
|
|||||||
 |
|||||||
¿Terminaste este patrón?Entonces, etiqueta tus fotos con #dropspattern #donnasweater o envíalas a la galería #dropsfan. ¿Necesitas ayuda con este patrón?Encontrarás 5 videos tutoriales, un espacio para comentarios/preguntas y más visitando la página del patrón en garnstudio.com © 1982-2026 DROPS Design A/S. Todos los derechos reservados. Este documento, incluyendo todas sus sub-secciones, está protegido por los derechos de autor (copyright). Lee más acerca de lo que puedes hacer con nuestros patrones en la parte de abajo de cada patrón de nuestro sitio. |
|||||||


Con más de 40 años en el diseño de modelos de punto y de ganchillo, DROPS Design ofrece una de las más vastas colecciones de patrones gratuitos en el internet - traducidos en 17 idiomas. Al día de hoy, contamos con 324 catálogos y 12290 patrones - de los cuales 11674 están traducidos en español.
Nosotros trabajamos con mucho esmero para brindarte lo mejor que las labores de punto y ganchillo tienen para ofrecer,inspiración y consejos, así como hilos de magnífica calidad a precios increíbles! Te gustaría usar nuestros patrones para otro fin además del uso personal? Puedes leer acerca de lo que estás permitida a hacer en el texto de Copyright en la parte de abajo de todos nuestros patrones. Felices labores!
Escribe un comentario sobre DROPS 145-19
¡Nos encantaría saber qué piensas acerca de este patrón!
Si quieres escribir una pregunta referente al patrón, por favor asegúrate de elegir la categoría correcta en el formulario debajo, para acelerar el proceso de respuesta. Los campos obligatorios están marcados con un *.