
Categorías populares
¿Buscas un hilo?


Comentarios / Preguntas (123)
Lisa escribió:
Hi, I am working on the sleeve for size S, and after the third increase I already have the total 57 tr/ch stitches , because increasing by 1tr+1ch at each end of the row means there is an increase of 4 stitches for the row, but the pattern only counts 2 to calculate the total. Is that correct, and if so should I end up with a total of 69 stitches? Or am I doing something wrong? thanks
30.04.2017 - 16:33DROPS Design respondió:
Dear Lisa, number of sts after increase will be check, thank you. Happy crocheting!
02.05.2017 - 10:35
![]() Sylvia escribió:
Sylvia escribió:
What does, A.1B stands for. First time doing symbols. Thanks
02.04.2017 - 07:12DROPS Design respondió:
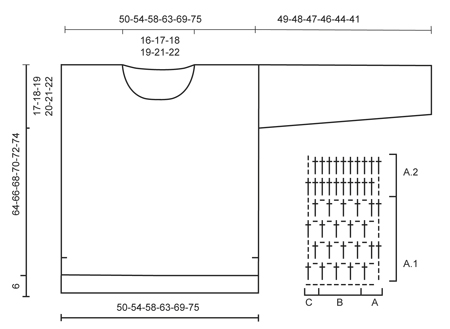
Dear Sylvia, diagram A.1 is divided into 3 parts: A.1A = beg of row from RS (= row1: 3 ch, 1 ch, skip 1 st, 1 dc in next st) and end of row from WS, then A.1B to repeat until last 3 sts on row 1 (= *1 ch, skip 1 st, 1 dc in next ch*, repeat from *-* a total of 3 times for 1 repeat of A.1B, repeat these until 2 sts remain on row, and A.1C = end of row from RS, beg of row from WS (row 1 = 1 ch, 1 dc in last st). Your DROPS store will provide you any further invidivual assistance required for reading charts. Happy crocheting!
03.04.2017 - 10:39
![]() Tommie escribió:
Tommie escribió:
Can you send me the pattern for this. I would be happy to pay for a pdf or written out.
03.11.2016 - 02:33DROPS Design respondió:
Dear Tommie, you will find the pattern for free scrolling down the page. Happy crocheting!
03.11.2016 - 09:45Eva escribió:
Hello!!!Can you tell me the size of the jumper on picture?Thank you.
10.08.2016 - 00:13DROPS Design respondió:
Dear Eva, our models are usually wearing size M - read more about sizing here. Happy crocheting!
10.08.2016 - 08:45
![]() Wendy escribió:
Wendy escribió:
I am on the back section starting A2 which seems to be a row of treble's. I've done that and I have 5 extra trebles which I don't know how to get rid of but also, because it has gone from a mesh pattern to all treble's, it is very curly. Am I reading the pattern correctly, is it a row of all treble's?
04.08.2016 - 23:51DROPS Design respondió:
Dear Wendy, A.2 is all trebles - remember to check and keep gauge (17 tr = 10 cm) when working A.1, and do not work too tight the rows with ch and tr. Happy crocheting!
05.08.2016 - 09:45
![]() Wendy escribió:
Wendy escribió:
I really want to make this and looking at it, it appears easy, however, I don't understand the pattern at all. On the back piece, after the foundation row, I've done a treble in the 6th chain from the hook as instructed. It tells me that is A.1A, but the diagram shows it as two chains and a treble. Is it possible to get the written pattern instructions as opposed to looking at the diagram? If not, can you tell me what to do after the first treble in row 2.
31.07.2016 - 01:57DROPS Design respondió:
Dear Wendy, when you work first row you skip first 5 ch (working in the 6th ch from hook), these first 5 ch are : 1st tr (= 3 ch), 1 ch before next tr + 1 ch skipped before crocheting next tr). At the beg of row 2 work A.1C: 3ch, 1 tr around next ch, then repeat A.1B and finish with A.1C. Happy crocheting!
01.08.2016 - 09:35
![]() Sarah escribió:
Sarah escribió:
I need further clarification on the sleeve increases, inadvertently I am acquiring an extra two stitches when increasing the sleeves leading to too many stitches. I have looked at the pattern to see how I can prevent the extra stitches from occurring but having great difficulty in figuring out how, can you advise further? The first increase stitch is placed at A.1 A and at the end however the extra stitches are occurring in every third row following this, hope this makes sense, Thanks Sarah
11.03.2016 - 23:30DROPS Design respondió:
Dear Sarah, you inc for sleeve 1 st in each side, ie you will have a total of 2 tr more on every inc row - increase should be done by working 1 tr + 1 ch more in outermost tr in each side. On next row, work in A.1 as before, you will have same as before, but just 2 more tr per inc row. Happy crocheting!
12.03.2016 - 18:03Trishy escribió:
I'm new to the Crotchet world. And was wondering, if I try to make a large size in this jumper, how do I know how many stitches do I need for the back, & front etc?
31.10.2015 - 04:23DROPS Design respondió:
Dear Trishy, you will find at the bottom of the pattern a measurement chart, compare the measurements (in cm) to a similar garment you have and like the shape and find out the matching size - you can then follow this size in the pattern. Read more about sizing here. Happy crocheting!
31.10.2015 - 18:09
![]() Federica Piucci escribió:
Federica Piucci escribió:
Buon pomeriggio, io intendo confezionare questa maglia in con due colori diversi, uno per la parte superiore e uno per quella inferiore. Indicativamente quanti grammi potrebbero servire per le due parti prese separatamente?
12.10.2015 - 15:06DROPS Design respondió:
Buongiorno Federica. Non riusciamo ad essere precisi sul quantitativo di filato necessario per lavorare con due colori. Lavorare un piccolo campione con i due diversi motivi potrebbe dare una prima indicazione. Il suo rivenditore di fiducia è a sua disposizione per consigliarla. Se possibile e non troppo oneroso, si informi anche sulla possibilità di restituire eventuali gomitoli di filato integri e non utilizzati. Buon lavoro!
16.10.2015 - 23:39Dalia escribió:
When piece measures 53-54-55-56-57-58 cm / 21''-21¼''-21 5/8''-22''-22½''-22¾'', insert 1 marker in each side (marks where armhole beg). where exactly do I insert my markers?
14.07.2015 - 10:29DROPS Design respondió:
Dear Dalia, see answer below. Happy crocheting!
27.07.2015 - 11:29
|
|||||||
Donna#donnasweater |
|||||||
 |
 |
||||||
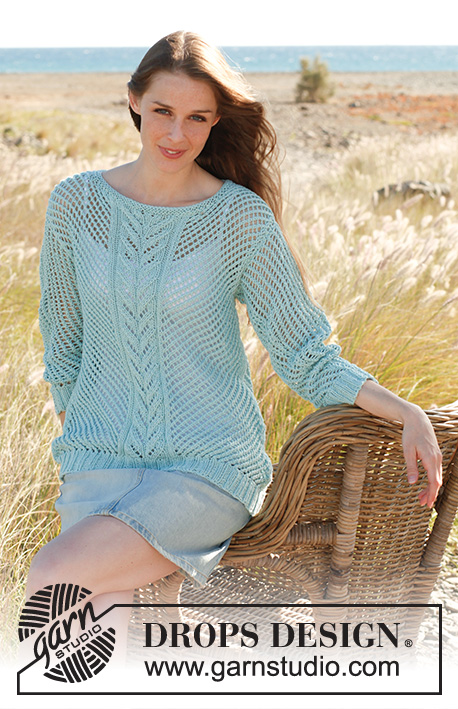
Pulóver en ganchillo DROPS, en “Cotton Light”. Talla: S – XXXL.
DROPS 145-19 |
|||||||
|
PATRÓN: Tejer de acuerdo a A.1 y A.2. TIP PARA DISMINUCIÓN: Virar cuando tenga 1 p.a. restante = 1 p.a. dism. TIP PARA AUMENTO: Aum haciendo 1 p.a. + 1 cad adicional en el p.a. más externo en cada lado. Trabajar los pts aum gradualmente en A.1. ------------------------------------------------------ ESPALDA: Trabajada de ida y vuelta. La pieza de la espalda es trabajada 6 cm más larga que la pieza del frente. Mon una hilera con 88-94-102-110-120-130 cad FLOJAS (es importante que las cad sean flojas para evitar que quede una orilla apretada) en ag de ganchillo tamaño 4 mm con Cotton Light. Virar y hacer 1 p.a. en la 6ª cad a partir de la ag (A.1A ahora ha sido hecho – ver el Diagrama). Trabajar A.1B sobre las 80-86-94-102-112-122 cad sig, y terminar con A.1C en las últimas 2 cad. Después continuar trabajando de acuerdo a A.1. Cuando la pieza mida 47-48-49-50-51-52 cm, trabajar de la manera sig: A.2A, repetir A.2B hasta que resten 2 p.a./cad, trabajar A.2C = 85-91-99-107-117-127 p.a. Continuar con A.2 hasta el fin. Cuando la pieza mida 53-54-55-56-57-58 cm, insertar 1 marcapuntos en cada lado (marca el inicio de la sisa). Cuando la pieza mida 68-70-72-74-76-78 cm, los 27-29-31-33-35-37 p.a. centrales no se trabajan más = 29-31-34-37-41-45 p.a. restantes en cada hombro. Ahora terminar cada hombro por separado. Continuar con A.2, cortar y asegurar el hilo cuando la pieza mida 70-72-74-76-78-80 cm. DELANTERO: Empezar y trabajar como lo hizo en la pieza de la espalda hasta que la pieza mida 41-42-43-44-45-46 cm – NOTA: La pieza de la espalda debe ser 6 cm más larga que la pieza del delantero – por ello, las diferentes medidas. Ahora continuar de la manera sig: A.2A, repetir A.2B hasta que resten 2 p.a./cad, trabajar A.2C = 85-91-99-107-117-127 p.a. Continuar con A.2 hasta el fin. Cuando la pieza mida 47-48-49-50-51-52 cm, insertar 1 marcapuntos en cada lado (marca el inicio de la sisa). Cuando la pieza mida 56-58-60-62-64-66 cm, los 23-25-27-29-31-33 p.a. centrales no se trabajan más. Ahora terminar cada hombro por separado, al mismo tiempo dism 1 p.a. en cada hilera en el lado del escote 2 veces en total – leer TIP PARA DISMINUCIÓN = 29-31-34-37-41-45 p.a. restantes en cada hombro. Continuar con A.2, cortar y asegurar el hilo cuando la pieza mida 64-66-68-70-72-74 cm. MANGA: Trabajar la manga de ida y vuelta. Mon una hilera con 48-48-50-52-54-56 cad FLOJAS (es importante que las cad sean flojas para evitar que quede una orilla apretada) en ag de ganchillo tamaño 4 mm con Cotton Light. Virar y hacer 1 p.a. en la 6ª cad a partir de la ag (A.1A ahora ha sido hecho). Trabajar A.1B sobre los 40-40-42-44-46-48 cad sig, y terminar con A.1C en las últimas 2 cad = 45-45-47-49-51-53 p.a./cad. Después continuar trabajando de acuerdo a A.1. Cuando la pieza mida 8 cm, aum 1 pt en cada lado – LEER TIP PARA AUMENTO! Repetir este aum a cada 7-5-4½-3½-3½-3 cm 5-7-8-9-9-10 veces más (6-8-9-10-10-11 aum en total) = 57-61-65-69-71-75 p.a./cad. Cortar y asegurar el hilo cuando la pieza mida 49-48-47-46-44-41 cm (medidas más cortas en las tallas más grandes debido a una mayor anchura de hombros). TERMINACIÓN: Hacer las costuras de los hombros. Coser las mangas – a partir del hombro y descendiendo hasta el marcapuntos en la pieza del delantero y de la espalda. Hacer las costuras debajo de las mangas y las costuras laterales en una, parar cuando resten 26 cm en la pieza de la espalda y 20 cm en la pieza del delantero = abertura. |
|||||||
Explicaciones del diagrama |
|||||||
|
|||||||
 |
|||||||
¿Terminaste este patrón?Entonces, etiqueta tus fotos con #dropspattern #donnasweater o envíalas a la galería #dropsfan. ¿Necesitas ayuda con este patrón?Encontrarás 5 videos tutoriales, un espacio para comentarios/preguntas y más visitando la página del patrón en garnstudio.com © 1982-2026 DROPS Design A/S. Todos los derechos reservados. Este documento, incluyendo todas sus sub-secciones, está protegido por los derechos de autor (copyright). Lee más acerca de lo que puedes hacer con nuestros patrones en la parte de abajo de cada patrón de nuestro sitio. |
|||||||


Con más de 40 años en el diseño de modelos de punto y de ganchillo, DROPS Design ofrece una de las más vastas colecciones de patrones gratuitos en el internet - traducidos en 17 idiomas. Al día de hoy, contamos con 324 catálogos y 12290 patrones - de los cuales 11673 están traducidos en español.
Nosotros trabajamos con mucho esmero para brindarte lo mejor que las labores de punto y ganchillo tienen para ofrecer,inspiración y consejos, así como hilos de magnífica calidad a precios increíbles! Te gustaría usar nuestros patrones para otro fin además del uso personal? Puedes leer acerca de lo que estás permitida a hacer en el texto de Copyright en la parte de abajo de todos nuestros patrones. Felices labores!
Escribe un comentario sobre DROPS 145-19
¡Nos encantaría saber qué piensas acerca de este patrón!
Si quieres escribir una pregunta referente al patrón, por favor asegúrate de elegir la categoría correcta en el formulario debajo, para acelerar el proceso de respuesta. Los campos obligatorios están marcados con un *.