
Categorías populares
¿Buscas un hilo?


Comentarios / Preguntas (195)
![]() Klára escribió:
Klára escribió:
Dobrý den, mám problém se sešitím celého svetru dohromady. Nedaří se mi zakomponovat trup ke zbytku dílů. Sešila jsem náramenice předního a zadního dílu a na zátylku jsem sešila légu. Zbyl mi trup, který zdánlivě nikam nepatří. Doufám, že není špatně upletený. Prosím o názornější návod případně lepší fotografie výsledného produktu i zezadu. Děkuji za odpověď
02.08.2017 - 14:28DROPS Design respondió:
Dobrý den, svetr se plete téměř vcelku - tělo jako jeden díl rozdělený u průramků na 2 přední + záda a pak samostatně 2x rukáv. Máte-li sešité náramenice i légu, máte trup komplet :-) Zbývá vsadit rukávy. Hodně zdaru! Hana
03.08.2017 - 13:01
![]() Paola escribió:
Paola escribió:
Buongiorno!! Vorrei sapere se la misura della larghezza segnata sul modello (48cm per la taglia s) va raddoppiata per controllare la larghezza totale o se la banda traforata si sovrappone, per cui vanno aggiunti i cm corrispondenti. Grazie!!
29.06.2017 - 15:09DROPS Design respondió:
Buongiorno Paola. La banda traforata sul davanti è sovrapposta. La larghezza indicata, quindi 48 cm, è la larghezza del dietro. Buon lavoro!
29.06.2017 - 15:46
![]() Dajana escribió:
Dajana escribió:
Hallo, wie muss man das mit dem Linken Vorderteil gemeint? fange ich vorne bei dem Muster an oder bei glatt rechts? weil eine absatz später soll man ja die Maschen für die Schluter abnehmen aber das is ja in der Hinreihe die ja rechts gestrickt wird wäre schön, wenn Sie mir helfen könnten lg :)
22.02.2017 - 20:50DROPS Design respondió:
Liebe Dajana, für das linke Vorderteil stricken Sie glatt mit 1 Randm an der Seite und die Blendemaschen wie zuvor bis die Arbit misst 62-72cm (siehe Größe), dann die Maschen für die Schulter abketten (am Anfang einer Hinreihe). Viel Spaß beim stricken!
23.02.2017 - 09:54
![]() Mariette escribió:
Mariette escribió:
Hallo,Als ik met patroon A1 begin en heb nog 21 steken op de naald begin ik dan weer met een omslag ? Of bewaar ik die omslag tot voor de laatste kantsteek?
16.02.2017 - 15:58DROPS Design respondió:
Hoi Mariette. Je breit het telpatroon zoals eerst (van de goede kant): 1 omsl, 2 r samen tot aan de kantsteek.
22.02.2017 - 12:32
![]() June escribió:
June escribió:
Hi, I'm having the same problem as Jo re the front neck edge and working it into the back. Seems like too much "edging" to fit !!!
13.08.2016 - 19:59DROPS Design respondió:
Dear June, the 9-10-11 cm (see size) you are working on each collar sts will be sewn along neckline on back piece and the sts on collar on left front piece and on right front piece will be sewn tog. Happy knitting!
15.08.2016 - 10:55Jo escribió:
I am having a lot of trouble with the band at the neck join of the L and R front pieces...It is too long. Do you only cast off the 5 stitches on the R side? And is it right that the join is in a point? Thanking you in anticipation. I don't think I can bear unpicking it again.
12.08.2016 - 02:40DROPS Design respondió:
Dear Jo, when working on left front piece, you will cast off the 5 sts at the beg of next 3 row from RS + cast off the remaining 5-7 sts. These 20-22 sts will be sewn tog to the collar sts on right front piece to shape collar. The collar (beg/end of rows) will then be sewn along neckline on back piece (sts cast off for neckline). Happy knitting!
15.08.2016 - 10:30
![]() June escribió:
June escribió:
In the pattern it shows 2 rows for A1, different instructions. When I watch the tutorial, it was one row repeated (knit row). When is the 2nd row used??
27.07.2016 - 01:19DROPS Design respondió:
Dear June, A.1 is worked over 2 sts and 4 rows, Row 1 (from RS): YO, slip 1, K1, psso Row 2 (from WS): P2 Row 3: K2 tog, YO Row 4: P2 Happy knitting!
27.07.2016 - 08:09
![]() Sara escribió:
Sara escribió:
When completing the band at front where it says to bind off 5 stitches on each of the right side row 3 times then bind off last 5 stitches when you begin these bind offs are you working in the pattern stitches of A1or do you switch to stockinette at this point?
06.05.2016 - 22:07DROPS Design respondió:
Dear Sara, continue working the sts in A.1 as before when shaping the collar. Happy knitting!
09.05.2016 - 09:14
![]() Gaby escribió:
Gaby escribió:
Ik begin en eindig iedere naald van het lijf met een kantsteek, toch zien de zijkanten van linker en rechter voorbies er anders uit. Hoe krijg ik deze hetzelfde?
17.04.2016 - 15:34DROPS Design respondió:
Hoi Gaby. Hoe brei je de kantsteek? Brei je de kantsteek r in elke naald? Dan zou de steken aan beide zijkanten ook gelijk zijn.
18.04.2016 - 14:15
![]() Doris escribió:
Doris escribió:
Liebes Drops, Zum einen wollte ich bemerken, dass auch ich wie so viele andere nicht auf 16 M auf 10 cm komme. Ich nehme trotzdem 5,5 Nadeln und hab es umgerechnet. Bei mir sind es 13,5 M auf 10 cm. Meine Frage nun ist: wie breit ist das halbe Rumpfteil wirklich, inkl. Blenden, das Mass bei Ihnen ist 48 cm für Größe S. Ich vermute, dass die Blenden doppelt gelegt sind im Schaubild/Diagramm. Und: wie breit ist die Blende? Danke schoen und viele Gruesse Doris
04.02.2016 - 20:44DROPS Design respondió:
Sie sollten es vielleicht noch einmal mit einer kleineren Nadel versuchen. Das ganze Rumpfteil misst ca. 116 cm, davon entfallen ca. 17 cm auf jede Blende.
06.02.2016 - 09:08
|
||||||||||||||||
Nathalie#nathaliecardigan |
||||||||||||||||
 |
 |
|||||||||||||||
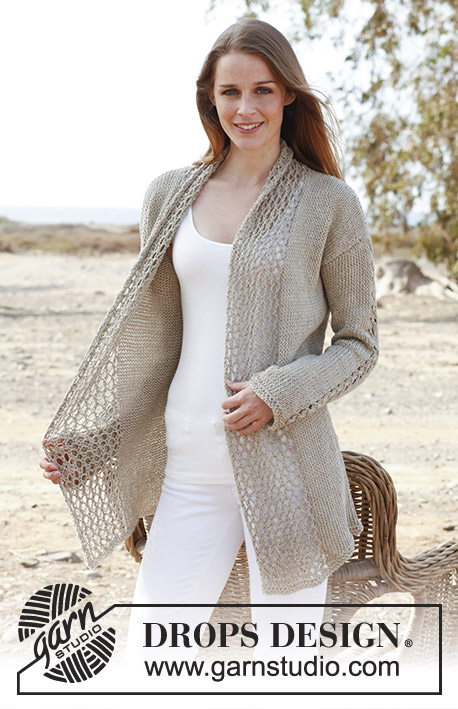
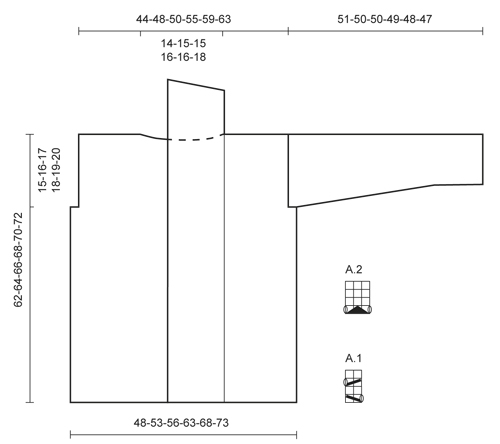
Saco de punto DROPS en “Bomull Lin” o “Paris”. Talla: S – XXXL.
DROPS 146-1 |
||||||||||||||||
|
PT MUSGO: Tejer de derecho de ida y vuelta en todas las hileras. 1 surco = 2 hileras tejidas de derecho. PATRÓN: Ver diagramas A.1 y A.2. Los diagramas muestran todas las hileras en 1 repetición del patrón vista por el LD. TIP PARA AUMENTO: Aum 1 pt haciendo 1 HEB (lazada). En la hilera sig, tejer la HEB retorcida (es decir, insertar la ag por atrás del pt en vez de adelante) para evitar que se formen agujeros. ------------------------------------------------------ CUERPO: Tejido de ida y vuelta en ag circular a partir del centro del frente. Mon flojamente 170-184-196-218-234-248 pts en ag circular tamaño 6 mm con Bomull-Lin. Tejer 4 hileras en pt musgo – leer explicación arriba. Tejer la hilera sig (= LD) de la manera sig: 1 pt de orillo en pt musgo, tejer A.1 9-9-9-10-10-10 veces en total (= 19-19-19-21-21-21 pts en el borde derecho), tejer en pt jersey hasta que resten 19-19-19-21-21-21 pts, tejer A.1 9-9-9-10-10-10 veces en total, terminar con 1 pt de orillo en pt musgo (= 19-19-19-21-21-21 pts en el borde izquierdo). Continuar con A.1 en el borde en cada lado y en pt jersey sobre los pts centrales. RECUERDE MANTENER LA MISMA TENSIÓN DE TEJIDO DE LA MUESTRA! Cuando la pieza mida 47-48-49-50-51-52 cm, insertar 2 marcapuntos; a 47-50-53-59-63-66 pts a partir de cada lado (= 76-84-90-100-108-116 pts entre los marcapuntos en la pieza de la espalda). En la hilera sig, rem 3-4-5-6-7-8 pts para las sisas en cada lado de ambos marcapuntos (= 6-8-10-12-14-16 pts rematados en cada lado). Ahora dividir la pieza y terminar cada parte por separado. ESPALDA: = 70-76-80-88-94-100 pts. Continuar en pt jersey con 1 pt de orillo en pt musgo en cada lado hasta que la pieza mida 60-62-64-66-68-70 cm. Después, rem los 20-22-22-24-24-26 pts centrales para el escote y terminar cada hombro por separado. Continuar rem 1 pt en la hilera sig a partir del escote = 24-26-28-31-34-36 pts restantes en el hombro. Rem cuando la pieza mida 62-64-66-68-70-72 cm. DELANTERO IZQUIERDO: = 44-46-48-53-56-58 pts. Continuar en pt jersey con 1 pt de orillo en pt musgo en el lado y 19-19-19-21-21-21 pts del borde al centro del frente hasta que la pieza mida 62-64-66-68-70-72 cm. Al inicio de la hilera sig por el LD, rem los primeros 24-26-28-31-34-36 pts para el hombro = 20-20-20-22-22-22 pts restantes en el borde. Continuar con A.1 con 1 pt de orillo en pt musgo en cada lado hasta que el borde mida 9-10-10-10-10-11 cm a partir del hombro. Al inicio de las 3 hileras sig por el LD rem los primeros 5 pts = 5-5-5-7-7-7 pts restantes. Rem flojamente estos pts en la hilera sig por el LD. DELANTERO DERECHO: Tejer como la pieza del delantero izquierdo, mas en sentido inverso. MANGA: Tejida de ida y vuelta en la ag. Mon flojamente 35-37-39-39-41-43 pts y tejer 4 hileras en pt musgo. Tejer la hilera sig (= LD) de la manera sig: 1 pt de orillo en pt musgo, 15-16-17-17-18-19 pts derechos, tejer A.2 sobre los 3 pts sig, 15-16-17-17-18-19 pts derechos, terminar con 1 pt de orillo en pt musgo. Continuar en pt jersey con A.2 sobre los 3 pts centrales hasta el fin. Cuando la pieza mida 8 cm, aum 1 pt a 1 pt del pt de orillo en cada lado – Leer TIP PARA AUMENTO arriba. Repetir estos aum a cada 6½-5½-4½-4-3½-3½ cm 6-7-8-9-10-10 veces más (7-8-9-10-11-11 veces en total) = 49-53-57-59-63-65 pts. Cuando la pieza mida 49-48-47-45-44-42 cm, insertar un marcapuntos en cada lado de la manga (para la terminación). Cuando la pieza mida 51-50-50-49-48-47 cm (medidas más cortas en las tallas más grandes debido a una mayor anchura de hombros), rem flojamente todos los pts. TERMINACIÓN: Hacer las costuras de los hombros en el interior de las orillas rematadas. Unir la orilla de remate en los bordes con una costura, LR contra LR. Coser los bordes a lo largo de la línea del escote en el escote de la espalda. Montar las mangas, hacer las costuras de las mangas a 1 pt del pt de orillo – NOTA: La sección tejida después del marcapuntos en la parte de arriba de la manga deberá encajar con el remate para la sisa. |
||||||||||||||||
Explicaciones del diagrama |
||||||||||||||||
|
||||||||||||||||
 |
||||||||||||||||
¿Terminaste este patrón?Entonces, etiqueta tus fotos con #dropspattern #nathaliecardigan o envíalas a la galería #dropsfan. ¿Necesitas ayuda con este patrón?Encontrarás 24 videos tutoriales, un espacio para comentarios/preguntas y más visitando la página del patrón en garnstudio.com © 1982-2026 DROPS Design A/S. Todos los derechos reservados. Este documento, incluyendo todas sus sub-secciones, está protegido por los derechos de autor (copyright). Lee más acerca de lo que puedes hacer con nuestros patrones en la parte de abajo de cada patrón de nuestro sitio. |
||||||||||||||||


Con más de 40 años en el diseño de modelos de punto y de ganchillo, DROPS Design ofrece una de las más vastas colecciones de patrones gratuitos en el internet - traducidos en 17 idiomas. Al día de hoy, contamos con 324 catálogos y 12290 patrones - de los cuales 11675 están traducidos en español.
Nosotros trabajamos con mucho esmero para brindarte lo mejor que las labores de punto y ganchillo tienen para ofrecer,inspiración y consejos, así como hilos de magnífica calidad a precios increíbles! Te gustaría usar nuestros patrones para otro fin además del uso personal? Puedes leer acerca de lo que estás permitida a hacer en el texto de Copyright en la parte de abajo de todos nuestros patrones. Felices labores!
Escribe un comentario sobre DROPS 146-1
¡Nos encantaría saber qué piensas acerca de este patrón!
Si quieres escribir una pregunta referente al patrón, por favor asegúrate de elegir la categoría correcta en el formulario debajo, para acelerar el proceso de respuesta. Los campos obligatorios están marcados con un *.