
Categorías populares
¿Buscas un hilo?


Comentarios / Preguntas (195)
![]() Corinna escribió:
Corinna escribió:
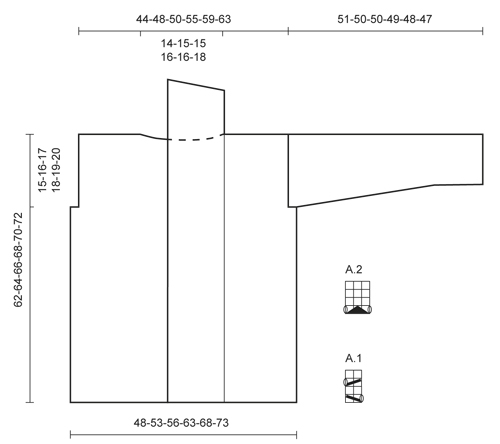
Liebes DROPS Team, Leider haben Sie meine Frage damit nicht beantwortet. Dass das Rückenteil 56cm hat sehe ich. Ich möchte wissen welche Breite das Vorderteil hat oder die Gesamtbreite, da die Jacke ja in einem gestrickt wird. Vielen Dank Corinna
30.05.2019 - 08:07DROPS Design respondió:
Liebe Corinna, die Breite gilt ja nur für die Breite der Jacke (mehr Maßen haben wir nicht) - wenn die Jacke flach liegt - wenn sie getragen wird, sieht es aus ungefär wie im Foto. Hier lesen Sie mehr über Maßen. Viel Spaß beim stricken!
31.05.2019 - 09:25
![]() Corinna escribió:
Corinna escribió:
Hallo, wieviel cm hat die Jacke über die gesamte Breite in L? Die Schemazeichnung sagt 56cm für das Rückenteil. Wie breit ist ein Vorderteil? Vielen Dank.
24.05.2019 - 22:59DROPS Design respondió:
Liebe Corinna, in L ist die Breite 56 cm, und die Länge ist 66 cm. Hier lesen Sie mehr über die Maßskizze. Viel Spaß beim stricken!
27.05.2019 - 13:22
![]() Giuliana escribió:
Giuliana escribió:
Vorrei sapere se posso lavorare con ferri normali e non circolari?
19.05.2019 - 15:41DROPS Design respondió:
Buongiorno Giuliana. Il cardigan è lavorato avanti e indietro, può quindi essere lavorato con i ferri dritti. I ferri circolari vengono suggeriti per via nel numero elevato di maglie. Potrebbe essere utile lavorare il dietro separatamente dai davanti. Per un aiuto più personalizzato, può rivolgersi al suo rivenditore Drops di fiducia. Buon lavoro!
19.05.2019 - 16:12
![]() Elke escribió:
Elke escribió:
Hallo, benutze ich wenn ich das Modell Nathalie mit dem Garn Paris stricke trotzdem Nadelstärke 6? Andere Modelle mit dem Garn Paris werden mit Nadelstärke 5 gestrickt. Grüße Elke
08.04.2019 - 12:36DROPS Design respondió:
Liebe Elke, hier muss Ihre Maschenprobe 16 M x 20 R glatt rechts sein, dh Sie brauchen Nadelgröße 6 oder die Nadelgröße anpassen, damit die Maschenprobe stimmt. Mit Nadeln 5 mm bekommt man normaleweise 17 M x 22 Reihe. Viel Spaß beim stricken!
08.04.2019 - 14:02Meghavarshini escribió:
Reply to question: Dear Mrs Meghavarshini, piece is worked bottom up in one piece up to armholes starting on mid front. The 170 sts include the front band sts worked in lace pattern on each side. You will have 76 sts for back piece (= approx. 48 cm) and 47 sts for each front piece. Happy knitting! Surely you mean 70sts? 76sts is for size M
17.08.2018 - 12:02DROPS Design respondió:
Dear Mrs Meghavarshini, you have 76 sts for the back piece between markers and 70 sts for back piece after the sts for armholes have been cast off (size S). Happy knitting!
17.08.2018 - 14:51Meghavarshini escribió:
Hello. I noticed that the measurements for the size small are 96cm. According to the tension mentioned here, that should be about 153-154 stitches. But I see that the CO instructions are for 170 stitches. How do the extra stitches help? Do they make the pattern more roomy, account for shrinkage, or serve some other purpose?
16.08.2018 - 19:56DROPS Design respondió:
Dear Mrs Meghavarshini, piece is worked bottom up in one piece up to armholes starting on mid front. The 170 sts include the front band sts worked in lace pattern on each side. You will have 76 sts for back piece (= approx. 48 cm) and 47 sts for each front piece. Happy knitting!
17.08.2018 - 11:08Stanislava escribió:
Dobrý deň, z plánu neviem vycitat aká je šírka trupu v cm pri veľkosti L. Ďakujem za potvrdenie
15.04.2018 - 18:00DROPS Design respondió:
Dobrý den, Stanislavo, šířka trupu u velikosti L je 56 cm, obvod (zadní díl + přední díly) je 112 cm, ale légy na předních dílech se překrývají. Tyto míry berte jako orientační - svetr je ležérní, volný. Hodně zdaru!
11.06.2018 - 20:39
![]() Stanka escribió:
Stanka escribió:
Dobrý deň, z plánu neviem vycitat aká je šírka trupu pri veľkosti L.
15.04.2018 - 14:31
![]() Nancy escribió:
Nancy escribió:
Pattern A2 are there 3 stockentette rows after the slip 1 st as if to K, K 2 tog, psso row? Also, the garter hem keeps flipping up. Is there anything, short of starting over, to get it to stay flat? Thanks
12.09.2017 - 00:24DROPS Design respondió:
Dear Nancy, it's correct about A.2, diagram is worked over 3 sts and 4 rows: 1 row with holes, 3 rows stockinette. When jacket is done, you can block it to make it flat with pins. Happy knitting!
12.09.2017 - 08:39
![]() Jasmin Braun escribió:
Jasmin Braun escribió:
Hallo Ich habe die Jacke soweit fertig und müsste nun die Ärmel einnähen...habe aber absolut keinen Plan wie ich anfangen soll. Erst einnähen und dann den Ärmel schließen? Gibt es hierzu ein Video? Danke
05.08.2017 - 11:27DROPS Design respondió:
Liebe Frau Braun, die Ärmel können Sie zuerst die Ärmel an den Armausschnitt zuerst einsetzten (siehe Video) und dann die Ärmel schließen. Viel Spaß beim fertigstellen!
07.08.2017 - 11:49
|
||||||||||||||||
Nathalie#nathaliecardigan |
||||||||||||||||
 |
 |
|||||||||||||||
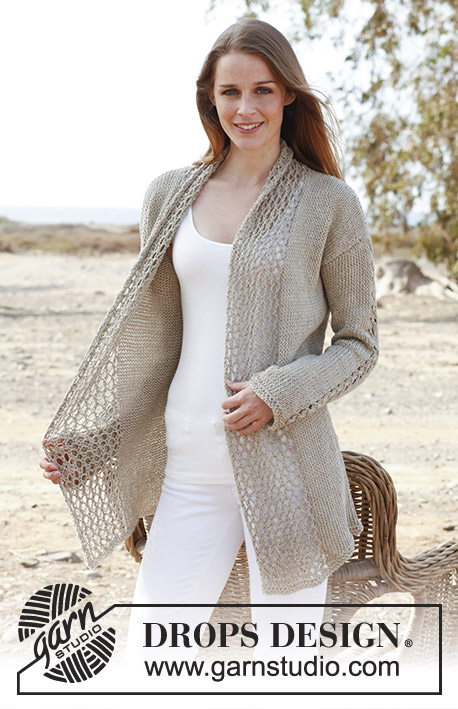
Saco de punto DROPS en “Bomull Lin” o “Paris”. Talla: S – XXXL.
DROPS 146-1 |
||||||||||||||||
|
PT MUSGO: Tejer de derecho de ida y vuelta en todas las hileras. 1 surco = 2 hileras tejidas de derecho. PATRÓN: Ver diagramas A.1 y A.2. Los diagramas muestran todas las hileras en 1 repetición del patrón vista por el LD. TIP PARA AUMENTO: Aum 1 pt haciendo 1 HEB (lazada). En la hilera sig, tejer la HEB retorcida (es decir, insertar la ag por atrás del pt en vez de adelante) para evitar que se formen agujeros. ------------------------------------------------------ CUERPO: Tejido de ida y vuelta en ag circular a partir del centro del frente. Mon flojamente 170-184-196-218-234-248 pts en ag circular tamaño 6 mm con Bomull-Lin. Tejer 4 hileras en pt musgo – leer explicación arriba. Tejer la hilera sig (= LD) de la manera sig: 1 pt de orillo en pt musgo, tejer A.1 9-9-9-10-10-10 veces en total (= 19-19-19-21-21-21 pts en el borde derecho), tejer en pt jersey hasta que resten 19-19-19-21-21-21 pts, tejer A.1 9-9-9-10-10-10 veces en total, terminar con 1 pt de orillo en pt musgo (= 19-19-19-21-21-21 pts en el borde izquierdo). Continuar con A.1 en el borde en cada lado y en pt jersey sobre los pts centrales. RECUERDE MANTENER LA MISMA TENSIÓN DE TEJIDO DE LA MUESTRA! Cuando la pieza mida 47-48-49-50-51-52 cm, insertar 2 marcapuntos; a 47-50-53-59-63-66 pts a partir de cada lado (= 76-84-90-100-108-116 pts entre los marcapuntos en la pieza de la espalda). En la hilera sig, rem 3-4-5-6-7-8 pts para las sisas en cada lado de ambos marcapuntos (= 6-8-10-12-14-16 pts rematados en cada lado). Ahora dividir la pieza y terminar cada parte por separado. ESPALDA: = 70-76-80-88-94-100 pts. Continuar en pt jersey con 1 pt de orillo en pt musgo en cada lado hasta que la pieza mida 60-62-64-66-68-70 cm. Después, rem los 20-22-22-24-24-26 pts centrales para el escote y terminar cada hombro por separado. Continuar rem 1 pt en la hilera sig a partir del escote = 24-26-28-31-34-36 pts restantes en el hombro. Rem cuando la pieza mida 62-64-66-68-70-72 cm. DELANTERO IZQUIERDO: = 44-46-48-53-56-58 pts. Continuar en pt jersey con 1 pt de orillo en pt musgo en el lado y 19-19-19-21-21-21 pts del borde al centro del frente hasta que la pieza mida 62-64-66-68-70-72 cm. Al inicio de la hilera sig por el LD, rem los primeros 24-26-28-31-34-36 pts para el hombro = 20-20-20-22-22-22 pts restantes en el borde. Continuar con A.1 con 1 pt de orillo en pt musgo en cada lado hasta que el borde mida 9-10-10-10-10-11 cm a partir del hombro. Al inicio de las 3 hileras sig por el LD rem los primeros 5 pts = 5-5-5-7-7-7 pts restantes. Rem flojamente estos pts en la hilera sig por el LD. DELANTERO DERECHO: Tejer como la pieza del delantero izquierdo, mas en sentido inverso. MANGA: Tejida de ida y vuelta en la ag. Mon flojamente 35-37-39-39-41-43 pts y tejer 4 hileras en pt musgo. Tejer la hilera sig (= LD) de la manera sig: 1 pt de orillo en pt musgo, 15-16-17-17-18-19 pts derechos, tejer A.2 sobre los 3 pts sig, 15-16-17-17-18-19 pts derechos, terminar con 1 pt de orillo en pt musgo. Continuar en pt jersey con A.2 sobre los 3 pts centrales hasta el fin. Cuando la pieza mida 8 cm, aum 1 pt a 1 pt del pt de orillo en cada lado – Leer TIP PARA AUMENTO arriba. Repetir estos aum a cada 6½-5½-4½-4-3½-3½ cm 6-7-8-9-10-10 veces más (7-8-9-10-11-11 veces en total) = 49-53-57-59-63-65 pts. Cuando la pieza mida 49-48-47-45-44-42 cm, insertar un marcapuntos en cada lado de la manga (para la terminación). Cuando la pieza mida 51-50-50-49-48-47 cm (medidas más cortas en las tallas más grandes debido a una mayor anchura de hombros), rem flojamente todos los pts. TERMINACIÓN: Hacer las costuras de los hombros en el interior de las orillas rematadas. Unir la orilla de remate en los bordes con una costura, LR contra LR. Coser los bordes a lo largo de la línea del escote en el escote de la espalda. Montar las mangas, hacer las costuras de las mangas a 1 pt del pt de orillo – NOTA: La sección tejida después del marcapuntos en la parte de arriba de la manga deberá encajar con el remate para la sisa. |
||||||||||||||||
Explicaciones del diagrama |
||||||||||||||||
|
||||||||||||||||
 |
||||||||||||||||
¿Terminaste este patrón?Entonces, etiqueta tus fotos con #dropspattern #nathaliecardigan o envíalas a la galería #dropsfan. ¿Necesitas ayuda con este patrón?Encontrarás 24 videos tutoriales, un espacio para comentarios/preguntas y más visitando la página del patrón en garnstudio.com © 1982-2026 DROPS Design A/S. Todos los derechos reservados. Este documento, incluyendo todas sus sub-secciones, está protegido por los derechos de autor (copyright). Lee más acerca de lo que puedes hacer con nuestros patrones en la parte de abajo de cada patrón de nuestro sitio. |
||||||||||||||||


Con más de 40 años en el diseño de modelos de punto y de ganchillo, DROPS Design ofrece una de las más vastas colecciones de patrones gratuitos en el internet - traducidos en 17 idiomas. Al día de hoy, contamos con 324 catálogos y 12290 patrones - de los cuales 11675 están traducidos en español.
Nosotros trabajamos con mucho esmero para brindarte lo mejor que las labores de punto y ganchillo tienen para ofrecer,inspiración y consejos, así como hilos de magnífica calidad a precios increíbles! Te gustaría usar nuestros patrones para otro fin además del uso personal? Puedes leer acerca de lo que estás permitida a hacer en el texto de Copyright en la parte de abajo de todos nuestros patrones. Felices labores!
Escribe un comentario sobre DROPS 146-1
¡Nos encantaría saber qué piensas acerca de este patrón!
Si quieres escribir una pregunta referente al patrón, por favor asegúrate de elegir la categoría correcta en el formulario debajo, para acelerar el proceso de respuesta. Los campos obligatorios están marcados con un *.