
Categorías populares
¿Buscas un hilo?


Comentarios / Preguntas (48)
![]() RS escribió:
RS escribió:
Hi This is a follow-up question to my previous one regarding tension. I did wash and block my swatch and the tension was 24sts to 10cm. Would you recommend using a double strand of brushed alpaca silk instead and a smaller needle to try and achieve the right tension? I am not sure how tricky it would be to use a double strand of yarn for a lace knitting.
29.09.2020 - 13:14DROPS Design respondió:
Dear RS, if you don't get the correct tension with needle size 4 mm, try again with larger needles until you get the right tension - read more about tension here - Happy knitting!
29.09.2020 - 14:49
![]() RS escribió:
RS escribió:
The pattern recommends 4mm needles but this is for Drops Vivaldi. Drops recommend Brushed Alpaca Silk as a substitute and for this yarn 5mm needles are suggested. I'm having trouble with the tension. When I swatched I had 24sts to 10cm with 5mm needles. I don't want to increase the needle size as this will produce a loose fabric in the finished item and this does not look nice with a lace pattern. Would it be possible to use a double strand of yarn instead and a smaller needle to get tension?
28.09.2020 - 12:14DROPS Design respondió:
Dear RS, Brushed Alpaca Silk is a good choice as alternative to Vivaldi (same weight/meterage). To get the finished measurements you need to have the correct tension, you can block your swatch first and check measurements after blocking - read more about tension here. Happy knitting!
28.09.2020 - 12:37
![]() RS escribió:
RS escribió:
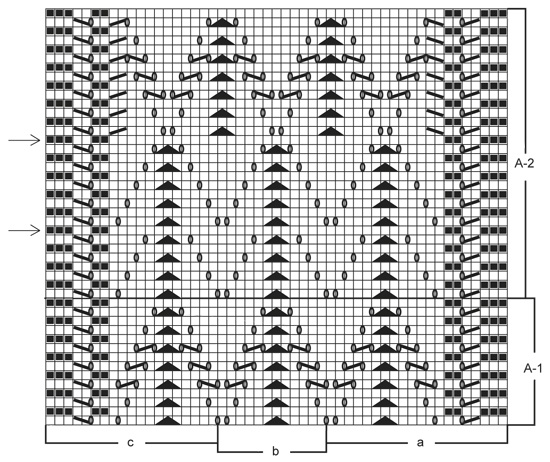
Hi On some rows in the pattern, row 1 for example, there is a YO between A1a and A1b and A1b and A1c (this is also the case in A2). I'm not exactly sure how to handle this given that I need to repeat A1b 4 times. I think that you would do the following: Do a YO at the end of A1a and then start A1b with a knit stitch and then end A1b with a YO and then when you start A1b for the second time you start with a knit stitch? Is this correct?
14.08.2020 - 13:34DROPS Design respondió:
Dear RS, you should always have the same number of sts in each diagram, ie each decrease will be compensate by a yarn over. work a over 20 sts, each b over 12 sts and c over 19 sts. Adding a marker between each repeat can help you to keep the correct number of sts. Happy knitting!
14.08.2020 - 13:43
![]() RS escribió:
RS escribió:
Hi, You sent me a response yesterday about how to handle A2b row 19 which ends part way through a slip 1 st as if to K, K2 tog, psso. You wrote: "On the row with the double decrease, work the last 2 sts in a/b together with the first stich in b/next b/c." Do you mean that you end A2a with a slip 1 st as if to K, K2 tog, psso and then you end A2b in the same way and then when you go back to start A2b for the 2nd time you start it with a knit stitch? Is that correct?
14.08.2020 - 13:12DROPS Design respondió:
Dear RS, you end A.2a with slip the next to last st in a as if to K, K tog the last st in a + the first st in b, psso = this is now the first stitch in b. Work b until 2 sts remain, slip the next st as if to K, Ktog the last st in b + first stitch next b (then c), psso = this is now the first stitch in next b (and c at the end of the row). Do not hesitate to add markers between the repeats so that you can count the stitches and check that you still get the same number of sts in each repeat in width. Happy knitting!
14.08.2020 - 13:38
![]() RS escribió:
RS escribió:
Please clarify: "When A-1 has been worked 1 time vertically, continue with A-2 the same way." Do you mean that for A-2 you also knit diagram a over the first 20 sts, diagram b 4 times in breadth and then diagram c over the last 19 sts? If yes, how do you handle A2 diagram b from row 19 onwards, as on the odd rows diagram b ends part way through a slip 1 st as if to K, K 2 tog, psso. How do you tackle this?
13.08.2020 - 12:48DROPS Design respondió:
Dear RS, correct, you will work (from RS): A.2a, A.2b a total of 4 times in width and A.2c - (from WS read from the left towards the right and work: A.2c, A.2b a total of 4 times and finish with A.2a). On the row with the double decrease, work the last 2 sts in a/b together with the first stich in b/next b/c. Happy knitting!
13.08.2020 - 15:46
![]() RHS escribió:
RHS escribió:
Hi Could you please tell me if there is a correction to this pattern, as I got the impression from some of the comments that there was an error in the diagram? Thank you.
13.07.2020 - 18:21DROPS Design respondió:
Dear RHS, pattern and diagrams are right - this could help you to understand how to read diagrams. Happy knitting!
14.07.2020 - 09:02
![]() Silvia escribió:
Silvia escribió:
Ho realizzato questo modello con lana alpaka silk e con tanta fatica ma purtroppo al primo lavaggio a 30° si è completamente infeltrito e ora è inutilizzabile.
22.05.2019 - 18:56
![]() Marie Nilsson escribió:
Marie Nilsson escribió:
Det står i början att alla varv ska stickas räta men i diagramet står det vid en symbol ”rät från rätsidan och avig från avigsidan... hur stickar man då?
02.10.2018 - 12:43DROPS Design respondió:
Hei Marie. Hvis du refererer til forklaringen av RILLE, så gjelder dette kun der det står i oppskriften at du skal strikke rille. Jeg kan se at i akkurat denne oppskriften er det ikke noen steder det skal strikkes riller, så akkurat her er den informasjonen irrelevant - vi skal få fjernet den. Du skal følge diagrammet som anvist, og strikke rett fra retten og vrang fra vrangen der det symbolet står. God fornøyelse.
03.10.2018 - 11:16
![]() Silvia Desiderio escribió:
Silvia Desiderio escribió:
Salve, ho iniziato a lavorare questo scialle. Potreste spiegarmi come lavorare la parte b del diagramma A1? Siccome si deve ripetere 4 volte, inizio con 1 gettata, 4 m. a rovescio, 1 m passata senza lavorarla, 2 insieme a dir, accavallo la m passata, 4 rov, 1 gett.,1 dir e poi? Ricomincio o devo fare 2 gettate? Grazie
30.08.2018 - 17:14DROPS Design respondió:
Buongiorno Silvia. Il primo ferro della parte b si lavora così, sul diritto del lavoro: 1 gettato, 4 m diritto, 1 m passata,2 insieme a dir, accavalla, 4 m diritto, 1 gettato, 1 dir e poi ricomincia con 1 gettato, 4 m dir e così via. Il numero delle maglie resta lo stesso su tutti i ferri. Buon lavoro!
30.08.2018 - 18:49
![]() Silvia Desiderio escribió:
Silvia Desiderio escribió:
Volevo chiedere un'altra cosa. Siccome questo scialle mi serve per un matrimonio, ho preso il colore nero (Vivaldi non era disponibile e allora ho preso brushed alpaca silk). C'è un filato da abbinare che dia un pò di luminosità? tipo un filo lurex o qualcosa del genere...
28.08.2018 - 13:11DROPS Design respondió:
Buongiorno Silvia. Può aggiungere un filo di glitter. Buon lavoro!
28.08.2018 - 14:09
|
|||||||||||||||||||
Fiona#fionascarf |
|||||||||||||||||||
 |
 |
||||||||||||||||||
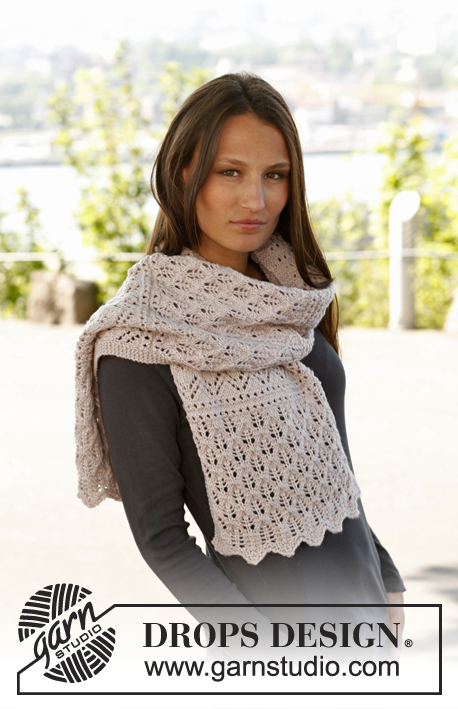
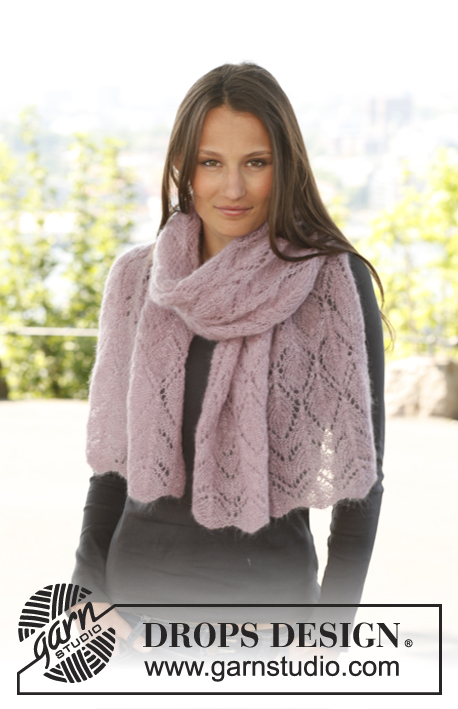
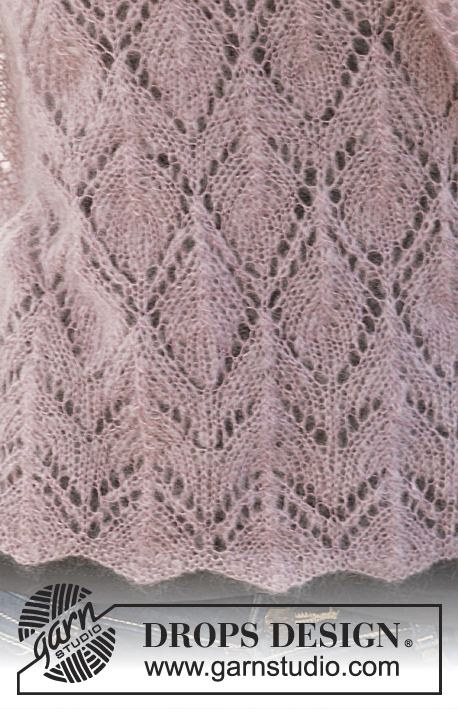
Chal DROPS, de punto, con patrón de calados en “Vivaldi”.
DROPS 141-11 |
|||||||||||||||||||
|
PATRÓN DE CALADOS: Ver diagramas A.1 y A.2. Los diagramas muestran todas las hileras en el patrón vistas por el LD. ------------------------------------------------------ CHAL: Tejido de ida y vuelta en la ag en 2 partes iguales y unidas con una costura en el centro de la espalda cuando está terminado. Mon FLOJAMENTE 99 pts en ag tamaño 4 mm con Vivaldi. Tejer la primera hilera de la manera sig (por el LD): 13 derechos, * deslizar 1 pt de derecho, 2 pjd, pasar el pt desl por encima, 11 derechos *, repetir de *a* hasta que resten 2 pts, tejer estos pts de derecho = 87 pts en la ag. Tejer 3 hileras de derecho de ida y vuelta sobre todos los pts. Continuar con A.1 de la manera sig: Diagrama a sobre los primeros 20 pts, diagrama b 4 veces en anchura y, después, diagrama c sobre los últimos 19 pts. Cuando A.1 ha sido tejido 1 vez verticalmente, continuar con A.2 de la misma manera. RECUERDE MANTENER LA MISMA TENSIÓN DE TEJIDO DE LA MUESTRA! Repetir A.2 en dirección hacia arriba hasta que la pieza mida aprox 85 cm – ajustar para que la última hilera sea tejida sea una de las hileras marcadas con 1 flecha en el diagrama. Deslizar los pts en un gancho o seguro aux. Tejer la otra parte de la misma manera. Unir las 2 partes con una costura usando la técnica de remallado/costura invisible. |
|||||||||||||||||||
Explicaciones del diagrama |
|||||||||||||||||||
|
|||||||||||||||||||
 |
|||||||||||||||||||
¿Terminaste este patrón?Entonces, etiqueta tus fotos con #dropspattern #fionascarf o envíalas a la galería #dropsfan. ¿Necesitas ayuda con este patrón?Encontrarás 6 videos tutoriales, un espacio para comentarios/preguntas y más visitando la página del patrón en garnstudio.com © 1982-2026 DROPS Design A/S. Todos los derechos reservados. Este documento, incluyendo todas sus sub-secciones, está protegido por los derechos de autor (copyright). Lee más acerca de lo que puedes hacer con nuestros patrones en la parte de abajo de cada patrón de nuestro sitio. |
|||||||||||||||||||


Con más de 40 años en el diseño de modelos de punto y de ganchillo, DROPS Design ofrece una de las más vastas colecciones de patrones gratuitos en el internet - traducidos en 17 idiomas. Al día de hoy, contamos con 324 catálogos y 12290 patrones - de los cuales 11685 están traducidos en español.
Nosotros trabajamos con mucho esmero para brindarte lo mejor que las labores de punto y ganchillo tienen para ofrecer,inspiración y consejos, así como hilos de magnífica calidad a precios increíbles! Te gustaría usar nuestros patrones para otro fin además del uso personal? Puedes leer acerca de lo que estás permitida a hacer en el texto de Copyright en la parte de abajo de todos nuestros patrones. Felices labores!
Escribe un comentario sobre DROPS 141-11
¡Nos encantaría saber qué piensas acerca de este patrón!
Si quieres escribir una pregunta referente al patrón, por favor asegúrate de elegir la categoría correcta en el formulario debajo, para acelerar el proceso de respuesta. Los campos obligatorios están marcados con un *.