
Categorías populares
¿Buscas un hilo?


Comentarios / Preguntas (266)
![]() Anke Gerlach escribió:
Anke Gerlach escribió:
In het patroon staat bij het achterpand net na de boord : begin met telpatroon A 4 maar dat is er niet kan het een vergissing zijn?
13.03.2020 - 16:45DROPS Design respondió:
Dag Anke,
Deze staat (een beetje verstopt :) onder de maattekening, zeg maar onder de mouw. Het is een klein telpatroontje voor dubbele gerstekorrel.
22.03.2020 - 12:25
![]() Van Damme escribió:
Van Damme escribió:
Bj comment faire après le point mousse et côtés 2/2 pour que le point de fantaisie soit dans le même sens pour le modèle rambling man devant droit merci
04.03.2020 - 15:55DROPS Design respondió:
Bonjour Mme Van Damme, je ne suis pas sûre de bien comprendre votre question, dans cette veste, on rabat les mailles point mousse des bordures des devants, et on continue les torsades comme avant. Tout à la fin, on va relever les mailles du col (le long de la fin des devants et de l'encolure dos) et les tricoter en côtes 2/2 puis les assembler aux mailles point mousse rabattues. Bon tricot!
04.03.2020 - 16:58
![]() Deni escribió:
Deni escribió:
May I ask how many sts should I have (beside ones in A1)after binding off stitches for sleeve size M?
16.01.2020 - 15:59DROPS Design respondió:
Dear Mrs Deni, the number of remaining stitches after all bind off for sleeve will depend on your tension in height, most important is here the height in cm so that the sleeve has the right length. Happy knitting!
17.01.2020 - 07:57
![]() Armelle Follin escribió:
Armelle Follin escribió:
Bonjour, je termine le modèle LI-014 et je ne comprends pas les augmentations du col châle. Je dois ajouter 16 mailles à raison d'1 maille par section (soit 16 rangs ?), mais comme il s'agit de côtes 2x2, comment faut-il procéder ? Faut-il ajouter la maille au milieu ? Maille endroit ou maille envers, est-ce important ? Merci de votre réponse.
07.01.2020 - 16:01DROPS Design respondió:
Bonjour Mme Follin, vous augmentez le nombre de mailles envers (vues sur l'endroit) des côtes = vous augmentez 16 m sur un seul rang, vous aurez ainsi 16 fois 3 m env, mais les autres mailles seront 2 m end et 2 m env comme avant. Bon tricot!
08.01.2020 - 08:09
![]() Amy Kaufman escribió:
Amy Kaufman escribió:
I made the Rambling Man sweater into a knee length coat so I eliminated the ribbing on the sleeves and bottom of the coat. I replaced the ribbing on the sleeve with garter stitch. My question is about the collar. If I wanted to use garter stitch on the shawl part would I follow the same directions in terms of increases and number of stitches? With no other ribbing on the sweater I thought the change might look better. Your thoughts.
29.12.2019 - 18:22DROPS Design respondió:
Dear Amy, what you descrile is posible, but be aware and take it into consideration that while ribbing pulls the stitches in, the garter stitch pushes them apart a little bit, so the collar with garter stitch might sit a bit off, somewhat wavy. Happy Knitting!
29.12.2019 - 20:34
![]() Beth Hayes escribió:
Beth Hayes escribió:
This question concerns men's DROPS Rambling Man 0-850 pattern. I am working on the right front piece. The garter (band) stitches do not lie as flat as the K2 P2 rib, so the bottom of the sweater is uneven. How can I make the two different parts of the bottom of the sweater even? Thanks very much.
23.12.2019 - 03:20DROPS Design respondió:
Dear Bethm try knitting the rows with garter stitch with a different sized needle. Generally, using smaller needles for garter stitch helps with the unevennes. I hope this helps. Happy Knitting!
24.12.2019 - 17:05
![]() Monique Labatut escribió:
Monique Labatut escribió:
Bonjour , Je ne comprends pas que faire quand vous notez:" augmenter une maille dans chacune des 14 sections envers centrales ( = encolure dos ) , vu sur endroit = 162m. Modele: Rambling Man explication du col chale. Merci pour votre reponse
11.12.2019 - 14:03DROPS Design respondió:
Bonjour Mme Labatut, vous tricotez d'abord le col en côtes 2 m end/2 m env, avec 2 m end et 1 m lis au point mousse de chaque côté (vu sur l'endroit). Pour que le col se retourne joliment, on va augmenter dans les 14 ou 16 (cf tailles) sections 2 m envers du milieu du col (= côté encolure dos) et on aura ainsi des côtes 2 m end/2 m env comme avant, puis 14 ou 16 fois 2 m end/3 m env au milieu du rang et on termine ensuite par des côtes 2 m end/2 m env. Bon tricot!
11.12.2019 - 14:34
![]() Dusica escribió:
Dusica escribió:
I'm knitting size M and need help with sleeves.Hiw to work yarn overs in pattern? For example, I work 1 row by making k1,than p,k,p...than A1....Second row k1,p,k,p...A1....on 3rd I will increase by making YO..How to work them in pattern afterwards?
28.11.2019 - 08:44DROPS Design respondió:
Dear Dusica, see answer below, make sure that the pattern is always the same, ie you should always have 2 rows K over K, P over P, then on next row, P over K, K over P, and 4th row with K over K and P over P. Happy knitting!
28.11.2019 - 09:56
![]() Dusica escribió:
Dusica escribió:
Hello, I'm knitting size M and need help with sleeves.At the part where it says increase by making YO and than work yarn overs in pattern. Can you give me a clue?For example, I work first row as indicated k1,(p,k...)than A1 ....second row k1,p,k...now on 3rd row I will increase by making YO.How do I continue in row 4 by working yarn covers in pattern?
28.11.2019 - 08:41DROPS Design respondió:
Dear Dusica, the increases should be worked in pattern A.4, ie the first yarn over at the beg of row from WS should be purled if the next stitch should be knitted, and it should be knitted if the next stitch should be purled. Same at the end of the row: if the last stitch in A.4 is a P stitch, K the yarn over, if the last st is a K stitch, P the yarn over - remember to K or P twisted (= into back of loop) to avoid holes. Happy knitting!
28.11.2019 - 09:53
![]() Monique Labatut escribió:
Monique Labatut escribió:
Bonjour, D'abord merci pour tous ses modèles magnifique. Il me manque 4 pelotes de LIMA colour: 9010 Dyelot: 392183 puis-je être sure d'accord le même bain en le recommandant sur internet. Merci d'avance pour votre réponse
15.11.2019 - 20:42DROPS Design respondió:
Bonjour Mme Labatut, nous vous recommandons de vous adresser directement à votre magasin (même par mail ou téléphone) pour toute information complémentaire sur le réassort d'un même bain, n'hésitez pas à en contacter plusieurs si besoin. Bon tricot!
18.11.2019 - 08:27
|
||||||||||||||||
Rambling Man#ramblingmancardigan |
||||||||||||||||
 |
 |
|||||||||||||||
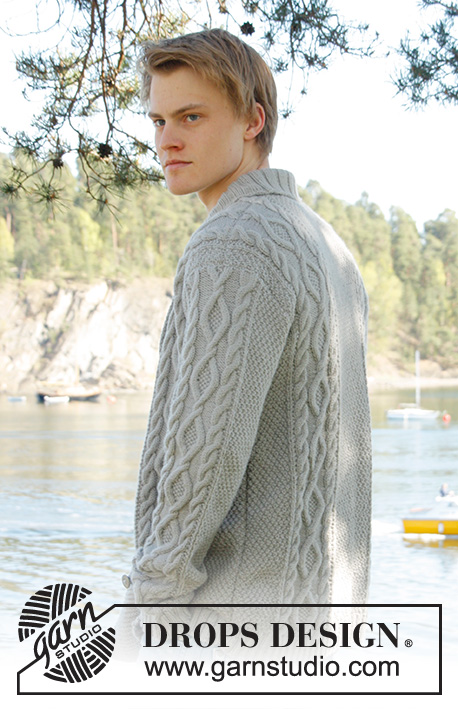
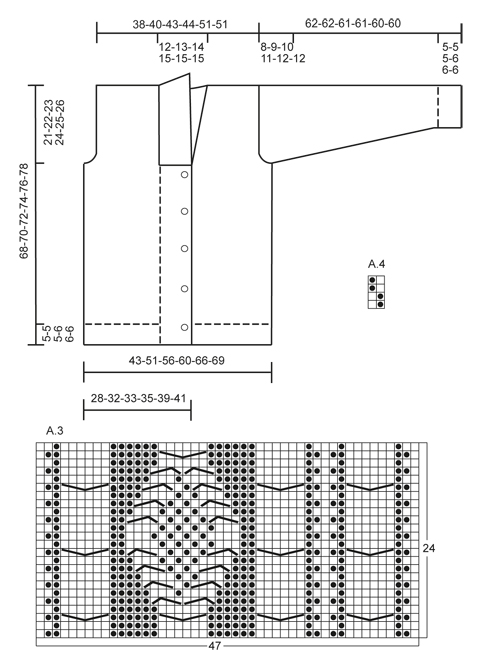
Cardigan DROPS para hombre, tejido con patrón de torsadas y cuello chal en “Lima”. Talla: S – XXXL.
DROPS Extra 0-850 |
||||||||||||||||
|
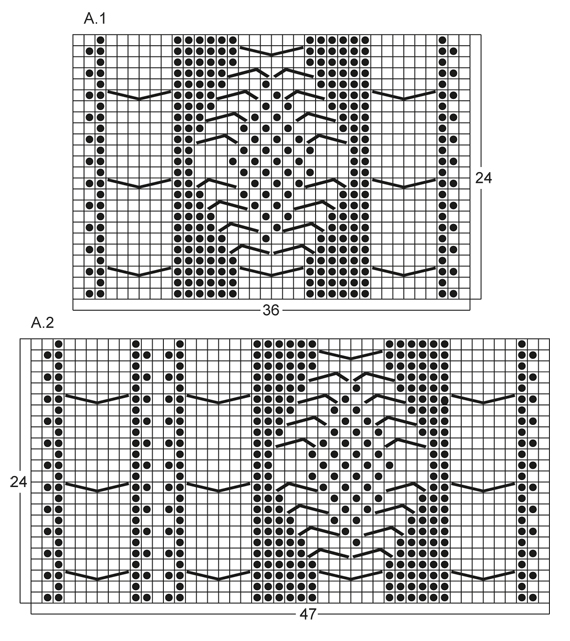
TIP PARA LA ELABORACIÓN DEL TEJIDO: Este diseño fue escrito con los ojales en el borde delantero derecho. Si prefiere los ojales clásicos para hombre, puede hacerlos en el borde delantero izquierdo. PT MUSGO (de ida y vuelta en la ag): Tejer todas las vtas de derecho. NOTA: Todos los pts de orillo son tejidos en pt musgo. PATRÓN: Ver diagrama A.1 a A.4 – los diagramas muestran todas las vtas en 1 repetición del patrón por el LD. VUELTAS CORTAS: DELANTERO DERECHO: Tejer 1 vuelta corta en la vta 3 de cada repetición del patrón verticalmente hasta completar las medidas, de la manera sig: En la 3ª vta en el patrón (= LD), tejer 26-26-26-26-30-30 pts del borde, virar y tejer la vta sig. Después, tejer sobre todos los pts de la vta como antes. DELANTERO IZQUIERDO: Tejer 1 vuelta corta en la vta 2 de cada repetición del patrón verticalmente hasta completar las medidas, de la manera sig: En la 2ª vta en el patrón (= LR), tejer 26-26-26-26-30-30 pts del borde, virar y tejer la vta sig. Después, tejer sobre todos los pts de la vta como antes. OJALES: Rem para 5 ojales, por el LD, en el borde derecho. 1 OJAL = rem el 7º y 8º pt a partir del centro del frente y, en la vta sig, mon 2 pts nuevos sobre estos pts. Rem para los ojales cuando la pieza mida: TALLA S: 14, 22, 30, 38 y 46 cm TALLA M: 15, 23, 31, 39 y 47 cm TALLA L: 16, 24, 32, 40 y 48 cm TALLA XL: 17, 25, 33, 41 y 49 cm TALLA XXL: 18, 26, 34, 42 y 50 cm TALLA XXXL: 19, 27, 35, 43 y 51 cm TIP PARA AUMENTO: Aum 1 pt haciendo 1 HEB (lazada), en la vta sig tejer la HEB retorcida (es decir, tejer por atrás del pt en vez de adelante) para evitar que se formen agujeros. ------------------------------------------------------ ESPALDA: Tejida de ida y vuelta en la ag. Mon 136-156-168-180-196-204 pts (incl 1 pt de orillo en cada lado) en ag circular tamaño 3.5 mm con Lima. Tejer resorte de la manera sig (1ª vta = LD): 1 pt de orillo en PT MUSGO – ver explicación arriba, * 2d, 2r *, repetir de *a*, terminar con 2d y 1 pt de orillo en pt musgo. Continuar tejiendo de esta manera hasta que el resorte mida 5-5-5-6-6-6 cm. En la última vta por el LR, tejer de revés AL MISMO TIEMPO que dism 20-22-24-26-26-26 pts distribuidos equitativamente = 116-134-144-154-170-178 pts. Después cambiar a ag tamaño 4 mm y tejer la vta sig, por el LD, de la manera sig: 1 pt de orillo en pt musgo, 8-16-20-24-20-24 pts en A.4, tejer A.1 una vez en la talla S – XL, tejer A.2 una vez en la talla XXL y XXXL, 26-28-30-32-34-34 pts en A.4, después tejer A.1 una vez en la talla S – XL, tejer A.3 una vez en la talla XXL y XXXL, terminar con 8-16-20-24-20-24 pts en A.4 y 1 pt de orillo en pt musgo. RECUERDE MANTENER LA MISMA TENSIÓN DE TEJIDO DE LA MUESTRA! Continuar tejiendo de esta manera hasta que la pieza mida 47-48-49-50-51-52 cm. Después, rem para las sisas al inicio de cada vta, en cada lado, de la manera sig: Rem 3 pts 0-1-1-2-2-2 veces, 2 pts 1-1-1-2-2-2 veces, 1 pt 4-7-9-8-4-8 veces = 104-110-116-118-142-142 pts. Continuar con el patrón como antes hasta que la pieza mida 66-68-70-72-74-76 cm. Ahora rem los 20-22-24-26-28-28 pts centrales para el escote y terminar cada parte por separado. Rem 2 pts en la vta sig a partir del escote = 40-42-44-44-55-55 pts restantes en el hombro. Continuar con el patrón como antes. Cuando la pieza mida 68-70-72-74-76-78 cm, rem los pts flojamente con derecho sobre derecho y revés sobre revés. DELANTERO DERECHO: Tejido de ida y vuelta en la ag. Mon 83-91-95-99-111-115 pts (incl 1 pt de orillo en el lado) en ag circular tamaño 3.5 mm con Lima. Tejer resorte de la manera sig (1ª vta = LD): 26-26-26-26-30-30 pts en pt musgo (= pts del borde), * 2d, 2r *, repetir de *a*, terminar con 1 pt de orillo en pt musgo. Continuar con resorte y los pts del borde en pt musgo hasta que el resorte ida 5-5-5-6-6-6 cm. En la última vta por el LR, tejer de revés sobre todos los pts en resorte y, AL MISMO TIEMPO, dism 12-12-12-12-13-13 pts distribuidos equitativamente (no dism sobre los pts del borde) = 71-79-83-87-98-102 pts. Después cambiar a ag tamaño 4 mm y tejer la vta sig, por el LD, de la manera sig: 26-26-26-26-30-30 pts del borde, tejer A.1 una vez en la talla S – XL, tejer A.3 una vez en la talla XXL y XXXL, 8-16-20-24-20-24 pts en A.4 y 1 pt de orillo en pt musgo. En la vta sig por el LD (= 3ª vta en el patrón) tejer VUELTAS CORTAS – leer explicación arriba. Continuar con el patrón y pts del borde en el frente – y, AL MISMO TIEMPO, tejer 1 vuelta corta en la 3ª vta de cada repetición del patrón verticalmente hasta completar las medidas. Cuando la pieza mida 14-15-16-17-18-19 cm, rem para los OJALES en el borde derecho – ver explicación arriba! Continuar tejiendo hasta que la pieza mida 47-48-49-50-51-52 cm. Después, rem al inicio de la vta sig por el LD, de la manera sig: Rem los primeros 25-25-25-25-29-29 pts, insertar un marcapuntos (éste marca donde empezar a levantar los pts para el cuello), tejer el resto de la vta. Después, rem para la sisa en cada vta por el LR, de la manera sig: 3 pts 0-1-1-2-2-2 veces, 2 pts 1-1-1-2-2-2 veces, 1 pt 4-7-9-8-4-8 veces = 40-42-44-44-55-55 pts restantes en el hombro. Continuar con el patrón como antes. Cuando la pieza mida 68-70-72-74-76-78 cm, rem los pts flojamente con derecho sobre derecho y revés sobre revés. DELANTERO IZQUIERDO: Mon y tejer resorte como lo hizo en la pieza del delantero derecho, pero a la inversa (es decir, * 2r, 2d *, repetir de *a*) con 26-26-26-26-30-30 pts del borde en pt musgo. Continuar tejiendo hasta que el resorte mida 5-5-5-6-6-6 cm. En la última vta por el LR, tejer de revés sobre todos los pts en resorte y, AL MISMO TIEMPO, dism 12-12-12-12-13-13 pts distribuidos equitativamente (no dism sobre los pts del borde) = 71-79-83-87-98-102 pts. Después cambiar a ag tamaño 4 mm y tejer la vta sig, por el LD, de la manera sig: 1 pt de orillo en pt musgo, 8-16-20-24-20-24 pts en A.4, tejer A.1 una vez en la talla S – XL, tejer A.2 una vez en la talla XXL y XXXL, 26-26-26-26-30-30 pts del borde en pt musgo. En la vta sig por el LR (= 2ª vta en el patrón) tejer VUELTAS CORTAS – leer explicación arriba. Continuar tejiendo de la misma manera como lo hizo en la pieza del delantero derecho, mas sin los ojales. MANGA: Tejida de ida y vuelta en la ag. Mon 74-78-82-86-90-90 pts (incl 1 pt de orillo en cada lado) en ag circular tamaño 3.5 mm con Lima. Tejer resorte de la manera sig (1ª vta = LD): 1 pt de orillo en pt musgo, * 2d, 2r *, repetir de *a* y terminar con 1 pt de orillo en pt musgo. Continuar tejiendo de esta manera hasta que el resorte mida 5-5-5-6-6-6 cm. En la última vta por el LR, tejer de revés AL MISMO TIEMPO que dism 12-14-16-18-18-18 pts distribuidos equitativamente = 62-64-66-68-72-72 pts. Después, cambiar a ag tamaño 4 mm y tejer la vta sig, por el LD, de la manera sig: 1 pt de orillo en pt musgo, 12-13-14-15-17-17 pts en A.4, tejer A.1 una vez, 12-13-14-15-17-17 pts en A.4, terminar con 1 pt de orillo en pt musgo. AL MISMO TIEMPO, cuando la pieza mida 6 cm, aum 1 pt a 1 pt del pt de orillo en cada lado – Leer TIP PARA AUMENTO arriba. NOTA: Tejer los pts aum en A.4. Repetir los aum a cada 3½-3-2½-2½-2½-2½ cm un total de 14-15-16-17-16-17 veces = 90-94-98-102-104-106 pts. Continuar hasta que la pieza mida 54-53-51-50-48-48 cm (medidas más cortas en las tallas más grandes debido a copete de manga más largo y a una mayor anchura de hombros), rem al inicio de cada vta, en cada lado: 3 pts 1-1-1-2-2-2 veces, 2 pts 1-1-2-2-2-2 veces y 1 pt 2-2-3-3-4-4 veces. Después, rem 2 pts en cada lado hasta que la pieza mida 61-61-60-60-59-59 cm, después rem 3 pts 2 veces en cada lado. Cuando la pieza mida aprox 62-62-61-61-60-60 cm, rem los pts flojamente con derecho sobre derecho y revés sobre revés. TERMINACIÓN: Hacer las costuras de los hombros y pegar las mangas a 1 pt del pt de orillo. Hacer las costuras de las mangas y de los laterales en una, a 1 pt del pt de orillo. Coser los botones en la pieza del delantero izquierdo, a aprox 2½ cm del último pt derecho en el patrón. CUELLO CHAL: Levantar pts, por el LD, a 1 pt del pt de orillo en ag circular tamaño 3.5 mm. Empezar al centro del frente en el marcapuntos de la pieza del delantero derecho, de la manera sig: Levantar aprox 60-70 pts hasta el hombro, después 30-40 pts a lo largo del escote y 60-70 pts a lo largo de la pieza del delantero izquierdo hasta el marcapuntos = 150-180 pts. Tejer 1 vta de derecho por el LR y, AL MISMO TIEMPO, ajustar el número de pts a 144-148-156-164-172-180. Después, tejer resorte en la vta sig por el LD, de la manera sig: 1 pt en pt musgo, * 2d, 2r *, repetir de *a* y terminar con 2d y 1 pt en pt musgo. Continuar de esta manera hasta que el cuello mida aprox 5-5-5-6-6-6 cm. Ahora aum 1 pt en cada una de las 14-14-14-16-16-16 secciones de pts reveses visto por el LD (= escote de la espalda) = 158-162-170-180-188-196 pts. Continuar hasta que el cuello mida aprox 12-12-12-12-14-14 cm, después rem flojamente con derecho sobre derecho y revés sobre revés. Fijar el cuello con puntadas en la parte de abajo, en cada lado del borde, por el LR (para que la costura no sea visible por el LD) – coser orilla con orilla para evitar que se forme una costura abultada. |
||||||||||||||||
Explicaciones del diagrama |
||||||||||||||||
|
||||||||||||||||
 |
||||||||||||||||
 |
||||||||||||||||
¿Terminaste este patrón?Entonces, etiqueta tus fotos con #dropspattern #ramblingmancardigan o envíalas a la galería #dropsfan. ¿Necesitas ayuda con este patrón?Encontrarás 23 videos tutoriales, un espacio para comentarios/preguntas y más visitando la página del patrón en garnstudio.com © 1982-2026 DROPS Design A/S. Todos los derechos reservados. Este documento, incluyendo todas sus sub-secciones, está protegido por los derechos de autor (copyright). Lee más acerca de lo que puedes hacer con nuestros patrones en la parte de abajo de cada patrón de nuestro sitio. |
||||||||||||||||


Con más de 40 años en el diseño de modelos de punto y de ganchillo, DROPS Design ofrece una de las más vastas colecciones de patrones gratuitos en el internet - traducidos en 17 idiomas. Al día de hoy, contamos con 324 catálogos y 12290 patrones - de los cuales 11675 están traducidos en español.
Nosotros trabajamos con mucho esmero para brindarte lo mejor que las labores de punto y ganchillo tienen para ofrecer,inspiración y consejos, así como hilos de magnífica calidad a precios increíbles! Te gustaría usar nuestros patrones para otro fin además del uso personal? Puedes leer acerca de lo que estás permitida a hacer en el texto de Copyright en la parte de abajo de todos nuestros patrones. Felices labores!
Escribe un comentario sobre DROPS Extra 0-850
¡Nos encantaría saber qué piensas acerca de este patrón!
Si quieres escribir una pregunta referente al patrón, por favor asegúrate de elegir la categoría correcta en el formulario debajo, para acelerar el proceso de respuesta. Los campos obligatorios están marcados con un *.