
Categorías populares
¿Buscas un hilo?


Comentarios / Preguntas (20)
![]() Marie Mansi escribió:
Marie Mansi escribió:
I don’t understand the first instruction “bund odd 1 st at beginning of every row on each side. Does that mean bind off 2 stitches on each row
05.11.2020 - 00:59DROPS Design respondió:
Hi Marie, This means you bind off 1 stitch at the beginning of the first row, then bind off 1 stitch at the beginning of the next row, when you turn and work back and continue like this. Happy knitting!
05.11.2020 - 07:11
![]() Jacqueline Briscoe escribió:
Jacqueline Briscoe escribió:
What changes are required if using bernat blanket yarn?
21.01.2020 - 19:08DROPS Design respondió:
Dear Mrs Briscoe, We are able to provide free patterns thanks to our yarns sold throughout the world. You will therefore understand that we can only recomand you to contact your DROPS Store in Canada for any further help & assistance. Thank you for your comprehension.
22.01.2020 - 08:16
![]() Patricia Bauer escribió:
Patricia Bauer escribió:
Sorry--still confused. To assemble, A and B are stitched together--but A has the extra edge stitch (seam allowance)on both sides on ALL rows, whereas last row of B the 2 edge stitches have been bound off--is this last row of B not part of the assembly seam?
03.12.2013 - 16:42DROPS Design respondió:
Dear Mrs Bauer, A and B are sewn together on each side (armholes), so that 1 st at beg of row + 1 st at end of row will be used for seam both armholes. Happy knitting!
04.12.2013 - 09:56
![]() Patricia Bauer escribió:
Patricia Bauer escribió:
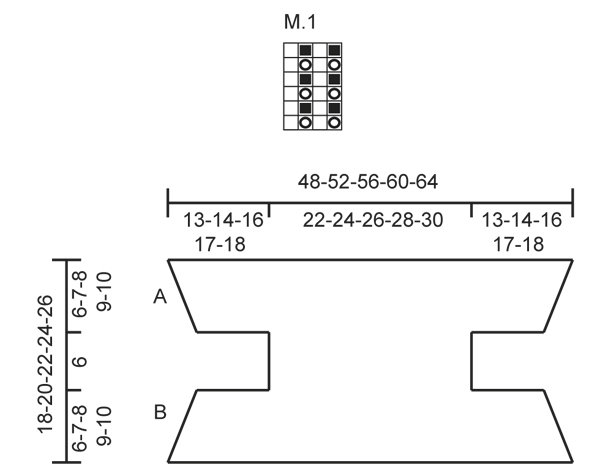
88-96-102-110-120 sts. Piece now measures approx. 18-20-22-24-26 cm / 7"-8"-8 3/4"-9½"-10 1/4". On next row bind off 1 st at beg and end of row, then slip sts on a stitch holder. Why is the seam allowance (2 edge stitches) bound off as described above (to make 94 st on the size 5/6), when that is not done on the starting row that it will meet (96 st)?
03.12.2013 - 13:46DROPS Design respondió:
Dear Mrs Bauer, in size 5/6 you have 94 sts left at the end of body and pick up 94 sts in the 96 sts from cast on row so that you have again 1 st each side for seam = a total of 188 sts. Happy knitting!
03.12.2013 - 14:26
![]() Annetta Kerans escribió:
Annetta Kerans escribió:
Thank you so much for your reply and the video. I actually found the answer from someone else's question. It's always nice to know there is someone who can answer questions.
09.04.2013 - 22:31
![]() Riet escribió:
Riet escribió:
Zo heb ik het ook gedaan, maar dan krult het niet om! Op de foto is goed te zien,dat het het omgekrulde randje ribbelsteek en geen boordsteek is.
14.02.2013 - 15:00DROPS Design respondió:
Het is een rand van 1 r/1 av. Kijk op de foto van dichtbij, dat is geen ribbelst.
14.02.2013 - 15:33
![]() Riet Moraal escribió:
Riet Moraal escribió:
De beschrijving van de rand is anders dan op de foto staat. Ik heb de rand,( 8 cm.) in patroon M1 gebreid, maar dan krult hij niet om, zoals op de foto.volgens mij moeten de laatste naalden weer in ribbelsteek gebreid worden? Met vr. grt. Riet Moraal
29.01.2013 - 16:37DROPS Design respondió:
Het patroon klopt. Je moet niet de laatste nld in ribbelsteken breien, maar heel LOSJES afkanten met r boven r en av boven av.
06.02.2013 - 18:32
![]() Laura Graciani escribió:
Laura Graciani escribió:
Entiendo que para seguir la secuencia del diagrama M.1,es necesario que el número de puntos a tejer sea impar.Tenemos que terminar la secuencia con 1YO + slip 1 st, para que en la 2º vuelta poder K tog YO and slipped st. Gracias.
29.12.2012 - 08:06DROPS Design respondió:
Hola Laura, el diagrama M.1 se teje así: 1a vuelta: * 1 HEB + deslizar 1 pt de derecho, 1 revés *, repetir de *a* en toda la vta. 2a vuelta: * Tejer juntos de derecho la HEB y el pt desl, 1 revés *, repetir de *a* en toda la vta. Repetir la 1a y 2a vuelta.
29.12.2012 - 10:07Helen escribió:
I am almost finished this little vest but am not sure how to work the M1 diagram. Is it possible to get the instructions as words. Is the purl stitch every second round or every second stitch in a round row?
20.08.2012 - 04:13DROPS Design respondió:
Work 1st round in M1: *1 YO + slip 1 st as if to K, P1*, rep *-* around. 2nd round: *K tog YO and slipped st, P1*, rep *-* around. Repeat 1st and 2nd round.
25.08.2012 - 02:47Jill Forward escribió:
I've had 2attempts at this pattern & it still doesn't make sense. Cast off -does this mean knit to end and slip one over last stitch? The decline seems too rapid. Is the pattern grid illustrated referring to this pattern and in what way? Can't see the relevance of the 13, 48, 13 written at top of drawing. Help, I really want to make this.
20.04.2012 - 11:02DROPS Design respondió:
You bind off in beg of every row, which is not as how you write it above. Gauge in both width and height is just as important for correct measures. Numbers in chart are measures in centimeters.
23.04.2012 - 20:00
|
||||||||||
Pixie#pixievestbolero |
||||||||||
 |
 |
|||||||||
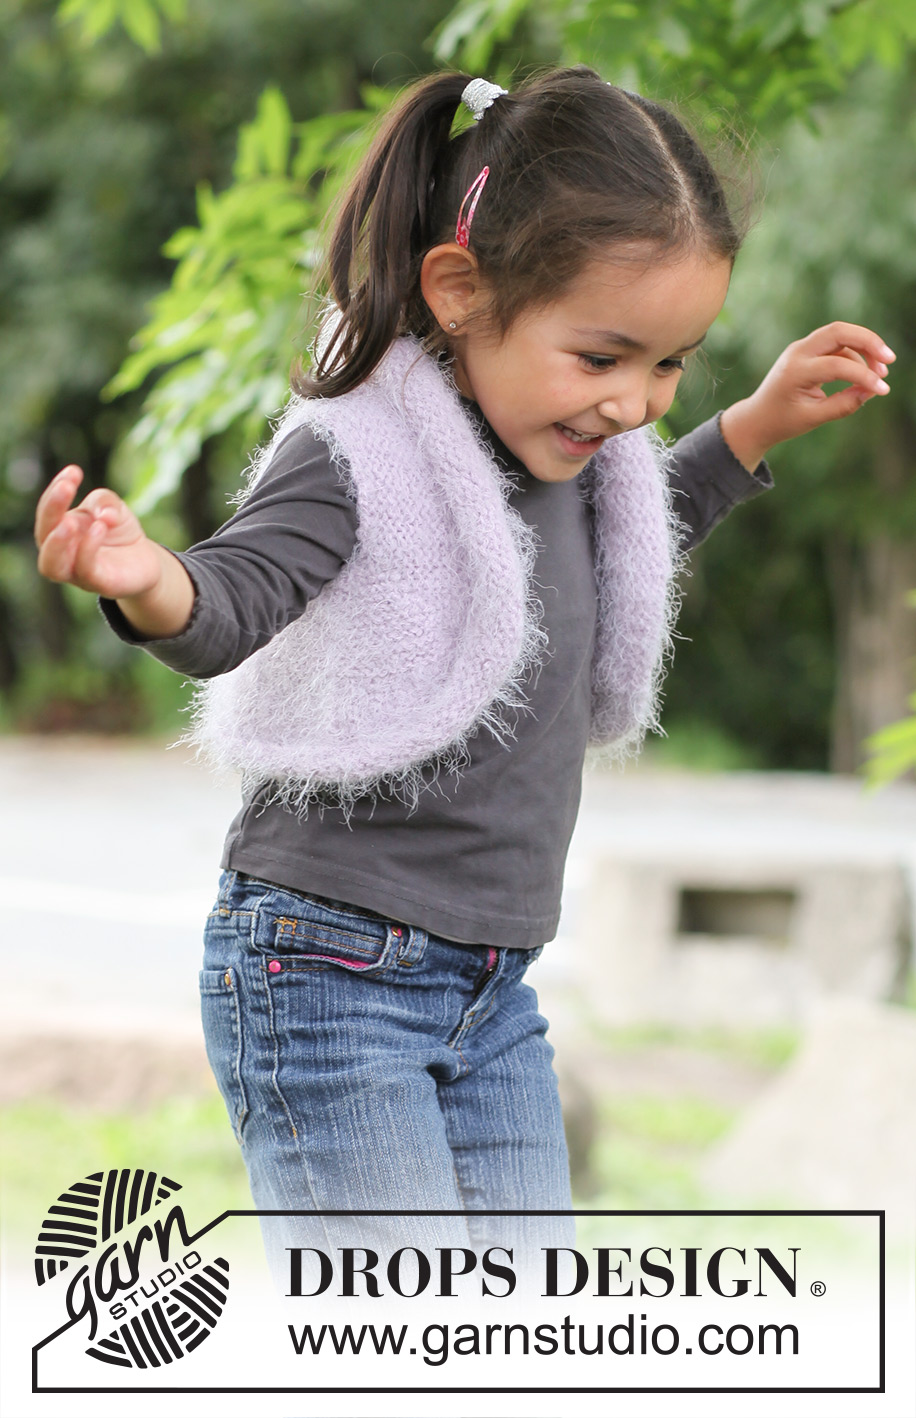
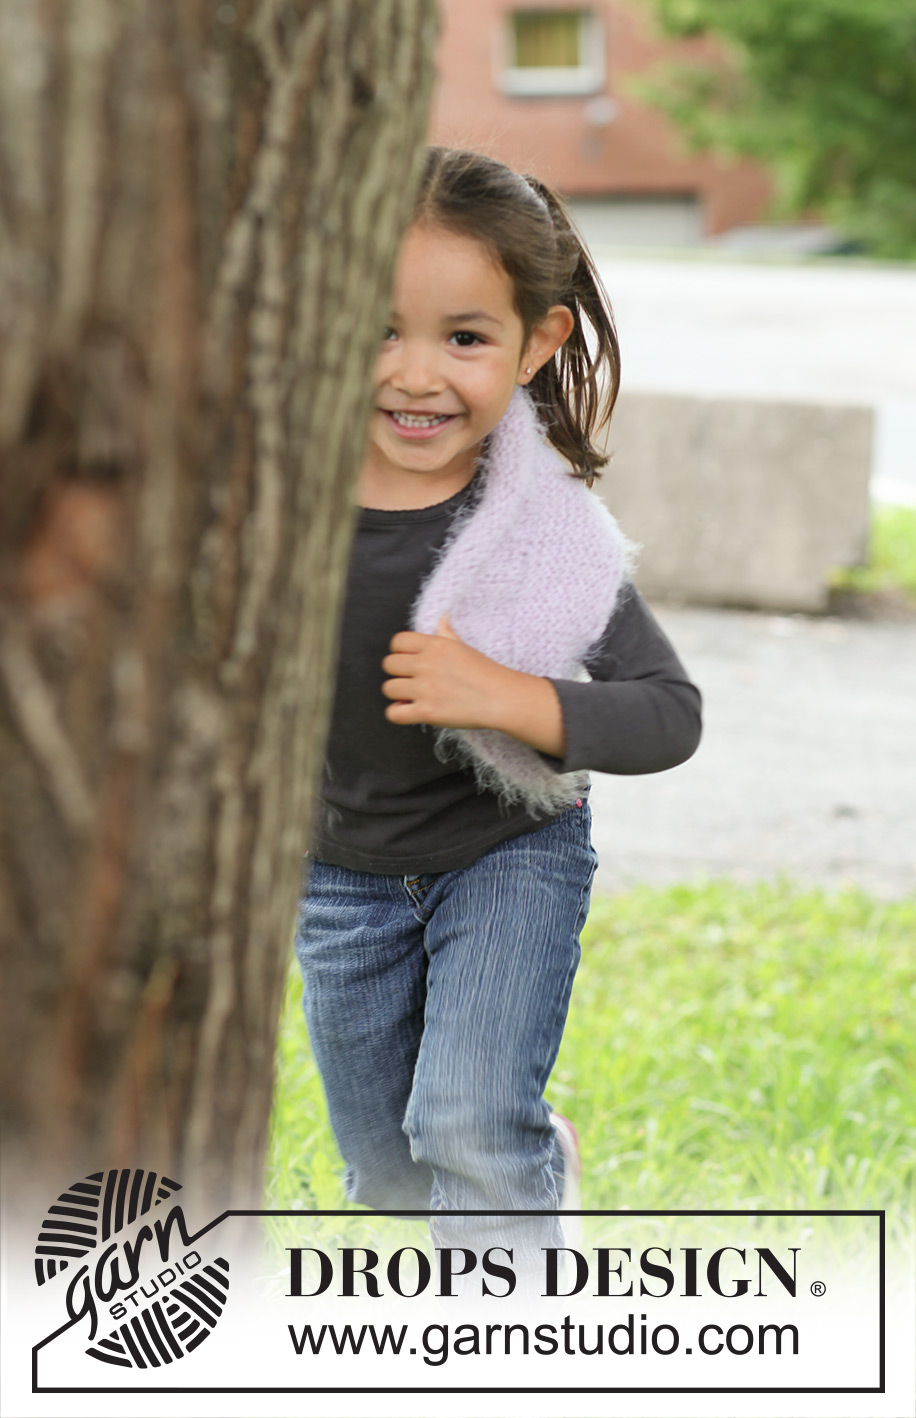
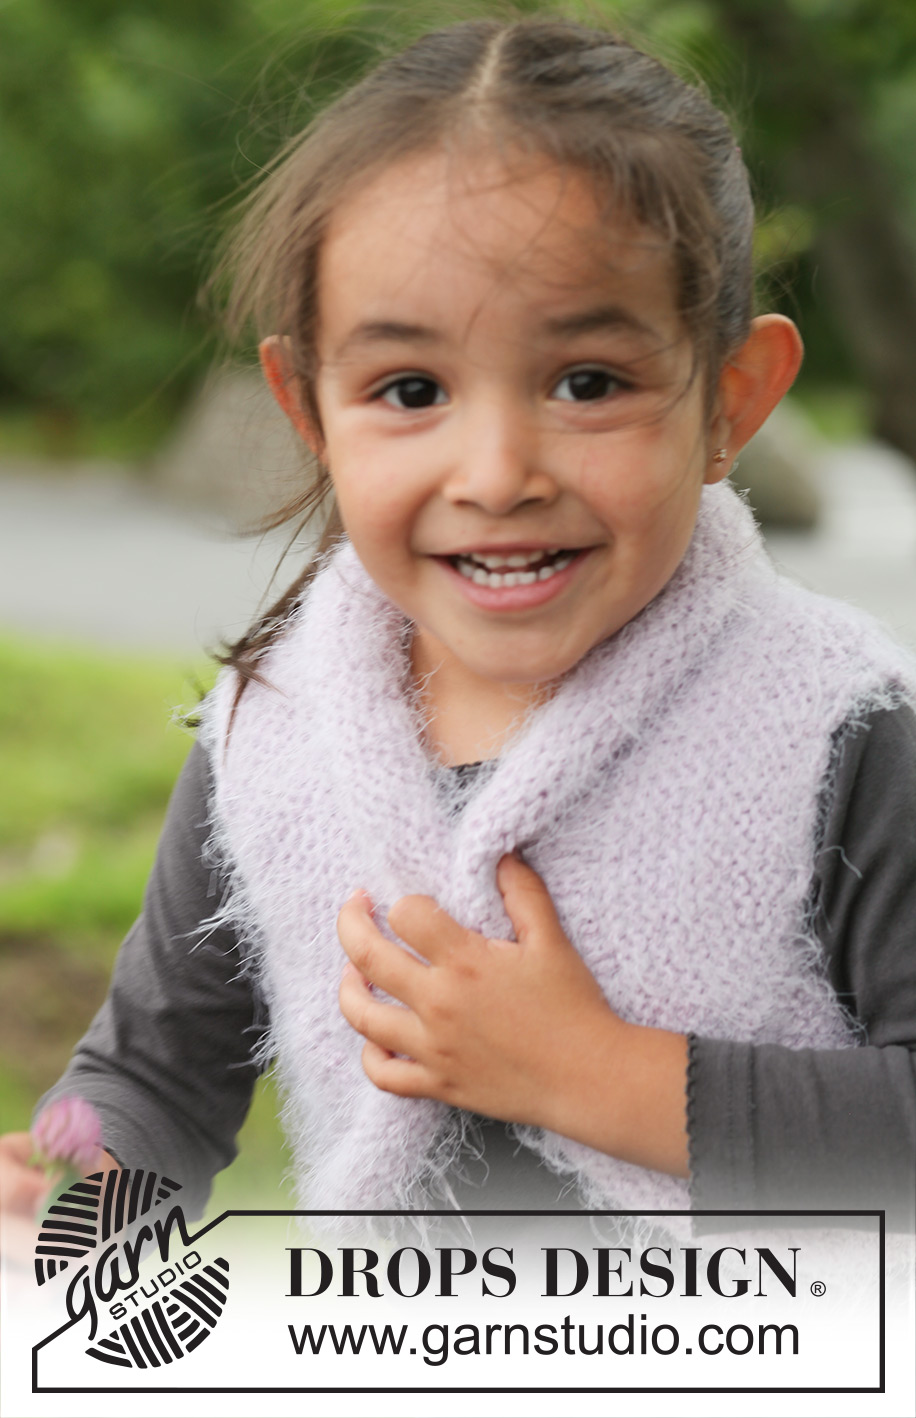
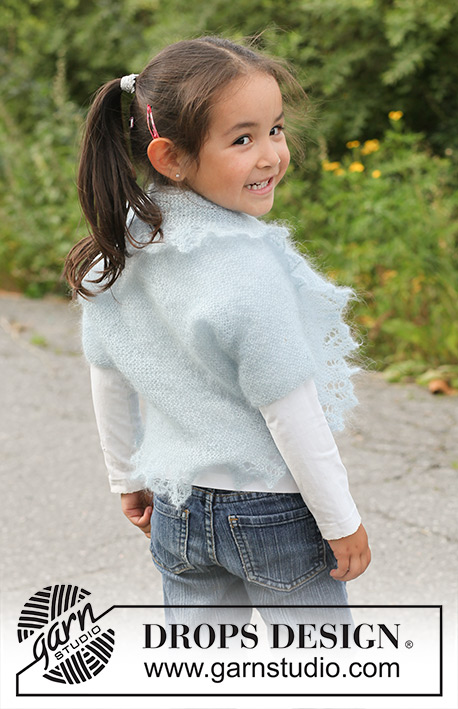
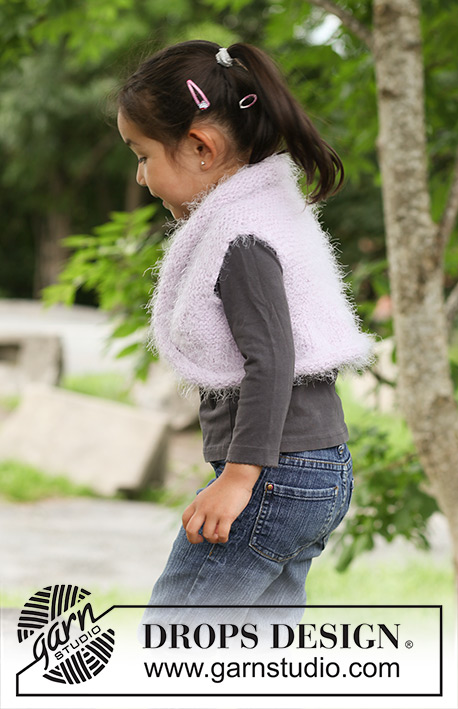
Bolero pequeño de punto en DROPS Symphony. Tallas 3 - 12 años.
DROPS Children 22-19 |
||||||||||
|
PT MUSGO (de ida y vuelta en la ag): Todas las vtas de derecho. PATRÓN: Ver diagrama M.1 ------------------------------------------------------ CUERPO: Tejido de ida y vuelta en ag circular. Mon 88-96-102-110-120 pts (incl 1 pt de orillo en cada lado) en ag circular tamaño 4.5 mm con Symphony. Tejer en PT MUSGO sobre todos los pts – ver explicación arriba – AL MISMO TIEMPO, en la 2ª vta, rem 1 pt al inicio de cada vta 9-11-12-14-16 veces en cada lado, y después rem 15-15-16-16-17 pts 1 vez en cada lado = 40-44-46-50-54 pts restantes en la ag. Continuar tejiendo en pt musgo hasta que la pieza mida 12-13-14-15-16 cm. Ahora, flojamente mon nuevos pts al final de cada vta: 15-15-16-16-17 pts 1 vez en cada lado y, después, 1 pt 9-11-12-14-16 veces en cada lado = 88-96-102-110-120 pts. La pieza ahora mide aprox 18-20-22-24-26 cm. En la vta sig, rem 1 pt al inicio y final de la vta, después deslizar los pts en un gancho o seguro aux. TERMINACIÓN: Colocar A en contra de B – ver el diagrama – y unir con una costura a 1 pt del pt de orillo. Esto se hace en ambos lados de la pieza. ORILLA: Tejida en redondo en ag circular. Deslizar los pts del gancho o seguro aux de regreso en la ag circular y levantar 86-94-100-108-118 pts (1 pt en cada pt) a lo largo de la orilla de montaje = 172-188-200-216-236 pts. Tejer la 1ª vta de la manera sig: * 1d, 1r *, repetir de *a* en toda la vta. Después tejer el diagrama M.1. Cuando la orilla mida 8-9-9-10-10 cm, rem los pts FLOJAMENTE con derecho sobre derecho y revés sobre revés. ORILLA EN GANCHILLO: Trabajar en ag de ganchillo tamaño 5 mm alrededor de toda la orilla del bolero y alrededor de las sisas, de la manera sig: 1 p.b. en el primer pt, * 3 cad, saltar aprox 1 cm, 1 p.b. en el pt sig *, repetir de *a* y terminar con 1 p.bjs en el p.b. del inicio de la vta. |
||||||||||
Explicaciones del diagrama |
||||||||||
|
||||||||||
 |
||||||||||
¿Terminaste este patrón?Entonces, etiqueta tus fotos con #dropspattern #pixievestbolero o envíalas a la galería #dropsfan. ¿Necesitas ayuda con este patrón?Encontrarás 12 videos tutoriales, un espacio para comentarios/preguntas y más visitando la página del patrón en garnstudio.com © 1982-2026 DROPS Design A/S. Todos los derechos reservados. Este documento, incluyendo todas sus sub-secciones, está protegido por los derechos de autor (copyright). Lee más acerca de lo que puedes hacer con nuestros patrones en la parte de abajo de cada patrón de nuestro sitio. |
||||||||||


Con más de 40 años en el diseño de modelos de punto y de ganchillo, DROPS Design ofrece una de las más vastas colecciones de patrones gratuitos en el internet - traducidos en 17 idiomas. Al día de hoy, contamos con 324 catálogos y 12290 patrones - de los cuales 11675 están traducidos en español.
Nosotros trabajamos con mucho esmero para brindarte lo mejor que las labores de punto y ganchillo tienen para ofrecer,inspiración y consejos, así como hilos de magnífica calidad a precios increíbles! Te gustaría usar nuestros patrones para otro fin además del uso personal? Puedes leer acerca de lo que estás permitida a hacer en el texto de Copyright en la parte de abajo de todos nuestros patrones. Felices labores!
Escribe un comentario sobre DROPS Children 22-19
¡Nos encantaría saber qué piensas acerca de este patrón!
Si quieres escribir una pregunta referente al patrón, por favor asegúrate de elegir la categoría correcta en el formulario debajo, para acelerar el proceso de respuesta. Los campos obligatorios están marcados con un *.