
Categorías populares
¿Buscas un hilo?


Comentarios / Preguntas (59)
![]() Gilardi Claudette escribió:
Gilardi Claudette escribió:
Je ne comprends pas l'explication des manches.que veut dire "avec les rangs raccourcis comme avant,aux mêmes endroits" Merci
31.01.2022 - 09:02DROPS Design respondió:
Bonjour Mme Gilardi, vous avez auparavant tricoté des rangs raccourcis sur toute la longueur, lorsque vous tricotez les manches, vous allez tourner aux mêmes endroit qu'avant (moins de fois car moins de marqueurs), et continuer ainsi les rangs raccourcis comme avant. Bon tricot!
31.01.2022 - 10:23
![]() Martens escribió:
Martens escribió:
Ik ben deze Eden vest aan het breien. Ik ben nu de libkermouw aan het breien. Deze moeten in verkorte toeren gebreid worden. De eerste en de tweede toer van de verkorte toeren moeten gewoon volledig heen en terug gebreid worden. Blijft dit ook gelden in de mouw? Want er zijn maar 2 verkorte toeren in de mouw ipv 3. Ik begrijp tevens niet hoe je 35 cm meet (aan de onderkant op het breedste deel) in de uitleg van de linkermouw. Kan u mij daarmee helpen, please?
09.01.2021 - 20:24DROPS Design respondió:
Dag Martens,
De lengte van de mouw meet je aan de onderkant van de mouw op het breedste deel. Als je verkorte toeren maakt op de mouw, keer je het werk op het zelfde punt als bij de panden, dus het aantal steken vanaf de hals tot het keerpunt voor de verkorte toeren moet hetzelfde zijn. Hoe de verkorte toeren herhaald worden is verder precies hetzelfde als op de panden.
10.01.2021 - 12:15
![]() Bobby Garland escribió:
Bobby Garland escribió:
OK, I think I get it. I need to do 1 more row on the LF (row 1 for me) in order to end at the top. Then, I need to attach a new yarn to stitch #64 on the WS and knit the side piece. Then I will end up with the last row on the RS. Then I will cut that yarn. Then I will go back to the top edge on the LF and pick up yarn and turn to the WS to start the sleeve on those 51 sts. It would have been nice if the instructions had been more specific, instead of saying "work approximately..."
08.01.2021 - 19:57
![]() Bobby Garland escribió:
Bobby Garland escribió:
I get what you are saying, but I am not asking about the sleeve, as I am not there yet. I need to know if I am to cut the yarn at the lower edge of the left front piece and reattach it to the WS at stitch #64 to start the first row of the side piece so as to end on the RS of the side piece as instructed. There is no other way to end up on the RS unless you start the side piece on the WS in the middle of the work.
08.01.2021 - 17:21DROPS Design respondió:
Dear Mrs Garland, after left front piece measures 23 cm, adjust so that next row will be worked from RS and now work this 1 cm starting from RS = from the bottom edge over the first 64 cm - adjust this 1 cm so that last row is worked from RS, then cut the yarn and join it to work sleeve (starting from RS) over the 51 sts left unworked on needle (starting from RS). Happy knitting!
11.01.2021 - 06:57
![]() Bobby Garland escribió:
Bobby Garland escribió:
OK, so you also cut the yarn at the end of the left front, which for me is at the lower edge, and reattach to stitch # 64 (for small size) in order to start the side piece on the WS, so as to finish last row of side piece on the RS?
08.01.2021 - 15:15DROPS Design respondió:
Dear Mrs Garland, the last row on left front piece is worked from RS, but when you turn and work sleeve, first row on sleve is worked from WS = this means you don't need to cut the yarn between left front piece and sleeve, then after sleeve, just work the 64 sts on side at the end of a WS row. - no need to cut the yarn neither between sleeve and back piece. Happy knitting!
08.01.2021 - 16:19
![]() Bobby Garland escribió:
Bobby Garland escribió:
Thank you for your response. Another question....I finished the left front and ended on row 8 of short row sequence, which means the next row would be a right side row. In order to finish the side piece on the RS as instructed and have the side pieces be the same number of rows and have a marker in the middle, I would have to start the side piece on the WS. Do I cut the yarn and start at stitch number 64 at the other end from the WS?
08.01.2021 - 14:08DROPS Design respondió:
Dear Mrs Garland, last row worked for side on front piece is worked from the right side, then cut the yarn and work sleeve. Last row worked on sleeve is from WS, after you have worked this last row on sleeve, work the stitches of the side at the end of this row = from WS, all stitches are now back on needle, turn and start short rows at the beg of next row from RS. Happy knitting!
08.01.2021 - 15:02
![]() Bobby Garland escribió:
Bobby Garland escribió:
For short rows, when moving from left front to sleeve to back to sleeve to right front, do you continue in the same numerical sequence from the previous section, or do you start again at row 1 or do you reverse the short row sequence, work rows 8-1? You start with row 1 at the left front border and end up with row 8 at the right front....the pieces would not be "mirrored." Even if you have the same number of rows, the short rows would not be in the same place. Does it matter?
04.01.2021 - 14:50DROPS Design respondió:
Dear Mrs Garland, after you have worked the sleeve, work the short rows on back piece starting from row 1 of short rows. Happy knitting!
05.01.2021 - 10:43
![]() LISA RENBARGER escribió:
LISA RENBARGER escribió:
A friend and I are about to cast on Eden to knit at the same time. My bust measurement is between size M & L. Is there positive ease built in to the pattern?
13.01.2020 - 16:49DROPS Design respondió:
Dear Mrs Renbarger, measure a similar garment you have and like the shape and compare these measurements to the one in the measurement chart (taken flat from side to side, in cm) to find out the matching size. You can then either decide if you want it rather tight or rather loose (with negative or positive ease). Read more here. Happy knitting!
14.01.2020 - 07:17
![]() Kironieke escribió:
Kironieke escribió:
If i cast on 120 stitches for size M with 23st/cm (tension) how do i get to the total height of 75cm? It only adds up to the 52cm of the body, not the yoke/sleeve part.
21.05.2019 - 20:53DROPS Design respondió:
Dear Kironieke, the 120 stitches will measure 52 cm = whole length of jacket as shown in measurement chart (= 23 cm yoke + 29 cm body). Happy knitting!
22.05.2019 - 09:14
![]() Rosie FRANCIS escribió:
Rosie FRANCIS escribió:
When knitting the left sleeve, you will have between 51 and 62 stitches, how many do you work before turning on the short rows? The short row instructions work for the whole garment (between 115 and 138 stitches)
06.08.2018 - 22:35DROPS Design respondió:
Dear Mrs Francis, you should work the short rows on the left sleeve on the same places you worked the short rows on the top of front piece before, ithe "turns" should continue and be aligned from the beg of piece. Happy knitting!
07.08.2018 - 09:38
|
||||
Eden#edencardigan |
||||
|
|
||||
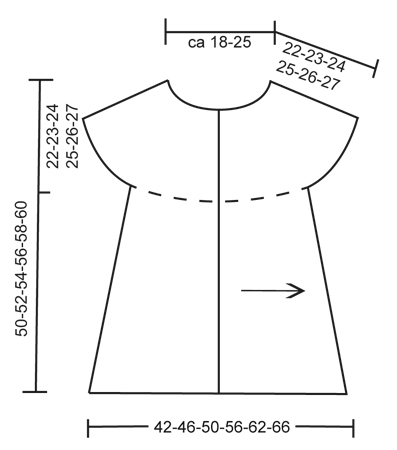
Chaleco DROPS en punto musgo, tejido lateralmente con vueltas cortas en “Fabel”. Talla: S – XXXL.
DROPS 134-4 |
||||
|
TIP PARA LA ELABORACIÓN DEL TEJIDO: Siempre que se vira la pieza en el centro de una vuelta, deslizar el primer pt de derecho, tensar el hilo y regresar. Esto se hace para evitar que se formen agujeros cuando se tejen vueltas cortas. VUELTAS CORTAS: Tejer vueltas cortas en el centro de la pieza para darle a la prenda una forma ligeramente en A. Empezar a partir de la orilla inferior y tejer de la manera sig subiendo en dirección al cuello. * Tejer todos los pts, virar y tejer de regreso. Tejer 103-108-112-115-119-122 pts, virar y tejer de regreso. LEER TIP PARA LA ELABORACIÓN DEL TEJIDO! Tejer 89-94-97-99-103-105 pts, virar y tejer de regreso. Tejer 71-75-77-79-81-83 pts, virar y tejer de regreso *. Repetir de *a*, es decir, 1 repetición = 2 vueltas en la parte de arriba y 8 vueltas en la parte de abajo. TIP PARA TOMAR LAS MEDIDAS: Medir la pieza colocada horizontalmente. Es importante no estirar la pieza en el momento de medir. ------------------------------------------------------ CHALECO: Tejer de un lado a otro, de ida y vuelta en la ag. Empezar en el centro del frente en la pieza delantera izquierda y terminar en el centro del frente en la pieza delantera derecha. NOTA: La fotografía del chaleco fue invertida. DELANTERO IZQUIERDO: Toda la pieza se teje en pt musgo, es decir, todas las vtas de derecho. Mon flojamente 115-120-125-129-134-138 pts en ag tamaño 3.5 mm con vista al mar Fabel. La 1ª vta se teje por el LD (= a partir de la orilla inferior en dirección al cuello). Tejer 3 cm sobre todos los pts (= borde), terminar después de 1 vta por el LR. RECUERDE MANTENER LA MISMA TENSIÓN DE TEJIDO DE LA MUESTRA! Continuar con VUELTAS CORTAS – ver explicación arriba! Continuar de esta manera hasta que la pieza mida aprox 23-25-27-30-33-35 cm a partir de la orilla de montaje (medida en la parte de abajo, en el lado más ancho) – LEER TIP PARA TOMAR LAS MEDIDAS! Después tejer en el lado de la manera sig: Tejer 1 cm de ida y vuelta solamente sobre los 64-67-70-72-74-76 pts a partir de la orilla inferior, Insertar 1 marcapuntos (MP) = centro del lado). Tejer 1 cm de ida y vuelta sobre los mismos pts, y deslizarlos en 1 gancho o seguro aux (terminar después de 1 vta por el LD, los pts serán usados en la pieza de la espalda más adelante). Después tejer la manga. MANGA IZQUIERDA: = 51-53-55-57-60-62 pts en la ag. Tejer de ida y vuelta con vueltas cortas en los mismos lugares que antes hasta que la pieza mida aprox 30-31-32-33-34-35 cm (en la parte de abajo, en el lado más ancho), terminar después de 1 vta por el LR. ESPALDA: Tejer los 64-67-70-72-74-76 pts del gancho o seguro aux de regreso en la ag (por el LR) = 115-120-125-129-134-138 pts. Continuar con vueltas cortas como antes. Cuando la pieza mida aprox 21-23-25-28-31-33 cm a partir del MP en el lado (medida en la parte de abajo, en el lado más ancho), insertar otro MP (= centro de la espalda). Continuar con vueltas cortas hasta que la pieza mida aprox 20-22-24-27-30-32 cm a partir del MP en el centro de la espalda (medida en la parte de abajo, en el lado más ancho). Ahora tejer el lado de la manera sig: Tejer 1 cm de ida y vuelta solamente sobre los 64-67-70-72-74-76 pts a partir de la orilla inferior. Insertar otro nuevo MP (= centro del lado). Tejer 1 cm de ida y vuelta sobre los mismos pts (terminar después de 1 vta por el LD), después deslizarlos en 1 gancho o seguro aux. Tejer la manga derecha. MANGA DERECHA: Tejer como la manga izquierda. DELANTERO DERECHO: Tejer los 64-67-70-72-74-76 pts del gancho o seguro aux de regreso en la ag (por el LR) = 115-120-125-129-134-138 pts. Continuar con vueltas cortas como lo hizo en la pieza de la espalda. Cuando se haya tejido el mismo número de vtas en la pieza delantera derecha que en la pieza delantera izquierda (menos el borde = 3 cm), tejer el borde de la manera sig: Tejer 1½ cm de ida y vuelta sobre todos los pts. En la vta sig por el LD, rem para los ojales de la manera sig (= a partir de la orilla inferior): Tejer 12 pts para todas las tallas, rem los 2 pts sig, * tejer 12-13-14-14-15-15 pts, rem los 2 pts sig *, repetir de *a* un total de 4 veces, tejer el resto de la vta. En la vta sig mon 2 nuevos pts sobre los pts rem. Tejer sobre todos los pts hasta que el borde mida un total de 3 cm. Rem flojamente. TERMINACIÓN: Trabajar en ganchillo con 2 hilos café y ag tamaño 4 mm de la manera sig: Empezar en la parte de abajo de la pieza delantera derecha con 1 p.b., * 2 cad, saltar aprox 1 cm, 1 p.b. *, repetir de *a* subiendo a lo largo de la pieza delantera derecha, del cuello, del escote de la espalda y bajando a lo largo de la pieza delantera izquierda, cortar los hilos y asegurar. Coser los botones. |
||||
Explicaciones del diagrama |
||||
|
||||
 |
||||
¿Terminaste este patrón?Entonces, etiqueta tus fotos con #dropspattern #edencardigan o envíalas a la galería #dropsfan. ¿Necesitas ayuda con este patrón?Encontrarás 6 videos tutoriales, un espacio para comentarios/preguntas y más visitando la página del patrón en garnstudio.com © 1982-2026 DROPS Design A/S. Todos los derechos reservados. Este documento, incluyendo todas sus sub-secciones, está protegido por los derechos de autor (copyright). Lee más acerca de lo que puedes hacer con nuestros patrones en la parte de abajo de cada patrón de nuestro sitio. |
||||


Con más de 40 años en el diseño de modelos de punto y de ganchillo, DROPS Design ofrece una de las más vastas colecciones de patrones gratuitos en el internet - traducidos en 17 idiomas. Al día de hoy, contamos con 324 catálogos y 12290 patrones - de los cuales 11675 están traducidos en español.
Nosotros trabajamos con mucho esmero para brindarte lo mejor que las labores de punto y ganchillo tienen para ofrecer,inspiración y consejos, así como hilos de magnífica calidad a precios increíbles! Te gustaría usar nuestros patrones para otro fin además del uso personal? Puedes leer acerca de lo que estás permitida a hacer en el texto de Copyright en la parte de abajo de todos nuestros patrones. Felices labores!
Escribe un comentario sobre DROPS 134-4
¡Nos encantaría saber qué piensas acerca de este patrón!
Si quieres escribir una pregunta referente al patrón, por favor asegúrate de elegir la categoría correcta en el formulario debajo, para acelerar el proceso de respuesta. Los campos obligatorios están marcados con un *.