
Categorías populares
¿Buscas un hilo?


Comentarios / Preguntas (23)
![]() Joanna escribió:
Joanna escribió:
In M1, where do you place the stitch marker for the mid back? Do you place it at st #1 at the beginning of row, or on st #34?
01.01.2026 - 02:02DROPS Design respondió:
Hi Joanna, between the first and last stitch in round. Happy knitting!
05.01.2026 - 13:32
![]() Joanna escribió:
Joanna escribió:
M1 is for 33 sts. You said to cast on 88 sts. So if you repeat the pattern twice (66sts), what happens to the remaining 22 sts?
07.12.2025 - 19:49DROPS Design respondió:
Hi Joanna, you have to repeat M1 for the 3rd time (from the beginning) and work 22 remaining stitches. Please see the lesson HERE and 'When stitch count doesn’t match whole repeats of diagram'. Happy knitting!
07.12.2025 - 20:32
![]() Nicole escribió:
Nicole escribió:
Hallo, ik ben bezig met de sokken en ben bijna klaar met M2, dan begin ik met M3, met nog 68 st. op de naald. M3 is 30 st met daarbij 2 delen van 4 av. In het patroon staat dat ik bij een hoogte van 28-29-30 cm in de av delen 2x moet minderen, van 6 av naar 4 av, maar hoe kan dat als ik maar 4 av had?
08.02.2020 - 09:38DROPS Design respondió:
Dag Nicole<,/p>
Deze 6 averecht steken zitten in het midden van M.3, het is de bedoeling dat je daar mindert.
09.02.2020 - 11:26
![]() Aissela Laudo escribió:
Aissela Laudo escribió:
Grazie mille per il consiglio. Allora chiedo anche se mi potete indicare su quanti ferri a doppia punta metter su i punti iniziali (3, 4 o altro) e...come meglio dividerli su questi. Grazie ancora,sempre chiari e gentili.
27.04.2018 - 23:23DROPS Design respondió:
Buongiorno Aissela. Generalmente le maglie vengono divise in parti uguali sui ferri. Può usare 4 ferri a doppia punta; quando poi il numero delle maglie si riduce bastano 3 ferri. Valuti sempre in base a quale soluzione le consente di lavorare il più comodamente possibile. Buon lavoro!
28.04.2018 - 08:46
![]() Aissela Laudo escribió:
Aissela Laudo escribió:
Non appena avrò finito il modello Kaia inizierò questo bellissimo progetto. Posso chiedere se è possibile lavorarlo con ferri circolari anziché a doppia punta e nel caso che lunghezza cavo? Grazie in anticipo
23.04.2018 - 02:46DROPS Design respondió:
Buongiorno Aissela, potrebbe provare ad utilizzare i ferri circolari da 23 cm, ma in ogni caso ad un certo punto andranno utilizzati i ferri a doppia punta, a causa del numero di maglie troppo basso. Buon lavoro!
23.04.2018 - 11:17
![]() Liz escribió:
Liz escribió:
Just to clarify the previous answer, should the decreases in the large P sections be done on the same rows where the decreases are occurring in the M2 pattern? Or should they be done on a different row? Thank you!!
07.02.2018 - 01:47DROPS Design respondió:
Dear Liz, the decreases in the large P sections will occur on different places as in M2 pattern, they start when piece measures 12 cm and are repeated then every 4th cm a total of 3 times while decrease in M2 patterns are shown in diagram. Happy knitting!
07.02.2018 - 09:07
![]() Liz escribió:
Liz escribió:
I am enjoying working on this pattern. I am having trouble understanding where to decrease in the large P sections (where I would be decreasing from 92 sts on my needles to 68sts). I understand that at the end of section M2 there should be 68sts and I should be decreasing 3 times in the P sections does this happen on the same rows that there are decreases in the patterned sections? Thanks in advance for the help.
03.02.2018 - 02:41DROPS Design respondió:
Dear Liz, you dec 4 sts in each of the large P sections a total of 3 times (= 4 sts x 2 sections x 4 times = 12 sts dec in the large P sections) + dec 6 sts in each M.2 pattern - see diagram (= 6 sts x 2 repeats = 12 sts dec) = 92 sts - 12 - 12 = 68 sts remain when all dec in P-sections are done and after M.2 has been completed in height. Happy knitting!
05.02.2018 - 10:54
![]() Erin escribió:
Erin escribió:
Sorry to have to ask another question, I am trying to understand how the decreases occur in section M2. Which row do they occur in on the M2 diagram? Where I see 2 less stitches in each row of the diagram? Thank you!
21.01.2018 - 02:37DROPS Design respondió:
Hi Erin, The 2 squares with the dark triangle inside (the last symbol in the list where the instructions say purl 2 together) is where you decrease in M2. The symbol is first on row 29 where the 3rd and 4th stitches on the row and the 33rd and 34th stitches are purled together and then again on rows 35 and 41, where you purl 2 stitches together each time you reach the symbol. I hope this helps and happy knitting!
21.01.2018 - 07:15
![]() Erin escribió:
Erin escribió:
I'm new to knitting socks, as I'm reading the pattern should I be starting at the bottom of M1 diagram and work up (as it appears I do this for the M2 diagram)?
15.01.2018 - 04:24DROPS Design respondió:
Hi Erin, Yes, unless stated otherwise, the diagrams are always read from bottom right to bottom left and then on upwards. Happy knitting!
15.01.2018 - 06:09
![]() Trine escribió:
Trine escribió:
Nå har jeg telt og finlest om og om igjen, og det står når man begynner på M2 at man skal strikke sammen to og to masker over fletten i det feltet med vrange masker. Da blir det etter hva jeg forstår bare 10 masker igjen i dette feltet og 92 masker på pinnen. Så når jeg har strikket 12 cm, står det at jeg skal felle to masker i dette feltet og da ha 10 masker igjen. Men etter den forrige fellingen hadde jeg bare 10 masker igjen allerede. Hva har jeg gått glipp av?
15.09.2017 - 13:27DROPS Design respondió:
Hei Trine. Det at det står = 10 m er at det gjelder de 2 store vr-partiene som er på 10 masker, men etter fellingene er det 8 masker i hver at de 2 store vr-partiene (= 8 masker). God Fornøyelse!
20.09.2017 - 11:44
|
||||||||||||||||||||||
Riverdance#riverdancesocks |
||||||||||||||||||||||
 |
 |
|||||||||||||||||||||
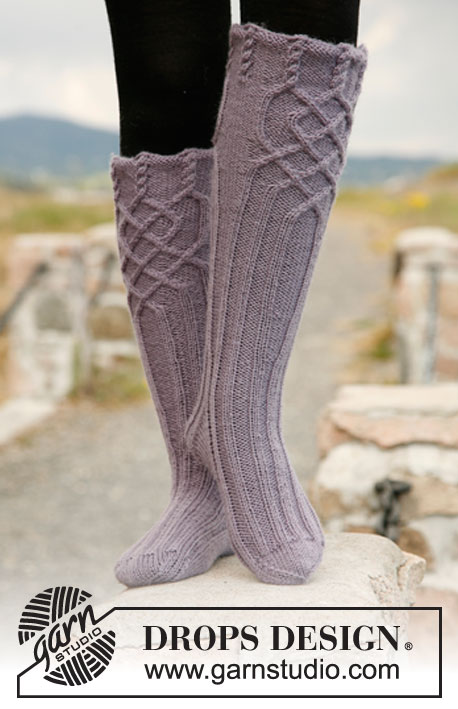
Calcetas DROPS, de punto, con torsadas / trenzas en “Karisma”.
DROPS 132-8 |
||||||||||||||||||||||
|
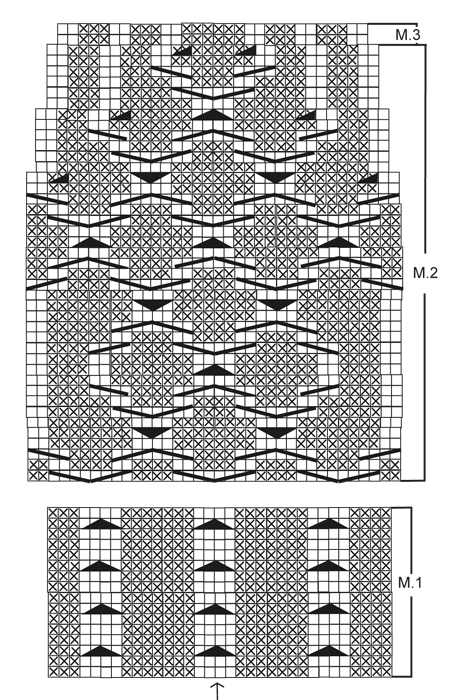
PATRÓN: Ver diagramas M.1, M.2 y M.3 – los diagramas son vistos por el LD y muestran 1 repetición del patrón a lo ancho y a lo alto. DISMINUCIÓN DEL TALÓN: 1ª vuelta (= LD): Tejer hasta que resten 8 pts, deslizar 1 pt de derecho, 1d, pasar el pt desl por encima, virar la pieza. 2ª vuelta (= LR): Tejer hasta que resten 8 pts, desl 1 pt de revés, 1r, pasar el pt desl por encima, virar la pieza. 3ª vuelta (= LD): Tejer hasta que resten 7 pts, desl 1 pt de derecho, 1d, pasar el pt desl por encima, virar la pieza. 4ª vuelta (= LR): Tejer hasta que resten 7 pts, desl 1 pt de revés, 1r, pasar el pt desl por encima, virar la pieza. Continuar dism de esta manera, con 1 pt menos antes de cada dism, hasta tener 12 pts en la ag. ------------------------------------------------------ CALCETA: Tejer en redondo, en ag de doble punta. Mon 88 pts para todos los tamaños en ag de doble punta tamaño 3 mm con Karisma. Tejer 1 vta de derecho, después tejer el diagrama M.1, insertar un marcapuntos (MP) al inicio de la vta (= centro de la parte de atrás). AL MISMO TIEMPO en la última vta en el diagrama M.1, aum 1 pt en cada sección de pts reveses tejiendo 2 pts reveses en el primer pt revés en todas las secciones de pts reveses (para la sección de pts reveses en el centro de la parte de atrás hacer el aum al final de la vta) = 96 pts. Cambiar a ag de doble punta tamaño 3.5 mm y cont de la manera sig: Tejer el diagrama M.2 sobre los primeros 36 pts, tejer los 12 pts sig de revés – al mismo tiempo tejer juntos de derecho, de 2 en 2, los 4 pts sobre la torsada (es decir, dism 2 pts), tejer el diagrama M.2 sobre los 36 pts sig y tejer los últimos 12 pts de revés – al mismo tiempo tejer juntos de derecho, de 2 en 2, los 4 pts sobre la torsada (es decir, dism 2 pts) = 92 pts. Cont de esta manera hacia arriba con el diagrama M.2 y pts reveses en cada lado. RECUERDE MANTENER LA MISMA TENSIÓN DE TEJIDO DE LA MUESTRA! Cuando la pieza mida 12 cm, dism 2 pts en cada una de las secciones grandes de pts reveses (= 10 pts) en cada lado – es decir, que los primeros 2 y los últimos 2 pts reveses son tejidos juntos. Repetir la dism cada 4 cm un total de 3 veces. Cuando el diagrama M.2 ha sido tejido, la pieza mide aprox 20 cm y tenemos un total de 68 pts en la ag. Cont con el diagrama M.3 sobre el diagrama M.2 y 4 pts reveses en cada lado. Cuando la pieza mida 28-29-30 cm, dism 2 pts en la sección grande de pts reveses en el frente y en la parte de atrás (es decir, 6 pts reveses se convierten en 4 pts reveses) = 64 pts. Cuando la pieza mida 33-34-35 cm, dism todos los 4 pts reveses a 2 pts reveses (es decir, dism 8 pts) = 56 pts. Cuando la pieza mida 38-40-42 cm, dejar los primeros 26 pts (del inicio de la vta) en la ag para el talón (ver la flecha en el diagrama, esto marca el centro de la parte de atrás y centro de la parte del frente). Desl los 30 pts restantes en un gancho o seguro aux (= centro del empeine). Cont con el patrón como antes sobre los 26 pts del talón por 5-5½-6 cm. Insertar un MP, medir el pie desde aquí. Después tejer la DISMINUCIÓN DEL TALÓN en pt jersey sobre todos los pts – ver explicación arriba! Después de la dism del talón, levantar 11-12-13 pts en cada lado del talón y desl los 30 pts del gancho o seguro aux de regreso en la ag = 64-66-68 pts. Insertar un MP en cada lado de los 30 pts centrales en el empeine. Cont el patrón como antes sobre estos pts y pt jersey sobre los pts restantes – Al mismo tiempo tejer juntos retorcidos de derecho los últimos 2 pts ANTES del primer MP en el empeine (es decir, tejer por atrás del pt en vez de adelante) y tejer juntos de derecho los primeros 2 pts DESPUÉS del MP en el empeine. Repetir la dism en vtas alternas un total de 8-9-8 veces = 48-48-52 pts. Cont hasta que la pieza mida 18-20-22 cm a partir del MP en el talón (= aprox 4-4-5 cm restantes). Insertar un MP en cada lado para tener 24-24-26 pts en el empeine y 24-24-26 pts en la parte de abajo del pie. Tejer todos los pts de derecho AL MISMO TIEMPO que dism para los dedos en cada lado de ambos MP de la manera sig: Tejer hasta que resten 3 pts antes del MP, 2 pjd, 2d (el MP queda entre estos 2 pts), 2 pts juntos retorcidos de derecho. Repetir la dism en vtas alternas un total de 4-4-5 veces y después en cada vta un total de 6 veces = 8 pts restantes en la ag. Cortar el hilo, pasar a través de los pts restantes, fruncir y asegurar. |
||||||||||||||||||||||
Explicaciones del diagrama |
||||||||||||||||||||||
|
||||||||||||||||||||||
 |
||||||||||||||||||||||
¿Terminaste este patrón?Entonces, etiqueta tus fotos con #dropspattern #riverdancesocks o envíalas a la galería #dropsfan. ¿Necesitas ayuda con este patrón?Encontrarás 10 videos tutoriales, un espacio para comentarios/preguntas y más visitando la página del patrón en garnstudio.com © 1982-2026 DROPS Design A/S. Todos los derechos reservados. Este documento, incluyendo todas sus sub-secciones, está protegido por los derechos de autor (copyright). Lee más acerca de lo que puedes hacer con nuestros patrones en la parte de abajo de cada patrón de nuestro sitio. |
||||||||||||||||||||||


Con más de 40 años en el diseño de modelos de punto y de ganchillo, DROPS Design ofrece una de las más vastas colecciones de patrones gratuitos en el internet - traducidos en 17 idiomas. Al día de hoy, contamos con 324 catálogos y 12290 patrones - de los cuales 11685 están traducidos en español.
Nosotros trabajamos con mucho esmero para brindarte lo mejor que las labores de punto y ganchillo tienen para ofrecer,inspiración y consejos, así como hilos de magnífica calidad a precios increíbles! Te gustaría usar nuestros patrones para otro fin además del uso personal? Puedes leer acerca de lo que estás permitida a hacer en el texto de Copyright en la parte de abajo de todos nuestros patrones. Felices labores!
Escribe un comentario sobre DROPS 132-8
¡Nos encantaría saber qué piensas acerca de este patrón!
Si quieres escribir una pregunta referente al patrón, por favor asegúrate de elegir la categoría correcta en el formulario debajo, para acelerar el proceso de respuesta. Los campos obligatorios están marcados con un *.