
Categorías populares
¿Buscas un hilo?


Comentarios / Preguntas (163)
![]() Anja escribió:
Anja escribió:
Liebes Drops Team, ich hätte um ein Haar Geld für eure Anleitung bezahlt, da diese auf etsy angeboten wird - ohne Urheberrechtsverweis, sogar euer Bild wurde verwendet. Ich finde das wirklich dreist. Die Verkäuferin nennt sich carolrosa und der Artikel wird "Knitting Pattern Asymetrical Jacket - Ladies Longline Cardigan Sweater" genannt.
30.12.2025 - 19:34DROPS Design respondió:
Liebe Anja, herzlichen Dank für den Hinweis! Wir gehen dem nach. Ihnen weiterhin viel Spaß mit unseren kostenlosen Anleitungen!
24.02.2026 - 18:03
![]() Hanna Matter escribió:
Hanna Matter escribió:
Ich arbeite am Modell 131-8. Wie genau muss ich den Kragen zusammennähen ? Wo gehört der hin? Danke!
08.01.2024 - 22:59DROPS Design respondió:
Liebe Frau Matter, in diesem Video zeigen wir, wie man so einen einfachen Schalkragen strickt, hier stricken Sie Zopf wie zuvor. Am Ende nähen Sie die abgeketteten Maschen vom beiden Schalkragen zusammen, und dann den Kragen am Halsausschnitt. Viel Spaß beim fertigstellen!
09.01.2024 - 07:56
![]() Catarina Samuelsson escribió:
Catarina Samuelsson escribió:
Hej, Jag skall börja avmaskning för ärmhålet på bakstycket. Vid tidigare avmaskning så uppmanar ni att man skall läsa Minskningstips som gäller bakstycket men där står inte hur man skall göra när man maskar av t.ex 3 maskor i varje sida. Jag förstår inte hur jag skall göra.
07.11.2023 - 19:06DROPS Design respondió:
Hei Catarina. Når du skal felle av til ermhull, feller du av som vanlig. Første gang feller du av 3 masker. Se hjelpevideoen: Luk af - retsiden, om du er usikker på hvordan det felles. Neste gang fra retten feller du av 2 masker (husk å se antaller ganger i den størrelsen du strikker etter, 0-1-2-3-5-7 ganger), og deretter felles det av 1 maske ( 1-2-2-4-4-5 ganger). mvh DROPS Design
13.11.2023 - 10:25
![]() Trish escribió:
Trish escribió:
I have just started the cabling and don't understand the pattern chart. The image of the jacket appears to show a continuous cable, but the pattern chart shows only one row of cabling (row 3) followed by 5 rows of normal stocking stitch. Should the cable pattern be repeated every RS row?
05.11.2023 - 11:45DROPS Design respondió:
Dear Trish, when working a cable you work several straight (normal stocking stitch) rows and one row where you actually cable. The row with cable will create the necessary shape for the rest of the rows; you don't need to cable stitches every other row for this pattern. Happy knitting!
05.11.2023 - 19:49
![]() Tami Williams escribió:
Tami Williams escribió:
After seeing another person share someone selling this design on eBay from the UK, I also see another Drops pattern from the same seller. I wonder just how many copyrighted designs they have in their store. Same for the Etsy seller... just saying.
12.03.2023 - 22:08
![]() Tami Williams escribió:
Tami Williams escribió:
I have been trying to let you know that this design is listed for sale. But I cannot seem to make that happen. If you would like more information, please email me.
12.03.2023 - 22:03
![]() DIANE WREN escribió:
DIANE WREN escribió:
Just wanted you to know that someone is selling this on Ebay and is charging for photocopies of your pattern. They call it LC005 KNITTING PATTERN LADIES SWING JACKET WITH SHAPED HEM IN ARAN SIZES 28 - 62 They even used your original photos. I do not appear to be able to send links in this box to the actual item but here is the Ebay number 264294164130
24.09.2022 - 00:31
![]() Lesley escribió:
Lesley escribió:
Can you tell me the size in cm of the pattern S-M-L-XL-XXL-XXXL please. Currently, I do not know which size to knit. Thank you
02.02.2022 - 20:50DROPS Design respondió:
Hi Lesley, You will find a measurements chart for all the sizes at the bottom of the pattern. Happy knitting!
03.02.2022 - 07:22
![]() Christina Nilsson escribió:
Christina Nilsson escribió:
Hej! Var inne på ”Etsy..com” och hittade där denna beskrivning, samma foto dessutom, men man sålde det för 16.11 kronor. Tyckte detta var märkligt så jag beslöt mig för att signalera det till er.
19.01.2022 - 00:03DROPS Design respondió:
Hej Christina. Tack för info, det ska vi undersöka! Alla våra mönster är gratis och får inte tas betalt för. Mvh DROPS Design
21.01.2022 - 10:54
![]() Patti Warcup escribió:
Patti Warcup escribió:
Hi. I have just finished this beautiful pattern but the arms don’t fit onto the main piece of the garment. I have been over and over the pattern and cannot see where I have gone wrong. The arm shoulder seam would be out by about 2” too narrow on both sides. Help!
25.03.2021 - 15:42DROPS Design respondió:
Dear Mrs Warcup, pin the sleeve along the armhole so that the cast off stitches on sleeve match the cast off stitches on body, the whole top of sleeve should now match the armhole. Hope this will help.
25.03.2021 - 16:22
|
|||||||||||||
Medieval#medievaljacket |
|||||||||||||
 |
 |
||||||||||||
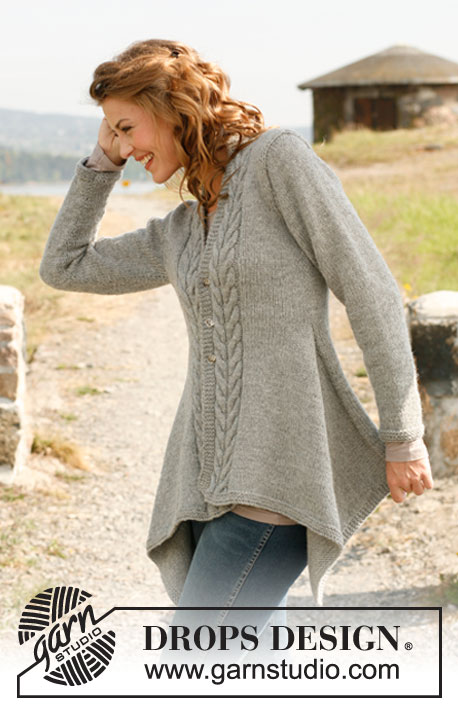
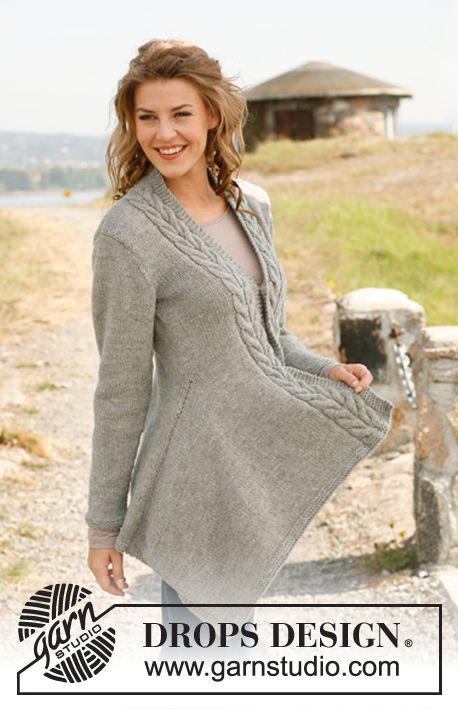
Saco asimétrico DROPS, de punto, con torsadas / trenzas en “Nepal”. Talla: S – XXXL.
DROPS 131-8 |
|||||||||||||
|
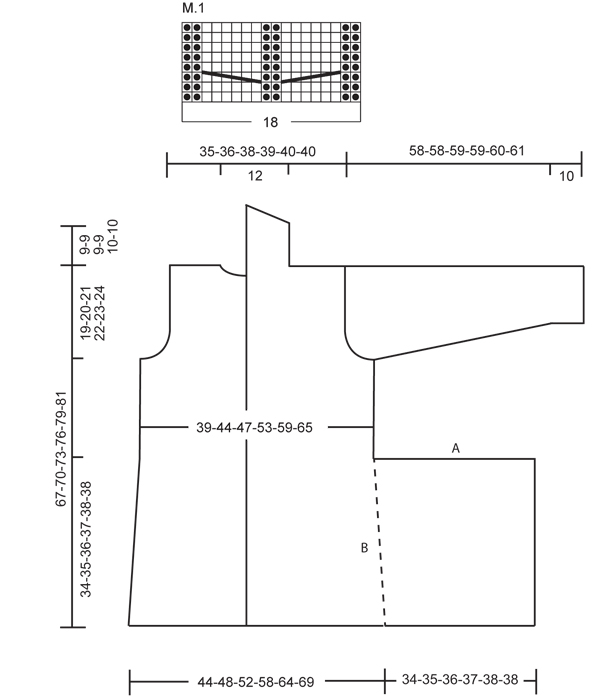
PT MUSGO (de ida y vuelta en la ag): Todas las vtas de derecho. TIP PARA DISMINUCIÓN (aplica a la pieza de la espalda): Todas las dism son hechas por el LD. Dism 1 pt en cada lado de la manera sig: Tejer 2 pts, deslizar 1 pt de derecho, 1d, pasar el pt desl por encima. Tejer hasta que resten 4 pts en la ag, tejer juntos de derecho los 2 pts sig, tejer los últimos 2 pts. PATRÓN: Ver diagrama M.1 (el diagrama muestra el patrón por el LD). OJALES: Rem para 3 ojales en el borde delantero derecho. 1 OJAL = rem el 4º pt a partir de la orilla y mon 1 nuevo pt en la vta sig sobre este pt. Rem para los ojales cuando la pieza mida aprox: TALLA S: 26, 33, 40 cm TALLA M: 27, 34, 41 cm TALLA L: 29, 36, 43 cm TALLA XL: 30, 37, 44 cm TALLA XXL: 32, 39, 46 cm TALLA XXXL: 33, 40, 47 cm ------------------------------------------------------ ESPALDA: Tejer de ida y vuelta en ag circular. Mon 76-84-90-100-110-120 pts (incl 1 pt de orillo en pt musgo en cada lado) en ag circular tamaño 5 mm con Nepal. Tejer 6 vtas en pt musgo – Ver explicación arriba. Después tejer en pt jersey con 1 pt de orillo en pt musgo en cada lado (1ª vta = LD). Cuando la pieza mida 10 cm, dism 1 pt en cada lado – Leer TIP PARA DISMINUCIÓN arriba. Repetir la dism cada 6-7-7-8-8-8 cm un total de 4 veces = 68-76-82-92-102-112 pts. RECUERDE MANTENER LA MISMA TENSIÓN DE TEJIDO DE LA MUESTRA! Insertar un marcapuntos (MP) en el pt de orillo en cada lado cuando la pieza mida 34-35-36-37-38-38 cm (= marcadores para la terminación). Cuando la pieza mida 48-50-52-54-56-57 cm, rem para las sisas, en cada lado, en vtas alternas, de la manera sig: 3 pts 1 vez, 2 pts 0-1-2-3-5-7 veces y 1 pt 1-2-2-4-4-5 veces = 60-62-64-66-68-68 pts. Cuando la pieza mida 65-68-71-74-77-79 cm, rem los 18 pts centrales para el cuello y terminar cada hombro por separado. Dism 1 pt en la vta sig a partir del cuello = 20-21-22-23-24-24 pts restantes en cada hombro. Rem cuando la pieza mida 67-70-73-76-79-81 cm. DELANTERO IZQUIERDO: Tejer de ida y vuelta en ag circular. Mon 104-110-116-122-128-134 pts en ag circular tamaño 5 mm. Tejer 6 vtas en pt musgo, tejer la vta sig (= LD) de la manera sig: 4 pts en pt musgo (= orilla inferior), tejer en pt jersey hasta que resten 22 pts en la ag, tejer el diagrama M.1 (= 18 pts), y terminar con 4 pts en pt musgo (= pts del borde en el centro del frente). Tejer de esta manera hasta que la pieza mida 34-35-36-37-38-38 cm, después rem los primeros 57-59-62-63-64-65 pts por el LD = 47-51-54-59-64-69 pts. Continuar con el diagrama M.1 y pts del borde en el centro del frente como antes. Cuando la pieza mida 48-50-52-54-56-57 cm, rem para la sisa en el lado, como lo hizo en la pieza de la espalda = 43-44-45-46-47-47 pts. Cuando la pieza mida 67-70-73-76-79-81 cm, rem los primeros 20-21-22-23-24-24 pts por el LD para el hombro en todas las tallas = 23 pts restantes para el cuello en todas las tallas. Tejer la vta sig por el LD de la manera sig: 1 pt de orillo en pt musgo, diagrama M.1 y terminar con 4 pts en pt musgo. Tejer de esta manera hasta que el cuello mida 9 cm medido a partir del hombro. Ahora rem los primeros 7 pts al inicio de las 2 vtas sig por el LD, después rem flojamente los 9 pts restantes. DELANTERO DERECHO: Tejer como la pieza del delantero izquierdo, pero a la inversa y sin ojales en el borde – Leer explicación arriba. MANGA: Tejer de ida y vuelta en ag circular. Mon 36-38-38-40-42-44 pts (incl 1 pt de orillo en cada lado) en ag circular tamaño 5 mm. Tejer 6 vtas en pt musgo (1ª vta = LD), después tejer en pt jersey hasta completar las medidas. Cuando la pieza mida 10 cm, aum 1 pt en cada lado. Repetir el aum cada 5½-4½-4-3½-3-3 cm un total de 7-8-9-10-11-11 veces = 50-54-56-60-64-66 pts. Cuando la pieza mida 47 cm en todas las tallas, rem para el copete de manga, en cada lado, en vtas alternas, de la manera sig: 3 pts 1 vez, 2 pts 1-2-2-2-2-2 veces, 1 pt 2-1-2-3-4-5 veces. Cuando la pieza mida 53-53-54-54-55-56 cm, rem en cada lado, en vtas alternas, de la manera sig: 1 pt 2 veces, 2 pts 2 veces y 3 pts 1 vez = 18-20-20-22-24-24 pts. Rem flojamente todos los pts. Ahora la pieza mide aprox 58-58-59-59-60-61 cm. Tejer la otra manga. TERMINACIÓN: Hacer las costuras de los hombros. Unir el cuello con una costura en el centro de la parte de atrás y coser a la parte de atrás del cuello, a 1 pt del pt de orillo. Montar las mangas. Hacer las costuras laterales a 1 pt del pt de orillo de la manera sig: Coser A (= orilla de rem en la pieza delantera) contra B (= lado de la pieza de la espalda) – ver diagrama. NOTA! Ajustar para que la orilla de rem en cada pieza delantera sea cosida hasta el MP en la pieza de la espalda, después continuar la costura lateral como antes, a 1 pt del pt de orillo, y hacer las costuras de manga en una. Coser los botones en el borde delantero izquierdo. |
|||||||||||||
Explicaciones del diagrama |
|||||||||||||
|
|||||||||||||
 |
|||||||||||||
¿Terminaste este patrón?Entonces, etiqueta tus fotos con #dropspattern #medievaljacket o envíalas a la galería #dropsfan. ¿Necesitas ayuda con este patrón?Encontrarás 14 videos tutoriales, un espacio para comentarios/preguntas y más visitando la página del patrón en garnstudio.com © 1982-2026 DROPS Design A/S. Todos los derechos reservados. Este documento, incluyendo todas sus sub-secciones, está protegido por los derechos de autor (copyright). Lee más acerca de lo que puedes hacer con nuestros patrones en la parte de abajo de cada patrón de nuestro sitio. |
|||||||||||||


Con más de 40 años en el diseño de modelos de punto y de ganchillo, DROPS Design ofrece una de las más vastas colecciones de patrones gratuitos en el internet - traducidos en 17 idiomas. Al día de hoy, contamos con 324 catálogos y 12290 patrones - de los cuales 11685 están traducidos en español.
Nosotros trabajamos con mucho esmero para brindarte lo mejor que las labores de punto y ganchillo tienen para ofrecer,inspiración y consejos, así como hilos de magnífica calidad a precios increíbles! Te gustaría usar nuestros patrones para otro fin además del uso personal? Puedes leer acerca de lo que estás permitida a hacer en el texto de Copyright en la parte de abajo de todos nuestros patrones. Felices labores!
Escribe un comentario sobre DROPS 131-8
¡Nos encantaría saber qué piensas acerca de este patrón!
Si quieres escribir una pregunta referente al patrón, por favor asegúrate de elegir la categoría correcta en el formulario debajo, para acelerar el proceso de respuesta. Los campos obligatorios están marcados con un *.