
Categorías populares
¿Buscas un hilo?


Comentarios / Preguntas (15)
![]() Barbara escribió:
Barbara escribió:
Guten Tag Ich habe eine Frage zu den verkürzten Reihen. Ist es richtig, dass über die ganzen 4 x Verkürzen die 10 M auf dem Hilfsfaden bleiben und ich 8 Maschen stricken soll, wenden, zurück und das 4 x? Vielen Dank für Ihre Antwort und herzlichen Gruss Danke auch für die immer tollen Anleitungen!
20.08.2023 - 16:16DROPS Design respondió:
Liebe Barbara, am Anfang einer Hinreihe stricken Sie die ersten 10 Maschen und legen Sie diese Maschen still, dann stricken Sie diese Hinreihe bis zur Ende, wenden Sie und stricken Sie die Rückreihe. Diese 2 Reihen insgesamt 4 Mal stricken (es sind dann 10 M x 4 = 40 Maschen auf dem Faden) und 8 bis 20 M (siehe Größe) übrig auf der Nadel. Viel Spaß beim stricken!
21.08.2023 - 09:07
![]() MSHARRY escribió:
MSHARRY escribió:
I am working on th e section where I hav just finished all the cast offs and cast ons and I have 56 sts on the needle. The next step says to work in stocking stwhen piece measures 20 cm work short rows Does that mean I measure from where I have the 56 sts to do the stocking st. till I have 20 cm and then work the short rows?
06.11.2019 - 21:24DROPS Design respondió:
Dear MSHarry, the 20 cm should be measured from the markers added on each side after 13 cm ie where pattern says to measure piece from here. Happy knitting!
07.11.2019 - 09:06
![]() MSHARRY escribió:
MSHARRY escribió:
I am at the section of the pattern where it says repeat inc when edge measure 5 and 8 cm. When I have done the increases every third p section to 3 sts and I have 224 sts I do not understand where to displace inc . Can you make this a little more clearly?
02.10.2019 - 03:10DROPS Design respondió:
Dear MsHarry, after first increase you should have: *K3, P3, K3, P2, K3, P2*, repeat from *-* all the round - after 2nd increase you should have *K3, P3, K3, P3, K3, P2*, repeat from *-* all the round and after last increase you should have *K3, P3, K3, P3, K3, P3**, repeat from *-* all the round = K3/P3 on the round. Happy knitting!
02.10.2019 - 08:25
![]() MSHARRY escribió:
MSHARRY escribió:
IF YOU READ THE SECTION WHERE IT SAYS TOWARDS FRONT PIECE, WOULDN'T THE 4 ROW BE ON TOWARD THE BACK PIECE, OR AM I NOT READING THIS PROPERLY. ANY HELP WILL BE APPRECIATED
16.07.2019 - 16:13DROPS Design respondió:
Dear Mrs Msharry, the right hand side of piece seen from RS is the front piece, while the left hand side of the piece seen from RS is back piece. For front piece, you will cast off at the beg of a RS row, and for back piece you will cast on new stitches at the end of a RS row. Happy knitting!
17.07.2019 - 10:56
![]() MSHARRY escribió:
MSHARRY escribió:
When you are doing cast off and dec. how can the pattern read dec on every 4th row? Wouldn't that be on the towards the back instead of towards the front?
16.07.2019 - 03:04DROPS Design respondió:
Hi MSHARRY, The first decrease is from the right side, so all the following 4th rows will also be from the right side. Happy knitting!
16.07.2019 - 06:58
![]() Charlotte Lücking escribió:
Charlotte Lücking escribió:
Jeg har striket modellen i Paris str. M - det er ikke nok med 250 g. Jeg måtte købe et nøgle ekstra - surt når man handler online, og derved kommer til at betale porto to gange 😔
15.01.2016 - 13:58
![]() Drops Design escribió:
Drops Design escribió:
Hi Stephanie, yes, make sure last row you work is worked from WS so that next row will begin a RS row.
19.12.2011 - 17:45
![]() Stephanie Gum escribió:
Stephanie Gum escribió:
Does "adjust so that last row is from WS" mean to the next row should begin a RS row? Or does it mean the next row should begin a WS row?
19.12.2011 - 13:49Myriam escribió:
Beautiful shape
02.02.2011 - 18:02
![]() Carole escribió:
Carole escribió:
I love shrugs. This one looks wonderful.
31.01.2011 - 03:32
|
||||
Spring Flutter#springflutterbolero |
||||
 |
 |
|||
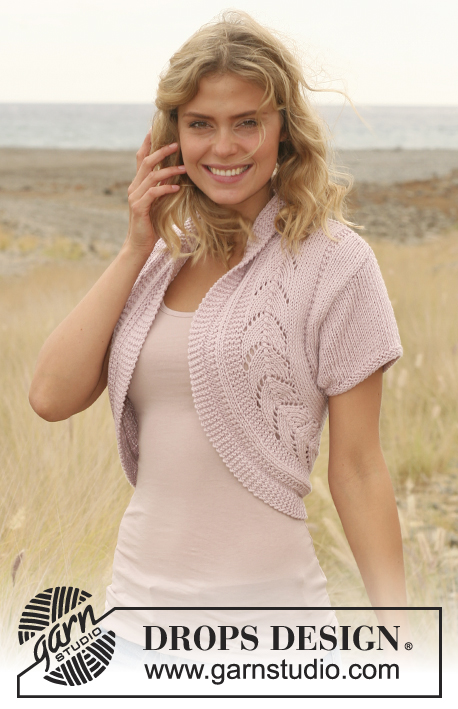
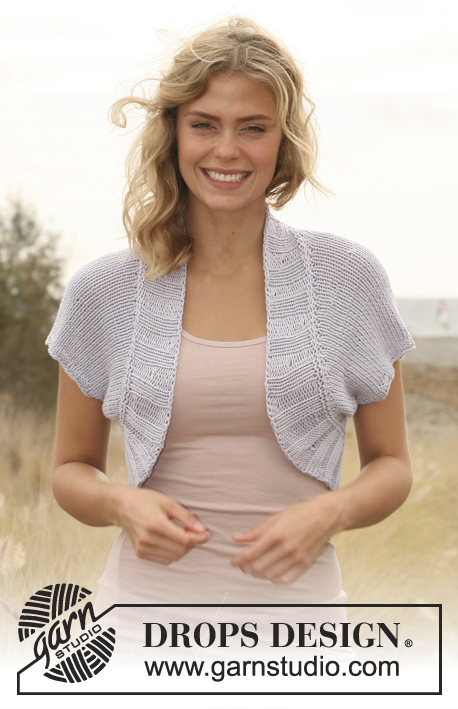
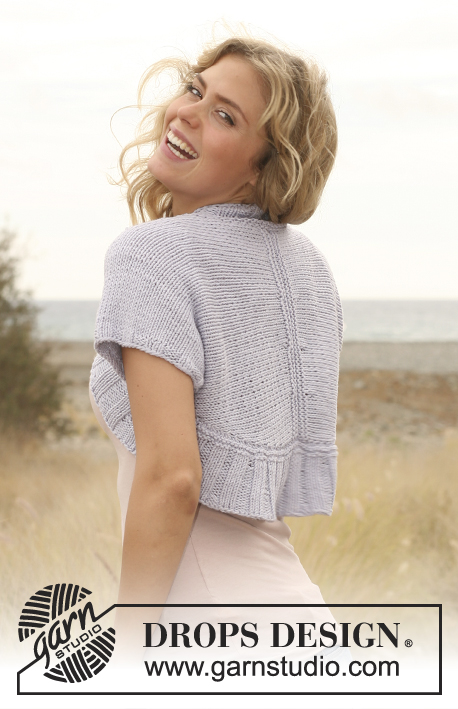
Bolero de punto DROPS en "Paris". Talla: S - XXL.
DROPS 130-13 |
||||
|
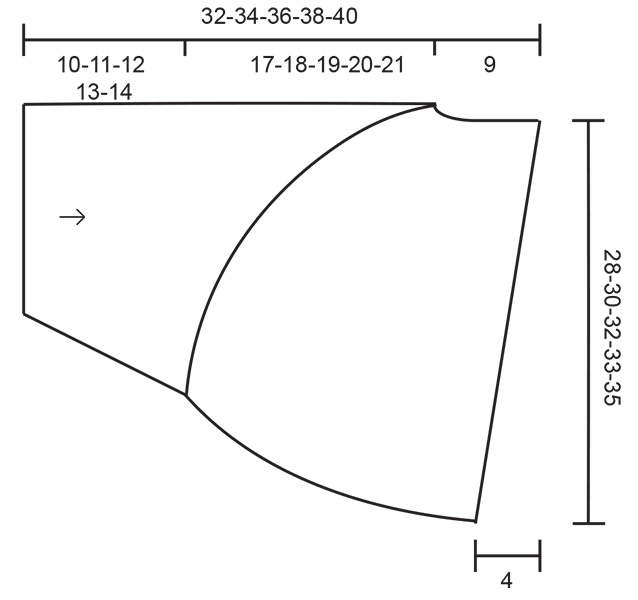
PT MUSGO: (ida y vta en ag): todas las filas del derecho. (en redondo en ag circular): *1 vta del derecho, 1 vta del revés*, repetir de * a *. ------------------------------------------------------------------------------- PARTE DERECHA: Se trabaja de ida y vta en ag. Mont 54-54-60-66-72 pts en ag circular tamaño 4.5 mm con Paris y trabajar 1 fila del revés por el LR, después trabajar en pt elástico comenzando por el LD como sigue: 1 pt orillo en pt musgo, 2 d., *3 r., 3 d.*, repetir de * a * un total de 8-8-9-10-11 vcs, finalizar con 2 r., 1 pt orillo en pt musgo. Cuando la labor mida 2 cm , cambiar a ag tamaño 5 mm y trabajar en pt jersey, AL MISMO TIEMPO aum el número de pts de manera equitativa hasta los 56-58-62-68-72 pts. Cuando la labor mida 3 cm, aum 1 pt en cada lado, repetir el aum cada 1.5-1.5-1.5-2-2 cm un total de 5-6-6-5-5 vcs = 66-70-74-78-82 pts. Cuando la labor mida 10-11-12-13-14 cm, insertar un marcapuntos (MP) a cada lado (ajustar para que la última fila es por el LR) - ahora tome las medida desde aquí. Ahora cerrar y dism en el lado derecho de la labor (=hacia el delantero), al mismo tiempo mont pts nuevos en el lado izquierdo de la labor (= hacia la espalda) como sigue: Hacia el delantero: Cerrar en cada segunda fila 3 pts 4 vcs y 2 pts 9-10-11-12-13 vcs, después dism en cada 4ª fila1 pt 3 vcs. Hacia la espalda: En cada segunda fila mont 2 pts 3 vcs y 1 pt 5-6-7-6-9 vcs, después dism en cada 4ª fila 1 pt 4-4-4-5-4 vcs. Después de todas las dism, los aum y los cierres hay 48-51-54-56-60 pts en la ag. Continuar en pt jersey. Cuando la labor mida 17-18-19-20-21 cm ( ajustar para que la última fila es por el LD), trabajar las filas acortadas para la espalda como sigue: Tejer 10 pts y desl estos pts a un gancho aux (= parte inferior de la espalda) - repetir un total de 4 vcs al inicio de cada fila por el LR (un total de 40 pts en el gancho aux) = 8-11-14-16-20 pts quedan en ag. En la sig fila por el LD, desl todos los pts del gancho aux de vta a la ag y tejer 4 fila en pt musgo (ver explicación arriba) sobre todos los pts. Rem. No retire los marcadores aún. PARTE IZQUIERDA: Mont los pts y trabajar como la parte derecha pero con los aum, dism, pts cerrados y pts montados en el lado opuesto. TERMINACIÓN: Coser las mangas dentro de 1 pt orillo hasta el MP. Unir las dos partes en el centro de la espalda por el borde de la fila del remate. Recoger por el LD a lo largo de la abertura del bolero - es decir subir a lo largo del delantero derecho, pasar alrededor del escote en la espalda, bajar a lo largo del delantero izquierdo y finalmente a lo largo de la espalda = 180-195-210-225-240 pts (divisible por 15) - en ag circular tamaño 4.5 mm con Paris ( recoger aprox 38-43-48-53-58 pts a lo largo de cada delantero, 16 pts en el escote, 88-93-98-103-108 pts a lo largo de la espalda) - ATENCIÓN: En caso de que se hayan recogido más/menos pts, dism / aum estos pts de más/menos repartidos en la 1ª vta. Es importante también recoger suficientes pts en las costuras de las mangas en cada lado para que el borde no quede demasiado apretado bajo la manga. Trabajar en redondo con ag circular como sigue (ver por el LD): 4 vtas en pt musgo (ver explicación arriba), después trabajar en pt elástico (= 3d./2 r.). Cuando el borde mida 2 cm, aum cada tercera sección del revés a 3 r. (en lugar de 2) = 192-208-224-240-256 pts. Repetir el aum cuando la labor mida 5 y 8 cm, pero desplazar el aum para que en la de 5 cm sea cada 2ª sección y en la de 8 cm en todas las secciones = 216-234-252-270-288 pts. Después de la última vta con aum, el pt elástico tiene 3d./3 r. en toda la vta. Rem flojo con derecho sobre derecho y revés sobre revés. |
||||
Explicaciones del diagrama |
||||
|
||||
 |
||||
¿Terminaste este patrón?Entonces, etiqueta tus fotos con #dropspattern #springflutterbolero o envíalas a la galería #dropsfan. ¿Necesitas ayuda con este patrón?Encontrarás 17 videos tutoriales, un espacio para comentarios/preguntas y más visitando la página del patrón en garnstudio.com © 1982-2026 DROPS Design A/S. Todos los derechos reservados. Este documento, incluyendo todas sus sub-secciones, está protegido por los derechos de autor (copyright). Lee más acerca de lo que puedes hacer con nuestros patrones en la parte de abajo de cada patrón de nuestro sitio. |
||||


Con más de 40 años en el diseño de modelos de punto y de ganchillo, DROPS Design ofrece una de las más vastas colecciones de patrones gratuitos en el internet - traducidos en 17 idiomas. Al día de hoy, contamos con 324 catálogos y 12290 patrones - de los cuales 11675 están traducidos en español.
Nosotros trabajamos con mucho esmero para brindarte lo mejor que las labores de punto y ganchillo tienen para ofrecer,inspiración y consejos, así como hilos de magnífica calidad a precios increíbles! Te gustaría usar nuestros patrones para otro fin además del uso personal? Puedes leer acerca de lo que estás permitida a hacer en el texto de Copyright en la parte de abajo de todos nuestros patrones. Felices labores!
Escribe un comentario sobre DROPS 130-13
¡Nos encantaría saber qué piensas acerca de este patrón!
Si quieres escribir una pregunta referente al patrón, por favor asegúrate de elegir la categoría correcta en el formulario debajo, para acelerar el proceso de respuesta. Los campos obligatorios están marcados con un *.