
Popular categories
Looking for a yarn?


Comments / Questions (15)
![]() Barbara wrote:
Barbara wrote:
Guten Tag Ich habe eine Frage zu den verkürzten Reihen. Ist es richtig, dass über die ganzen 4 x Verkürzen die 10 M auf dem Hilfsfaden bleiben und ich 8 Maschen stricken soll, wenden, zurück und das 4 x? Vielen Dank für Ihre Antwort und herzlichen Gruss Danke auch für die immer tollen Anleitungen!
20.08.2023 - 16:16DROPS Design answered:
Liebe Barbara, am Anfang einer Hinreihe stricken Sie die ersten 10 Maschen und legen Sie diese Maschen still, dann stricken Sie diese Hinreihe bis zur Ende, wenden Sie und stricken Sie die Rückreihe. Diese 2 Reihen insgesamt 4 Mal stricken (es sind dann 10 M x 4 = 40 Maschen auf dem Faden) und 8 bis 20 M (siehe Größe) übrig auf der Nadel. Viel Spaß beim stricken!
21.08.2023 - 09:07
![]() MSHARRY wrote:
MSHARRY wrote:
I am working on th e section where I hav just finished all the cast offs and cast ons and I have 56 sts on the needle. The next step says to work in stocking stwhen piece measures 20 cm work short rows Does that mean I measure from where I have the 56 sts to do the stocking st. till I have 20 cm and then work the short rows?
06.11.2019 - 21:24DROPS Design answered:
Dear MSHarry, the 20 cm should be measured from the markers added on each side after 13 cm ie where pattern says to measure piece from here. Happy knitting!
07.11.2019 - 09:06
![]() MSHARRY wrote:
MSHARRY wrote:
I am at the section of the pattern where it says repeat inc when edge measure 5 and 8 cm. When I have done the increases every third p section to 3 sts and I have 224 sts I do not understand where to displace inc . Can you make this a little more clearly?
02.10.2019 - 03:10DROPS Design answered:
Dear MsHarry, after first increase you should have: *K3, P3, K3, P2, K3, P2*, repeat from *-* all the round - after 2nd increase you should have *K3, P3, K3, P3, K3, P2*, repeat from *-* all the round and after last increase you should have *K3, P3, K3, P3, K3, P3**, repeat from *-* all the round = K3/P3 on the round. Happy knitting!
02.10.2019 - 08:25
![]() MSHARRY wrote:
MSHARRY wrote:
IF YOU READ THE SECTION WHERE IT SAYS TOWARDS FRONT PIECE, WOULDN'T THE 4 ROW BE ON TOWARD THE BACK PIECE, OR AM I NOT READING THIS PROPERLY. ANY HELP WILL BE APPRECIATED
16.07.2019 - 16:13DROPS Design answered:
Dear Mrs Msharry, the right hand side of piece seen from RS is the front piece, while the left hand side of the piece seen from RS is back piece. For front piece, you will cast off at the beg of a RS row, and for back piece you will cast on new stitches at the end of a RS row. Happy knitting!
17.07.2019 - 10:56
![]() MSHARRY wrote:
MSHARRY wrote:
When you are doing cast off and dec. how can the pattern read dec on every 4th row? Wouldn't that be on the towards the back instead of towards the front?
16.07.2019 - 03:04DROPS Design answered:
Hi MSHARRY, The first decrease is from the right side, so all the following 4th rows will also be from the right side. Happy knitting!
16.07.2019 - 06:58
![]() Charlotte Lücking wrote:
Charlotte Lücking wrote:
Jeg har striket modellen i Paris str. M - det er ikke nok med 250 g. Jeg måtte købe et nøgle ekstra - surt når man handler online, og derved kommer til at betale porto to gange 😔
15.01.2016 - 13:58
![]() Drops Design wrote:
Drops Design wrote:
Hi Stephanie, yes, make sure last row you work is worked from WS so that next row will begin a RS row.
19.12.2011 - 17:45
![]() Stephanie Gum wrote:
Stephanie Gum wrote:
Does "adjust so that last row is from WS" mean to the next row should begin a RS row? Or does it mean the next row should begin a WS row?
19.12.2011 - 13:49Myriam wrote:
Beautiful shape
02.02.2011 - 18:02
![]() Carole wrote:
Carole wrote:
I love shrugs. This one looks wonderful.
31.01.2011 - 03:32
|
||||
Spring Flutter#springflutterbolero |
||||
 |
 |
|||
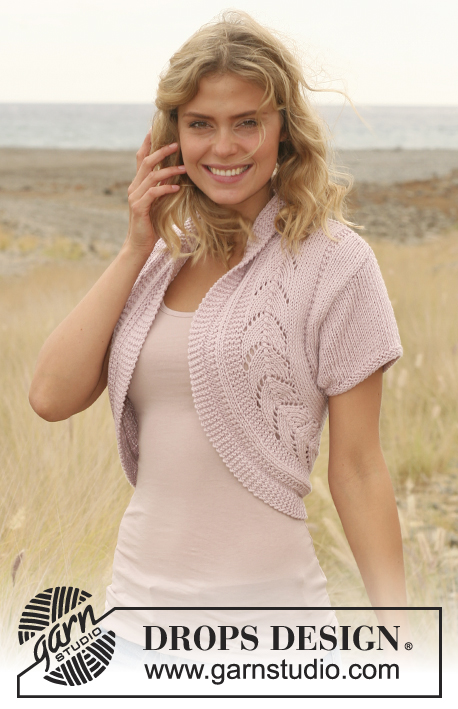
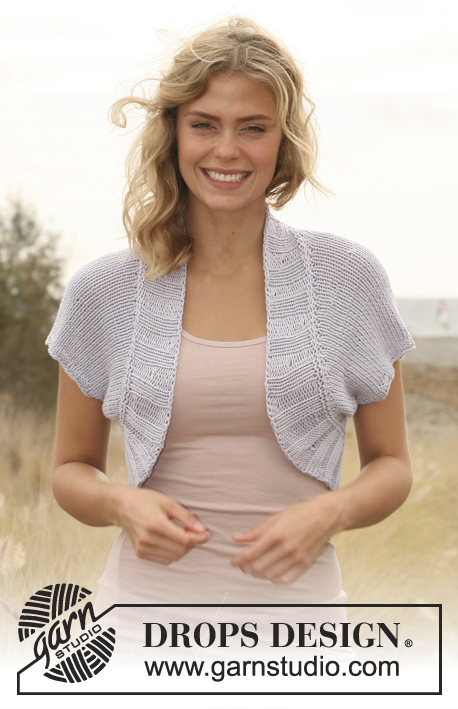
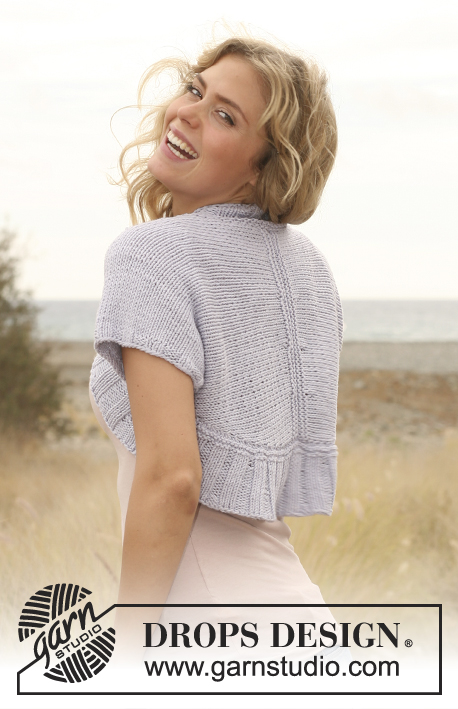
Knitted DROPS bolero in "Paris". Size: S - XXL.
DROPS 130-13 |
||||
|
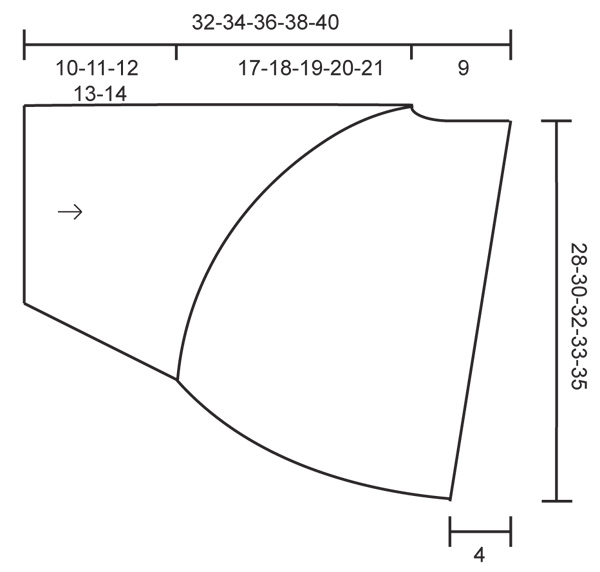
GARTER ST (back and forth on needle): K all rows. (in the round on circular needle): * K 1 round and P 1 round *, repeat from *-*. --------------------------------------------------------- RIGHT PART: Worked back and forth on needle. Cast on 54-54-60-66-72 sts on circular needle size 4.5 mm with Paris and P 1 row from WS, then work rib with beg from RS as follows: 1 edge st in garter st, K 2, * P 3, K 3 *, repeat from *-* a total of 8-8-9-10-11 times, finish with P 2, 1 edge st in garter st. When piece measures 2 cm, switch to needle size 5 mm and work in stocking st while AT THE SAME TIME evenly inc the no of sts to 56-58-62-68-72. When piece measures 3 cm, inc 1 st in each side, repeat inc every 1.5-1.5-1.5-2-2 cm a total of 5-6-6-5-5 times = 66-70-74-78-82 sts. When piece measures 10-11-12-13-14 cm, insert a marker in each side (adjust so that last row is from WS) - now measure piece from here! Now cast off and dec in the right side of piece (= towards front piece) while at the same time casting on new sts in the left side of piece (= towards back piece) as follows: Towards front piece: Cast off on every other row 3 sts 4 times and 2 sts 9-10-11-12-13 times, then dec on every 4th row 1 st 3 times. Towards back piece: On every other row cast on 2 sts 3 times and 1 st 5-6-7-6-9 times, then on every 4th row 1 st 4-4-4-5-4 times. After all cast offs, dec and cast ons, there are 48-51-54-56-60 sts on the needle. Continue in stocking st. When piece measures 17-18-19-20-21 cm (adjust so that last row is from RS), work short rows for back as follows: Work 10 sts and slip these sts on a stitch holder (= bottom of back piece) - repeat a total of 4 times at the beg of every row from WS (a total of 40 sts on stitch holder) = 8-11-14-16-20 sts remain on needle. On next row from RS, slip all sts from the stitch holder back on the needle and work 4 rows in garter st (see explanation above) over all sts. Cast off. Do not remove the markers yet. LEFT PART: Cast on and work as right part but with inc, dec, cast offs and cast ons in the opposite side. ASSEMBLY: Sew sleeve seams inside 1 edge st up to marker. Sew tog the two parts mid back in the cast off edge. Knit up sts from RS along the opening of the bolero - i.e. up along right front piece, back of neck, down along left front piece and then along back piece = 180-195-210-225-240 sts (to be divided by 15) - on circular needle size 4.5 mm with Paris (knit up approx. 38-43-48-53-58 sts along each front piece, 16 sts in the neck, 88-93-98-103-108 sts along back piece) - NOTE: If more or fewer sts have been knitted up, inc/dec evenly on 1st round. It is also important to knit up enough sts by sleeve seam in each side so that the edge is not too tight under the arms. Work in the round on circular needle as follows (seen from RS): 4 rounds in garter st (see explanation above), then work rib (= K 3/P 2). When edge measures 2 cm, inc every third P-section to 3 P sts = 192-208-224-240-256 sts. Repeat inc when edge measures 5 and 8 cm, but displace inc so that next 2 st P section is inc to 3 P sts = 216-234-252-270-288 sts. After last round with inc, the rib should be K 3/P 3 the entire round. Loosely cast off with K over K and P over P. |
||||
Diagram explanations |
||||
|
||||
|
||||
Have you finished this pattern?Tag your pictures with #dropspattern #springflutterbolero or submit them to the #dropsfan gallery. Do you need help with this pattern?You'll find 17 tutorial videos, a Comments/Questions area and more by visiting the pattern on garnstudio.com. © 1982-2025 DROPS Design A/S. We reserve all rights. This document, including all its sub-sections, has copyrights. Read more about what you can do with our patterns at the bottom of each pattern on our site. |
||||


With over 40 years in knitting and crochet design, DROPS Design offers one of the most extensive collections of free patterns on the internet - translated to 17 languages. As of today we count 314 catalogues and 11822 patterns translated into English (UK/cm).
We work hard to bring you the best knitting and crochet have to offer, inspiration and advice as well as great quality yarns at incredible prices! Would you like to use our patterns for other than personal use? You can read what you are allowed to do in the Copyright text at the bottom of all our patterns. Happy crafting!
Post a comment to pattern DROPS 130-13
We would love to hear what you have to say about this pattern!
If you want to leave a question, please make sure you select the correct category in the form below, to speed up the answering process. Required fields are marked *.