
Categorías populares
¿Buscas un hilo?


Comentarios / Preguntas (36)
![]() Anna escribió:
Anna escribió:
Hej igen, skulle uppskatta ett svar av frågan jag ställde för en månad sen!
14.11.2019 - 17:30
![]() Anna escribió:
Anna escribió:
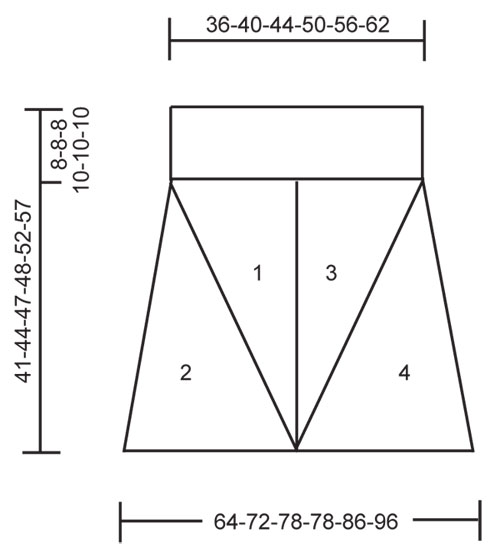
Jag får inte rätt på del 1 för storlek S. Ser i frågetråden att man ska sticka två varv, göra omslag på tredje, sen sticka 3 varv, omslag på fjärde -sen börja om med två varv igen. Så det är en upprepning på 7 varv hela tiden? Det måste vara något tokigt för när jag mäter min färdiga stickningen av del 1 så stämmer den i bred (18cm) men inte i höjd (endast 32 cm, när det ska vara 41!). Vore väldigt tacksam för ett förtydligande, tack!
15.10.2019 - 20:20
![]() Yvonne Görmar escribió:
Yvonne Görmar escribió:
Das Muster ist ja eine schöne Herausforderung, und ich glaube, ich habe fast alles verstanden. Eine Frage: Warum muss man bei den Teilen 2, 4, 6 und 8 die Maschen auf einen HIlfsfaden legen? Zum Zusammennähen im Maschenstich? Oder kann man auch abketten und "normal" zusammennähen? Danke!
10.06.2019 - 13:10DROPS Design respondió:
Liebe Frau Görmar, die Maschen werden dann im Maschentstich zusammengenäht, abketten können Sie, aber beachten Sie, das die Arbeit nicht zu eng wird. Viel Spaß beim stricken!
11.06.2019 - 11:50
![]() Reix escribió:
Reix escribió:
Bonsoir, j'aimerais savoir combien de pelotes il me faut pour ce modèle en taille 40 (L). De plus je voudrais que la jupe m'arrive à hauteur du genou, c'est à dire en longueur 52 cm. Combien de pelotes il faut rajouter? Merci de votre réponse. Cordialement
22.03.2018 - 19:22DROPS Design respondió:
Bonjour Mme Reix, vous trouverez la quantité totale nécessaire pour chaque taille, au poids, sous l'en-tête des explications, soit 5 pelotes en taille L. Nous ne sommes malheureusement pas en mesure de pouvoir ajuster chacun de nos modèles à chaque demande individuelle, vous pouvez volontiers vous adresser à votre magasin DROPS ou à un forum de tricot pour toute assistance complémentaire pour adapter cette jupe à vos envies. Bon tricot!
26.03.2018 - 09:56Katerina escribió:
Hi! As far as I understand, first, in this pattern parts 1 and 3 are knitted from top to bottom, part 2 from right to left and part 4 from left to right. And second, the stitches from the stitch holder on part 2 are grafted with the stitches on the stitch holder from part 8. Am I right? Thank you.
03.01.2018 - 19:03DROPS Design respondió:
Dear Katerina, part 1 and 3 are worked from the tip (= cast on 3 sts) to the top (= increase until there are 47-77 sts - see size). Part 2 and 4 are worked top down (= cast on 2 sts and increase until there are 78-115 sts). See also measurement chart with all parts. Happy knitting!
04.01.2018 - 13:25
![]() Tanja escribió:
Tanja escribió:
Hallo, wie ist das bei Teil 3 und 4 mit dem spiegelverkehrt stricken gemeint? Ist es so gemeint das ich da mit der hohen Maschenzahl anfange und dann entsprechend abnehme? LG Tanja
03.12.2017 - 16:21DROPS Design respondió:
Liebe Tanja, spiegelverkehr bedeutet wenn Sie vor bzw nach der Markierer zugenommen haben, jetzt werden Sie nach bzw vor der Markierer zunehmen. Viel Spaß beim stricken!
04.12.2017 - 09:48
![]() Stephanie escribió:
Stephanie escribió:
Hi, do I work 3 rows and increase on that 3rd row, then work 4 rows and work inc on that row (2 inc at same side) Then again on following 3rd then again on following 4th (2 inc now at opposite side of marker). Can you explain the line on pattern, "inc 1 stitch on 3rd and 4th row alternately" please as I can't get this to work out. Thanks again for helping out.
27.06.2016 - 12:23DROPS Design respondió:
Dear Stephanie, when inc alternately every 3rd and every 4th row, work as follows: *work 2 rows, inc on next row (= 3rd row), work 3 rows, inc on next row (= 4th row)* and repeat from *-*. Happy knitting!
27.06.2016 - 17:39
![]() Stephanie escribió:
Stephanie escribió:
Hi, confused starting section 1. If I inc on 3rd row, then 4th etc I'm inc 2 stitches on one side of marker then 2 stitches at other side, resulting in piece being a triangle. On chart, piece one has an angle at left and straight edge at right. Piece 3 being a mirror image and two pieces sewn together. Cannot understand why inc are not done at same side to give angle. Also can't figure out how a total of 104 stitches is enough for the waist of medium size. Help appreciated.
25.06.2016 - 13:24DROPS Design respondió:
See answer below :)
27.06.2016 - 09:41
![]() Stephanie escribió:
Stephanie escribió:
Hi, confused starting section 1. If I inc on 3rd row, then 4th etc I'm inc 2 stitches on one side of marker then 2 stitches at other side, resulting in piece being a triangle. On chart, piece one has an angle at left and straight edge at right. Piece 3 being a mirror image and two pieces sewn together. Cannot understand why inc are not done at same side to give angle. Also can't figure out how a total of 104 stitches is enough for the waist of medium size. Help appreciated.
25.06.2016 - 12:26DROPS Design respondió:
Dear Stephanie, you inc before last st seen from RS, so that right side of piece will be straight and left side of piece will create a diagonal. Part 1 and 3 are for front piece, you will work 2 similar pieces for back piece = 104 sts x 2 = 208 sts around the waist. Happy knitting!
27.06.2016 - 09:33
![]() Jess escribió:
Jess escribió:
Just to clarify size. Is the cm measurement on chart given for garment lying flat. So size Small would measure 64 cm from left to right and 128cm all the way around. Waist 36 flat left to right and 72cm all around waist. Thanks.
17.06.2016 - 15:46DROPS Design respondió:
Dear Jess,you're right, these are the measurement for the bottom part; for size S waist measurement are 36 cm lying flat and 72 cm all the way round. Happy knitting!
17.06.2016 - 19:54
|
|
Evening Diamond#eveningdiamondskirt |
|
|
|
|
Falda DROPS en punto musgo con “Nepal”. Talla S – XXXL. Diseño DROPS: Patrón No. DE-019
DROPS 121-4 |
|
|
TIP PARA AUMENTO: Aum haciendo 1 HEB (lazada). En la vta de retorno tejer la HEB del derecho, por atrás, para evitar que se forme un agujero. OJALES: Hacer los ojales en el borde para los botones. 1 ojal = rem el 3º y 4º pt del borde para los botones y mon 2 pts nuevos en la vta sig. Hacer los ojales cuando el borde para los botones mida: TALLA S + M + L: 1, 4 y 7 cm TALLA XL + XXL + XXXL: 1, 4, 6 y 9 cm ------------------------------------------------------ FALDA: Se teje en pt musgo, es decir, todas las vtas del derecho. La falda se teje en 8 partes, de ida y vuelta en ag, y las partes se cosen juntas más adelante. PARTE 1: Mon 2 pts en ag circular tamaño 3 mm con Delight. Tejer 1 vta del derecho por el LR. Colocar un marcapuntos (MP) en el 2º pt por el LD. Cont de ida y vuelta en la ag, AL MISMO TIEMPO aum como sigue antes del MP – Ver TIP PARA AUMENTO: TALLA S + M + L: aum 1 pt en cada 3ª y 4ª vta alternadamente. TALLA XL + XXL + XXXL: aum 1 pt en cada 3ª vta. Cont así hasta tener un total de 47-52-56-63-69-77 pts en la ag. Desl los pts en un gancho o seguro aux. PARTE 2: Mon 2 pts en ag circular tamaño 3 mm con Delight. Tejer 1 vta del derecho por el LR. Colocar un MP en el primer pt por el LD. Cont de ida y vuelta en la ag, AL MISMO TIEMPO aum después del MP como sigue: 1 pt en vtas alternas. Cont así hasta tener un total de 78-87-94-94-103-115 pts en la ag. Desl los pts en otro gancho o seguro aux. Coser la Parte 1 a la Parte 2, orilla con orilla en la hebra externa de los pts, para evitar que se forme una costura abultada. PARTE 3: Como la Parte 1, pero a la inversa. PARTE 4: Como la Parte 2, pero a la inversa. Coser la Parte 3 a la Parte 4, orilla con orilla en la hebra externa de los pts, para evitar que se forme una costura abultada. PARTE 5, 6, 7 y 8: Como la Parte 1, 2, 3 y 4. TERMINACIÓN: Coser juntas las partes 1/2 y partes 3/4 (= delantero central) y partes 5/6 y partes 7/8 (= centro posterior). Coser orilla con orilla en la hebra externa de los pts, para evitar que se forme una costura abultada. Unir con costura invisible y por el LR los pts en los ganchos o seguros aux de cada lado. PRETINA: Empezar en el lado izquierdo de la pieza, en el centro de la costura. Regresar los pts de los ganchos o seguros aux de vuelta a la ag, y levantar 1 a 2 pts en cada costura entre todas las partes. Tejer 1 vta del derecho por el LR y 1 vta del derecho por el LD, AL MISMO TIEMPO ajustar el número de pts a 182-202-224-250-274-302 pts y AL MISMO TIEMPO mon 6 pts nuevos al final de esta vta para el borde para los botones = 188-208-230-256-280-308 pts. Cont de ida y vuelta en todos los pts. AL MISMO TIEMPO cuando el borde para los botones mida aprox 1 cm, hacer los OJALES – ver arriba. AL MISMO TIEMPO cuando la pretina mida aprox 7-7-7-8-8-8 cm, dism 10-10-10-10-5-5 pts distribuidos equitativamente (no dism en el borde para los botones) = 178-198-220-246-275-303 pts. Cont hasta que el borde para los botones mida 8-8-8-10-10-10 cm. Rem pts. Coser los botones. |
|
 |
|
¿Terminaste este patrón?Entonces, etiqueta tus fotos con #dropspattern #eveningdiamondskirt o envíalas a la galería #dropsfan. ¿Necesitas ayuda con este patrón?Encontrarás 11 videos tutoriales, un espacio para comentarios/preguntas y más visitando la página del patrón en garnstudio.com © 1982-2026 DROPS Design A/S. Todos los derechos reservados. Este documento, incluyendo todas sus sub-secciones, está protegido por los derechos de autor (copyright). Lee más acerca de lo que puedes hacer con nuestros patrones en la parte de abajo de cada patrón de nuestro sitio. |


Con más de 40 años en el diseño de modelos de punto y de ganchillo, DROPS Design ofrece una de las más vastas colecciones de patrones gratuitos en el internet - traducidos en 17 idiomas. Al día de hoy, contamos con 324 catálogos y 12290 patrones - de los cuales 11685 están traducidos en español.
Nosotros trabajamos con mucho esmero para brindarte lo mejor que las labores de punto y ganchillo tienen para ofrecer,inspiración y consejos, así como hilos de magnífica calidad a precios increíbles! Te gustaría usar nuestros patrones para otro fin además del uso personal? Puedes leer acerca de lo que estás permitida a hacer en el texto de Copyright en la parte de abajo de todos nuestros patrones. Felices labores!
Escribe un comentario sobre DROPS 121-4
¡Nos encantaría saber qué piensas acerca de este patrón!
Si quieres escribir una pregunta referente al patrón, por favor asegúrate de elegir la categoría correcta en el formulario debajo, para acelerar el proceso de respuesta. Los campos obligatorios están marcados con un *.