
Categorías populares
¿Buscas un hilo?


Comentarios / Preguntas (53)
Annie82 escribió:
Aaaaaa.... now I am enlightened! :-D Thanks a lot! One just have to read a little more carefully. Happy knitting for everyone!
31.10.2017 - 11:53Annie escribió:
Dear DROPS Design, as a beginner I chose this sweater to knit, but know I don't really understand how to knit the armpit. The L size instructions sais, that I should decrease from 64 sts to 52 sts (which means 12 sts) by casting off 2 sts 2 times and 1 st 2 times- but that's just 6 sts. Do I have to repeat this patter of castin off (2stsX2 + 1 stsX2)? I just doesn't add up in my head. Thank you for your kind answer. Best regards, Annie
31.10.2017 - 08:12DROPS Design respondió:
Dear Annie, you will have to bind off the stitches for armhole at the beginning of each row (both from RS and WS), ie you will bind off on each side 2 sts 2 times and 1 st 2 times = 6 sts dec on each side x 2 sides = 12 sts decreased = 52 sts remain. Happy knitting!
31.10.2017 - 09:52Brigitte Beaney escribió:
Thank you so much for getting back to me. But now I'm just wondering how many rows to do for the neck to get the fold seen in the picture?
05.08.2016 - 05:58DROPS Design respondió:
Dear Mrs Beany, number of rows to neck will depend on your tension in height. Cast off sts in M.1 when neck measures 24-26 cm from pick up sts. You can also try on the jumper to check measurements on you before casting off. Happy knitting!
05.08.2016 - 09:53Brigitte Beaney escribió:
Hi, I am currently knitting this sweater but am struggling to understand decrease: "Continue in pattern as before AT THE SAME TIME bind off for armhole at the beg of every row each side: 2 sts 1-2-2-4-5-7 times and 1 st 1-2-2-1-2-1 times = 46-46-52-52-55-55 sts." This is my first jumper, because I feel to get down to the required 46 stitches I think I should follow the second decrease instructions but am then clueless about what to do with the first set? Please help.
03.08.2016 - 01:45DROPS Design respondió:
Dear Mrs Beaney, in 2nd size you will bind off at the beg of every row (= both from RS and from WS): 2 sts 2 times and 1 st 2 times (= 6 sts bound off on each side for armholes). Happy knitting!
03.08.2016 - 09:38
![]() Tara Caldwell escribió:
Tara Caldwell escribió:
Forgive me, I understand the pattern. No need to reply.
06.02.2016 - 06:04
![]() Tara Caldwell escribió:
Tara Caldwell escribió:
I am knitting the woman's sweater number 125-10. I see the photo of the pattern, though the directions under "PATTERN: See diagram M.1" does not tell me how to knit the pattern. Am I missing the directions? Please help with how to knit the pattern. Your help is appreciated.
06.02.2016 - 06:01DROPS Design respondió:
Dear Mrs Caldwell, you will work in pattern following diagram M.1 - see at the end of the pattern below the sleeve and diagram text just above. Read more about diagrams here. Happy knitting!
08.02.2016 - 11:09Karin escribió:
Dann? Das was unter dem Ärmel des Diagramms steht!
24.11.2013 - 18:25
![]() Bianca B. escribió:
Bianca B. escribió:
Hallo Liebes Drops Team Was ist das für ein Muster? Rippe und dann? Liebe Grüße
23.11.2013 - 21:28Runa escribió:
Diagram: below the sleeve diagram ( right side) as usual.
03.11.2013 - 16:42
![]() Viktoria escribió:
Viktoria escribió:
Hej. Håller nu på och stickar på den här tröjan, den blir lång och jättemysig. Har en fråga angående antalet maskor man ska plocka upp runt halsringningen. Hur ska man veta hur många man ska plocka upp eftersom det inte står något exakt antal? Tack på förhand /Viktoria
13.09.2013 - 14:58DROPS Design respondió:
Plocka upp 40 till 60 m dvs 40 i den minsta str osv... blir det för många m går det att justera på 1:a varvet. Lycka till!
18.09.2013 - 13:20
|
|||||||
DROPS 125-10 |
|||||||
|
|
|||||||
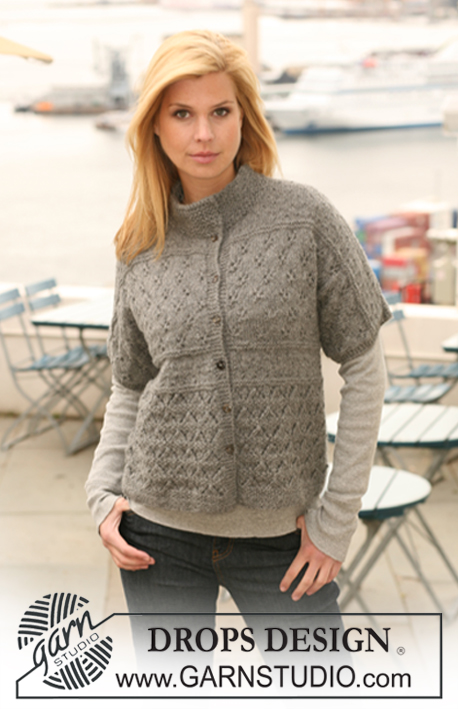
Jersey DROPS en ”Snow”. Talla S a XXXL.
DROPS 125-10 |
|||||||
|
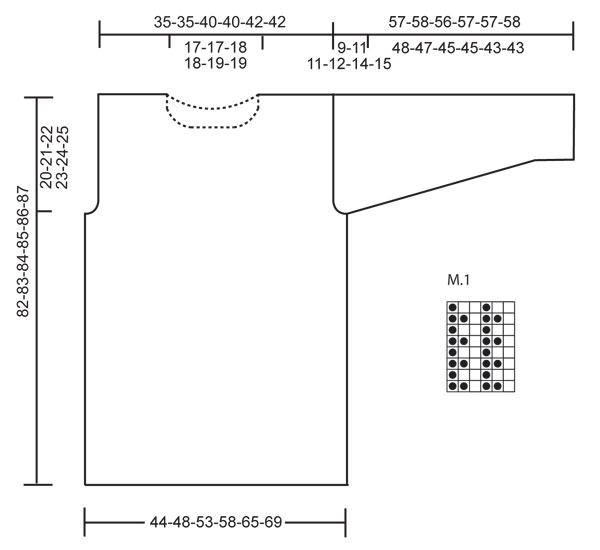
PATRÓN: Ver el diagrama M.1. El diagrama muestra el patrón por el LD. PT MUSGO (en redondo): 1 vta de derecho, 1 vta de revés. TIP PARA LOS AUMENTOS -1: Aum 1 pt trabajando 1 HEB (lazada). En la sig vta trabajar la HEB por detrás del pt para evitar que se formen agujeros. TIP PARA LOS AUMENTOS -2: Aum 1 pt dentro de 1 pt orillo trabajando 1 HEB. En la sig vta trabajar la HEB por detrás del pt para evitar que se formen agujeros. Incorporar los pts aumentados en M.1 según se va avanzando. ------------------------------------------------------------------------------------------------------------------------ CUERPO: Se trabaja en redondo. Mont 97-106-117-128-143-152 pts en ag circular tamaño 8 mm con Snow. Trabajar 6 vtas en PT MUSGO - ver arriba. AL MISMO TIEMPO aum en la última vta 17-20-21-22-25-28 pts repartidos - Ver TIP PARA LOS AUMENTOS -1 = 114-126-138-150-168-180 pts. Insertar un marcapuntos (MP) en el primer pt y en el pt 57º-63º-69º-75º-84º-90º ( para marcar los lados). Continuar en M.1 en redondo. RECUERDE MANTENER LA MISMA TENSIÓN DE LA MUESTRA! Cuando la labor mida 62 cm cerrar 5 pts a cada lado para la sisa ( el pt con MP es el pt central de esos 5 pts). Cortar el hilo. Ahora completar cada lado por separado. ESPALDA: = 52-58-64-70-79-85 pts. Continuar con el patrón como antes, AL MISMO TIEMPO cerrar para la sisa al inicio de cada fila a cada lado: 2 pts 1-2-2-4-5-7 vcs y 1 pt 1-2-2-1-2-1 vcs = 46-46-52-52-55-55 pts. Continuar hasta que la labor mida 79-80-81-82-83-84 cm. Ahora cerrar los 20-20-22-22-23-23 pts centrales para el escote y cerrar 2 pts en el escote en la sig fila = 12-12-14-14-15-15 pts quedan para el hombro. Continuar hasta que la labor mida 82-83-84-85-86-87 cm, rem. DELANTERO: = 52-58-64-70-79-85 pts.Continuar con el patrón y cerrar para la sisa a cada lado como se describe para la espalda = 46-46-52-52-55-55 pts. Cuando la labor mida 79 cm desl los 18-18-18-18-19-19 pts centrales a un gancho aux para el escote y completar cada lado por separado. Cerrar para la forma del escote al inicio de cada fila desde el centro del delantero: 2 pts 1 vez y 1 pt 0-0-1-1-1-1 vez = 12-12-14-14-15-15 pts restantes para el hombro. Continuar hasta que la labor mida 82-83-84-85-86-87 cm, rem. MANGA: Se trabaja de ida y vta en ag. Mont 27-28-29-30-31-32 pts ( incl 1 pt orillo a cada lado) en ag tamaño 8 mm con Snow. Trabajar 6 filas en PT MUSGO _ ver arriba. AL MISMO TIEMPO en la última fila aum 2-4-6-8-7-9 pts repartidos = 29-32-35-38-38-41 pts. Continuar en M.1 con 1 pt orillo a cada lado. Cuando la labor mida aprox 7 cm aum 1 pt a cada lado, y repetir los aum cada 4.5-4.5-4-4-3-3 cm un total de 9-9-9-9-12-12 vcs - Ver TIP PARA LOS AUMENTOS -2 = 47-50-53-56-62-65 pts. Continuar hasta que la labor mida aprox 48-47-45-45-43-43 cm (ATENCIÓN! Medidas más cortas en las tallas más grandes debido a una mayor largura de la copa de la manga y una mayor anchura de hombros). Ahora cerrar 3 pts a cada lado para la copa de la manga y cerrar para la forma de la copa de la manga al inicio de cada fila a cada lado: 2 pts 2-2-3-3-4-4 vcs y 1 pt 0-0-0-1-1-0 vez, después cerrar 2 pts al inicio de cad fila a cada lado hasta que la labor mida 55-56-54-55-55-56 cm. Ahora cerrar 3 pts a cada lado 1 vez y rem los pts restantes. La labor mide aprox 57-58-56-57-57-58 cm. TERMINACIÓN: Hacer las costuras de los hombros. Montar las mangas. Coser las mangas dentro de 1 pt orillo. CUELLO: Se trabaja en redondo. Recoger de 40 a 60 pts (incl los pts en el gancho aux) alrededor del escote en ag circular tamaño 7 mm con Snow. Trabajar 1 vta de revés, 1 vta de derecho y 1 vta de revés, AL MISMO TIEMPO ajustar el nº de pts a 50-56-62-68-74-76 en la última vta. Ahora trabajar 1 vta de derecho y continuar en pt elástico 1 d./1 r. Cuando el elástico mida aprox 4 cm, aum 1 pt después de cada 1 d. ( trabajando 1 HEB (lazada)). En la sig vta trabajar la HEB por detrás del pt = 75-84-93-102-111-114 pts. Ahora trabajar M.1 en todos los pts. Continuar hasta que el cuello mida aprox 24-26 cm y rem en M.1. |
|||||||
Explicaciones del diagrama |
|||||||
|
|||||||
 |
|||||||
¿Terminaste este patrón?Entonces, etiqueta tus fotos con #dropspattern o envíalas a la galería #dropsfan. ¿Necesitas ayuda con este patrón?Encontrarás 23 videos tutoriales, un espacio para comentarios/preguntas y más visitando la página del patrón en garnstudio.com © 1982-2026 DROPS Design A/S. Todos los derechos reservados. Este documento, incluyendo todas sus sub-secciones, está protegido por los derechos de autor (copyright). Lee más acerca de lo que puedes hacer con nuestros patrones en la parte de abajo de cada patrón de nuestro sitio. |
|||||||


Con más de 40 años en el diseño de modelos de punto y de ganchillo, DROPS Design ofrece una de las más vastas colecciones de patrones gratuitos en el internet - traducidos en 17 idiomas. Al día de hoy, contamos con 324 catálogos y 12290 patrones - de los cuales 11685 están traducidos en español.
Nosotros trabajamos con mucho esmero para brindarte lo mejor que las labores de punto y ganchillo tienen para ofrecer,inspiración y consejos, así como hilos de magnífica calidad a precios increíbles! Te gustaría usar nuestros patrones para otro fin además del uso personal? Puedes leer acerca de lo que estás permitida a hacer en el texto de Copyright en la parte de abajo de todos nuestros patrones. Felices labores!
Escribe un comentario sobre DROPS 125-10
¡Nos encantaría saber qué piensas acerca de este patrón!
Si quieres escribir una pregunta referente al patrón, por favor asegúrate de elegir la categoría correcta en el formulario debajo, para acelerar el proceso de respuesta. Los campos obligatorios están marcados con un *.