
Categorías populares
¿Buscas un hilo?


Comentarios / Preguntas (66)
![]() Daguyt Heidi escribió:
Daguyt Heidi escribió:
Beste, hoelang moet de rondbreinaald zijn voor het maken van het doopjurkje? Mvg Heidi
17.01.2018 - 09:58DROPS Design respondió:
Hoi Daguyt, De onderkant is behoorlijk wijd, dus je kunt wel een naald van 80 cm gebruiken. Bij de smallere gedeeltes kun je een kortere naald gebruiken of de 'magic loop'. Dit is uigelegd in deze video
17.01.2018 - 10:53
![]() Birthe Thimm escribió:
Birthe Thimm escribió:
I forklaringen på maskerne er der to, der mangler ift ud/indtagning. Jeg vil gerne høre om i har de rette
27.02.2017 - 14:11DROPS Design respondió:
Hej Birthe. Hvad mener du? Kan du sige hvilket symbol du mangler og i hvilket diagram?
27.02.2017 - 14:24
![]() Sally Feely escribió:
Sally Feely escribió:
I am an experienced knitter...but only only 2 straight needles !! I am looking at your baby patterns ...mainly the jackets ... and wonder if the patterns adapt from circular to straight needles. Thank you.
21.07.2016 - 19:09DROPS Design respondió:
Dear Mrs Feely, most of our patterns are worked flat back and forth, like the jackets: circular needle are helpful due to the high number of sts but you can work with straight needles as well. Happy knitting!
21.07.2016 - 19:58
![]() Lars escribió:
Lars escribió:
Alla diagram finns! Titta noga mellan diagrammen.
03.06.2016 - 16:38
![]() Susanne Arved escribió:
Susanne Arved escribió:
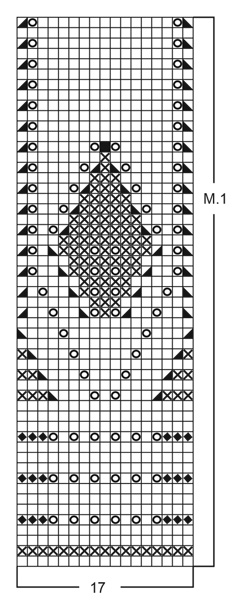
Jeg har læst opskriften igennem og kan se, at på nederdelen af kjolen henvises til diagram M1, og på bærerstykket på dragten henvises til diagram M6. Disse to diagrammer er ikke afbillede på opskriften. Venligst opdaterer opskriften eller eftersende diagrammerne. På forhånd tak.
03.06.2016 - 13:32DROPS Design respondió:
Hej Susanne. Begge er nederst paa opskriften. M.1 er hele gentagelsen af det store diagram til venstre (M.4 er de nederste 16 m og M.1 er hele diagrammet - staar til höjre for diagrammet). M.6 er de 3 p överst i M.2
06.06.2016 - 14:29
![]() Karlye escribió:
Karlye escribió:
Do I repeat M.1 until it reaches the measurement? Or do I do it once and move on to the next step?
26.04.2016 - 03:40DROPS Design respondió:
Dear Karlye, you work M.1 only one time in height for the dress, and repeat M.1 until piece measures 10-12 cm for the bonnet. Happy knitting!
26.04.2016 - 08:49Carol escribió:
I am just beginning the hat. Your symbol - left side box blacked out with following: slip 1 st as if to K, K1, psso - should it not read: slip 1 as if to k, k2tog, psso? Otherwise it doesn't count out correctly.
27.12.2015 - 00:20DROPS Design respondió:
Dear Carol, diagram and legend are correct: number of sts in diagram should be constant: 1 yo = 1 dec. Happy knitting!
02.01.2016 - 13:56
![]() Kathy Fischer escribió:
Kathy Fischer escribió:
I found the pattern on line, 11-31, and would like to make it for my 6th grandchild due January 5th, 2016. Since it is a newborn size, it probably would leave me a month after the birth to finish. I just try very hard to get the nerve up to start this project. As I see, you are helping many people. How difficult is the pattern ? and how easy is it to get help ? Sincerely, Kathy Fischer
27.11.2015 - 23:58DROPS Design respondió:
Dear Mrs Fisher, if you have any question to this pattern, you are welcome to ask your question here - you will get any individual help & assistance by your DROPS store. Happy knitting!
30.11.2015 - 10:05
![]() Anna escribió:
Anna escribió:
Hallo, ik ben bezig met de jurk zelf en daarvan de kleinste maat. Op gegeven moment brei je 4 naaldplooitjes en daarna de voorpas/bovenstukje van de jurk. Hier moet je minderen volgens mindertips bovenaan het patroon. Dit zijn 2 soorten minderingen, maar als ik het doe zoals beschreven kom ik niet uit. Bij mindering 1 krijg ik maar aan 1 kant een gaatje en bij mindering 2 word er na de kantst. 2 st. tegelijk geminderd. Groetjes Anna
24.10.2015 - 11:49DROPS Design respondió:
Hoi Anna. Bedoel je de minderingen langs de armsgaten of de minderingen bij de halskant. En graag doorgeven welke maat je maakt, dan kan ik makkelijker meekijken. Bvd.
02.12.2015 - 16:46
![]() Lisa escribió:
Lisa escribió:
I'm making the larger size of the christening gown and have gotten to the end of M2, decreasing to 379 stitches on the first row of the leaf pattern. The first row is *K5, P5*, repeat from *-* and finish K5. Based on the 379 stitches I end up with the last 9 stitches being knit. Is this correct? Or are there edge stitches in this section as well? 2 edge stitches on either side would fix this, or am I missing something else? Thank you!
22.10.2015 - 14:50DROPS Design respondió:
Dear Lisa, when working the leaf pattern, you will also continue the 2 sts in garter st on each side, so that you will have: K2, (*K5, P5*, repeat from *-* a total of 37 times, finish with K5, and K2 (=379 sts). Happy knitting!
22.10.2015 - 15:09
|
||||||||||||||||||||||
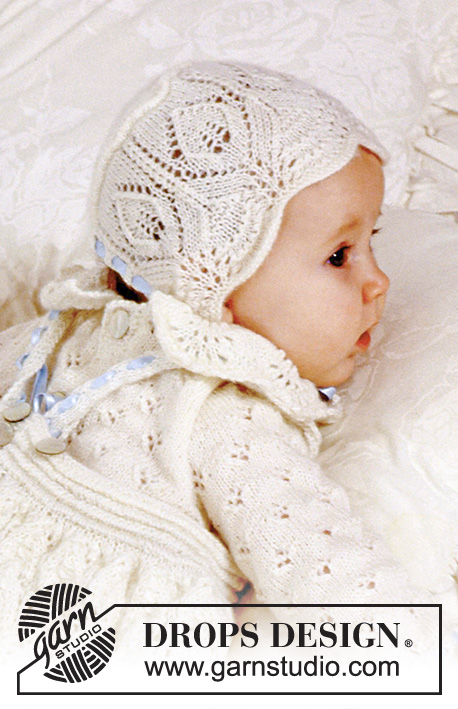
Angel Kissed Bonnet#angelkissedbonnet |
||||||||||||||||||||||
 |
 |
|||||||||||||||||||||
Bonete de punto con patrón de ondas para bebé en DROPS BabyAlpaca Silk. Talla: 1-9 meses.
DROPS Baby 11-31 |
||||||||||||||||||||||
|
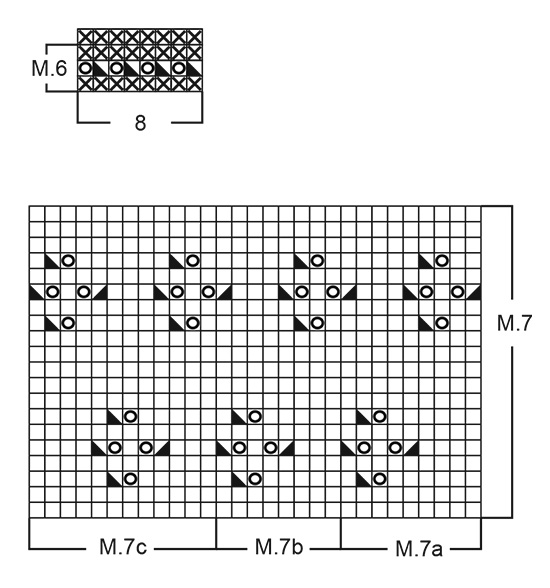
BONETE: Muestra: 25 pts x 34 hileras en ag tamaño 2.5 mm en pt jersey = 10 x 10 cm. Nota! El patrón tendrá más hileras por 10 cm. Pt musgo (de ida y vuelta en la ag): Tejer todas las hileras de derecho. Alforza: Tejer 1 hilera de revés por el LD y después 4 hileras en pt jersey. Tejer la hilera sig de la manera sig por el LR: * Levantar la parte superior del pt abajo de la hilera tejida de revés, colocar el bucle en la ag derecha, 1r, levantar el bucle por encima del pt revés para cerrar el bucle *, repetir de *a*. Patrón M.1 – M.6 – M.7: Ver diagramas. Los diagramas muestran el patrón por el lado derecho. La traducción al español de los símbolos de los diagramas se encuentra en la parte de abajo de la página, en el orden vertical en que aparecen en el diagrama. Mon 87-104 pts (incluye 1 pt de orillo en cada lado, tejidos en pt musgo de principio a fin) en ag rectas tamaño 2.5 m. Tejer M.1 hasta que la pieza mida 10-12 cm. Ahora tejer una alforza – ver explicación arriba – al mismo tiempo, para la talla 6/9 meses dism 1 pt en la primera hilera de la alforza = 87-103 pts. Ahora rem 28-36 pts en cada lado = 31 pts restantes (= pieza central de atrás). ¡Medir la pieza a partir de aquí! Continuar de la manera sig: 1 pt de orillo, M.7A (= 9 pts), M.7B (= 8 pts), M.7C (= 12 pts) y 1 pt de orillo. Rem cuando la pieza central mida 11-14 cm. Coser a las piezas de los lados. Levantar aprox 86 a 98 pts (múltiplo de 4+2 para obtener un número par de agujeros para el listón de seda) a lo largo de la orilla del frente en ag tamaño 2.5 mm y tejer M.6 con 1 pt de orillo en cada lado. Rem en pts reveses (visto por el LD). Cortar un listón de seda de aprox 80 cm de largo y pasarlo a través de la hilera de agujeros. |
||||||||||||||||||||||
Explicaciones del diagrama |
||||||||||||||||||||||
|
||||||||||||||||||||||
 |
||||||||||||||||||||||
 |
||||||||||||||||||||||
¿Terminaste este patrón?Entonces, etiqueta tus fotos con #dropspattern #angelkissedbonnet o envíalas a la galería #dropsfan. ¿Necesitas ayuda con este patrón?Encontrarás 34 videos tutoriales, un espacio para comentarios/preguntas y más visitando la página del patrón en garnstudio.com © 1982-2026 DROPS Design A/S. Todos los derechos reservados. Este documento, incluyendo todas sus sub-secciones, está protegido por los derechos de autor (copyright). Lee más acerca de lo que puedes hacer con nuestros patrones en la parte de abajo de cada patrón de nuestro sitio. |
||||||||||||||||||||||


Con más de 40 años en el diseño de modelos de punto y de ganchillo, DROPS Design ofrece una de las más vastas colecciones de patrones gratuitos en el internet - traducidos en 17 idiomas. Al día de hoy, contamos con 324 catálogos y 12290 patrones - de los cuales 11685 están traducidos en español.
Nosotros trabajamos con mucho esmero para brindarte lo mejor que las labores de punto y ganchillo tienen para ofrecer,inspiración y consejos, así como hilos de magnífica calidad a precios increíbles! Te gustaría usar nuestros patrones para otro fin además del uso personal? Puedes leer acerca de lo que estás permitida a hacer en el texto de Copyright en la parte de abajo de todos nuestros patrones. Felices labores!
Escribe un comentario sobre DROPS Baby 11-31
¡Nos encantaría saber qué piensas acerca de este patrón!
Si quieres escribir una pregunta referente al patrón, por favor asegúrate de elegir la categoría correcta en el formulario debajo, para acelerar el proceso de respuesta. Los campos obligatorios están marcados con un *.