
Categorías populares
¿Buscas un hilo?


Comentarios / Preguntas (90)
Karen' escribió:
Dear Drops, thanks again for your help. I have some questions about the sleeves. 1) I have cast on sleeves and worked the next 2 rows. for the next row it says to 'Continue as follows: 5 front band sts in garter st, 25-28-32-36-41-46 stocking sts, 4 garter sts, 4 stocking sts, M.1 on 60-60-60-72-72-72 sts, etc'. What are these stocking stitches? since the last row was done in purl on the sides and back, I presume those stitches should be garter on this row?
21.05.2014 - 21:26DROPS Design respondió:
Dear Karen, the sts worked in stocking st on this row will be K from RS and then P from WS - you have 4 sts K every round for each raglan (4 sts in garter st) and on sleeve 4 sts before M1 and 5 sts after M1 worked in stocking st (K from RS, P from WS). Happy knitting!
22.05.2014 - 08:35Karen escribió:
Dear Drops, me again! I have managed to cast on my sleeves after your help, thank you. I'm struggling now to read M1. I understand that I read the pattern from the bottom right hand side? Does this mean I should repeat M1 across six times because I should work M1 on 60 stitches according to the pattern. Also, I am little confused about why the top 3 rows appear to have less stitches? Are there written instructions available for DROPS patterns instead of diagrams?
20.05.2014 - 08:33DROPS Design respondió:
Dear Karen, on the sleeve you will repeat M.1 (= 12 sts) a total of 5 times (= over 60 sts). on the last rows, you will have less sts because there will be more dec than yos. Happy knitting!
20.05.2014 - 09:16Karen escribió:
Dear Drops, I have a question about casting on stitches over the armholes. When it says in the pattern 'On next row (from RS) loosely cast on 69-69-69-81-81-81 new sts for sleeves over each armhole = 264-276-292-332-352-372 sts ', where exactly do I cast on these stitches? It might be a silly question but I'm fairly new to reading patterns. Hopefully you can help me :) Best wishes, Karen
16.05.2014 - 21:39DROPS Design respondió:
Dear Karen, after binding off sts for armholes at each marker, work a new row from RS and cast on 69-81 sts (see size) over the 18 sts bound off over each armhole, ie, work first front piece, cast on sts for sleeve, work back piece, cast on sts for sleeve and work 2nd front piece. Happy knitting!
17.05.2014 - 09:26Karen escribió:
For the increases at the beginning would it be okay to knit into the back and front of a stitch? I find this an easy way to make an increase
12.05.2014 - 16:01DROPS Design respondió:
Dear Karen, you may use the increase technique you are more at ease with, ie, knit into back and front will also work. Happy knitting!
13.05.2014 - 09:05
![]() Paula escribió:
Paula escribió:
In this video, I clearly see a hole made by the yarn over, but the pattern instructions say there is a way to avoid the hole. Is there a video for that?
17.01.2014 - 16:19
![]() Hatice escribió:
Hatice escribió:
Vielen Dank. Sie haben Recht, nach ein paar Reihen legt sich das wieder. Für mich war abzuklären, ob es da einen Trick gibt. Was man auf jeden Fall beachten sollte ist, LOCKERE Maschen anzuschlagen. Hilft sehr. Danke und LG.
15.01.2014 - 18:32
![]() Hatice escribió:
Hatice escribió:
"Nach diesen 2 R. auf beiden Seiten 10 M. für das Armloch abk. [...] Bei der nächsten R. (= rechte Seite) über dem Ärmel locker je 69-69-69-81-81-81 neue M. anschlagen " Diese Stelle meine ich. Die neuen Maschen werden über dem Ärmel angeschlagen. Aber über dem Ärmel (über den 10 abgeketteten M.?) ist es sehr mit den neuen M. sehr eng, so dass ich nicht weiter stricken kann, weil die neuen M. viel länger sind (als die Stelle mit den zehn abgeketteten M.). LG
13.01.2014 - 15:14DROPS Design respondió:
Liebe Hatice, das stimmt, bei neu angeschlagenen Maschen sind die ersten 2-3 Reihen manchmal etwas schwierig zu stricken. Schieben Sie die Maschen auf der Rundnadel so zurecht, dass es geht (evtl. etwas Seil zwischen den Maschen herausziehen, dass die M nach vorne gleiten). Es legt sich schon in der 2. R und man kann bald ganz normal weiter stricken.
14.01.2014 - 07:51
![]() Hatice escribió:
Hatice escribió:
Hallo. Ich habe ein Problem damit über dem Ärmel neue Maschen anzuschlagen. Damit ist gemeint, dass man über den 10 abgeketteten Maschen neue anschlagen soll, allerdings ist es danach schwer zu stricken, weil die Spitzen der Naseln sich nicht mehr berühren können, da die Spannweite nicht ausreicht. Ich weiß leider nicht mehr, wie ich weiter machen soll. LG
12.01.2014 - 21:57DROPS Design respondió:
Liebe Hatice, leider habe ich Ihr Problem nicht ganz verstanden. Könnten Sie das bitte genauer erklären oder sich die Ausführung von dem Laden erklären lassen, in dem Sie die Wolle gekauft haben.
13.01.2014 - 10:03
![]() Valeria escribió:
Valeria escribió:
Grazie per la risposta veloce.per le asole tutto ok.non avevo ben capito...invece per gli aumenti nn trovo riscontro.-Sto realizzando per la taglia M. e alla fine mi ritrovo non con 158 m. 148 maglie.Dove sbaglio? grazie
25.03.2013 - 16:31DROPS Design respondió:
Buongiorno, vediamo di analizzare insieme gli aumenti, magari troviamo la soluzione. Allora, gli aumenti iniziano con 1° f. a m. rasata, 1 aumento per lato per 12 volte, quindi da 114 m. dovremmo averne 138 per la taglia M. Poi quando il lavoro misura 4 cm bisogna aumentare 1 m. a entrambi i lati dei due segnapunti ai lati, quindi 4 aumenti per f., per 5 volte, per cui 20 aumenti in totale: da 138 si passa a 158 m.. Spero che sia tutto chiaro e che possa proseguire nel suo lavoro. Buon lavoro!!
25.03.2013 - 18:03
![]() Valeria escribió:
Valeria escribió:
Non è spiegato le asole ogni quanti ferri vanno distribuiti..
25.03.2013 - 12:33DROPS Design respondió:
Buongiorno, le asole fanno fatte secondo le indicazioni presenti nelle spiegazioni, sono indicati i cm, non i f.. Buon lavoro!
25.03.2013 - 13:22
|
||||||||||||||||
Spanish Flower#spanishflowercardigan |
||||||||||||||||
|
|
||||||||||||||||
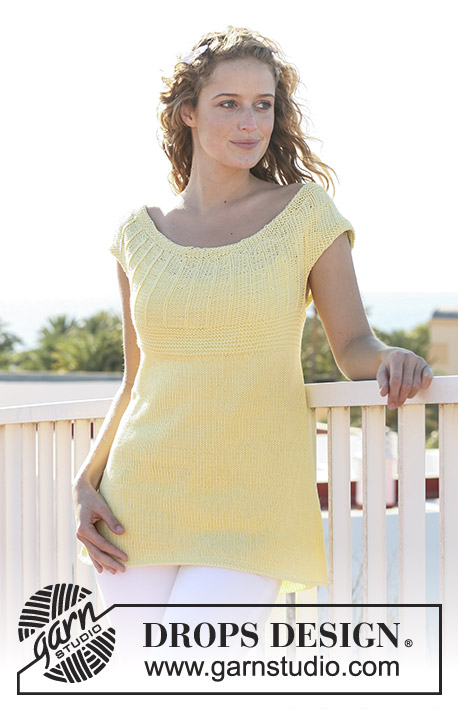
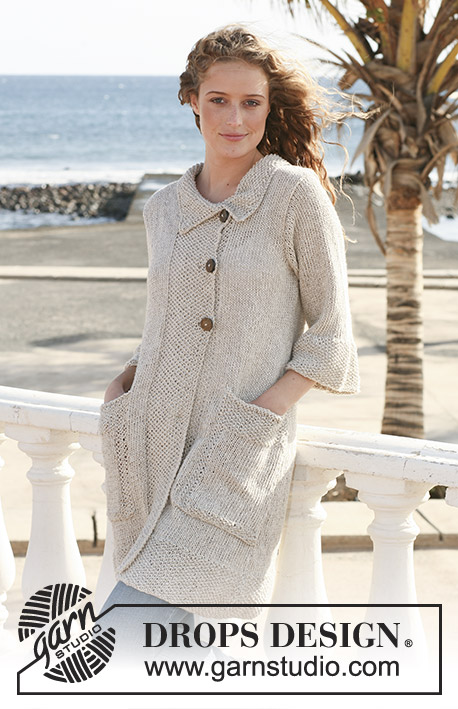
Bolero DROPS en ”Paris” de manga corta y ancha con patrón de calados. Talla S – XXXL.
DROPS 113-23 |
||||||||||||||||
|
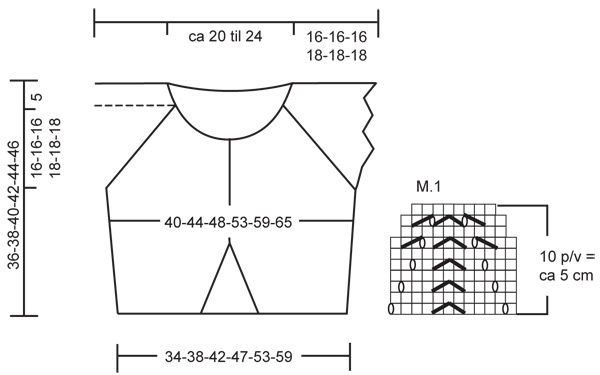
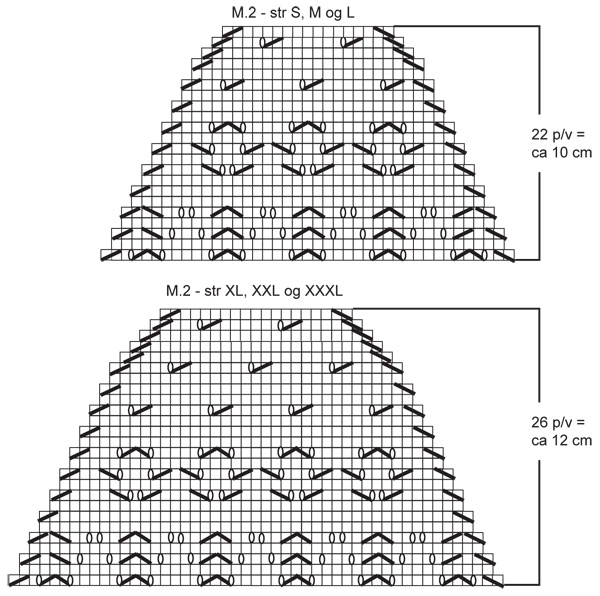
PT MUSGO ( de ida y vta en ag): Todas las filas del derecho. TIP PARA LOS AUMENTOS: Aum 1 pt hacia el centro del delantero por el LD dentro de 5 pt en pt musgo haciendo 1 HEB (lazada). En la fila de vta trabajar la HEB como pt retorcido para evitar los agujeros. PATRÓN: Ver diagramas M.1 y M.2 - los diagramas muestran el patrón por el LD. OJALES: Hacer los ojales en la cenefa derecha. 1 ojal = trabajar juntos el 2º y 3er pt desde el centro del delantero y hacer 1 HEB. Hacer los ojales cuando la labor mida: TALLA S: 14, 20 y 26 cm. TALLA M: 15, 21 y 27 cm. TALLA L: 15, 22 y 29 cm. TALLA XL: 16, 23 y 30 cm. TALLA XXL: 16, 24 y 32 cm. TALLA XXXL: 17, 25 y 33 cm DISMINUCIONES DEL RAGLÁN: Dism 1 pt a cada lado de 4 pts en pt musgo. Por el LD: Antes de los 4 pts : 2 pjd. Después de los 4 pts: desl 1 pt del derecho, 1 d., pasar el pt desl por encima. Por el LR: Antes de los 4 pts: trabajar 2 pts juntos de revés retorcido Después de los 4 pts: 2 pjr. ------------------------------------------------------------------------- CUERPO: Se trabaja de ida y vta en ag circular desde el centro del delantero. Mont 102-114-130-146-166-186 pts (incl 5 pts de la cenefa a cada lado hacia el centro del delantero) en ag circular tamaño 5 mm y Paris. Insertar un marcapuntos (MP) a 22-25-29-33-38-43 pts de cada lado (=58-64-72-80-90-100 pts para la espalda). Trabajar 4 filas en pt musgo - VER ARRIBA - (la 1ª fila = por el LD). Continuar en pt jersey con 5 pts de la cenefa en pt musgo a cada lado. AL MISMO TIEMPO en la 1ª fila en pt jersey aum 1 pt dentro de los 5 pts de la cenefa a cada lado - VER TIP PARA LOS AUMENTOS - y repetir el aum en cada segunda fila un total de 12 vcs. AL MISMO TIEMPO cuando la labor mida 4 cm aum 1 pt a cada lado de ambos MP de los lados y repetir el aum cada 2-2.5-3-3-3.5-3.5 cm un total de 5 vcs. AL MISMO TIEMPO, cuando la labor mida 14-15-15-16-16-17 cm hacer LOS OJALES en la cenefa del delantero derecho - ver arriba. RECUERDE MANTENER LA MISMA TENSIÓN DE LA MUESTRA! Cuando estén completados los aum de la cenefa y los lados tenemos 146-158-174-190-210-230 pts en la fila. Cuando la labor mida aprox 15-17-19-19-21-23 cm - ajustar para que la sig fila sea por el LR - trabajar 2 filas en pt musgo en 18 pts de cada lado (= 9 pts a cada lado del MP) con los pts restantes como antes. Después de estas 2 filas cerrar 10 pt a cada lado (= 5 pts a cada lado del MP) para la sisa - cerrar con pts del derecho por el LR. En la sig fila (por el LD) mont flojo 69-69-69-81-81-81 pts nuevos para la manga sobre cada sisa = 264-276-292-332-352-372 pts - continuar en pt musgo en los 4 pts a cada lado de la manga. TRABAJAR LA SIG FILA COMO SIGUE: (=LR): 5 pts en pt musgo, 25-28-32-36-41-46 pts del revés, 77-77-77-89-89-89 pts del derecho, 50-56-64-72-82-92 pts del revés, 77-77-77-89-89-89 pts del derecho, 25-28-32-36-41-46 pts del revés, 5 pts en pt musgo. Ahora trabajar 2 filas en pt jersey en los 69-69-69-81-81-81 pts de la manga a cada lado, trabajar el resto de los pts como antes. AHORA LEER TODA LA SECCIÓN SIGUIENTE ANTES DE CONTINUAR! Continuar como sigue: 5 pts de la cenefa en pt musgo, 25-28-32-36-41-46 pts en pt jersey, 4 pts en pt musgo, 4 pts en pt jersey, M.1 en los 60-60-60-72-72-72 pts, 5 pts en pt jersey, 4 pts en pt musgo, 50-56-64-72-82-92 pts en pt jersey, 4 pts en pt musgo, 4 pts en pt jersey, M.1 en los 60-60-60-72-72-72 pts, 5 pts en pt jersey, 4 pts en pt musgo, 25-28-32-36-41-46 pts en pt jersey y 5 pts de la cenefa en pt musgo. DISMINUCIONES DE RAGLÁN: Al mismo tiempo en la fila 3 de M.1 dism para el RAGLÁN - ver arriba - en cada segunda fila un total de 14-14-14-15-15-15 vcs y después en cada fila 3-3-3-5-5-5 vcs. AL MISMO TIEMPO después de M.1 ( quedan 41-41-41-49-49-49 pts para cada manga) trabajar M.2 (ver el diagrama para la talla) en la mangas - AL MISMO TIEMPO continuar dism para el raglán (marcado en M.2). LÍNEA DEL ESCOTE: Al mismo tiempo, cuando la labor mida 27-28-30-31-33-34 cm (desde la fila de montaje de los pts) desl 7-8-9-11-11-12 pts de cada lado hacia el centro del delantero a ganchos aux para el escote. Dism 1 pt a cada lado hacia el centro del delantero al inicio de cada fila hasta que las dism del raglán estén completadas. Después de M.2 quedan aprox 68-78-92-98-116-134 pts en la fila. ESCOTE: Recoger (por el LD) 12-17 pts ( incl los pts de los ganchos aux.) en la parte delantera del escote, tejer todos los pt que hay en la ag del derecho y levantar 12 a 17 pts ( incl los pts de los ganchos aux.) al final de la fila = aprox 92 a 168 pts. Tejer 1 fila del derecho por el LR, AL MISMO TIEMPO dism pts repartidos hasta que queden 90-94-96-104-108-112 pts (no dism en las partes delanteras ni en el raglán). Trabajar 2 filas del derecho y rem flojo. REMATE A GANCHILLO: Trabajar un remate a lo largo de la fila de montaje de las mangas con ag. de ganchillo tamaño 4 mm como sigue: 1 p.b. en el 1er pt, * 3 p.de cad., saltar aprox 1 cm, 1 p.b. en el sig pt *, repetir de * a *. Coser los botones |
||||||||||||||||
Explicaciones del diagrama |
||||||||||||||||
|
||||||||||||||||
 |
||||||||||||||||
 |
||||||||||||||||
¿Terminaste este patrón?Entonces, etiqueta tus fotos con #dropspattern #spanishflowercardigan o envíalas a la galería #dropsfan. ¿Necesitas ayuda con este patrón?Encontrarás 25 videos tutoriales, un espacio para comentarios/preguntas y más visitando la página del patrón en garnstudio.com © 1982-2026 DROPS Design A/S. Todos los derechos reservados. Este documento, incluyendo todas sus sub-secciones, está protegido por los derechos de autor (copyright). Lee más acerca de lo que puedes hacer con nuestros patrones en la parte de abajo de cada patrón de nuestro sitio. |
||||||||||||||||


Con más de 40 años en el diseño de modelos de punto y de ganchillo, DROPS Design ofrece una de las más vastas colecciones de patrones gratuitos en el internet - traducidos en 17 idiomas. Al día de hoy, contamos con 324 catálogos y 12290 patrones - de los cuales 11675 están traducidos en español.
Nosotros trabajamos con mucho esmero para brindarte lo mejor que las labores de punto y ganchillo tienen para ofrecer,inspiración y consejos, así como hilos de magnífica calidad a precios increíbles! Te gustaría usar nuestros patrones para otro fin además del uso personal? Puedes leer acerca de lo que estás permitida a hacer en el texto de Copyright en la parte de abajo de todos nuestros patrones. Felices labores!
Escribe un comentario sobre DROPS 113-23
¡Nos encantaría saber qué piensas acerca de este patrón!
Si quieres escribir una pregunta referente al patrón, por favor asegúrate de elegir la categoría correcta en el formulario debajo, para acelerar el proceso de respuesta. Los campos obligatorios están marcados con un *.