
Categorías populares
¿Buscas un hilo?


Comentarios / Preguntas (71)
![]() Ludivine escribió:
Ludivine escribió:
Concernant les diminutions faut il déplacer les marqueurs à chaque rangs ou faut il les laisser sur le premier rang ? Merci
29.11.2017 - 21:08DROPS Design respondió:
Bonjour Ludivine, placez les marqueurs au 1er rang et faites-les suivre pour qu'ils restent bien en place, ils servent de repères pour les diminutions. Utilisez un fil marqueur que vous passez à chaque rang alternativement sur l'endroit et sur l'envers pour qu'ils restent bien en place. Bon crochet!
30.11.2017 - 08:44
![]() Margo escribió:
Margo escribió:
How many ball of wool of each type used do I need for this pattern. Thank you
27.04.2017 - 21:12DROPS Design respondió:
Dear Margo, in S/M size you will need 5 balls (250 g) of DROPS Cotton Viscose and 3 balls (75 g) of DROPS Kid-Silk. Choose your size and count the balls. Happy knitting!
27.04.2017 - 21:34
![]() Angela escribió:
Angela escribió:
Am i reading this right they use 2 different types of yarn. So you would use 2 strands together to crochet this piece?
27.04.2017 - 17:41DROPS Design respondió:
Dear Angela! You have to use two strands together to crochet this shoulder wrap. Happy knitting!
27.04.2017 - 18:00
![]() Yen escribió:
Yen escribió:
Please explain row 7. "ROW 7: 8 ch, 1 sc in first ch-loop, * 5 ch, 1 sc in next ch-loop *, repeat from *-*. " What do you mean by 1sc in first ch-loop and 1sc in next ch-loop? And how many total ch loop for row 7? Sorry, I normally crochet with diagram and a bit confused with instruction. Thanks
13.03.2017 - 00:01DROPS Design respondió:
Dear Yen, you will always have the same number of ch-spaces,work 8 ch to turn with at the beg of row 7, then work 1 sc in 1st ch-space (= last ch-space on previous row), then repat *5 ch, 1 sc in next ch-space) and repeat this row until stated measurement for your size. Happy crocheting!
13.03.2017 - 11:08
![]() RWolowiec escribió:
RWolowiec escribió:
When you state there is to be 17 sc between the markers, it should really state that you start counting from the last marker. That makes 16 in between, not 17. Nothing was working until I did this. Very confusing.
06.03.2017 - 06:38
![]() Faron escribió:
Faron escribió:
Server mind about the dec term. I googled it :). I would still like to know if sc is supposed to be stitch from here on. Thanks in advance. I'm not feeling so desperate anymore.
21.05.2016 - 19:40DROPS Design respondió:
Dear Faron, about decrease, you've to dec 1 st by skipping 1 sc after marker if you want to dec on the left side of the markers, and by skipping 1 sc before marker if you want to dec on the right side of the markers. And yes, you,ve to work sc from here on. Happy crocheting!
21.05.2016 - 20:18
![]() Faron Antoine-Shrieves escribió:
Faron Antoine-Shrieves escribió:
I am stuck! After placing the markers, you say to dec1 st to left of marker. What does dec mean? And what stitch am I doing in that row? Do I single crochet that row? This point in the pattern is very confusing to me. It's so cute and I want to finish. Otherwise I've wasted many hours. I'm desperate. Please, help!
21.05.2016 - 19:24DROPS Design respondió:
Dear Faron, about decrease, you've to dec 1 st by skipping 1 sc after marker if you want to dec on the left side of the markers, and by skipping 1 sc before marker if you want to dec on the right side of the markers. And yes, you,ve to work sc from here on. Happy crocheting!
21.05.2016 - 20:18
![]() Sharon escribió:
Sharon escribió:
When the pattern reads "with one thread of each quality" does this mean to crochet with both yarns for each stitch (2 strands of yarn used in each stitch)? Thanks.
20.04.2016 - 09:55DROPS Design respondió:
Dear Sharon, that's correct, you will work with both strands tog just as if there was just one. Happy crocheting!
20.04.2016 - 10:58
![]() Martine Trépanier escribió:
Martine Trépanier escribió:
Le rang 7 n'est pas claire car on demande de faire 1 ms dans le dernier arceau, mais il reste la moitié de l'arceau. Que dois-t-on faire ?
15.04.2016 - 00:56DROPS Design respondió:
Bonjour Mme Trépanier, au rang 7, on commence par 8 ml pour le 1er arceau, puis on répète tout le rang (1 ms dans l'arceau suivant, 5 ml), et on termine par 1 ms dans le dernier arceau. En répétant le rang 7, on termine par 1 ms dans l'arceau de 8 ml du début du rang précédent. Veillez à toujours bien avoir le même nombre d'arceaux sur chaque rang. Bon crochet!
15.04.2016 - 09:18
![]() Susan Hardy escribió:
Susan Hardy escribió:
I have the correct amount of stitches and have placed 11 markers but the pattern says using 12 markers. !!
14.06.2014 - 11:07DROPS Design respondió:
Dear Mrs Hardy, in 2nd size, you work 8 st, put 1st marker, then work *17 sts, put 1 marker*, repeat from *-* a total of 11 times, 9 sts remain after last marker = 204 sts. Happy crocheting!
16.06.2014 - 10:19
|
|
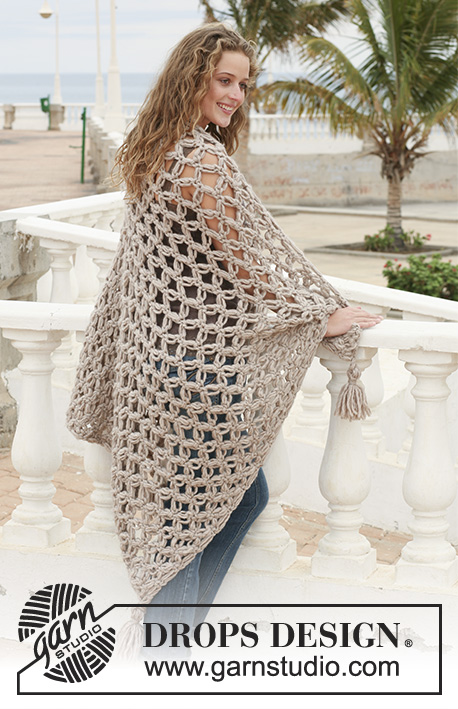
Milano#milanocardigan |
|
|
|
|
Capa DROPS a ganchillo en ”Cotton Viscose” y ”Kid-Silk”.
DROPS 111-38 |
|
|
CAPA: Se trabaja desde el borde inferior hacia arriba. Trabajar 210-230-250-270 p.de cad. con ag de ganchillo tamaño 4 mm y 1 hilo de cada calidad. FILA 1 (=LD): 1 p.b. en el 2º p.de cad. desde la ag., 1 p.b. en cada uno de los sig 4-5-6-7 p.de cad., saltar 1 p.de cad., *1 p.b. en cada uno de los sig 8 p.de cad., saltar 1 p.de cad*, repetir de * a * y finalizar con 1 p.b. en cada uno de los últimos 5-6-7-8 p.de cad = 186-204-222-240 p.b. FILA2-5: 1 p.b. en cada p.b. - girar cada fila con 1 p.de cad. FILA 6: *5 p.de cad., saltar 2 p.b., 1 p.b. en el sig p.b.*, repetir de * a * = 62-68-74-80 arcos. FILA 7: 8 p.de cad., 1 p.b. en el 1er arco, * 5 p.de cad., 1 p.b. en el sig arco*, repetir de * a *. Repetir la fila 7 hasta que la labor mida aprox 25-27-29-31 cm - ajustar para que la sig fila sea por el LR. SIG. FILA: 1 p.de cad. y 3 p.b. en el cada arco a lo largo de toda la fila = 186-204-222-240 p.b. SIG 2 FILAS: 1 p.b. en cada p.b. Ahora insertar 11-12-13-14 marcapuntos (MP) en la labor (por LD) como sigue: El primer MP después de 8-8-9-9 p.b., y luego 17 p.b. entre cada MP = 8-9-9-10 p.b. restantes después del último MP. En la sig fila dism 1 pt a la izquierda de todos los MP (dism 1 pt. saltando 1 p.b. después del MP) = un total de 11-12-13-14 pts dism en la fila. Trabajar una fila por el LR con 1 p.b. en cada p.b. En la sig fila dism 1 pt a la derecha de todos los MP (saltando 1 p.b. antes del MP). Repetir la dism en cada fila por el LD un total de 9 vcs, alternando las dism a la derecha y a la izquierda de los MPs. Cuando se han completado todas las dism hay 87-96-105-114 p.b. en la fila. Trabajar 2 filas con 1 p.b. en cada p.b., cortar y asegurar el hilo. BANDA DELANTERA IZQUIERDA: Trabajar aprox 55-67 p.b. a lo largo del delantero - aprox 3 p.b. en cada arco y 2 p.b. por cada 3 filas con p.b. Asegúrese de que el borde no queda ni demasiado apretado ni demasiado flojo. Ahora trabajar 4 filas con 1 p.b. en cada p.b. BANDA DELANTERA DERECHA: Trabajar de la misma manera que la banda delantera izquierda, pero después de 2 filas trabajar 2 ojales. 1 ojal = 3 p.de cad., saltar 3 p.b., en la sig fila trabajar 3 p.b. en el arco. Colocar el ojal de arriba a 2 cm del borde superior y el sig a 6 cm del primero. Coser los botones. |
|
 |
|
¿Terminaste este patrón?Entonces, etiqueta tus fotos con #dropspattern #milanocardigan o envíalas a la galería #dropsfan. ¿Necesitas ayuda con este patrón?Encontrarás 2 videos tutoriales, un espacio para comentarios/preguntas y más visitando la página del patrón en garnstudio.com © 1982-2026 DROPS Design A/S. Todos los derechos reservados. Este documento, incluyendo todas sus sub-secciones, está protegido por los derechos de autor (copyright). Lee más acerca de lo que puedes hacer con nuestros patrones en la parte de abajo de cada patrón de nuestro sitio. |


Con más de 40 años en el diseño de modelos de punto y de ganchillo, DROPS Design ofrece una de las más vastas colecciones de patrones gratuitos en el internet - traducidos en 17 idiomas. Al día de hoy, contamos con 324 catálogos y 12290 patrones - de los cuales 11673 están traducidos en español.
Nosotros trabajamos con mucho esmero para brindarte lo mejor que las labores de punto y ganchillo tienen para ofrecer,inspiración y consejos, así como hilos de magnífica calidad a precios increíbles! Te gustaría usar nuestros patrones para otro fin además del uso personal? Puedes leer acerca de lo que estás permitida a hacer en el texto de Copyright en la parte de abajo de todos nuestros patrones. Felices labores!
Escribe un comentario sobre DROPS 111-38
¡Nos encantaría saber qué piensas acerca de este patrón!
Si quieres escribir una pregunta referente al patrón, por favor asegúrate de elegir la categoría correcta en el formulario debajo, para acelerar el proceso de respuesta. Los campos obligatorios están marcados con un *.