
Categorías populares
¿Buscas un hilo?


Comentarios / Preguntas (32)
![]() Frances escribió:
Frances escribió:
I cannot access the pattern, I have selected the M size female, could you please email it to me
25.07.2025 - 08:31DROPS Design respondió:
Hi Frances, please change your browser or device and try again, the pattern is also available HERE. Happy knitting!
25.07.2025 - 08:52
![]() Gemma escribió:
Gemma escribió:
Hola . Me gustaria hacer este modelo con el hilo alpaca, pero no se tejer en circular,¿es posible hacerlo con 2 agujas que no sean circulares? la medidas son las mismas? ¿como podre hacer loa aumentos y las disminuciones? saludos y gracias
27.04.2023 - 00:00
![]() Jeni S escribió:
Jeni S escribió:
Instructions for body piece state: when piece measures 12cm dec 1 st on both sides of MT. The MT has been placed at beg of round after piece measures 10cm, so the MT only has one side. To dec 1 st each side, does this mean dec 1 st at beg and dec 1 st at end of row?
26.02.2023 - 10:19DROPS Design respondió:
Dear Jeni, you have inserted 2 markers and need to decrease on each side of each marker (= 4 decreases). Decrease 1 st at the beginning of the round, then before and after the marker on the other side and finally decrease 1 st at the end of the round. Happy knitting!
26.02.2023 - 20:34
![]() Kirsten Vejerslev Mikkelsen escribió:
Kirsten Vejerslev Mikkelsen escribió:
Jeg forstår slet ikke slutningen på kraven. "samtidig tages der 1 m ud i hver af de 9 nederste retpartier (set fra retsiden) i hver side. " , hvad skal jeg gøre?
19.04.2022 - 16:21DROPS Design respondió:
Hej Kirsten, du tager 1 maske ud i hver af de 9 nederste retmasker (i ribben) for at kanten skal blive løs. Du ser på billedet at den gerne må være lidt ekstra løs :)
22.04.2022 - 14:09
![]() Annouchka C escribió:
Annouchka C escribió:
Je suis novice. J'aimerais faire le pull gris col chale mais avec une autre laine. Je voudrais utiliser la drops air. Si j'ai bien compris le mode de calcul : drops alpaca = 167 m pour 50 gr Le pull de base utilise 2 x 350 gr d'alpaca Je peux changer avec drops air 1 fil = 28 gr = 150 m Donc il faut que j'achète combien de pelotes drops air ? Merci beaucoup pour votre aide.
16.02.2022 - 15:03DROPS Design respondió:
Bonjour Annouchka, pas vraiment car le métrage des deux fils est différent, utilisez notre convertisseur (pensez à sélectionner "2 fils" pour Alpaca - et retrouvez la règle de calcul dans cette leçon. 1 pelote Air = 50 g; Bon tricot!
16.02.2022 - 16:36
![]() Seada escribió:
Seada escribió:
At what point do you sew the shoulder seams? I don't see that in the pattern.
21.06.2021 - 02:15DROPS Design respondió:
Dear Seada, for the shoulders, you sew together the 21-22-22-23-23-24 sts cast onf for each shoulder. Hope this will help. Happy knitting!
21.06.2021 - 08:34
![]() BarbAra Boyer escribió:
BarbAra Boyer escribió:
Bonjour. When I bind off 18 stitches for the front do then finish the row, knit back to blinded off stitches and just continue with one side of the front? Thank you
07.04.2021 - 15:14DROPS Design respondió:
Dear BarbAra, you can continue knitting, finish that side, and go back, and knit up the other side later. Happy Knitting!
07.04.2021 - 15:38
![]() Deborah escribió:
Deborah escribió:
Sorry I’m still not understanding. You say to K3P2 but on the row the increases are made every stitch is knitted isn’t it? Then you cast off in rib which I still don’t understand? And am I I creasing by 18 stitches?
15.01.2019 - 17:48DROPS Design respondió:
Dear Deborah, the inc are made on a RS row, so that you will get seen from RS the K3 x 9 at the beg and at the end of collar, these sts will be worked P from WS. Yes you are increasing a total of 18 sts (9 sts at the beg of row and 9 sts at the end of row in each of the first K2 sections seen from RS). Happy knitting!
16.01.2019 - 08:04
![]() Deborah escribió:
Deborah escribió:
Hi. I’m at the point of finishing the collar and just need to clarify that I should increase by one stitch on each of the 4 stitch sections of the 36 stitches on each side, giving a total of 18 new stitches on the knit row before the final cast off of K2P2, i.e.: 194 stitches to cast off in the final row? And why do I need to revert to K2P2 on that cast off row when the previous row was K? Many thanks
15.01.2019 - 14:26DROPS Design respondió:
Dear Deborah, you first work back and forth with rib until collar measures 10-12 cm (see size), then continue with rib, but at the same time, slip the first 4 sts at the beg of every row on a thread (work the 4 sts then slip them on a thread) until there are 36 sts on a thread on each side. Now work all sts back on needle and increase 1 stitch in each of the first 9 K sections + 1 stitch in each of the last 9 K section (seen from RS) on each side, so that you will have K3/P2 x 9 then continue with K2/P2 and finish with ribbing K3/P2 x 9. Happy knitting!
15.01.2019 - 16:50
![]() Deborah escribió:
Deborah escribió:
Can I knit this using 1 thread alpaca boucle rather than 2 threads alpaca?
15.12.2018 - 10:24DROPS Design respondió:
Dear Deborah, you can use alpaca blouclè for this pattern, but remember to check your gauge first! Happy crafting!
15.12.2018 - 18:30
|
|
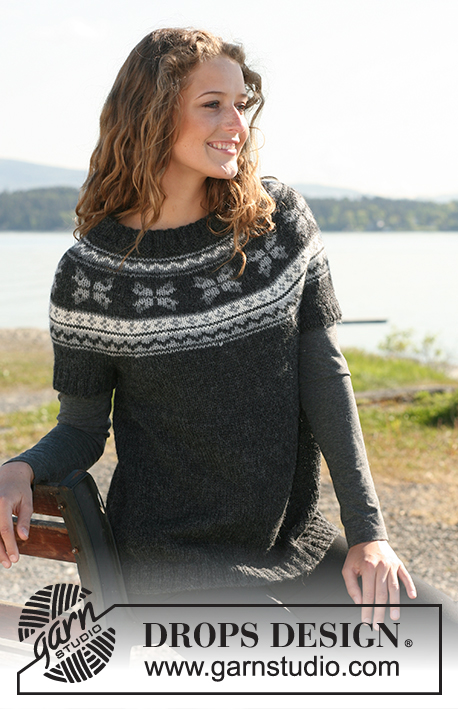
DROPS 108-21 |
|
|
|
|
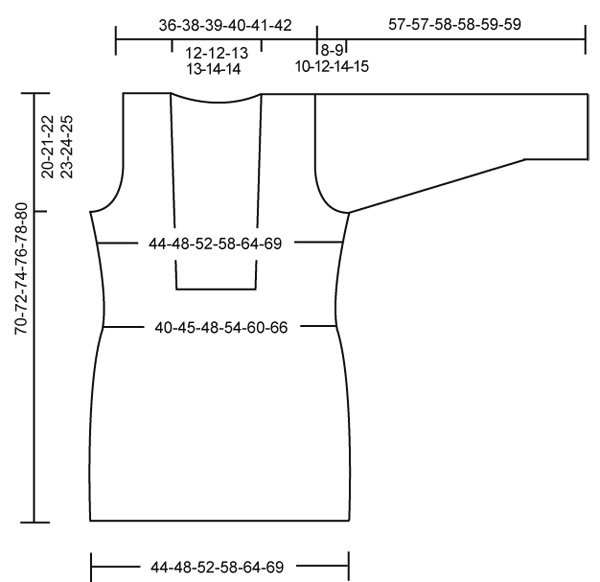
Suéter de punto DROPS con cuello largo en 2 hilos “Alpaca”. Talla S – XXXL.
DROPS 108-21 |
|
|
Cuerpo: Se trabaja en redondo con ag circular. Mon 160-176-188-208-228-248 pts en ag circular 4.5mm con 1 hilo de cada color. Tejer 1 vta del revés y cont en pt resorte, 2d/2r. Cuando la pieza mida 10 cm cambiar a ag circular 5mm y cont en pt jersey, al mismo tiempo dism 12 pts repartidos equitativamente en la primera vta = 148-164-176-196-216-236 pts. Colocar 1 marcapuntos (MP) al inicio de la vta y 1 después de 74-82-88-98-108-118 pts (para marcar los lados). Recuerde tejer la muestra! Cuando la pieza mida 12 cm dism 1 pt a ambos lados de cada MP (= 4 dism por vta) cada 9 cm un total de 3 veces = 136-152-164-184-204-224 pts. Ahora leer toda la sección siguiente antes de continuar! Cuando la pieza mida 36 cm aum 1 pt a ambos lados de cada MP cada 5-5-6-6-7-7 cm un total de 3 veces. Al mismo tiempo cuando la pieza mida 37-38-39-40-41-42 cm rem los 16-16-18-18-20-20 pts centrales en la pieza delantera y cont tejiendo de ida y vuelta en la ag. Cuando la pieza mida 48-49-50-51-52-53 cm dism 1 pt a cada lado hacia el centro delantero. Al mismo tiempo cuando la pieza mida 50-51-52-53-54-55 cm rem 6 pts a cada lado para la sisa (es decir, 3 pts a ambos lados de cada MP). Ahora completar las piezas delantera y espalda por separado. Espalda: = 68-76-82-92-102-112 pts. Rem para dar forma a la sisa a cada lado al inicio de cada vta: 2 pts 1-2-3-4-5-7 veces y 1 pt 1-2-2-4-6-6 veces = 62-64-66-68-70-72 pts. Cuando la pieza mida 68-70-72-74-76-78 cm rem los 18-18-20-20-22-22 pts centrales para el cuello y dism 1 pt en la línea del escote en la sig vta = 21-22-22-23-23-24 pts restantes en cada hombro. Rem cuando la pieza mida 70-72-74-76-78-80 cm. Pieza delantera derecha: = 25-29-31-36-40-45 pts. Rem para la sisa a un lado como se describe para la espalda. Cuando la pieza mida 60-61-62-63-64-65 cm dism 1 pt hacia el centro delantero. Después que han sido completadas todas las dism hay 21-22-22-23-23-24 pts restantes en el hombro. Rem cuando la pieza mida 70-72-74-76-78-80 cm. Pieza delantera izquierda: Como la pieza delantera derecha, pero a la inversa. Manga: Se trabaja en redondo con ag de doble punta. Mon 44-44-48-48-52-52 pts en ag de doble punta 4.5mm con 1 hilo de cada color. Colocar 1 MP al inicio de la vta. Tejer 1 vta del revés y cont en pt resorte, 2d/2r. Cuando la pieza mida 8 cm cambiar a ag 5mm y cont en pt jersey, al mismo tiempo dism 5-3-5-4-6-4 pts repartidos equitativamente en la primera vta = 39-41-43-44-46-48 pts. Cuando la pieza mida 10 cm aum 1 pt a cada lado del MP cada 3.5-3-3-2-2-2 cm un total de 11-12-13-15-16-17 veces = 61-65-69-74-78-82 pts. Cuando la pieza mida 49-48-48-46-45-44 cm – Nota! Menos en las tallas más grandes por copete de manga más largo y hombro más ancho – rem 6 pts para la sisa al centro bajo la manga (axila) (es decir, 3 pts a cada lado del MP) y cont tejiendo de ida y vta en la ag. Rem para dar forma al copete de manga a cada lado al inicio de cada vta: 2 pts 3-3-4-4-4-4 veces y 1 pt 1-2-2-4-5-7 veces, ahora rem 2 pts a cada lado hasta que la pieza mida 56-56-57-57-58-58 cm, rem 3 pts a cada lado 1 vez y rem los pts restantes. La pieza mida 57-57-58-58-59-59 cm. Cuello: Levantar 176 a 124 pts (múltiplo de 4) con 1 hilo de cada color en ag circular 4.5mm a lo largo de la línea del escote en la pieza delantera derecha, alrededor de la línea del escote en la pieza de la espalda y a lo largo de la línea del escote en la pieza delantera izquierda. Tejer 1 vta del derecho por el lado revés (LR) de ida y vuelta en la aguja y cont como sigue: 1 pt de orillo, resorte 2d/2r, y terminar con 1 pt de orillo. Cont de esta forma hasta que el resorte mida 10-10-11-11-12-12 cm. Ahora cont en pt resorte, pero a la vez desl 4 pts a un gancho o seguro aux a cada lado al inicio de cada vta hasta que tenga 36 pts en cada gancho. Ahora desl todos los pts de vuelta a la ag y tejer 1 vta del derecho con todos los pts, al mismo tiempo aum 1 pt en cada una de las primera/últimas 9 secciones de derechos (vistas desde el LD) a cada lado. Rem en la sig vta en pt resorte. Colocar el lado derecho del resorte sobre el lado izquierdo debajo de la línea del escote en la pieza delantera y unir a través de las dos piezas (capas). Terminación: Colocar mangas. |
|
 |
|
¿Terminaste este patrón?Entonces, etiqueta tus fotos con #dropspattern o envíalas a la galería #dropsfan. ¿Necesitas ayuda con este patrón?Encontrarás 20 videos tutoriales, un espacio para comentarios/preguntas y más visitando la página del patrón en garnstudio.com © 1982-2026 DROPS Design A/S. Todos los derechos reservados. Este documento, incluyendo todas sus sub-secciones, está protegido por los derechos de autor (copyright). Lee más acerca de lo que puedes hacer con nuestros patrones en la parte de abajo de cada patrón de nuestro sitio. |


Con más de 40 años en el diseño de modelos de punto y de ganchillo, DROPS Design ofrece una de las más vastas colecciones de patrones gratuitos en el internet - traducidos en 17 idiomas. Al día de hoy, contamos con 324 catálogos y 12290 patrones - de los cuales 11675 están traducidos en español.
Nosotros trabajamos con mucho esmero para brindarte lo mejor que las labores de punto y ganchillo tienen para ofrecer,inspiración y consejos, así como hilos de magnífica calidad a precios increíbles! Te gustaría usar nuestros patrones para otro fin además del uso personal? Puedes leer acerca de lo que estás permitida a hacer en el texto de Copyright en la parte de abajo de todos nuestros patrones. Felices labores!
Escribe un comentario sobre DROPS 108-21
¡Nos encantaría saber qué piensas acerca de este patrón!
Si quieres escribir una pregunta referente al patrón, por favor asegúrate de elegir la categoría correcta en el formulario debajo, para acelerar el proceso de respuesta. Los campos obligatorios están marcados con un *.