
Categorías populares
¿Buscas un hilo?


Comentarios / Preguntas (24)
![]() Ada escribió:
Ada escribió:
What is DROPS Extra 0-407 equivalent to in US yarns
24.07.2025 - 14:32DROPS Design respondió:
Dear Ada, read more about the yarn used for this pattern here. Happy crocheting!
25.07.2025 - 10:17
![]() Teresa Crespo escribió:
Teresa Crespo escribió:
There should really be a complete tutorial of these beautiful slippers.
27.04.2020 - 04:45DROPS Design respondió:
Dear Mrs Crespo, you will find here a video showing how to work these slippers - you will just work less rounds over the opening for foot in this pattern as shown in the video. Happy crocheting!
27.04.2020 - 09:46Susan escribió:
Hi. I am a European size 41. As the second size ends at 40 and the third size starts at 42, could you please advise which size I should make to get a 41?
14.04.2016 - 03:12DROPS Design respondió:
Dear Susan, if your feet are quite thin work rather the 2nd size working more rounds to get finished measurements if necessary, otherwise you can work larger size and adjust height - in both case try on the slipper to adjust length. Happy crocheting!
14.04.2016 - 09:09
![]() Zoe escribió:
Zoe escribió:
I really need some help. I literally do not understand this pattern. I have tried several times to do this pattern and each time it looks like a deformed flower. Is there another way you can word the pattern or show me an actual video of it please?
22.12.2014 - 15:49DROPS Design respondió:
Dear Zoe, for any individual assistance, you are welcome to contact your DROPS Store they can give you also any tips & advice. Happy crocheting!
22.12.2014 - 16:09
![]() Zoe escribió:
Zoe escribió:
I really need some help. I literally do not understand this pattern. I have tried several times to do this pattern and each time it looks like a deformed flower. Is there another way you can word the pattern or show me an actual video of it please?
22.12.2014 - 01:34DROPS Design respondió:
Dear Zoe, slippers are worked in the round; starting from the toe with inc to the opening of leg, then worked back and forth, and finally placed double to crochet back of heel tog. Crochet then a border around the opening for leg. You will find relevant videos to that pattern under the tab "video" at the right side of the picture (ring of ch, sc/dc, increase, crochet tog...). Happy crocheting!
22.12.2014 - 15:15
![]() Lindsey escribió:
Lindsey escribió:
For the heel instructions- when it says divide and crochet back and forth am I crocheting just 10 stitches at a time either side or so I crochet the 20 stitches round and leave the gap at the back? Thanks
23.11.2013 - 14:50DROPS Design respondió:
Dear Lindsey, start crocheting back and forth from beg of round, but instead of joining, turn and work from WS until end of row on all 20 sts. Turn again and work from RS until end of row. The beg of rows are now on the top of foot. Happy crocheting!
25.11.2013 - 08:56Riaana escribió:
Thanks for the reply! And where the pattern say 5-5-6 what does that mean the total of sc you have to make, and the end you must have 16
05.04.2013 - 21:24DROPS Design respondió:
Dear Riaana, this pattern is written in 3 sizes, on 2nd round, you work 5 sc in 1st and 2nd size and 6 sc in larger size. You then inc from round 3 until you get 15 sc in size 1st + 2nd size and 18 sc in larger size. Happy crocheting!
06.04.2013 - 10:44Riaana escribió:
Thanks for the reply! And where the pattern say 5-5-6 what does that mean the total of sc you have to make, and the end you must have 16
05.04.2013 - 19:36Riaana escribió:
I just want to know where do I get the crochet info?
05.04.2013 - 15:59DROPS Design respondió:
Dear Riaanna, the crochet info is at the beg of the pattern, under "Crochet tension". Happy crocheting!
05.04.2013 - 16:13
![]() Dörte Cords escribió:
Dörte Cords escribió:
Könnte ich das als Zeichnung bekommen, wie die einzelen Stücke aussehen müssen, bekomme das so nicht hin.Mfg
31.12.2012 - 16:18
|
|
Rosenelfe |
|
 |
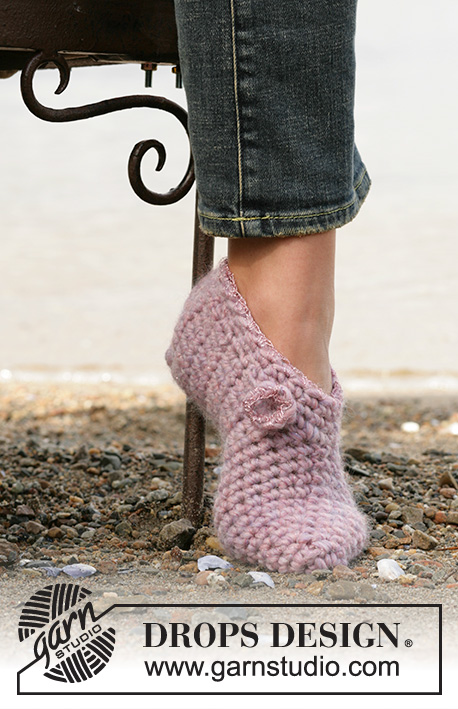 |
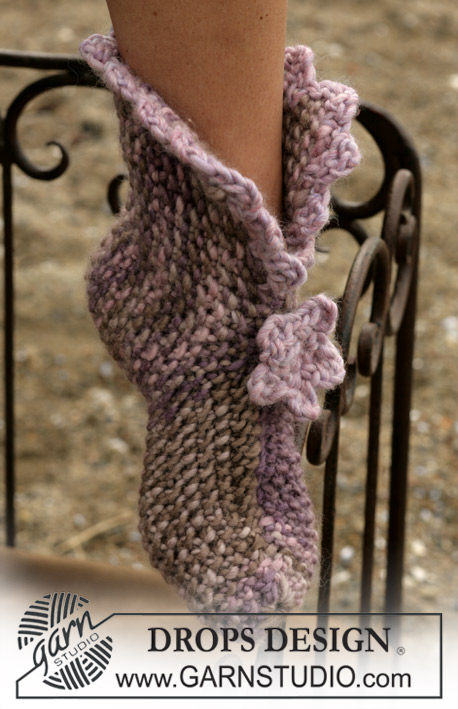
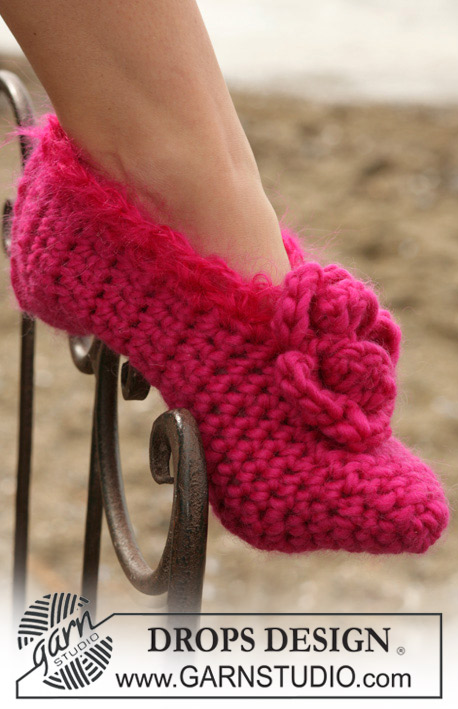
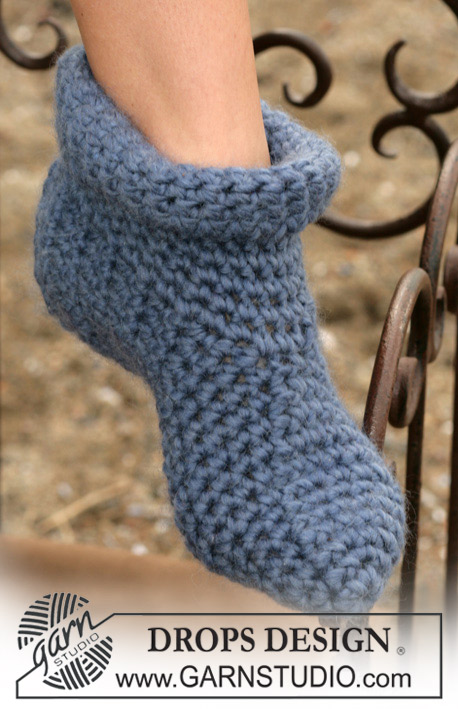
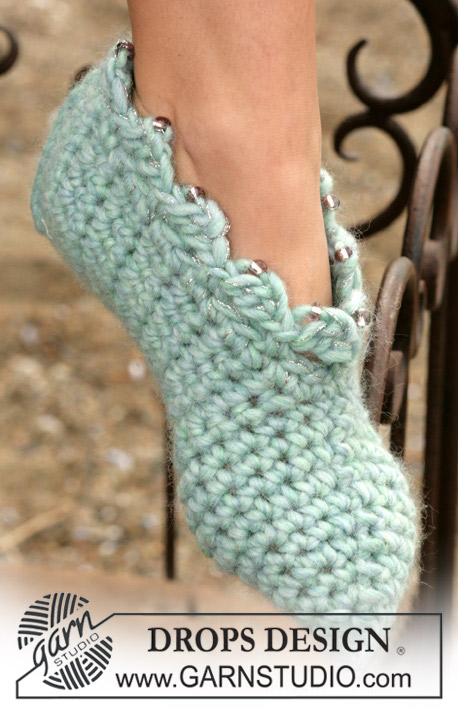
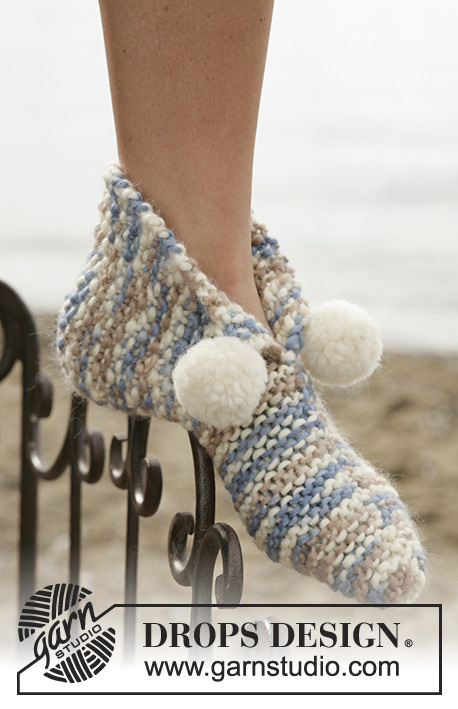
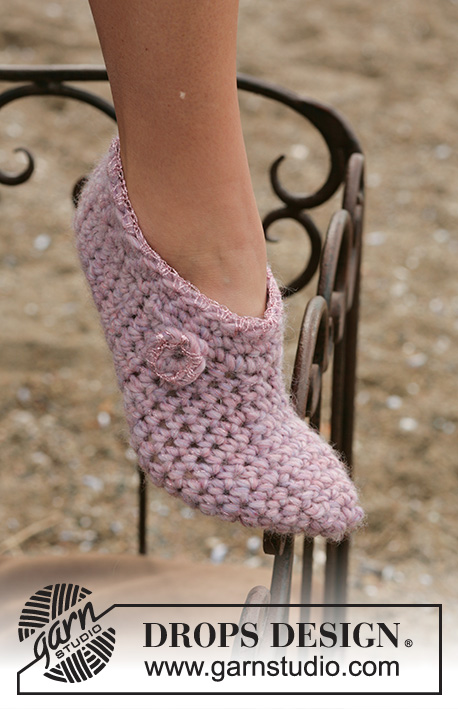
Zapatillas a ganchillo en Snow
DROPS Extra 0-407 |
|
|
TENSIÓN DE LA MUESTRA: 11 p.b. = 10 cm de ancho. TIP PARA LA REALIZACIÓN DEL TRABAJO: Sustituir el primer p.b. al inicio de la vta/fila por 1 p.de cad. Finalizar cada vta con 1 p.e. en el p.de cad. del inicio de la vta anterior (1 p.e. en el p.de cad. del inicio de la fila anterior cuando trabajamos de ida y vta). ----------------------------------------------------------------------- ZAPATILLAS: Se trabaja con ag de ganchillo tamaño 8 mm con 1 hilo Snow y 1 hilo Glitter. PIE: 1ª vta: Trabajar 3 p.de cad. y hacer un anillo con 1 p.e. en el primer p.de cad. 2ª vta: Trabajar 5-5-6 p.b. dentro del anillo - leer TIP PARA LA REALIZACIÓN DEL TRABAJO! 3ª vta: 2 p.b. en cada p.b. = 10-10-12 p.b. 4ª vta: *1 p.b. en el primer p.b., 2 p.b. en el sig p.b.*, repetir de *a* = 15-15-18 p.b. 5ª-7ª vta: Trabajar 1 p.b. en cada p.b. 8ª vta: *1 p.b. en el primer p.b., 1 p.b. en el segundo p.b. y 2 p.b. en el tercer p.b.*, repetir de * a * = 20-20-24 p.b. Continuar trabajando 1 p.b. dentro de cada p.b. hasta que la labor mida aprox 11-13-14 cm. TALÓN: Ahora dividir la labor y trabajar de ida y vta desde el centro del empeine - recordar el TIP PARA LA REALIZACIÓN DEL TRABAJO - 1 p.b. dentro de cada p.b. Cuando la zapatilla mida aprox 22-25-28 cm colocarla sobre una superficie plana y unir el centro de la parte posterior del talón con una fila de p.b. pinchando ambos lados. Cortar el hilo y asegurar. REMATE: Trabajar 1 vta de p.b. a lo largo de la abertura de la zapatilla . Comenzar en el centro de la parte posterior. Continuar con 1 p.b. en cada p.b. otras 2 vtas. Cortar el hilo y asegurar. Continuar trabajando 1 vta con 3 hilos Glitter como sigue: 2 p.b. en cada p.b. FLOR A GANCHILLO: Trabajar 3 p.de cad. con ag de ganchillo tamaño 8 mm y con Snow. Formar un anillo con 1 p.e. Continuar como sigue: Vuelta 1: 8 p.b. alrededor del anillo (trabajar desde el centro del anillo). Finalizar con 1 p.e. en el primer p.b. del inicio de la vta. Vuelta 2: Trabajar 1 vta con 3 hilos Glitter con 1 p.b. en cada p.b. Insertar un abalorio en el hilo en el centro de la flor antes de coserla. Coser la flor en la lateral de la zapatilla. |
|
¿Terminaste este patrón?Entonces, etiqueta tus fotos con #dropspattern o envíalas a la galería #dropsfan. ¿Necesitas ayuda con este patrón?Encontrarás 10 videos tutoriales, un espacio para comentarios/preguntas y más visitando la página del patrón en garnstudio.com © 1982-2026 DROPS Design A/S. Todos los derechos reservados. Este documento, incluyendo todas sus sub-secciones, está protegido por los derechos de autor (copyright). Lee más acerca de lo que puedes hacer con nuestros patrones en la parte de abajo de cada patrón de nuestro sitio. |
|


Con más de 40 años en el diseño de modelos de punto y de ganchillo, DROPS Design ofrece una de las más vastas colecciones de patrones gratuitos en el internet - traducidos en 17 idiomas. Al día de hoy, contamos con 325 catálogos y 12298 patrones - de los cuales 11696 están traducidos en español.
Nosotros trabajamos con mucho esmero para brindarte lo mejor que las labores de punto y ganchillo tienen para ofrecer,inspiración y consejos, así como hilos de magnífica calidad a precios increíbles! Te gustaría usar nuestros patrones para otro fin además del uso personal? Puedes leer acerca de lo que estás permitida a hacer en el texto de Copyright en la parte de abajo de todos nuestros patrones. Felices labores!
Escribe un comentario sobre DROPS Extra 0-407
¡Nos encantaría saber qué piensas acerca de este patrón!
Si quieres escribir una pregunta referente al patrón, por favor asegúrate de elegir la categoría correcta en el formulario debajo, para acelerar el proceso de respuesta. Los campos obligatorios están marcados con un *.