
Categorías populares
¿Buscas un hilo?


Comentarios / Preguntas (12)
![]() Clare escribió:
Clare escribió:
Hi, can you please let me know if this pattern can be updated to include larger sizes ? Like up to XXXL
21.01.2024 - 19:26
![]() Lynne Randall Caloggero escribió:
Lynne Randall Caloggero escribió:
I haven't begun to knit the project yet, but as I read through the instructions I'm wondering why it's necessary to shift M.1 half a pattern repeat to the right on every other row?
01.07.2020 - 15:30DROPS Design respondió:
Dear Mrs Randall Caloggero, you will displace the diagrams so that the flowers are note the one over each other but one flower will come over 2 from previous diagram. Happy knitting!
01.07.2020 - 15:43
![]() Debra escribió:
Debra escribió:
Hi, I have another question about the directions. I am working on the sleeve and am almost finished. I have cast off 10 sts mid underarm, ready to work back and forth on the needles. It says to decrease 6 sts 3 times on every other row. Where do I place these decreases- at the beginning, middle, end of row or equally spaced out across the row? Please clarify for me. Thanks for all your help so far.
20.06.2020 - 01:38DROPS Design respondió:
Dear Debra, after you have cast off 10 sts on mid under arm, you continue back and forth casting off (you don't decrease, pattern will be updated) 6 sts at the begining of every row on each side a total of 3 times (= 6 sts at the beg of next 6 rows). Happy knitting!
22.06.2020 - 07:37
![]() Debra escribió:
Debra escribió:
I am working on the sleeve and am questioning the instructions. Do I work M1 just once and then change to M2 as soon as it's completed or do I continue with M1 repeated several times until I have 122 sts and then switch to M2 once all 122 sts are made?
17.06.2020 - 19:41DROPS Design respondió:
Dear Debra, diagram M.1 is worked only one time in height (but around all stitches in the round - make sure to center a diagram mid on top of sleeve), then you work M.2 (both in width and height) to the end of sleeve. Happy knitting!
18.06.2020 - 09:37
![]() Debra escribió:
Debra escribió:
Thanks for your answer but I am still unsure about the meaning of decreasing 2 sts 2 times and 1 st 2 times. Is that all in one row and consecutively cast off. Why doesn't it just say cast off 6 stitches? Maybe I'm not understanding and making it more complicated than it is. Please help clear this up for me.
05.06.2020 - 18:08DROPS Design respondió:
Dear Debra, you don't cast off 6 sts 1 time to make the neck line somewhat rounded. You have to cast off the sts for neckline at the beg of row from neck towards armhole, then work row to the end, turn and work next row and repeat this 2 rows until all sts are cast off (you repeat these 2 rows 2 times casting off 2 sts at the beg of row then repeat 2 times castinf off 1 st at the beg of row). Happy knitting!
08.06.2020 - 07:35
![]() Debra escribió:
Debra escribió:
Can you give me more explicit details on how to shape the front neckline? I don't know what you mean by decrease 2 sts 2 times , 1 st 2 times. Are these all in the same row?How many stitches will I be decreasing in total? I assume I will be using the knit 2 together technique to do these decreases.
05.06.2020 - 02:08DROPS Design respondió:
Dear Debra, you first cast off the middle 41 sts for neck and finish each shoulder separately, at the beginning of every row from neck towards armhole (from RS on one shoulder, from WS on the other shoulder), you will cast off (will looks nicer than decrease): 2 sts 2 times and 1 stitch 2 times = you have cast off a total of 6 sts towards neck. Happy knitting!
05.06.2020 - 07:41
![]() Debra escribió:
Debra escribió:
Ughhh, I have already knitted one complete diagram as before the edits. Do you know if I can continue on pearling as the original pattern and just turn the garment inside out when finished so the knit side shows? Or is there a way to retread the stitches on the needle ? Or do I have to rip it all out and begin again? Please tell me what you think.
25.05.2020 - 23:14DROPS Design respondió:
Dear Debra, you could turn your work inside outside so that the knit side will be now towards outside (= from RS) and the purl side inside (from WS) - just do this at at the beg of the round - you might also continue working with purled sts outside and then just turn inside outside when dividing piece for armholes; Happy knitting!
26.05.2020 - 08:47
![]() Debra escribió:
Debra escribió:
Hi, Can you please give me some details as to how to shift the diagram half a pattern repeat to the right. Would I begin the rows on stitch 13 ? Thanks for your help.
24.05.2020 - 16:07DROPS Design respondió:
Dear Debra, when working the 2nd M.1 in height, you can start the round with the 13rd stitch and then repeat M.1 and finish round with the 12th stitch. On 3rd repeat, start again as before and continue like this. Happy knitting!
25.05.2020 - 09:53
![]() Debra escribió:
Debra escribió:
This pattern diagram is starting with a pearl row and the rose is done in knit stitch. Will this mean the right side of the sweater has the pearl side facing out? in the sweater photo, it looks like the main body is stocking stitch with the knitted side showing and the rose in pearls. Can you please help? Did I do something wrong to have the right side out showing pearl stitch?
23.05.2020 - 19:36DROPS Design respondió:
Dear Debra, diagram text has been reversed - it has been edited now, thanks for your feedback - a white square should be a K stitch and a small black square a P - Happy knitting!
25.05.2020 - 09:06
![]() Debra Briere escribió:
Debra Briere escribió:
I am confused with the instructions for the moss stitch pattern. It says to repeat second row but I am thinking it should say repeat these 2 rows of K1P1 over P1K1. Can you please clarify this for me?
22.05.2020 - 05:35DROPS Design respondió:
Hi Debra, Row 2 says to knit over purl and purl over knit, which is then repeated in the following rows - so all rows consist of knit over the previous row's purl and purl over the previous row's knit. I hope this helps and happy knitting!
22.05.2020 - 07:49
|
||||||||||
DROPS 29-22 |
||||||||||
|
|
||||||||||
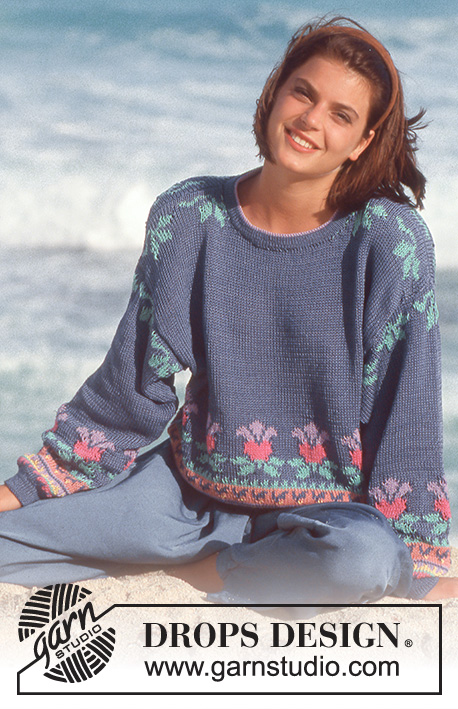
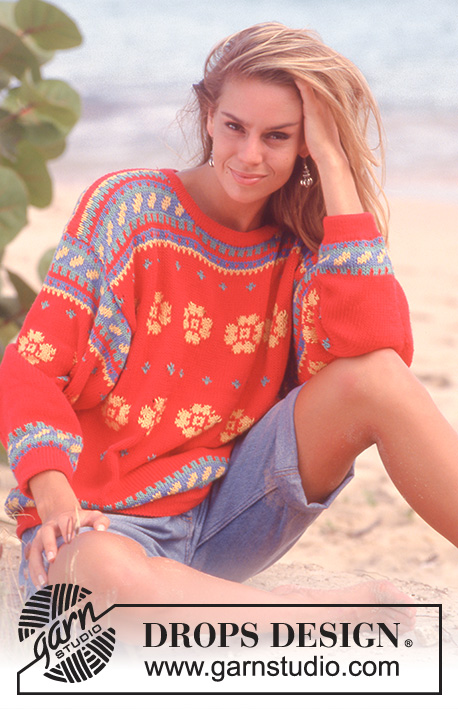
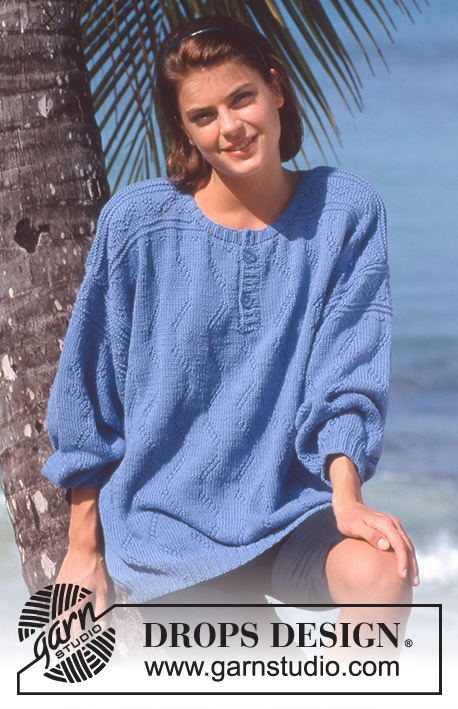
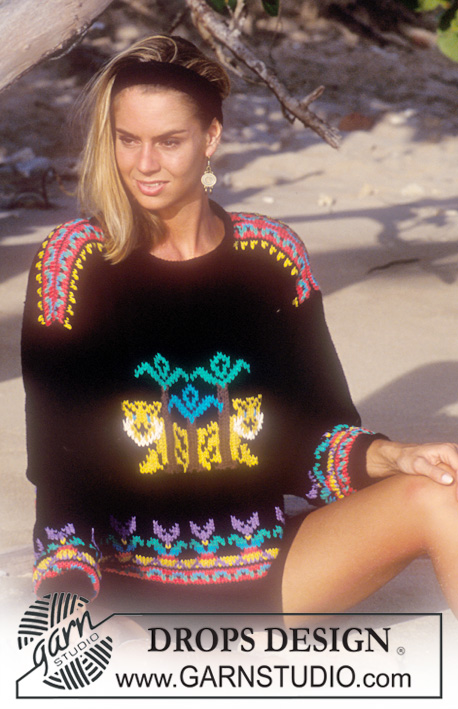
Jersey DROPS con flores en patrón texturado en “Muskat”.
DROPS 29-22 |
||||||||||
|
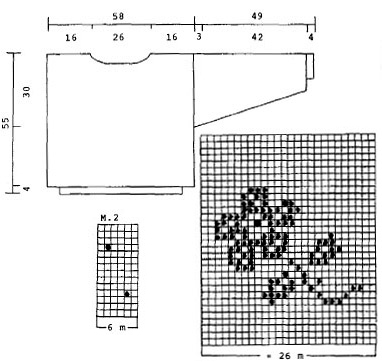
Patrón: Ver diagramas M.1 a M.4. Los diagramas muestran el patrón por el lado derecho. Punto arroz: 1ª hilera: 1 derecho, 1 revés. 2ª hilera: revés sobre derecho y derecho sobre revés. Repetir la 2ª hilera. Versión larga: Aumentar el material en 100 g. Aumentar todas las medidas en 14 cm. Largo final = 69 cm. Frente y espalda: Se tejen en redondo en aguja circular. Montar 188 puntos en aguja tamaño 2.5 mm y tejer 4 cm en punto arroz. Cambiar a aguja tamaño 4 mm, al mismo tiempo aumentar 46 puntos distribuidos equitativamente en la primera vuelta = 234 puntos. Tejer M.1, pero a cada 2 vueltas desviar M.1 media repetición del patrón a la derecha. ¡Recordar mantener la misma tensión de tejido de la muestra! Cuando la pieza mida 25 cm, dividir la pieza en dos y completar la pieza del frente y la pieza de la espalda separadamente. Frente: = 117 puntos. Cuando la pieza mida 50 cm, rematar los 41 puntos centrales para el escote y disminuir para formar la línea del escote a cada 2 hileras: 2 puntos 2 veces, 1 punto 2 veces. Rematar cuando la pieza mida 55 cm. Espalda: = 117 puntos. Cuando la pieza mida 53 cm, rematar los 49 puntos centrales para el escote y disminuir 2 puntos en la línea del escote en la hilera siguiente. Rematar como está explicado para la pieza del frente. Mangas: Se tejen en redondo en agujas de doble punta. Montar 46 puntos en agujas de doble punta tamaño 2.5 mm y tejer 4 cm en punto arroz. Cambiar a agujas tamaño 4 mm, al mismo tiempo aumentar 14 puntos distribuidos equitativamente en la primera vuelta = 60 puntos. Tejer M.1 (asegurarse de colocar una repetición del patrón al centro de la parte de arriba de la manga) y, al mismo tiempo, aumentar 2 puntos al centro bajo el brazo un total de 31 veces a cada 3ª vuelta = 122 puntos (incorporar los puntos aumentados en el patrón a medida que se teje). Después de M.1 continuar en M.2. Cuando la pieza mida 46 cm, rematar 10 puntos al centro bajo el brazo y completar la pieza de ida y vuelta en la aguja y rematar para formar la copa de la manga a cada 2 hileras: 6 puntos 3 veces. Rematar cuando la pieza mida 49 cm. Ensamblaje: Coser las costuras de los hombros. Levantar aprox. 102 puntos alrededor de la línea del escote en agujas de doble punta tamaño 2.5 mm y tejer 4 vueltas en punto arroz, rematar. Trabajar una orilla a ganchillo alrededor de la línea del escote en aguja de ganchillo tamaño 3 mm de la manera siguiente: 1 punto bajo, * 3 puntos de cadena, 1 punto alto en el primer punto de cadena, saltar 2 puntos, 1 punto bajo *, repetir de *a*. Montar las mangas, coser en los bucles externos de los puntos para evitar una costura gruesa. |
||||||||||
Explicaciones del diagrama |
||||||||||
|
||||||||||
 |
||||||||||
¿Terminaste este patrón?Entonces, etiqueta tus fotos con #dropspattern o envíalas a la galería #dropsfan. ¿Necesitas ayuda con este patrón?Encontrarás 26 videos tutoriales, un espacio para comentarios/preguntas y más visitando la página del patrón en garnstudio.com © 1982-2026 DROPS Design A/S. Todos los derechos reservados. Este documento, incluyendo todas sus sub-secciones, está protegido por los derechos de autor (copyright). Lee más acerca de lo que puedes hacer con nuestros patrones en la parte de abajo de cada patrón de nuestro sitio. |
||||||||||


Con más de 40 años en el diseño de modelos de punto y de ganchillo, DROPS Design ofrece una de las más vastas colecciones de patrones gratuitos en el internet - traducidos en 17 idiomas. Al día de hoy, contamos con 324 catálogos y 12290 patrones - de los cuales 11685 están traducidos en español.
Nosotros trabajamos con mucho esmero para brindarte lo mejor que las labores de punto y ganchillo tienen para ofrecer,inspiración y consejos, así como hilos de magnífica calidad a precios increíbles! Te gustaría usar nuestros patrones para otro fin además del uso personal? Puedes leer acerca de lo que estás permitida a hacer en el texto de Copyright en la parte de abajo de todos nuestros patrones. Felices labores!
Escribe un comentario sobre DROPS 29-22
¡Nos encantaría saber qué piensas acerca de este patrón!
Si quieres escribir una pregunta referente al patrón, por favor asegúrate de elegir la categoría correcta en el formulario debajo, para acelerar el proceso de respuesta. Los campos obligatorios están marcados con un *.