
Categorías populares
¿Buscas un hilo?


Comentarios / Preguntas (11)
![]() Sophie LACAILLE escribió:
Sophie LACAILLE escribió:
Bonjour, Je ne comprend pas bien les explications de la manche : augmenter 2 m sous la manche 27-27-28 fois. Que faut-il comprendre par 2 m sous la manche ? Et un tour équivaut-il à 2 rangs ? Merci de votre éclairage.
15.01.2023 - 15:39DROPS Design respondió:
Bonjour Mme Lacaille, pour 1 tour, vous tricotez toutes les mailles sur l'aiguille, pour augmenter 2 mailles sous la manche augmentez 1 maille à la fin du tour + 1 maille au début du tour suivant. Répétez ces augmentations soit alternativement tous les 3 et 4 tours (en S et L: voir cette leçon) soi tous les 4 tours (en M = tricotez 1 tour d'augmentations, 1 tour sans augmentations). Bon tricot!
16.01.2023 - 09:31
![]() Sophie LACAILLE escribió:
Sophie LACAILLE escribió:
Bonjour, j'aimerais savoir comment tricoter le premier rang en rouge foncé, faut-il faire un rang tout à l'endroit ou bien commencer la bordure avec ce rang ?
13.12.2022 - 11:05DROPS Design respondió:
Bonjour Mme Lacaille, vous pouvez effectivement tricoter ce 1er rang en rouge en mailles envers sur l'envers pour commencer la bordure sur l'endroit. Bon tricot!
13.12.2022 - 13:33
![]() Sophie LACAILLE escribió:
Sophie LACAILLE escribió:
Bonjour, je viens de commencer le modèle 38-7 mais je ne comprend pas comment je dois augmenter 10 fois 4 mailles à gauche de l'ouvrage. Faut-il augmenter à la fin du rang ou à l'intérieur de ce même rang avant la fin du rang ? Cordialement
11.12.2022 - 19:01DROPS Design respondió:
Bonjour Mme Lacaille, pour monter 10 fois 4 mailles à gauche, vu sur l'endroit, vous devez monter ces mailles (cf vidéo) en fin de rang sur l'endroit (= à gauche, vu sur l'endroit), et ceci 10 fois sur l'endroit (sur 20 rangs au total). Bon tricot!
12.12.2022 - 10:01
![]() Bernike Pasveer escribió:
Bernike Pasveer escribió:
Er staat dat ik ‘aan de rechterkant’ 6 steken moet afkanten, maar wat is de rechterkant?
05.06.2022 - 19:09DROPS Design respondió:
Dag Bernike,
Dit is de rechter kant aan de goede kant van het werk. Je breit het werk heen en weer vanaf midden voor en je breit dus richting de mouw. De onderkant is dus middenvoor en de rechterkant van het breiwerk wordt uiteindelijk de onderkant van het vest als je het draagt.
05.06.2022 - 20:27Lezlie Dhillon escribió:
I'm stuck on decreasing for sleeve cap: "Decrease to shape the sleeve cap on every other row...... where do I place the decreases - spread them evenly through the round or all at once at the beginning of the round? Sorry - I've never knitted sleeve caps before.
03.03.2016 - 22:00DROPS Design respondió:
Dear Mrs Dhillon, for sleeve cap cast off (pattern will be edited) 6 sts a total of 5 times at the beg of every row on each side (= every other row on each side) and cast off remaining sts. Happy knitting!
04.03.2016 - 10:43Lezlie Dhillon escribió:
I've almost finished the body of this sweater, and I'm on the sleeves - just a question about the two stitch increase inside the mid arm area: should I make two stitches right together or stagger them - I was making one stitch at the end of the round and then knit one at the beginning of the next round then make the second stitch - so that there was always one knit stitch in between the increases. How did you make the increases? Thank you! Lezlie Dhillon
12.02.2016 - 00:20DROPS Design respondió:
Dear Mrs Dhillon, you can inc 1 st at end of round, K1 (or K2 as you rather) and inc 1 st at beg of next round. Happy knitting!
12.02.2016 - 12:08Lezlie Dhillon escribió:
I found the problem: the cast on amount of stitches should be 114 instead of 116, which I believe is a typo?
23.05.2015 - 19:43DROPS Design respondió:
Dear Mrs Dhillon, number of sts for size M has been edited into 110 sts - see tab "corrections", written pattern online has been edited. Thank you. Happy knitting!
26.05.2015 - 09:46Lezlie Dhillon escribió:
I think if I can't make it past this question, perhaps I should move on to another project!! I'm an intermediate knitter, but I've done Fairisle, cables and knitting in the round, but some of the instructions have me stumped!! I'm knitting a medium for which I cast on 116 stitches. When I knit the Edge and moss stitches the calculation seems off?
23.05.2015 - 08:34DROPS Design respondió:
Dear Mrs Dhillon, the jacket is worked sideways, after the edge you cast off 6 sts towards neckline and continue increasing for neckline = 148 sts (= 74 cm) and cast off for then for armhole. 74 cm + 3 cm on bottom edge worked afterwards = 77 cm from bottom to shoulder as in shown in measurement chart. Happy knitting!
23.05.2015 - 14:04Lezlie Dhillon escribió:
Thank you for your quick response! So the first row worked in Wine Red - I assume is a knit row of stockinette stitch? Also for the Edge stitch itself - it includes "moss" stitch which is K1P1, so when the Edge stitch says "3 moss sts" would this be K1P1N1 or is each moss st a set of K1P1? Also, on the pattern the 2nd * is missing, in the Edge description. So should it be placed before the "3 stocking sts". Sorry for so many questions, but I'm eager to get going on this project!
21.05.2015 - 20:36DROPS Design respondió:
Dear Mrs Dhillon, that's right, you first work 1 row stocking st in wine red, then continue with dark brown then (from RS): *K 3, K1, P1, K1 (= 3 sts in moss st)* - typo will be edited thank you. Happy knitting!
22.05.2015 - 09:40Lezlie Dhillon escribió:
I'm just beginning this project and I'm wondering about the instructions in the beginning of the body, after I've cast on. After it says, "continue as follows back and forth on needle: 1 row wine red, change to dark brown and work 3 cm Edge". Is the "1 row wine red", the first row of Edge stitch included in the 3 cm? Thank you!
21.05.2015 - 01:38DROPS Design respondió:
Dear Mrs Dhillon, you cast on sts with wine red, work 1 row in wine red, then change to dark brown and work the edge in dark brown for 3 cm (excluding the row in wine red). Happy knitting!
21.05.2015 - 09:02
|
|
So Long |
|
 |
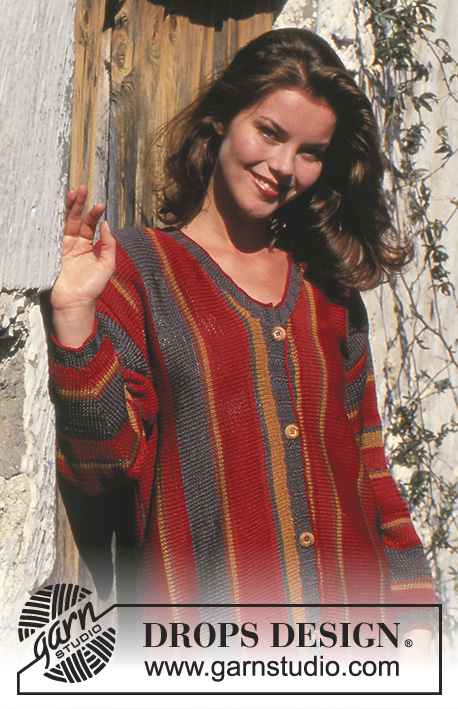 |
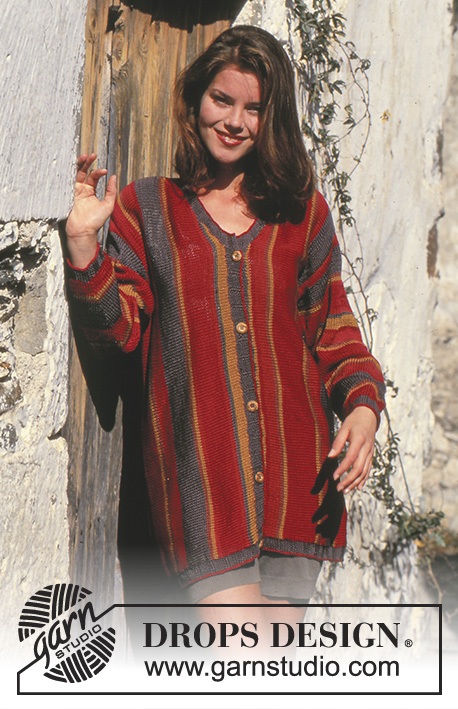
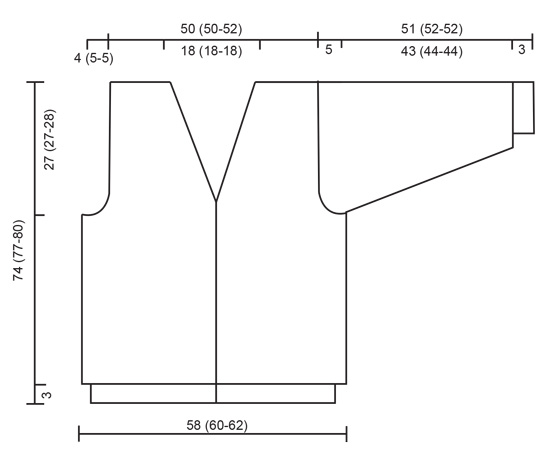
Chaqueta con rayas verticales en DROPS“Muskat”. Talla S – L
DROPS 38-7 |
|
|
Rayas: * 2 filas de amarillo, 2 filas de café oscuro, 2 filas de cobrizo, 12 filas de borgoña, 2 filas de cobrizo 2 filas de amarillo, 2 filas de café, 12 filas de café oscuro, 2 filas de borgoña 6 filas de cobrizo, 2 filas de café, 2 filas de amarillo, 18 filas de borgoña, 2 filas de amarillo, 2 filas de café, 6 filas de cobrizo, 2 filas de borgoña, 4 filas de amarillo*. Repetir de * a *. Pt arroz: 1ª fila: 1d, 1r. 2ª fila: R sobre d y d sobre r. Repetir la 2ª fila. Borde: *3 pts en pt jersey, 3 pts en pt arroz*, repetir de * a *. CUERPO La chaqueta se trabaja de lado a lado desde el centro del delantero en el delantero izquierdo, de ida y vuelta con una aguja circular. Montar 108-116-120 pts con una aguja circular de 3 mm con borgoña. Continuar como sigue de ida y vuelta en la aguja: 1 fila de borgoña, cambiar a café oscuro y trabajar 3 cm del Borde. Cambiar a una aguja de 4 mm y cerrar 6-6-6 pts en el lado derecho de la labor (ahora medir la labor desde aquí) = 102-110-114 pts. Continuar con las rayas (ver arriba) y en pt jersey. Después 4 filas aum para la línea del escote en el lado izquierdo de la labor cada 2ª fila: 4 pts 10 veces = 142-148-154 pts. Cuando la labor mida 25-25-26 cm cerrar para la sisa en el lado izquierdo de la labor cada 2ª fila: 45-45-47 pts 1 vez y 3 pts 3 veces = 88-94-98 pts. Cuando la labor mida 30-32-33 cm aum en el lado izquierdo cada 2ª fila: 3 pts 3 veces y 45-45-47 pts 1 vez = 142-148-154 pts. Cuando la labor mida 49-51-53 cm cerrar 4 pts en el lado izquierdo del escote en la espalda = 138-144-150 pts. Continuar hasta que la labor mida 67-69-71 cm (la línea del escote mide 18 cm) y ahora montar 4 pts en el lado izquierdo = 142-148-154 pts. Cuando la labor mida 83-85-88 cm cerrar para la sisa en el lado izquierdo de la labor cada 2ª fila 45-45-47 pts 1 vez y 3 pts 3 veces = 88-94-98 pts. Cuando la labor mida 88-92-95 cm aum en el delantero izquierdo cada 2ª fila: 3 pts 3 veces y 45-45-47 pts 1 vez = 142-148-154 pts. Cuando la labor mida 107-111-115 cm dism para la línea del escote en el lado izquierdo cada 2ª fila: 4 pts 10 veces = 102-108-114 pts. Trabajar 4 filas, la labor mide aprox. 116-120-124 cm. Cambiar a una aguja de 3 mm y café oscuro y montar 6 pts nuevos en el lado derecho de la labor. Trabajar 3 cm del Borde, pero después de 1 cm hacer 5-6-6 ojales repartidos. 1 ojal = cerrar 2 pts y montar 2 pts nuevos en la fila de vuelta. Cuando el Borde mide 3 cm cambiar a borgoña, trabajar 1 fila y cerrar. Manga: Montar 48-48-48 pts con agujas de doble punta de 3 mm con borgoña, trabajar 1 vuelta en pt jersey, cambiar a café oscuro y trabajar 3 cm del Borde. Cambiar a una aguja de 4 mm y continuar con las rayas (com con 6 filas con borgoña y continuar con el patrón), al mismo tiempo aum 6-6-8 pts repartidos en la 1ª vuelta = 54-54-56 pts. Al mismo tiempo después del Borde aum 2 pts en el centro bajo la manga un total de 27-27-28 veces cada 3ª y 4ª vuelta alternadamente para la talla S + L y cada 4ª vuelta para la talla M = 108-108-112 pts. Cuando la labor mida 46-47-47 cm cerrar 8 pts en el centro bajo la manga de ida y vuelta en la aguja. Cerrar para el centro bajo la manga y completar la manga de ida y vuelta en la aguja. Cerrar para la forma de la copa de la manga cada 2ª fila a cada lado: 6 pts 5 veces y cerrar. La manga mide aprox. 51-52-52 cm. Terminación: Hacer las costuras de los hombros. Recoger 207-213-219 pts por el borde inferior con una aguja de 3 mm con café oscuro y trabajar 3 cm del Borde de ida y vuelta en la aguja. Cambiar a borgoña, trabajar 1 fila y cerrar. Recoger aprox. 120 pts alrededor de la línea del escote con una aguja de 3 mm con café oscuro y trabajar el Borde como se describe para la cenefa inferior. Coser la cenefa inferior a las cenefas de los delanteros. Colocar las mangas y coser los botones. |
|
 |
|
¿Terminaste este patrón?Entonces, etiqueta tus fotos con #dropspattern o envíalas a la galería #dropsfan. ¿Necesitas ayuda con este patrón?Encontrarás 21 videos tutoriales, un espacio para comentarios/preguntas y más visitando la página del patrón en garnstudio.com © 1982-2026 DROPS Design A/S. Todos los derechos reservados. Este documento, incluyendo todas sus sub-secciones, está protegido por los derechos de autor (copyright). Lee más acerca de lo que puedes hacer con nuestros patrones en la parte de abajo de cada patrón de nuestro sitio. |
|


Con más de 40 años en el diseño de modelos de punto y de ganchillo, DROPS Design ofrece una de las más vastas colecciones de patrones gratuitos en el internet - traducidos en 17 idiomas. Al día de hoy, contamos con 324 catálogos y 12290 patrones - de los cuales 11685 están traducidos en español.
Nosotros trabajamos con mucho esmero para brindarte lo mejor que las labores de punto y ganchillo tienen para ofrecer,inspiración y consejos, así como hilos de magnífica calidad a precios increíbles! Te gustaría usar nuestros patrones para otro fin además del uso personal? Puedes leer acerca de lo que estás permitida a hacer en el texto de Copyright en la parte de abajo de todos nuestros patrones. Felices labores!
Escribe un comentario sobre DROPS 38-7
¡Nos encantaría saber qué piensas acerca de este patrón!
Si quieres escribir una pregunta referente al patrón, por favor asegúrate de elegir la categoría correcta en el formulario debajo, para acelerar el proceso de respuesta. Los campos obligatorios están marcados con un *.