
Categorías populares
¿Buscas un hilo?


Comentarios / Preguntas (57)
![]() Antje escribió:
Antje escribió:
Ich stricke gerade den Ärmel in LARGE. Ist bei den Zunahmen die 3. Hinreihe gemeint oder bedeudet 3. Reihe = Hinreihe , Rückreihe, Hinreihe?
31.05.2025 - 11:35DROPS Design respondió:
Liebe Antje, mit 3. Reihe ist gemeint in jeder 3. Reihe gestrickt, dh die 1. Zunahme entsteht in einer Hinreihe, dann stricken Sie noch 2 Reihen (= 1 Rückreihe + 1 Hinreihe), dann nehmen Sie bei der nächsten Reihe (= Rückreihe) zu, dann stricken Sie noch 2 Reihen (= 1 Hinreihe + 1 Rückreihe) und weiterstricken, dh die Zunahmen werden abwechslungsweise bei einer Hin- und bei einer Rückreihe gestrickt. Viel Spaß beim Stricken!
02.06.2025 - 07:48
![]() Antje escribió:
Antje escribió:
Das Bild und das Diagramm stimmen nicht überein. M.3 ist glatt rechts gestrickt, also müssen die Maschen in den Rückrunden links gestrickt werden. Nach Ihren Ausführungen sind alle Reihen im Diagramm angegeben, da sollen aber rechte Maschen folgen. Da passt was nicht.
31.07.2024 - 11:36DROPS Design respondió:
Liebe Antje, ja richtig, M.3 wird glatt rechts mit dem Lochmuster gestrickt, die Hinreihen stricken Sie rechts (mit Lochmuster) und die Rückreihen stricken Sie links. M3 wird dann über 8 Reihen in der Höhe wiederholt. Viel Spaß beim Stricken!
01.08.2024 - 08:59
![]() Tuija Roukals escribió:
Tuija Roukals escribió:
Hei, en ymmärrä malliohjeen alkua kun siinä käsketään neuloa 11 s M1 mukaisesti mutta M1 on 7 silmikkaa
07.07.2024 - 13:17DROPS Design respondió:
Hei, piirroksessa M.1 on 9 silmukkaa. Neulo nämä 9 silmukkaa ja neulo sitten vielä mallikerran ensimmäiset 2 silmukkaa.
08.07.2024 - 16:59
![]() Maaike Bandstra escribió:
Maaike Bandstra escribió:
Als ik het tel patroon die zoals het er staat kom ik niet op 119 uit mijn 2 kanst. Ik hou 5 steken over
06.04.2024 - 15:38
![]() Hannatjie Delport escribió:
Hannatjie Delport escribió:
Your pattern says yo and sl1 as if to knit. Your comment said english rib is yo and sl1 as if to purl. I am sl as if to knit and cannot change it but it is the first pattern that is a bit confusing to me. Mine still looks beautiful, although i am not quite sure if it is correct.
27.10.2023 - 20:15DROPS Design respondió:
Dear Mrs Delport, slip the stitch as if to purl - pattern will be edited, thanks. Happy knitting!
28.10.2023 - 08:57
![]() Hannatjie Delport escribió:
Hannatjie Delport escribió:
Thanks for the answer. The pattern now looks more like the picture. What is the goal of the yo and the p 2tog on wrong side as it looks the same for me if you just slip or right side and purl on wrong side? I cannot really see the use for the extra step. The picture also looks more than a kl p 1 rib than k1 p 2.
25.10.2023 - 21:26DROPS Design respondió:
Dear Mrs Delport, this stitch is in fact a stitch in English rib, from RS you make a yarn over and slip 1 st as if to P and from WS you will purl together the stitch and the yarn over. Happy knitting!
26.10.2023 - 06:52
![]() Hannatjie Delport escribió:
Hannatjie Delport escribió:
In m1 it is p2, yo+slip 1 as if to knit. Is the yarn at the back or front at this stage?
20.10.2023 - 20:44DROPS Design respondió:
Dear Hannatjie, when you slip 1 as if to knit the yarn should be at the back. Happy knitting!
23.10.2023 - 00:41
![]() Patty Walk escribió:
Patty Walk escribió:
Good morning, I have a question about the assembly of the sweater. After I pick up 100-106 st. round the neck and work 3/4 of an inch in garter stitch, do I just bind off and that's it?
17.10.2023 - 13:15DROPS Design respondió:
Dear Mrs Walk, correct, neck edge is 2 cm / ca 3/4" garter stitch. Happy knitting!
17.10.2023 - 16:00
![]() Conny escribió:
Conny escribió:
I'll try again in English. With size M, the pattern says to cast on 113 stitches. That includes 1 edge stitch on each side. You then have to knit a couple of repetitions of the pattern, but that amounts to 113 stitches WITHOUT the edge stitches. Shouldn't the cast-on be 115 stitches then?
01.10.2023 - 09:16DROPS Design respondió:
Hi Conny, The edge stitches are included in the M.1 pattern on each side. Happy knitting!
02.10.2023 - 06:51
![]() Christine Cornhill escribió:
Christine Cornhill escribió:
I love your yarn and patterns, but I struggle with following diagram pattern instructions. Please can you include written instructions ie k2 yf k2tog etc for the pattern part. I've bought Patterns from other designers and they include both diagram and written instructions. Thanks
31.08.2023 - 11:18DROPS Design respondió:
Dear Mrs Cornhill, we only have diagram for this pattern, but this lesson will help you understanding how to read diagrams. Happy knitting!
01.09.2023 - 08:33
|
||||||||||||||||||||||
French Fields#frenchfieldssweater |
||||||||||||||||||||||
 |
 |
|||||||||||||||||||||
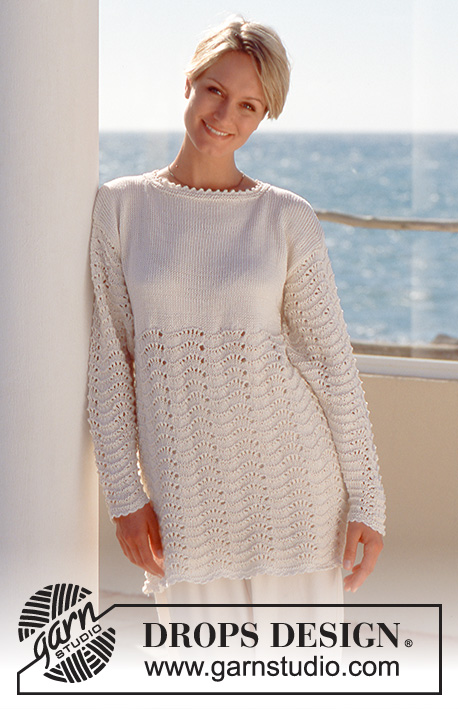
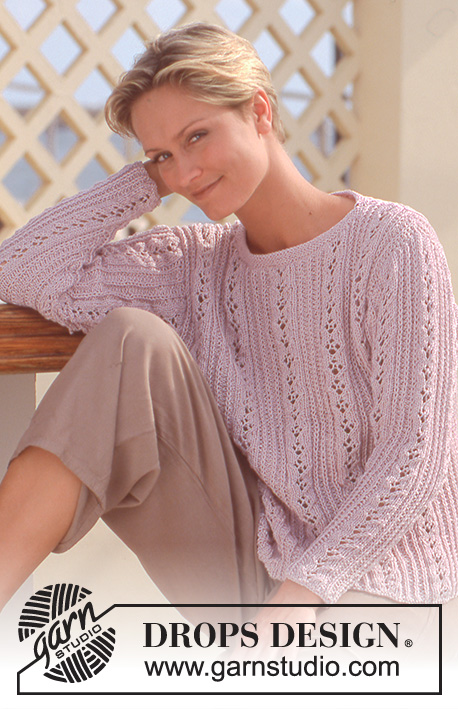
Jersey en DROPS Muskat con patrón de calados
DROPS 45-14 |
||||||||||||||||||||||
|
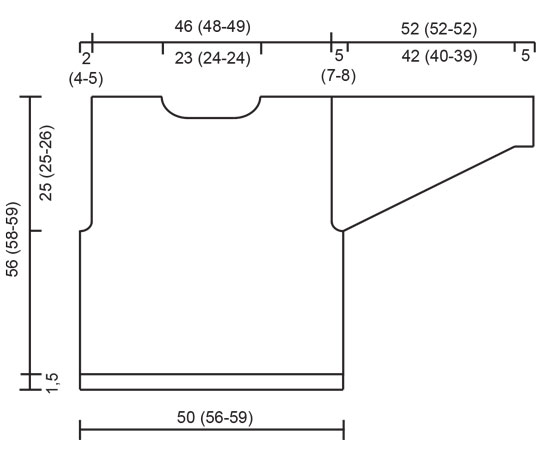
Tensión: 20 pts x 26 filas con aguja de 4 mm en punto jersey = 10 x 10 cm. Pt musgo, de ida y vuelta en la aguja: Trabajar todas las filas de derecho. Pt musgo con una aguja circular: 1 vuelta de derecho, 1 vuelta de revés. Patrón: Ver el diagrama. 1 diagrama = 1 repetición. Delantero: Trabajar de ida y vuelta con una aguja circular. Montar 101-113-119 pts (incl 1 pt orillo a cada lado) con una aguja de 4 mm y trabajar 2 filas en pt musgo. Continuar el patrón como sigue: 11-17-20 pts de M.1, 4 repeticiones de M.2, M.3, 11-17-20 pts de M.1. Recordar mantener la tensión del tejido! Cuando la labor mida 31-33-33 cm cerrar para la sisa a cada lado cada 2ª fila: 3 pts 0-1-2 veces, 2 pts 2-2-2 veces y 1 pt 1-2-1 veces = 91-95-97 pts. Cuando la labor mida 50-52-53 cm cerrar los 33-35-35 pts centrales para el escote y dism para la forma de la línea del escote en cada 2ª fila: 2 pts 2-2-2 veces y 1 pt 2-2-2 veces. Cerrar los pts restantes cuando la labor mida 56-58-59 cm. Espalda: Montar y trabajar como el delantero. Cerrar para las sisas como se describe en el delantero. Cuando la labor mida 54-56-57 cm cerrar los 41-43-43 pts centrales para el escote y dism 2 pts en la línea del escote en la siguiente fila. Cerrar los pts restantes cuando la labor mida 56-58-59 cm. Mangas: Trabajar de ida y vuelta en la aguja circular. Montar 45-45-47 pts (incl. 1 pt orillo a cada lado) con una aguja de 4 mm y trabajar 2 filas en pt musgo. Continuar el patrón como sigue: 1-1-2 pts de M.1, 2 repeticiones de M.2, M.3, 1-1-2 pts de M.1. Cuando la labor mida 5-5-5 cm aum 1 pt a cada lado un total de 28-28-29 veces como sigue: talla S + M cada 3ª y 4ª fila alternadamente, talla L cada 3ª fila = 101-101-105 pts – incorporar los pts aum en el patrón a la vez que se avanza. Cuando la labor mida 47-45-44 cm dism para la copa de la manga a cada lado cada 2ª fila: 5-3-3 pts 6-9-10 veces y cerrar los pts restantes. La manga mide aprox. 52-52-52 cm. Terminación: Unir los hombros. Colocar las mangas y coser las mangas y las costuras laterales. Recoger aprox. 100 a 106 pts alrededor del escote en la aguja de 3 mm y trabajar 2 cm en pt musgo. |
||||||||||||||||||||||
Explicaciones del diagrama |
||||||||||||||||||||||
|
||||||||||||||||||||||
 |
||||||||||||||||||||||
 |
||||||||||||||||||||||
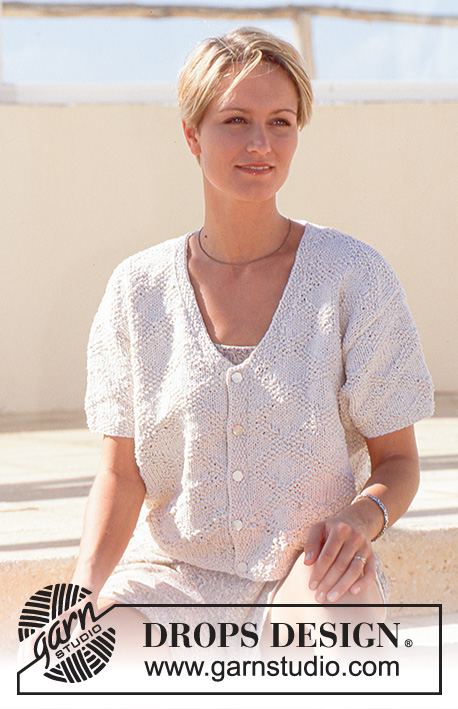
¿Terminaste este patrón?Entonces, etiqueta tus fotos con #dropspattern #frenchfieldssweater o envíalas a la galería #dropsfan. ¿Necesitas ayuda con este patrón?Encontrarás 21 videos tutoriales, un espacio para comentarios/preguntas y más visitando la página del patrón en garnstudio.com © 1982-2026 DROPS Design A/S. Todos los derechos reservados. Este documento, incluyendo todas sus sub-secciones, está protegido por los derechos de autor (copyright). Lee más acerca de lo que puedes hacer con nuestros patrones en la parte de abajo de cada patrón de nuestro sitio. |
||||||||||||||||||||||


Con más de 40 años en el diseño de modelos de punto y de ganchillo, DROPS Design ofrece una de las más vastas colecciones de patrones gratuitos en el internet - traducidos en 17 idiomas. Al día de hoy, contamos con 324 catálogos y 12290 patrones - de los cuales 11675 están traducidos en español.
Nosotros trabajamos con mucho esmero para brindarte lo mejor que las labores de punto y ganchillo tienen para ofrecer,inspiración y consejos, así como hilos de magnífica calidad a precios increíbles! Te gustaría usar nuestros patrones para otro fin además del uso personal? Puedes leer acerca de lo que estás permitida a hacer en el texto de Copyright en la parte de abajo de todos nuestros patrones. Felices labores!
Escribe un comentario sobre DROPS 45-14
¡Nos encantaría saber qué piensas acerca de este patrón!
Si quieres escribir una pregunta referente al patrón, por favor asegúrate de elegir la categoría correcta en el formulario debajo, para acelerar el proceso de respuesta. Los campos obligatorios están marcados con un *.