
Categorías populares
¿Buscas un hilo?


Comentarios / Preguntas (9)
![]() Greet escribió:
Greet escribió:
Ik zou niet in het rond breien. Dus alles met 2 naalden. Hoe brei ik dan de even naalden?
11.03.2026 - 09:49DROPS Design respondió:
Dag Greet,
Naald 1 en alle andere oneven naalden in het telpatroon brei je aan de goede kant, alle even naalden in het telpatroon brei je aan de verkeerde kant. De steken die je recht aan de goede kant breit brei je averecht aan de verkeerde kant en de steken die je averecht aan de goede kant breit brei je recht aan de verkeerde kant. Je breit de omslag en afgehaalde steek averecht samen (in plaats van recht).
11.03.2026 - 19:38
![]() Anuka escribió:
Anuka escribió:
Hi, thanks so much for answering my question! I am doing exactly as suggested [from WS then work (P1, K2, Purl together YO + slipped stitch (so that they look as K tog as before), K2, P5, K2, Purl together YO + slipped stitch, K2, P1] but still where I P5 it looks flatter - when knitting in the round and instead doing K5 the stitches look more horizontal, now they are more like V's. Maybe I need to somehow twist them?
19.05.2022 - 16:54DROPS Design respondió:
Dear Anuka, it might be a matter of difference in the tension, when working in the round or flat - show your work to your store (send them a picture per mail for ex.) or show it in a forum such as our DROPS Workshop, it might be easier for other knitters to help you seing your work. Hope it can help. Happy knitting!
20.05.2022 - 07:57
![]() Anuka escribió:
Anuka escribió:
Hi, I'm making this at the moment and have reached the point where I switch from in the round to flat. So from the right side I'm following the chart (odd number rows) and on the wrong side I am purling instead of knitting, and so forth. However, my middle section is looking a little flatter than when I did it in the round. [Slip 1 st as if to knit, K1, psso, yo, knit1, yo, K2 tog] - this looks wrong. What should I do differently? I'm purling this on the WS.
19.05.2022 - 15:21DROPS Design respondió:
Dear Anuka, make sure that the odd rows will be worked from RS - from WS then work (P1, K2, Purl together YO + slipped stitch (so that they look as K tog as before), K2, P5, K2, Purl together YO + slipped stitch, K2, P1). Happy knitting!
19.05.2022 - 16:38
![]() Lies escribió:
Lies escribió:
Hallo......vraagje...als ik rondbrei snap ik dat je het patroon moet volgen.....als je bij het gedeelte komt dat je het voor en achterkant apart verder moet breien dan brei je dus niet in de rondte maar heen en weer.....hoe brei je dan de teruggaande naalden....want daar is dan geen teltekening voor.....gr lies
30.06.2020 - 13:00DROPS Design respondió:
Dag Lies,
Bij de teruggaande naalden brei je dan averecht waar je recht op de goede kant breit, en recht waar je averecht op de goede kant breit. Zorg ervoor dat je steeds de even naalden van het patroon aan de verkeerde kant breit.
30.06.2020 - 15:56
![]() Anne Loveday escribió:
Anne Loveday escribió:
Can you explain the decrease for armhole on front/back? is this worked in the round? only 8 stitches are involved and these seem to end up all being on one armhole (right or left). Thank you
07.08.2017 - 19:14DROPS Design respondió:
Dear Mrs Loveday, you are casting off for armhole at the beginning of each row in each side 2 sts 1-2 times and 1 st 1 time, so that you will cast off 3-5 sts on each side = 6-10 sts in total. Happy knitting!
08.08.2017 - 08:42
![]() Carmella escribió:
Carmella escribió:
Bedankt voor de snelle reactie. Super!
13.01.2017 - 11:31
![]() Carmella escribió:
Carmella escribió:
Is het mogelijk om de telpatroon en het patroon toe te voegen ze staan er niet op.
11.01.2017 - 19:00DROPS Design respondió:
Hoi Carmella. Probeer opnieuw nu, het telpatroon is aangepast.
12.01.2017 - 14:49
![]() T.Melchior escribió:
T.Melchior escribió:
De teltekening wordt bij dit patroon niet aangegeven. Staat alleen een klein vierkantje
30.01.2015 - 17:32
![]() Heidrun Bitsch escribió:
Heidrun Bitsch escribió:
Wie werden die abnahmen bei Modell 46 -19 gegen das armloch die 4 Maschen beidseitig abgenommen?bitte dringend um Antwort lg
01.10.2014 - 14:40DROPS Design respondió:
Liebe Heidrun, die Anleitung ist etwas älteren Datums und wird gleich noch mal sprachlich überarbeitet, dann wird es hoffentlich klar, wie es gemeint ist. Sie können dann natürlich gerne noch mal fragen, falls noch etwas unklar geblieben ist.
01.10.2014 - 17:04
|
||||||||||||||||||||||
Pink Profusion |
||||||||||||||||||||||
|
|
||||||||||||||||||||||
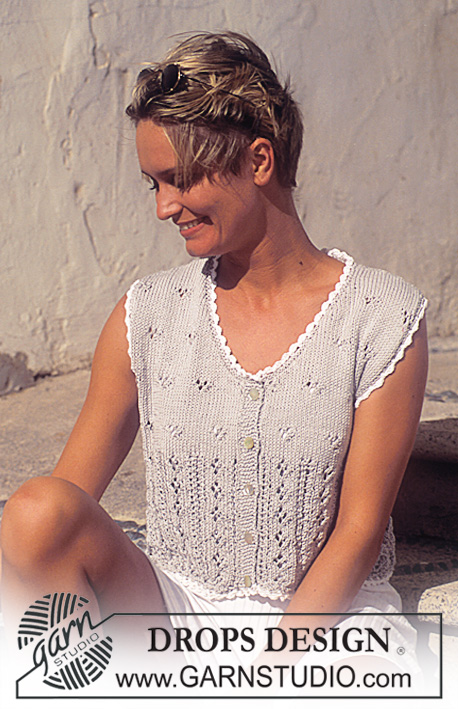
Jersey DROPS en Muskat con patrón de textura.
DROPS 46-19 |
||||||||||||||||||||||
|
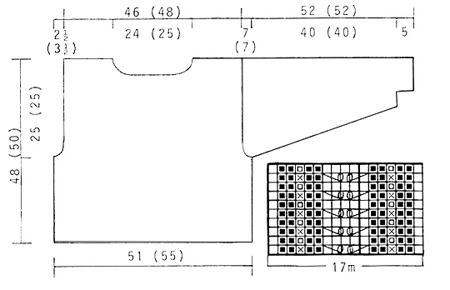
Tensión: 20 pts x 26 filas con agujas de 4 mm y punto jersey = 10 x 10 cm Recordar que el tamaño de la aguja es orientativo! Patrón: Ver el diagrama (1 diagrama = 1 repetición del patrón). El diagrama muestra todas las filas del patrón vistas por el lado derecho. Punto musgo/ Pliegue (en redondo): 1 pliegue en punto musgo = 2 vueltas. 1ª vuelta de derecho, 2ª vuelta de revés. Cuerpo: Montar 204 (221) pts con una aguja circular de 4 mm con rosa y trabajar el patrón. Recordar mantener la misma tensión del tejido. Cuando la labor mida 23 (25) cm cerrar los 4 puntos a cada lado para las sisas – delantero = 98 (106) pts y espalda = 98 (107) pts – asegurate colocar 2 puntos de derecho en el centro del delantero. Ahora finalizar cada parte por separado. Delantero: = 98 (106) pts. Continuar cerrando para la sisa cada 2ª fila: 2 pts 1 (2) veces, 1 pts 1 vez = 92 (96) pts. Cuando la labor mida 42 (44) cm cerrar los 26 (28) pts centrales para el escote y continuar cerrando para el escote cada 2ª fila: 4 pts 1 vez, 3 pts 1 vez, 2 pts 1 vez, 1 pt 2 veces. Cerrar los puntos restantes cuando la labor mida 48 (50) cm Espalda: = 98 (107) pts. Continuar cerrando para las sisas como en el delantero = 92 (97) pts. Cuando la labor mida 46 (48) cm cerrar los 44 (47) pts centrales para el escote y en la siguiente fila cerrar 2 pts a cada lado hacia el escote. Cerrar los puntos restantes cuando la labor mida 48 (50) cm Manga: Montar 43 (43) pts con aguja de doble punta de 4 mm con rose y continuar con Patrón (asegurate centrar el patrón en el centro superior de la manga) . Al mismo tiempo cuando la labor mida 5 (5-5) cm aumentar en el centro bajo la manga: 2 puntos 29 (29) veces cada 3ª vuelta = 101 (101) pts. Cuando la labor mida 45 (45) cm cerrar 4 puntos en el centro bajo la manga y completar la labor de ida y vuelta. Continuar cerrando para la copa de la manga cada 2ª fila: 4 pts 8 veces, cerrar los puntos restantes. La labor mide aprox. 52 (52) cm. Terminación: Hacer las costuras de los hombros. recoger aprox. 100-106 pts alrededor del escote con agujas de doble punta de 3 mm con rose y trabajar 1 pliegue, cerrar. Coser las mangas. |
||||||||||||||||||||||
Explicaciones del diagrama |
||||||||||||||||||||||
|
||||||||||||||||||||||
 |
||||||||||||||||||||||
¿Terminaste este patrón?Entonces, etiqueta tus fotos con #dropspattern o envíalas a la galería #dropsfan. ¿Necesitas ayuda con este patrón?Encontrarás 20 videos tutoriales, un espacio para comentarios/preguntas y más visitando la página del patrón en garnstudio.com © 1982-2026 DROPS Design A/S. Todos los derechos reservados. Este documento, incluyendo todas sus sub-secciones, está protegido por los derechos de autor (copyright). Lee más acerca de lo que puedes hacer con nuestros patrones en la parte de abajo de cada patrón de nuestro sitio. |
||||||||||||||||||||||


Con más de 40 años en el diseño de modelos de punto y de ganchillo, DROPS Design ofrece una de las más vastas colecciones de patrones gratuitos en el internet - traducidos en 17 idiomas. Al día de hoy, contamos con 324 catálogos y 12290 patrones - de los cuales 11675 están traducidos en español.
Nosotros trabajamos con mucho esmero para brindarte lo mejor que las labores de punto y ganchillo tienen para ofrecer,inspiración y consejos, así como hilos de magnífica calidad a precios increíbles! Te gustaría usar nuestros patrones para otro fin además del uso personal? Puedes leer acerca de lo que estás permitida a hacer en el texto de Copyright en la parte de abajo de todos nuestros patrones. Felices labores!
Escribe un comentario sobre DROPS 46-19
¡Nos encantaría saber qué piensas acerca de este patrón!
Si quieres escribir una pregunta referente al patrón, por favor asegúrate de elegir la categoría correcta en el formulario debajo, para acelerar el proceso de respuesta. Los campos obligatorios están marcados con un *.