
Popular categories
Looking for a yarn?


Comments / Questions (9)
![]() Anuka wrote:
Anuka wrote:
Hi, thanks so much for answering my question! I am doing exactly as suggested [from WS then work (P1, K2, Purl together YO + slipped stitch (so that they look as K tog as before), K2, P5, K2, Purl together YO + slipped stitch, K2, P1] but still where I P5 it looks flatter - when knitting in the round and instead doing K5 the stitches look more horizontal, now they are more like V's. Maybe I need to somehow twist them?
19.05.2022 - 16:54DROPS Design answered:
Dear Anuka, it might be a matter of difference in the tension, when working in the round or flat - show your work to your store (send them a picture per mail for ex.) or show it in a forum such as our DROPS Workshop, it might be easier for other knitters to help you seing your work. Hope it can help. Happy knitting!
20.05.2022 - 07:57
![]() Anuka wrote:
Anuka wrote:
Hi, I'm making this at the moment and have reached the point where I switch from in the round to flat. So from the right side I'm following the chart (odd number rows) and on the wrong side I am purling instead of knitting, and so forth. However, my middle section is looking a little flatter than when I did it in the round. [Slip 1 st as if to knit, K1, psso, yo, knit1, yo, K2 tog] - this looks wrong. What should I do differently? I'm purling this on the WS.
19.05.2022 - 15:21DROPS Design answered:
Dear Anuka, make sure that the odd rows will be worked from RS - from WS then work (P1, K2, Purl together YO + slipped stitch (so that they look as K tog as before), K2, P5, K2, Purl together YO + slipped stitch, K2, P1). Happy knitting!
19.05.2022 - 16:38
![]() Lies wrote:
Lies wrote:
Hallo......vraagje...als ik rondbrei snap ik dat je het patroon moet volgen.....als je bij het gedeelte komt dat je het voor en achterkant apart verder moet breien dan brei je dus niet in de rondte maar heen en weer.....hoe brei je dan de teruggaande naalden....want daar is dan geen teltekening voor.....gr lies
30.06.2020 - 13:00DROPS Design answered:
Dag Lies,
Bij de teruggaande naalden brei je dan averecht waar je recht op de goede kant breit, en recht waar je averecht op de goede kant breit. Zorg ervoor dat je steeds de even naalden van het patroon aan de verkeerde kant breit.
30.06.2020 - 15:56
![]() Anne Loveday wrote:
Anne Loveday wrote:
Can you explain the decrease for armhole on front/back? is this worked in the round? only 8 stitches are involved and these seem to end up all being on one armhole (right or left). Thank you
07.08.2017 - 19:14DROPS Design answered:
Dear Mrs Loveday, you are casting off for armhole at the beginning of each row in each side 2 sts 1-2 times and 1 st 1 time, so that you will cast off 3-5 sts on each side = 6-10 sts in total. Happy knitting!
08.08.2017 - 08:42
![]() Teresa wrote:
Teresa wrote:
Please translate k yo and lose sts tog
14.01.2017 - 17:52DROPS Design answered:
Dear Teresa, you will here K tog the yo and st slipped on previous row, just as in fisherman's rib -see video below. Happy knitting!
16.01.2017 - 09:25
![]() Carmella wrote:
Carmella wrote:
Bedankt voor de snelle reactie. Super!
13.01.2017 - 11:31
![]() Carmella wrote:
Carmella wrote:
Is het mogelijk om de telpatroon en het patroon toe te voegen ze staan er niet op.
11.01.2017 - 19:00DROPS Design answered:
Hoi Carmella. Probeer opnieuw nu, het telpatroon is aangepast.
12.01.2017 - 14:49
![]() T.Melchior wrote:
T.Melchior wrote:
De teltekening wordt bij dit patroon niet aangegeven. Staat alleen een klein vierkantje
30.01.2015 - 17:32
![]() Heidrun Bitsch wrote:
Heidrun Bitsch wrote:
Wie werden die abnahmen bei Modell 46 -19 gegen das armloch die 4 Maschen beidseitig abgenommen?bitte dringend um Antwort lg
01.10.2014 - 14:40DROPS Design answered:
Liebe Heidrun, die Anleitung ist etwas älteren Datums und wird gleich noch mal sprachlich überarbeitet, dann wird es hoffentlich klar, wie es gemeint ist. Sie können dann natürlich gerne noch mal fragen, falls noch etwas unklar geblieben ist.
01.10.2014 - 17:04
|
||||||||||||||||||||||
Pink Profusion |
||||||||||||||||||||||
|
|
||||||||||||||||||||||
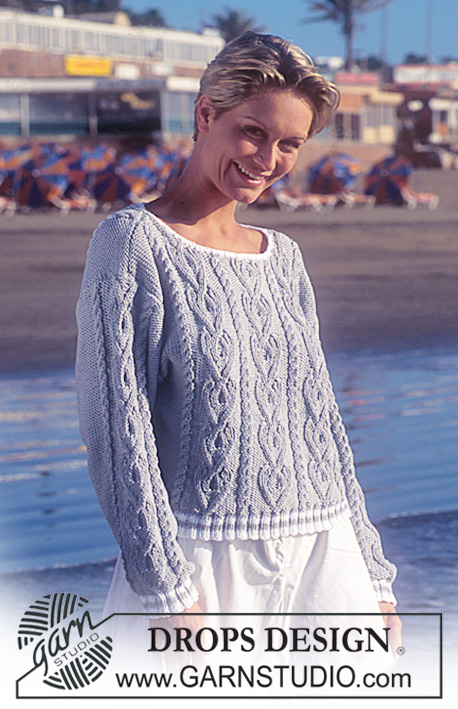
DROPS Sweater in Muskat with texture pattern
DROPS 46-19 |
||||||||||||||||||||||
|
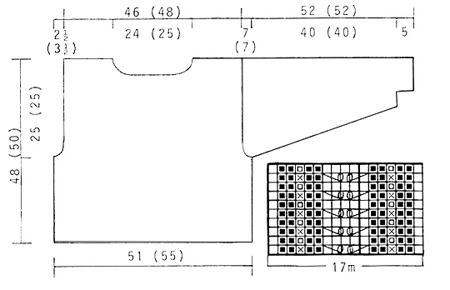
Knitting tension: 20 sts x 26 rows on needle size 4 mm and stocking sts = 10 x 10 cm Remember needle sizes are guidelines only! Pattern: See diagram (1 diagram = 1 pattern repeat). Diagrams are seen from RS. Ridge (on circular needles): 1 ridge = 2 rounds 1st round: K, 2nd round: P. Body: Cast on 204 (221) sts on circular needle size 4 mm with rose and knit Pattern continuously. Remember knitting tension. When piece measures 23 (25) cm cast off 4 sts on each side for armhole – front piece = 98 (106) sts and back piece = 98 (107) sts – ensure to place 2 K sts mid front on front piece. Complete front and back pieces separately. Front piece: = 98 (106) sts. Continuing cast off for armhole on every other row: 2 sts 1 (2) times, 1 sts 1 times = 92 (96) sts. When piece measures 42 (44) cm cast off middle 26 (28) sts for neck and continue cast off to shape neckline on every other row: 4 sts 1 times, 3 sts 1 times, 2 sts 1 time, 1 st 2 times. Cast off when piece measures 48 (50) cm Back piece: = 98 (107) sts. Continuing cast off for armhole like front piece = 92 (97) sts. When piece measures 46 (48) cm cast off middle 44 (47) sts for neck and then cast off 2 sts on each side on next row to shape neckline. Cast off when piece measures 48 (50) cm Sleeve: Cast on 43 (43) sts on double pointed needles 4 mm with rose and continuing knit Pattern (ensure to center pattern mid sleeve). At the same time when piece measures 5 (5-5) cm inc mid under arm: 2 sts 29 (29) times on every 3rd round = 101 (101) sts. When piece measures 45 (45) cm cast off 4 sts mid under arm and complete knitting back and forth on needle. Continuing cast off to shape sleeve cap on every other row: 4 sts 8 times, cast off. Piece measures approx 52 (52) cm. Assembly: Sew shoulder seams. Pick up approx 100-106 sts round neckline on double pointed needles size 3 mm with rose and knit 1 ridge, cast off. Sew in sleeves. |
||||||||||||||||||||||
Diagram explanations |
||||||||||||||||||||||
|
||||||||||||||||||||||
|
||||||||||||||||||||||
Have you finished this pattern?Tag your pictures with #dropspattern or submit them to the #dropsfan gallery. Do you need help with this pattern?You'll find 20 tutorial videos, a Comments/Questions area and more by visiting the pattern on garnstudio.com. © 1982-2025 DROPS Design A/S. We reserve all rights. This document, including all its sub-sections, has copyrights. Read more about what you can do with our patterns at the bottom of each pattern on our site. |
||||||||||||||||||||||


With over 40 years in knitting and crochet design, DROPS Design offers one of the most extensive collections of free patterns on the internet - translated to 17 languages. As of today we count 314 catalogues and 11821 patterns translated into English (UK/cm).
We work hard to bring you the best knitting and crochet have to offer, inspiration and advice as well as great quality yarns at incredible prices! Would you like to use our patterns for other than personal use? You can read what you are allowed to do in the Copyright text at the bottom of all our patterns. Happy crafting!
Post a comment to pattern DROPS 46-19
We would love to hear what you have to say about this pattern!
If you want to leave a question, please make sure you select the correct category in the form below, to speed up the answering process. Required fields are marked *.