
Categorías populares
¿Buscas un hilo?

































Comentarios / Preguntas (19)
 Chantelle escribió:
Hi, I am at 5 feet 1 inch women. Would you think size small in women would fit me or the child size in the pattern?
31.10.2026 - 23:06DROPS Design respondió:
Hi Chantelle, It is the chest size that is important for you to get correct (see size-chart at the bottom of the page). The length of the yoke and body can be adjusted to your size when you get that far. Regards, Drops Team.
01.11.2026 - 14:40
Chantelle escribió:
Hi, I am wondering can I use Estelle yarn for my yarn substitute? Chantelle
20.10.2026 - 12:34DROPS Design respondió:
Dear Chantelle, we do not know this yarn, you will find the list of DROPS stores for Canada here. Happy knitting!
21.10.2026 - 09:33
 Claire escribió:
Would you be able to suggest the amount of yarn needed for the base if I wanted to make the top of the yoke and body/sleeves of the sweater a different color besides Chestnut (Size S/M), but leaving the pattern otherwise unchanged with the gingerbread men still brown? Thank you!
03.10.2026 - 00:34DROPS Design respondió:
Dear Claire, we only have the amount of yarn for the colours used in the sweater here, but you can for example calculate how much yarn you would need for just the gingerbread men by working a swatch with the gingerbread pattern then multiply this amount of yarn by the number of repeats for your size. Your DROPS Store can also help you even per mail or telephone. Happy knitting!
05.10.2026 - 07:21
 Lesley Harrison escribió:
If I want to buy the wool and pattern in xl would you be able to work how many balls I need the gingerbread woman's jumper
02.10.2026 - 14:43DROPS Design respondió:
Dear Mrs Harrison, you will find the requested yarn amount in each size for each colour under tab "pattern" on top of the page together with the size list, needle size and tension. Choose your size to highlight it in the pattern. Happy kntitting!
02.10.2026 - 16:16
Katherine escribió:
Hi, just wondering if 50g of chestnut is enough for gingerbread men alone for size S-M. Thank you!
28.09.2026 - 23:07DROPS Design respondió:
Dear Katherine, to know how much you need, you can work a swatch with just 1 repeat then multiply by the number for your size (as we only have the total amount of yarn required for the whole piece). Happy knitting!
29.09.2026 - 16:05
Martina escribió:
This is a question about the increase According to the written instructions there are 5 increase rows on chart A The confusion for me is that 1&2 clearly show an increase on the chart but 3,4&5 do not I assume I just follow the written instructions and don't worry about the increase not being shown on chart A
03.02.2026 - 15:26DROPS Design respondió:
Hi Martina, all rows with increases (from 1-5) are marked by an arrow on the chart. Happy knitting!
07.04.2026 - 09:59
 Martine escribió:
Bonsoir Comment ce fait il que ce modèle soit en vente sur etsy a plus de 12 euros ? Merci beaucoup
28.01.2026 - 00:28DROPS Design respondió:
Bonjour Martine, n'hésitez pas à le reporter auprès d'Etsy - les explications de nos modèles sont toutes gratuites sur notre site. Merci. Bon tricot!
28.01.2026 - 09:23
Mary Snoke escribió:
Hello! I realized that I bought the chestnut in Lima, but the white and red in Flora. Can I still use the Flora with Lima for the colorwork in this pattern? Should I change needle sizes to accommodate?
24.01.2026 - 01:21DROPS Design respondió:
Hi Mary, Drops Flora yarn belongs to yarn group A, which is a thinner yarn than Lima (yarn group B). It would be better, both for the ease of knitting and the structure of the jumper, to buy the white and red yarns in Lima. You could try increasing the needle size when working with Flora, but the stitches will then be larger than the rest of the weave. Regards, Drops Team
24.01.2026 - 08:47
 Mary Carmen Hernandez escribió:
Está precioso felicidades y gracias por sus patrones
14.01.2026 - 18:44
Liz escribió:
Hi, first time making one of your pattern. When we start to work A1 in the round, we start from the mid-back? I know that we measure the yoke from the mid-front marker, but we always finish and start a round from the mid-back? Thank you so much!
18.12.2025 - 21:16
|
|||||||||||||
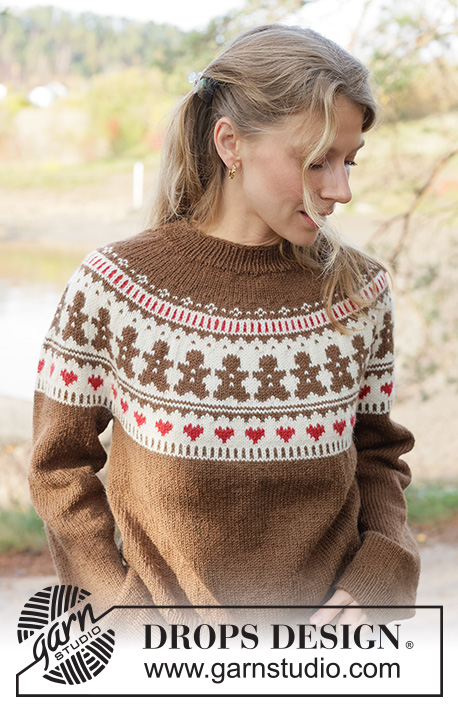
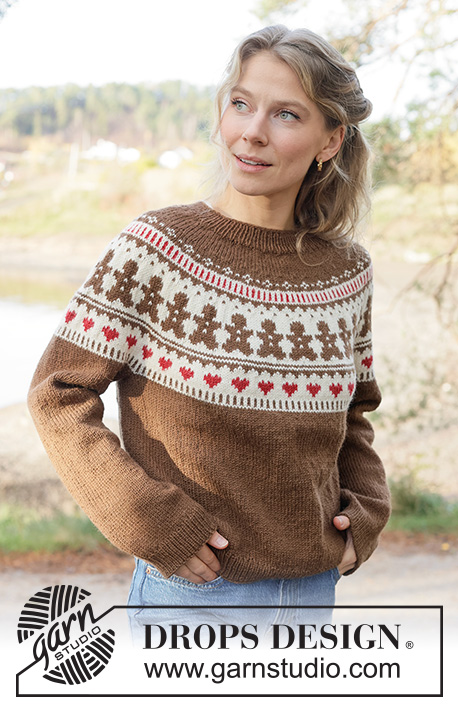
Cookie Parade Sweater#cookieparadesweater |
|||||||||||||
 |
 |
||||||||||||
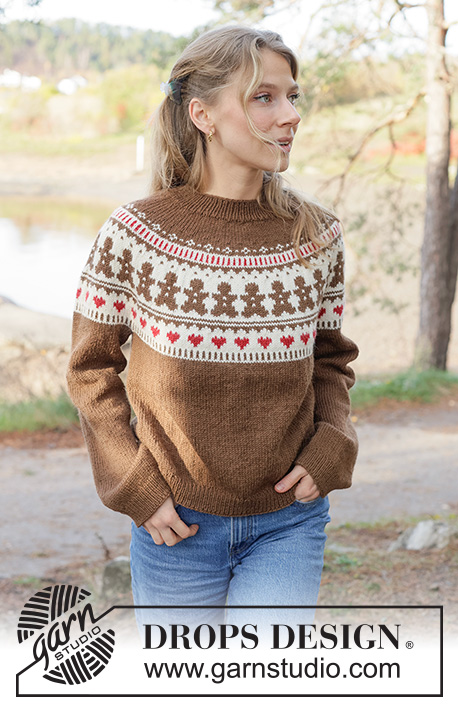
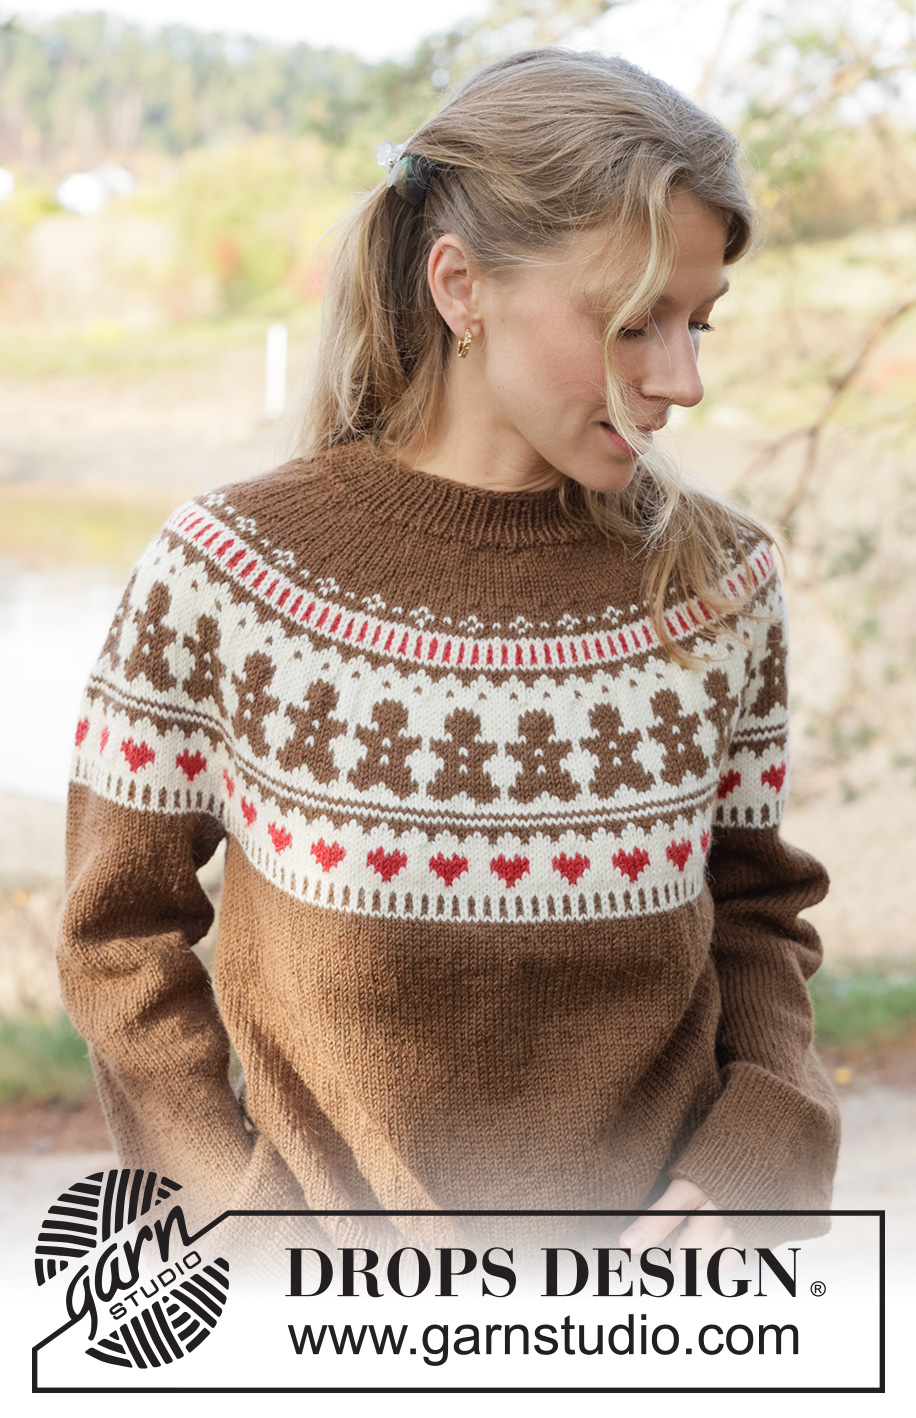
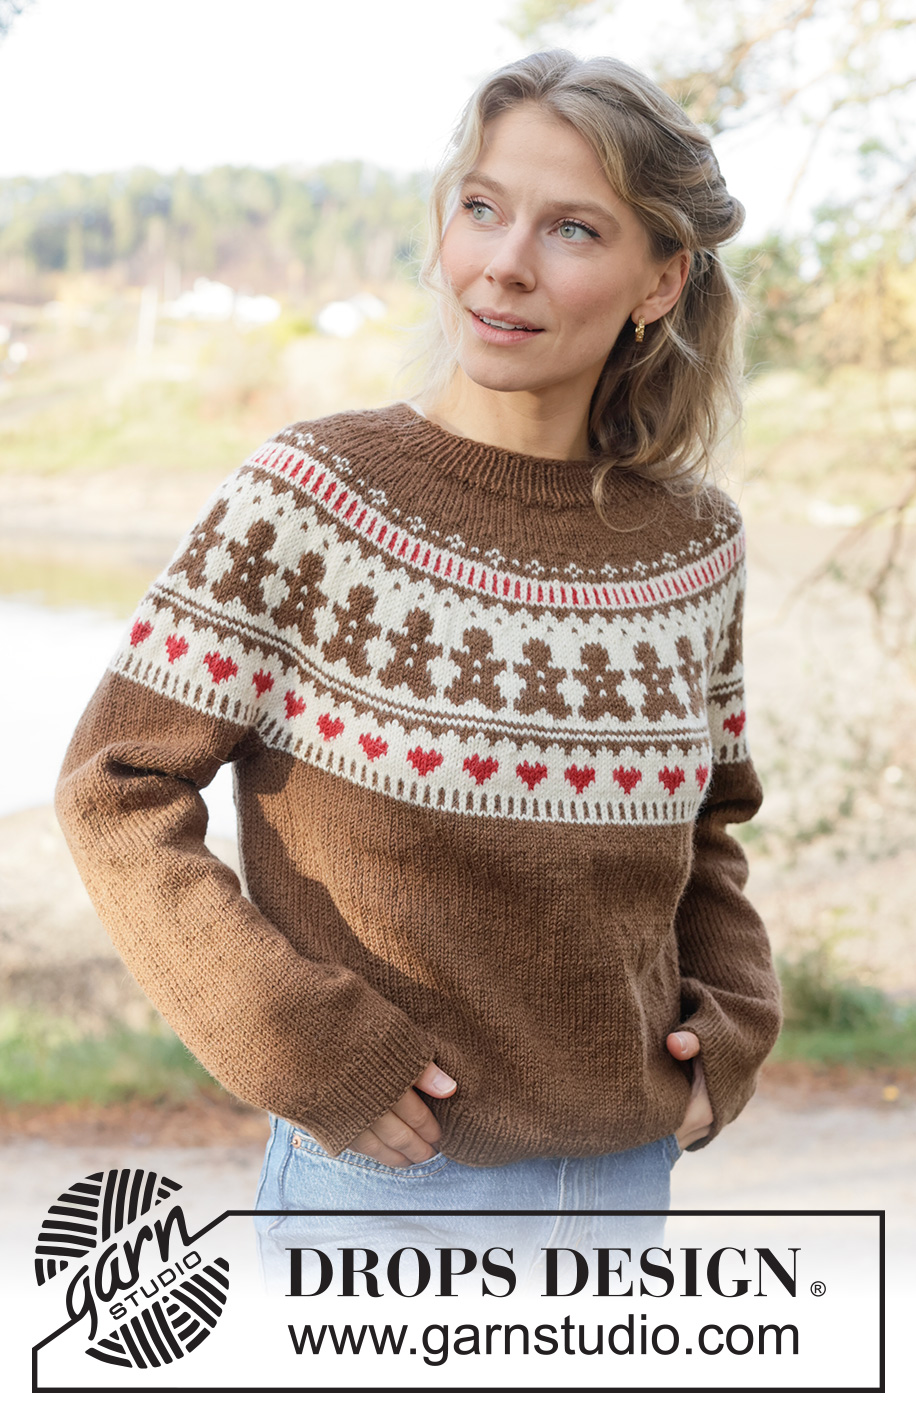
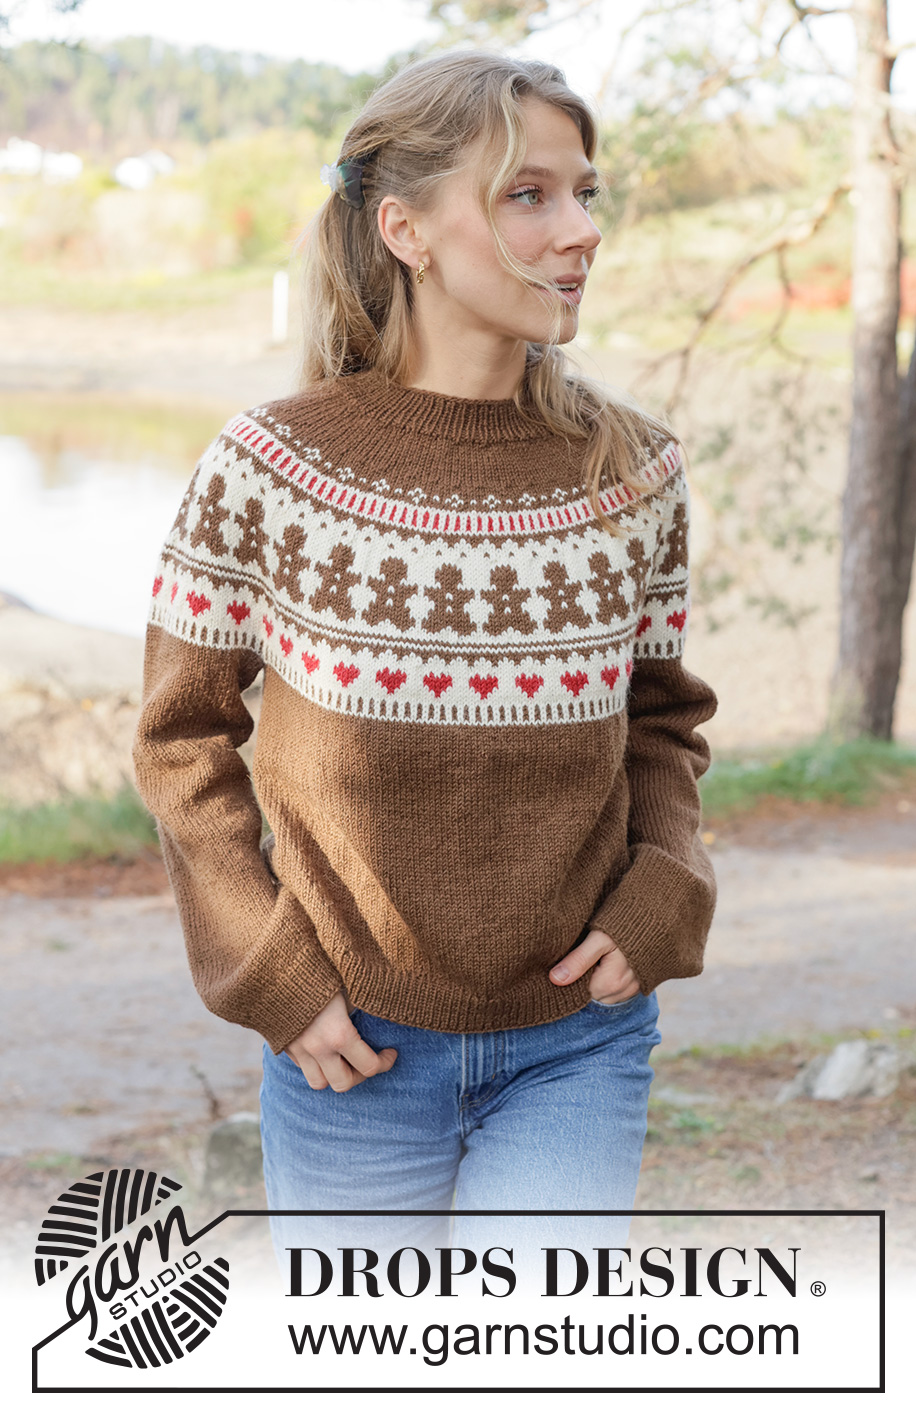
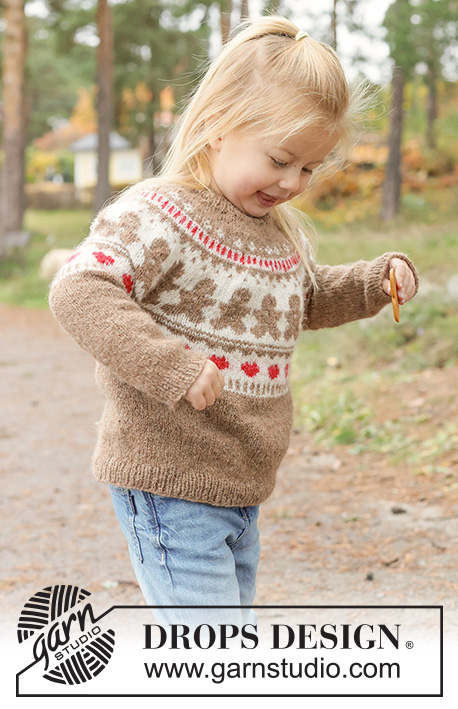
Jersey de punto en DROPS Lima. La pieza está tejida de arriba hacia abajo con canesú redondo y patrón jacquard multicolor de muñecos de jengibre y corazones. Tallas S – XXXL.
DROPS 262-38 |
|||||||||||||
|
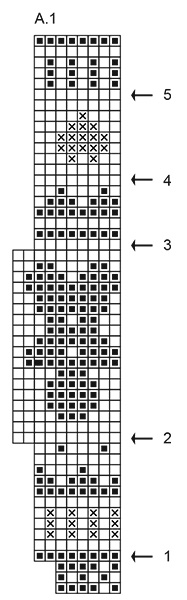
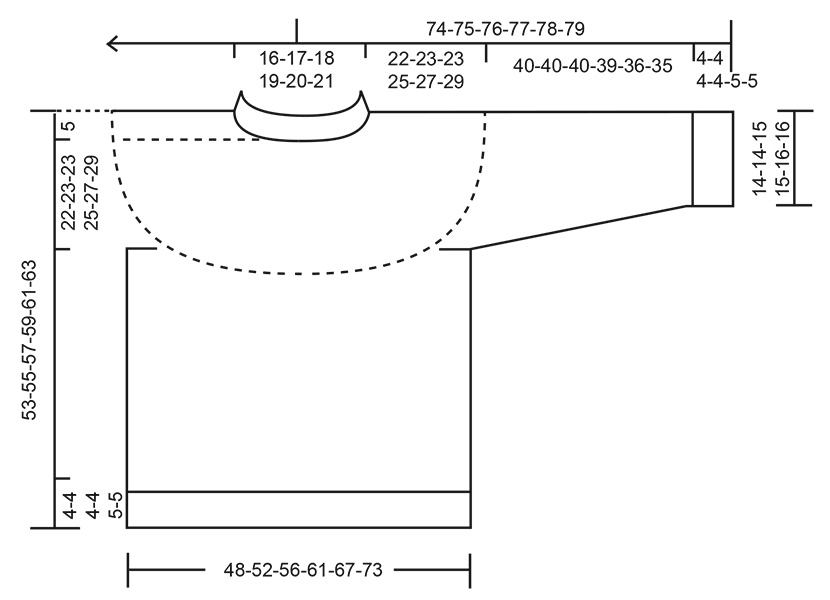
------------------------------------------------ EXPLICACIONES PARA REALIZAR EL PATRÓN: ------------------------------------------------ ELEVACIÓN: Para hacer que el jersey quede ligeramente más alto en el escote de la espalda cuando se teje un canesú redondo, se puede tejer una elevación como está explicado aquí. Saltarse esta sección si no se desea una elevación. Empezar por el lado derecho y tejer 16-17-18-19-20-21 puntos derechos a partir del hilo marcador al principio de la vuelta (= centro de la espalda), virar y tejer 32-34-36-38-40-42 puntos reveses. Tejer Hileras Cortas Alemanas para evitar que se formen agujeros – ver abajo. Virar, apretar el hilo y tejer 48-51-54-57-60-63 puntos derechos, virar, apretar el hilo y tejer 64-68-72-76-80-84 puntos reveses. Virar, apretar el hilo y tejer 80-85-90-95-100-105 puntos derechos, virar, apretar el hilo y tejer 96-102-108-114-120-126 puntos reveses. Virar, apretar el hilo y tejer de vuelta de derecho hasta el hilo marcador al centro de la espalda. Después continuar el canesú como está explicado en el texto. HILERAS CORTAS ALEMANAS: Cuando se tejen hileras cortas, habrá un pequeño agujero después de cada giro. Este agujero se puede cerrar apretando el hilo o usando la técnica de Hileras Cortas Alemanas de la manera siguiente: Deslizar el primer punto como de revés, colocar el hilo sobre la aguja derecha y apretar bien por atrás (2 bucles en la aguja). Estos bucles se tejen juntos en la hilera siguiente. PATRÓN: Ver diagrama A.1. El patrón se teje en punto jersey. TIP PARA TEJER: Para evitar que la tensión del tejido frunza la labor cuando se teje el patrón de jacquard, es importante que los hilos en el lado de atrás de la pieza no estén apretados. Usar agujas un número más grande cuando se teje el patrón de jacquard si fuera necesario. TIP PARA AUMENTAR: Aumentar 1 punto haciendo 1 lazada, la cual se teje retorcida de derecho en la vuelta siguiente para evitar que se forme un agujero. El nuevo punto se teje en punto jersey. TIP PARA DISMINUIR (para el centro bajo las mangas): Disminuir 1 punto a cada lado del hilo marcador de la manera siguiente: Tejer hasta que resten 3 puntos antes del hilo marcador, tejer 2 puntos juntos de derecho, tejer 2 puntos derechos (el hilo marcador está entre estos 2 puntos), deslizar 1 punto como de derecho, tejer 1 punto derecho y pasar el punto deslizado por encima del punto tejido (2 puntos disminuidos). ------------------------------------------------ COMENZAR LA PIEZA AQUÍ: ------------------------------------------------ JERSEY – RESUMEN DE LA PIEZA: El cuello y el canesú se tejen en redondo con aguja circular, de arriba hacia abajo y a partir del centro de la espalda. Cuando el canesú está terminado, se divide para el cuerpo y las mangas y el cuerpo se continúa en redondo, mientras las mangas esperan. Las mangas se tejen de arriba hacia abajo, en redondo. CUELLO: Montar 110-114-118-122-128-132 puntos con aguja circular tamaño 3 mm y el color Castaña DROPS Lima. Tejer 1 vuelta de derecho. Tejer en resorte en redondo (1 derecho, 1 revés) durante 4 cm. CANESÚ: Cambiar a aguja circular tamaño 4 mm. Insertar 1 hilo marcador al principio de la vuelta (centro de la espalda). Dejar que el hilo marcador siga la labor a medida que se teje. Tejer 1 vuelta de derecho y aumentar 32-32-34-38-40-44 puntos distribuidos equitativamente – leer TIP PARA AUMENTAR = 142-146-152-160-168-176 puntos. Insertar 1 marcador en el centro de la vuelta (centro del frente). Ahora medir la pieza a partir de aquí. Tejer una ELEVACIÓN en el escote de la espalda – leer explicación arriba. Tejer punto jersey en redondo. Recordar mantener la misma tensión de tejido de la muestra. Cuando el canesú mida 2-3-4-5-5-6 cm a partir del marcador al centro del frente, aumentar 38-46-46-50-54-52 puntos distribuidos equitativamente = 180-192-198-210-222-228 puntos. Cuando el canesú mida 3-4-5-6-6-7 cm, tejer el patrón y aumentar de la manera siguiente – leer TIP PARA TEJER y PATRÓN en las explicaciones arriba. Tejer A.1 en redondo. En cada hilera del diagrama marcada con una flecha, aumentar de la manera siguiente: FLECHA-1: Aumentar 44-48-50-46-58-60 puntos distribuidos equitativamente = 224-240-248-256-280-288 puntos. FLECHA-2: Aumentar 36-40-42-44-50-52 puntos distribuidos equitativamente = 260-280-290-300-330-340 puntos. FLECHA-3: Aumentar 20-32-30-44-38-52 puntos distribuidos equitativamente = 280-312-320-344-368-392 puntos. FLECHA-4: Aumentar 16-16-24-24-24-32 puntos distribuidos equitativamente = 296-328-344-368-392-424 puntos. FLECHA-5: Aumentar 8-4-4-16-8-12 puntos distribuidos equitativamente = 304-332-348-384-400-436 puntos. Cuando A.1 esté terminado en altura, continuar con punto jersey y el color Castaña. Cuando el canesú mida 22-23-23-25-27-29 cm a partir del marcador al centro del frente, dividir para el cuerpo y las mangas. DIVIDIR PARA EL CUERPO Y LAS MANGAS: Tejer 46-51-53-58-62-69 puntos derechos (= mitad pieza de la espalda), colocar los 60-64-68-76-76-80 puntos siguientes en un hilo/gancho auxiliar para la manga, montar 8-8-12-12-16-16 puntos (= centro bajo la manga), tejer 92-102-106-116-124-138 puntos derechos (= pieza del frente), colocar los 60-64-68-76-76-80 puntos siguientes en un hilo/gancho auxiliar para la manga, montar 8-8-12-12-16-16 puntos (= centro bajo la manga), tejer los últimos 46-51-53-58-62-69 puntos derechos (= mitad pieza de la espalda). Terminar el cuerpo y las mangas separadamente. CUERPO: = 200-220-236-256-280-308 puntos. Insertar 1 marcador en el centro de los 8-8-12-12-16-16 puntos montados bajo 1 manga. Empezar la nueva vuelta junto al marcador. Tejer punto jersey en redondo con el color Castaña hasta que la pieza mida 44-46-48-50-51-53 cm a partir del marcador al centro del frente. Tejer 1 vuelta de derecho y aumentar 42-42-46-52-58-60 puntos distribuidos equitativamente = 242-262-282-308-338-368 puntos. Cambiar a aguja circular tamaño 3 mm. Tejer en resorte (1 derecho, 1 revés) durante 4-4-4-4-5-5 cm. Rematar un poco flojo. El jersey mide aprox. 48-50-52-54-55-57 cm a partir del marcador al centro del frente y 53-55-57-59-61-63 cm a partir del hombro. MANGAS: Colocar los 60-64-68-76-76-80 puntos para la manga de un gancho auxiliar en aguja circular/agujas de doble punta tamaño 4 mm y levantar 1 punto en cada uno de los 8-8-12-12-16-16 puntos montados bajo la manga usando el color Castaña = 68-72-80-88-92-96 puntos. Insertar un hilo marcador en el centro de los 8-8-12-12-16-16 puntos bajo la manga. Dejar que el hilo marcador siga la labor a medida que se teje. Será usado cuando se disminuya bajo la manga. Empezar junto al hilo marcador. Tejer punto jersey en redondo con el color Castaña. Cuando la manga mida 4-4-3-3-3-3 cm, disminuir 2 puntos al centro bajo la manga (leer TIP PARA DISMINUIR) a cada 8-6-4-2½-2½-2 cm un total de 5-6-9-12-13-14 veces = 58-60-62-64-66-68 puntos. Continuar tejiendo hasta que la manga mida 40-40-40-39-36-35 cm a partir de la división. Tejer 1 vuelta de derecho y aumentar 12 puntos distribuidos equitativamente = 70-72-74-76-78-80 puntos. Cambiar a agujas de doble punta tamaño 3 mm. Tejer en resorte (1 derecho, 1 revés) durante 4-4-4-4-5-5 cm, después rematar un poco flojo. La manga mide aprox. 44-44-44-43-41-40 cm a partir de la división. |
|||||||||||||
Explicaciones del diagrama |
|||||||||||||
|
|||||||||||||
 |
|||||||||||||
 |
|||||||||||||
¿Terminaste este patrón?Entonces, etiqueta tus fotos con #dropspattern #cookieparadesweater o envíalas a la galería #dropsfan. ¿Necesitas ayuda con este patrón?Encontrarás 23 videos tutoriales, un espacio para comentarios/preguntas y más visitando la página del patrón en garnstudio.com © 1982-2026 DROPS Design A/S. Todos los derechos reservados. Este documento, incluyendo todas sus sub-secciones, está protegido por los derechos de autor (copyright). Lee más acerca de lo que puedes hacer con nuestros patrones en la parte de abajo de cada patrón de nuestro sitio. |
|||||||||||||






Con más de 40 años en el diseño de modelos de punto y de ganchillo, DROPS Design ofrece una de las más vastas colecciones de patrones gratuitos en el internet - traducidos en 17 idiomas. Al día de hoy, contamos con 333 catálogos y 12532 patrones - de los cuales 12026 están traducidos en español.
Nosotros trabajamos con mucho esmero para brindarte lo mejor que las labores de punto y ganchillo tienen para ofrecer,inspiración y consejos, así como hilos de magnífica calidad a precios increíbles! Te gustaría usar nuestros patrones para otro fin además del uso personal? Puedes leer acerca de lo que estás permitida a hacer en el texto de Copyright en la parte de abajo de todos nuestros patrones. Felices labores!
Escribe un comentario sobre DROPS 262-38
¡Nos encantaría saber qué piensas acerca de este patrón!
Si quieres escribir una pregunta referente al patrón, por favor asegúrate de elegir la categoría correcta en el formulario debajo, para acelerar el proceso de respuesta. Los campos obligatorios están marcados con un *.