
Categorías populares
¿Buscas un hilo?


Comentarios / Preguntas (4)
![]() Hetty Stok escribió:
Hetty Stok escribió:
Thanks for the help. Now I have another question. Please explain the instruction for thumb, specifically “knit up stitches at the same time as you increase behind and on each side of the thumb where the 3 stitches were cast on.” It is confusing. “Knit up, make 1 yarn over…” ?? Where are these 3 stitches??
05.10.2024 - 09:17DROPS Design respondió:
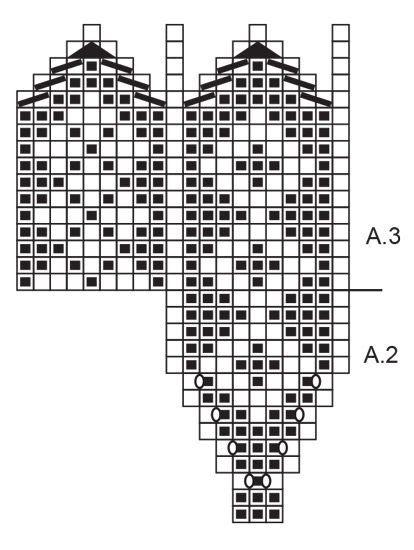
Dear Hetty, the 3 stitches that were cast on were used to continue working over the thumb and not interrupt pattern A.1. So you already worked over these 3 stitches. Now you have the stitches of A.2, that were on a thread, and you pick up the other end of these 3 stitches and pick up 1 stitch on each side of these 3 cast-on stitches, so that the thumb will be fully connected to the rest of the piece, and you will have no holes. So first work over the 11 stitches in the thread, with A.3 over A.2 as shown. Then, you knit up around the little hole for the thumb and work yarn overs in between the knitted up stitches, to get the correct number of stitches. Happy knitting!
06.10.2024 - 13:49
![]() Hetty Stok escribió:
Hetty Stok escribió:
Could you please clarify the instruction to increase at the base of the thumb? The colours do not remain as in the diagram. The instruction is to make a yarn over with the dark colour however the diagram indicates that the next stitch must be white. I’m aware that our English technique for “yarn over” is to bring the yarn to be knitted in the next stitch should be brought to the front (ie as for knitting a purl stitch) and that you may have a different technique. Please explain. Hetty
04.10.2024 - 14:30DROPS Design respondió:
Dear Mrs Stock, in this video we show how to increase for a thumb gusset (without pattern, but with the technique of the yarn overs); for these mittens we work the yarn over in the dark colour, but feel free to work it with the light colour if you rather like the result like this. Happy knitting!
04.10.2024 - 15:59
![]() Lorýa Björk Jónsson escribió:
Lorýa Björk Jónsson escribió:
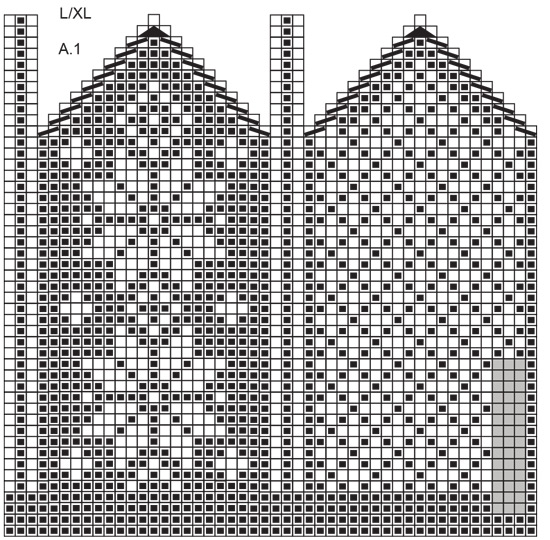
Fehler in muster a4 grösse s/m, linie 7 11 und 15 und fehler in muster a1 grösse l/xl, linie 16
04.12.2023 - 23:41
![]() Mette escribió:
Mette escribió:
Hej, Jag har lagt märke till att era vantar för herrar är väldigt små i storleken. Flera gånger har jag stickat olika modeller i största storlek och de är oftast passliga på en luten kvinnohand ändå. Här också är ju mönstret för storlek S/M lika långt som L/XL, vilket känns lite konstigt.
01.12.2023 - 11:44
|
||||||||||||||||||||||
Snow Flake Mittens#snowflakemittens |
||||||||||||||||||||||
 |
 |
|||||||||||||||||||||
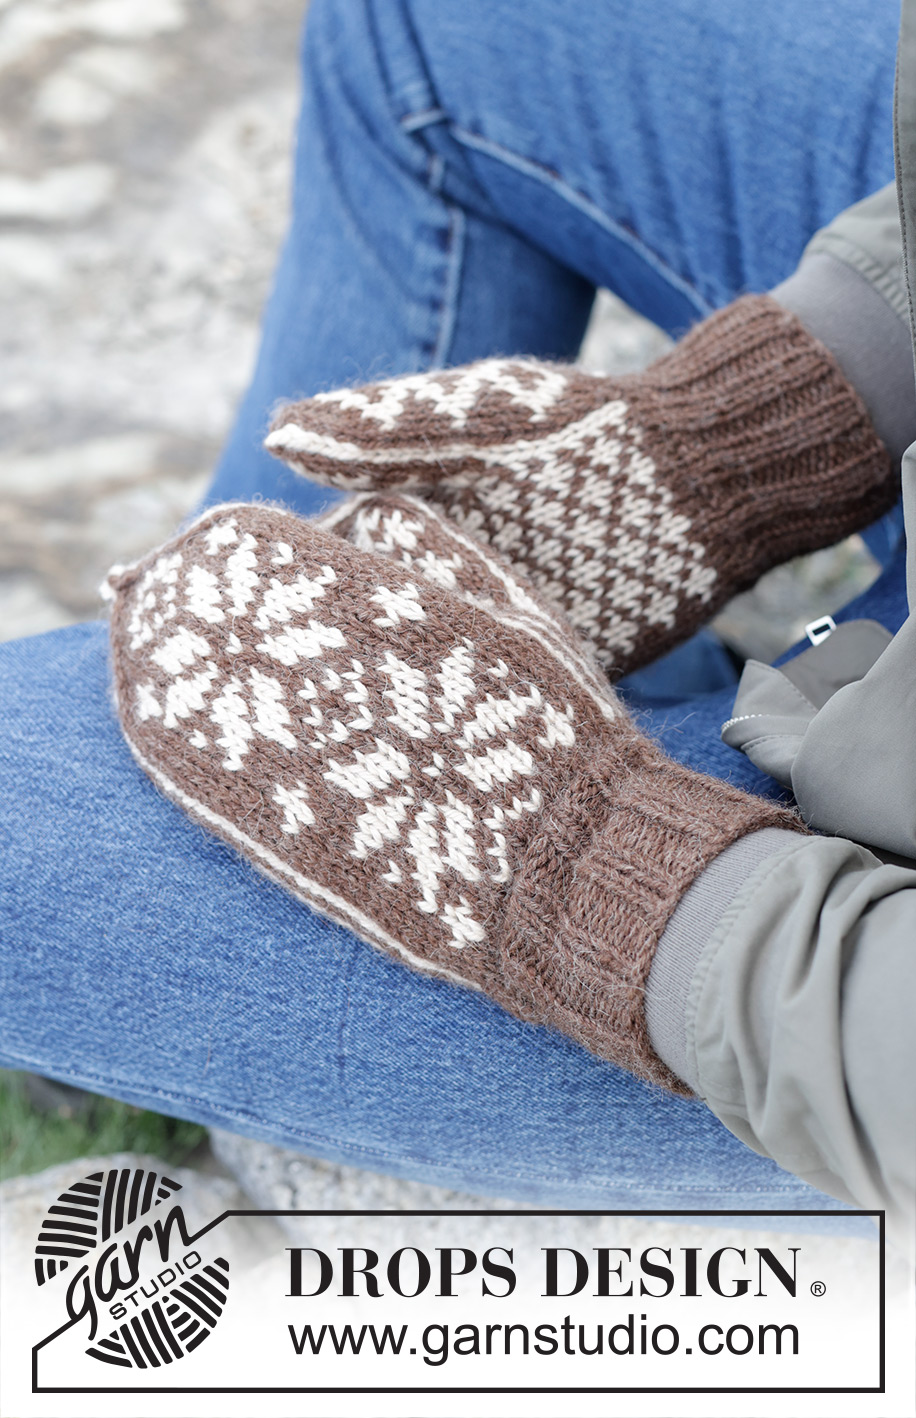
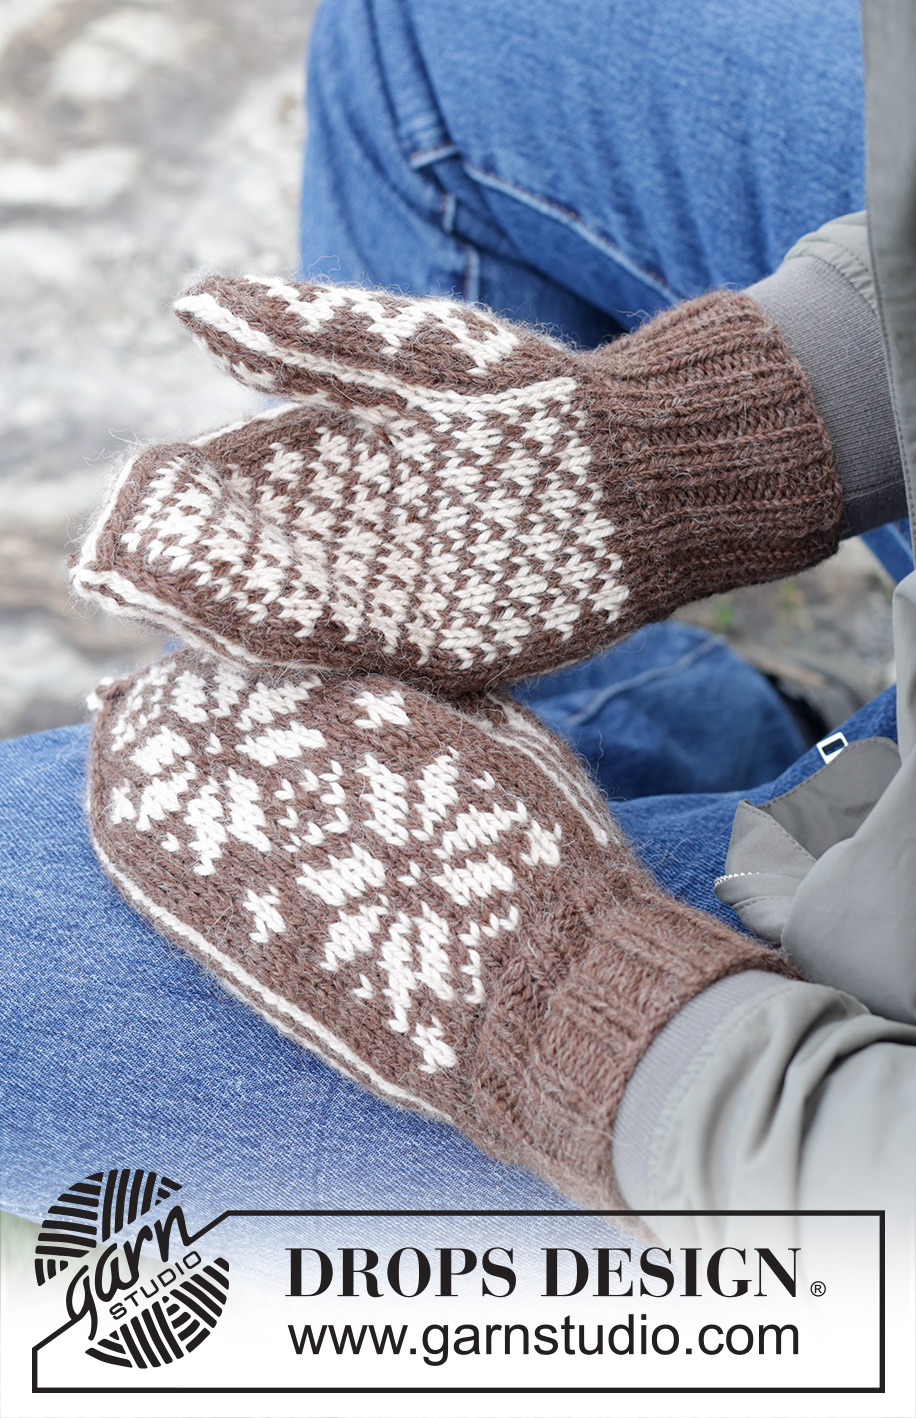
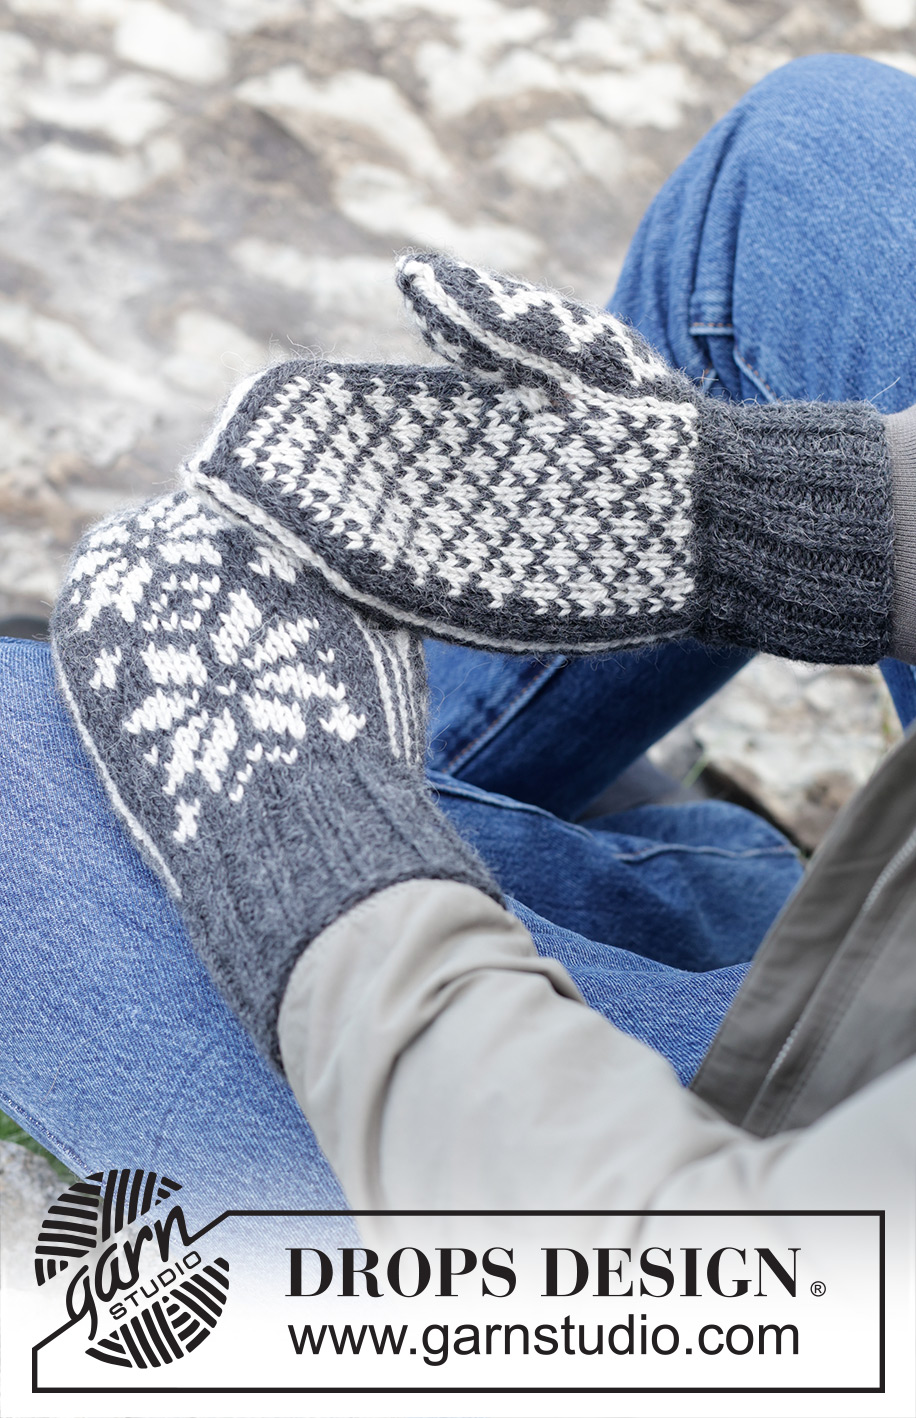
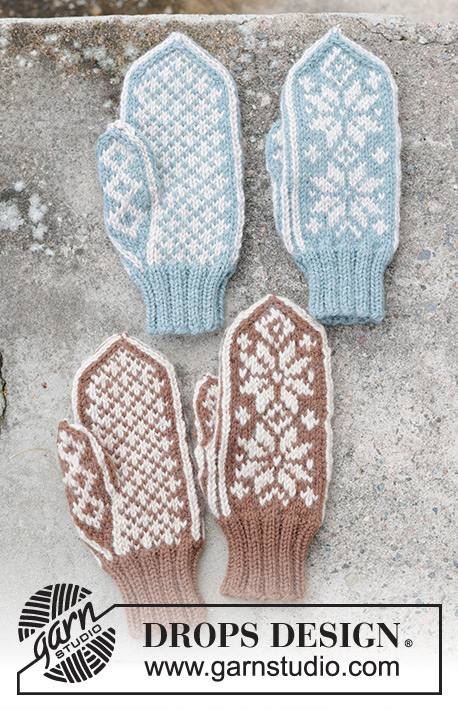
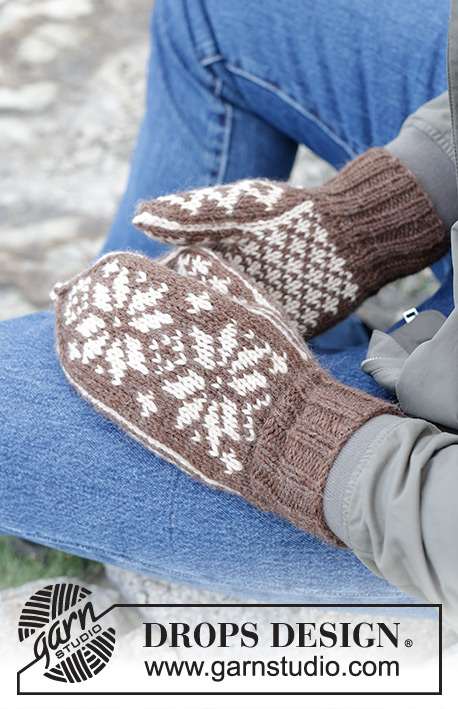
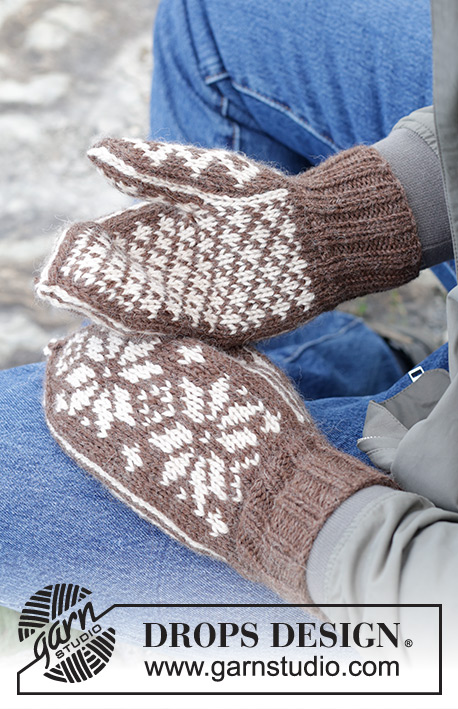
Manoplas a punto para hombre en DROPS Nepal. La labor está realizada con patrón de jacquard.
DROPS 246-20 |
||||||||||||||||||||||
|
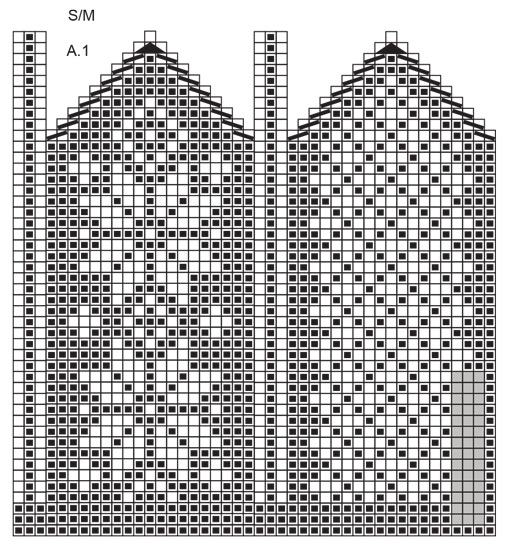
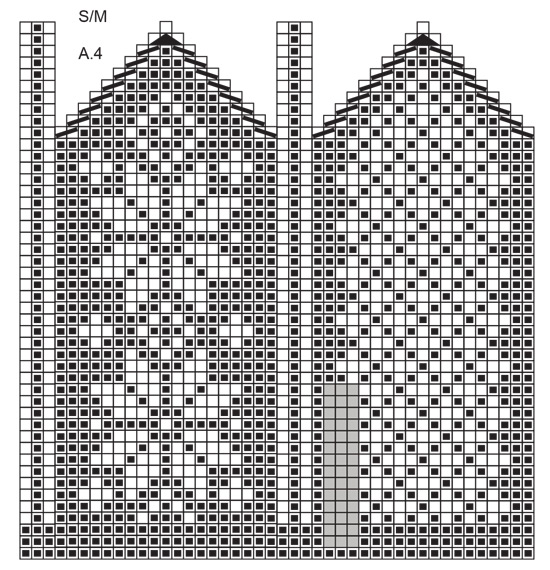
------------------------------------------------------- EXPLICACIONES PARA REALIZAR LA LABOR: ------------------------------------------------------- PATRÓN: Ver los diagramas A.1 a A.4. Elegir los diagramas para tu talla. ------------------------------------------------------- COMENZAR LA LABOR AQUÍ: ------------------------------------------------------- MANOPLAS - RESUMEN DE LA LABOR: La labor se trabaja en redondo con agujas de doble punta. MANOPLA DERECHA: Montar 44-48 puntos con agujas de doble punta de 3 mm y el color gris oscuro/café medio de DROPS Nepal. Trabajar el elástico en redondo (2 derechos, 2 reveses) 7-8 cm. Cambiar a agujas de doble punta de 3.5 mm. El resto de la manopla se trabaja en punto jersey. Trabajar según el diagrama A.1. El diagrama A.2 se trabaja sobre los cuadrados grises de A.1 = pulgar. RECORDAR MANTENER LA TENSIÓN DEL TEJIDO! Cuando el diagrama A.2 esté terminado, se han aumentado 8 puntos en A.2 (11 puntos en A.2). En la siguiente vuelta, colocar los puntos en A.2 en un hilo y montar 3 puntos como se muestra sobre los cuadrados grises de A.1. Cuando se haya terminado A.1, cortar los hilos y pasarlos por los puntos restantes, estirar y asegurar. PULGAR: Colocar los 11 puntos desde el gancho auxiliar en agujas de doble punta de 3.5 mm. Para obtener una bonita terminación, recoger puntos y al mismo tiempo aumentar detrás y a cada lado del pulgar, donde se montaron 3 puntos como sigue: Comenzar trabajando A.3 sobre los puntos en la aguja, recoger 1 punto con el color gris oscuro/café medio, hacer 1 hebra con el color gris claro/ beige claro, recoger 1 punto con el color gris claro/ beige claro, 1 hebra con el color gris claro/ beige claro, recoger 1 punto con el color gris oscuro/café medio, 1 hebra con el color gris claro/ beige claro, recoger 1 punto con el color gris claro/ beige claro, 1 hebra con el color gris claro/ beige claro y recoger 1 punto con el color gris oscuro/café medio. La 1ª vuelta de A.3 ya se ha trabajado/ recogido. En la siguiente vuelta, trabajar las hebras de derecho retorcido según la vuelta 2 de A.3. Cuando se haya terminado A.3, cortar los hilos y pasarlos por los puntos restantes, estirar y asegurar. MANOPLA IZQUIERDA: Trabajar de la misma manera que la manopla derecha pero trabajar según A.4 en vez de A.1. A.2 se trabaja en el lado opuesto, donde están los cuadrados grises en A.4. Cuando se haya terminado A.4, trabajar el pulgar de la misma manera que en la manopla derecha. |
||||||||||||||||||||||
Explicaciones del diagrama |
||||||||||||||||||||||
|
||||||||||||||||||||||
 |
||||||||||||||||||||||
 |
||||||||||||||||||||||
 |
||||||||||||||||||||||
 |
||||||||||||||||||||||
 |
||||||||||||||||||||||
¿Terminaste este patrón?Entonces, etiqueta tus fotos con #dropspattern #snowflakemittens o envíalas a la galería #dropsfan. ¿Necesitas ayuda con este patrón?Encontrarás 20 videos tutoriales, un espacio para comentarios/preguntas y más visitando la página del patrón en garnstudio.com © 1982-2026 DROPS Design A/S. Todos los derechos reservados. Este documento, incluyendo todas sus sub-secciones, está protegido por los derechos de autor (copyright). Lee más acerca de lo que puedes hacer con nuestros patrones en la parte de abajo de cada patrón de nuestro sitio. |
||||||||||||||||||||||


Con más de 40 años en el diseño de modelos de punto y de ganchillo, DROPS Design ofrece una de las más vastas colecciones de patrones gratuitos en el internet - traducidos en 17 idiomas. Al día de hoy, contamos con 324 catálogos y 12290 patrones - de los cuales 11685 están traducidos en español.
Nosotros trabajamos con mucho esmero para brindarte lo mejor que las labores de punto y ganchillo tienen para ofrecer,inspiración y consejos, así como hilos de magnífica calidad a precios increíbles! Te gustaría usar nuestros patrones para otro fin además del uso personal? Puedes leer acerca de lo que estás permitida a hacer en el texto de Copyright en la parte de abajo de todos nuestros patrones. Felices labores!
Escribe un comentario sobre DROPS 246-20
¡Nos encantaría saber qué piensas acerca de este patrón!
Si quieres escribir una pregunta referente al patrón, por favor asegúrate de elegir la categoría correcta en el formulario debajo, para acelerar el proceso de respuesta. Los campos obligatorios están marcados con un *.