
Categorías populares
¿Buscas un hilo?


Comentarios / Preguntas (189)
![]() Hanneke Spaans escribió:
Hanneke Spaans escribió:
Goedendag , voor de mouwen staat naalden zonder knop maar kan ik ook de rondbreinaalden nr 8 en nr 9 gebruiken Groetjes Hanneke
10.08.2024 - 11:38DROPS Design respondió:
Dag Hanneke,
Jazeker, in plaats daarvan kun je ook een rondbreinaald gebruiken.
12.08.2024 - 16:35
![]() Petra Fröhler escribió:
Petra Fröhler escribió:
Hallo, Ich stricke den Rain Chain Pullover und habe eine Frage zum Ärmel. Ab wo werden die 12 cm fürs zunehmen gerechnet. Erst ab dem Muster A1 oder schon nach dem Bündchen? Bitte erklären Sie mir folgendes genauer: „Dann glatt rechts weiterstricken - GLEICHZEITIG bei einer Länge von 12 cm je 1 Masche beidseitig….“ Vielen Dank schon im Voraus Schöne Grüße Petra
09.08.2024 - 15:24DROPS Design respondió:
Liebe Petra, messen Sie diese 12 cm ab der Anschlagskante, dh mit dem Bündchen. Viel Spaß beim Stricken!
12.08.2024 - 07:40
![]() Wilma Sleyster escribió:
Wilma Sleyster escribió:
Deze opmerking was bedoeld voor patroon 237-8
04.08.2024 - 21:17
![]() Wilma Sleyster escribió:
Wilma Sleyster escribió:
Fantastisch patroon. Hele mooie combinatie van garens. Een plezier om te breien !!
04.08.2024 - 21:08
![]() Hanneke Spaans escribió:
Hanneke Spaans escribió:
Ik begrijp de zin niet Brei A.2 ( en het patroon begint en eindigt met 1 rechte steek in Patentsteek aan de binnenkant van 1 kantsteek in ribbelsteek, aan de goede kant gezien). Ga verder met A.2 in de hoogte.
14.07.2024 - 20:37DROPS Design respondió:
Dag Hanneke,
Naast de kantsteek heb je 1 rechte steek. Die rechte steek maakt onderdeel uit van de patentsteek. De kantsteken brei je in ribbelsteken.
16.07.2024 - 18:20
![]() Heather escribió:
Heather escribió:
Totally confused with your A1 diagram . Do you mean knit from Right to left of diagram or from the right side of the jumper ??
04.07.2024 - 01:24DROPS Design respondió:
Dear Heather, first row in A.1 is worked bottom up starting from RS = knit 1 row from RS, knit 1 row from WS, knit 1 row from RS, knit 1 row from WS (2 ridges), knit 1 row from RS and purl 1 row from WS = you have worked the 6 rows A.1 (= 2 ridges + 2 rows stocking stitch). Hapy knitting!
04.07.2024 - 09:15
![]() Mitch escribió:
Mitch escribió:
Totally confused with the A1 diagram . Do you mean knit from R side of the diagram to left or from the right side of the jumper ??
04.07.2024 - 01:20
![]() Louchart escribió:
Louchart escribió:
Il me semble qu'il y a une erreur dans les côtes 1/1 en bas du pull.D’après le dessin, il faut des côtes de 18cm pour le dos et 10cm pour le devant.Or il est écrit 10cm pour le dos. Il doit y avoir 1 erreur dans les explications. Mais merci pour tous ces modèles. Cordialement Mme Louchart
24.06.2024 - 19:21DROPS Design respondió:
Bonjour Mme Louchart, le schéma est juste, les côtes mesurent 10 cm pour le devant et le dos mais le dos est 8 cm plus long que le devant, vous faites la couture des côtés à partir des emmanchures jusqu'aux côtes du devant soit 10 cm de côtes devant + les 8 cm du bas du dos. Bon tricot!
25.06.2024 - 09:22
![]() Karen Laila escribió:
Karen Laila escribió:
Drops 236-9. Model wi-054. Str. M Hvor mange g i alt med Drops wish E Hvor mange g i alt med Drops Air C Forstår ikke 1 tråd eller 2 tråde Om det er ca. 10 nøgler eller 20 nøgler Vh karen
27.05.2024 - 16:37DROPS Design respondió:
Hej Karen, uanset om du strikker i DROPS Wish eller DROPS Air skal du bruge 10 nøgler i str M. Men hvis du strikker i DROPS Air, strikker du med 2 tråde samtidigt for at få den rigtige tykkelse :)
28.05.2024 - 10:25
![]() Claudia escribió:
Claudia escribió:
Hallo Können Sie mir noch mal A1 Diagramm erklären.
09.05.2024 - 22:50DROPS Design respondió:
Liebe Claudia, bei A.1 stricken Sie die 1. Reihe (Hinreihe) rechts, die 2. Reihe (Rückreihe) rechts, die 3. Reihe rechts, die 4. Reihe rechts, die 5. Reihe rechts un die 6. Reihe links. Viel Spaß beim Stricken!
10.05.2024 - 08:58
|
||||||||||||||||
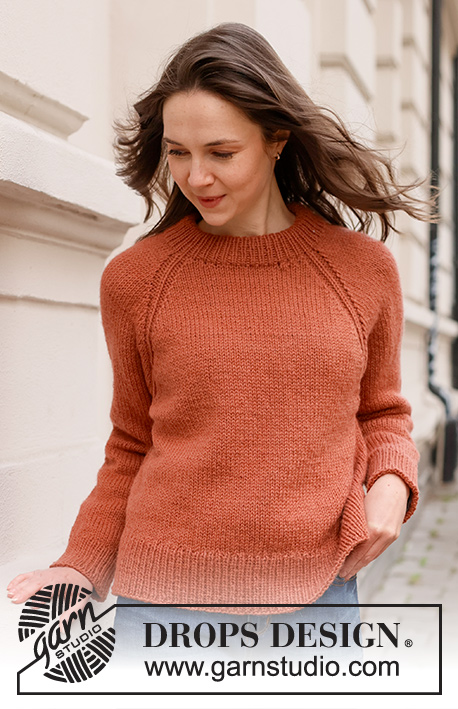
Rain Chain#rainchainsweater |
||||||||||||||||
 |
 |
|||||||||||||||
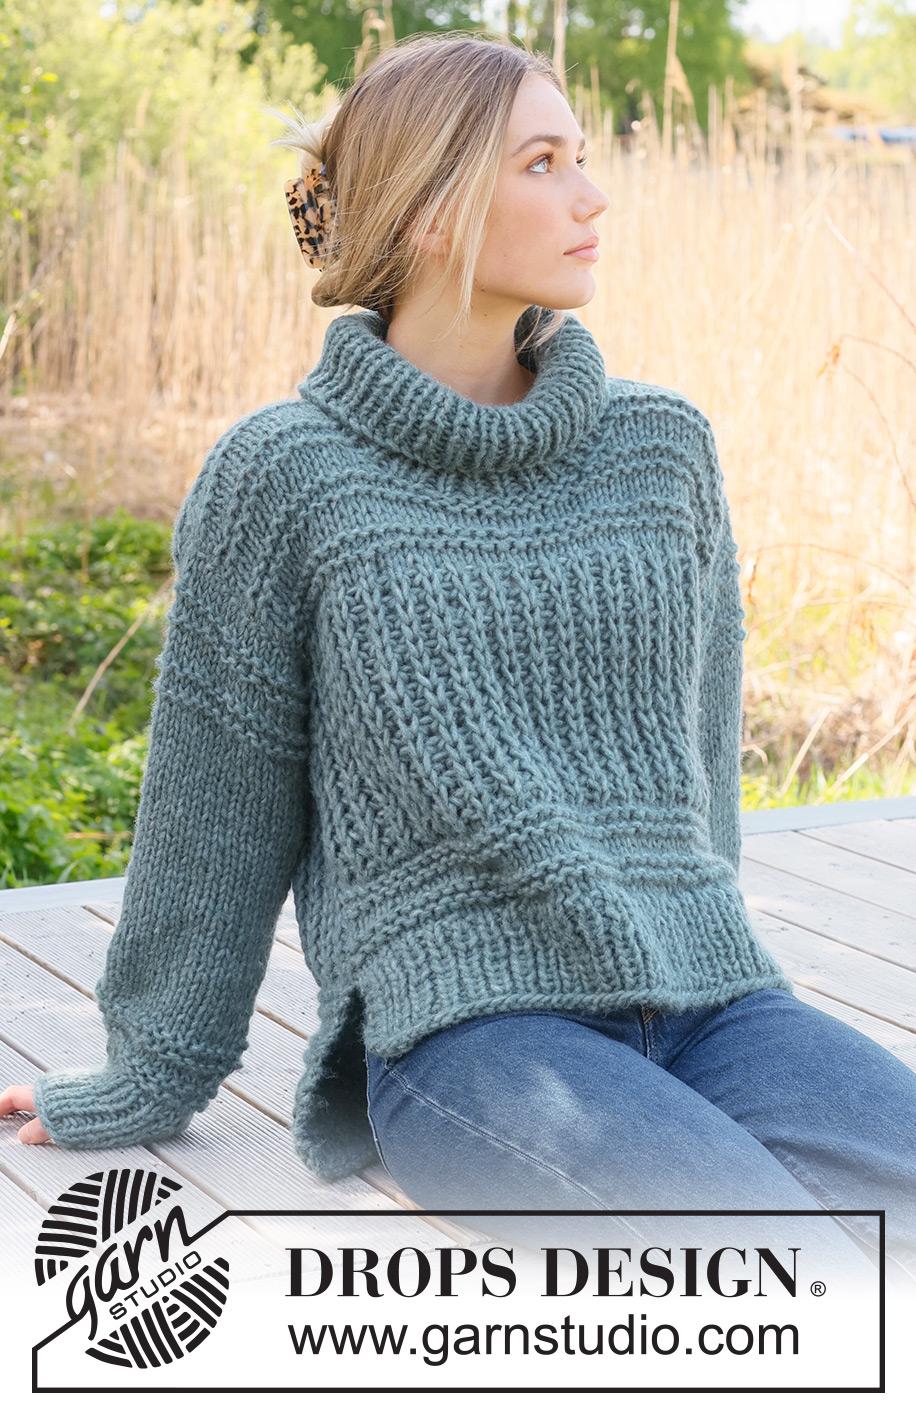
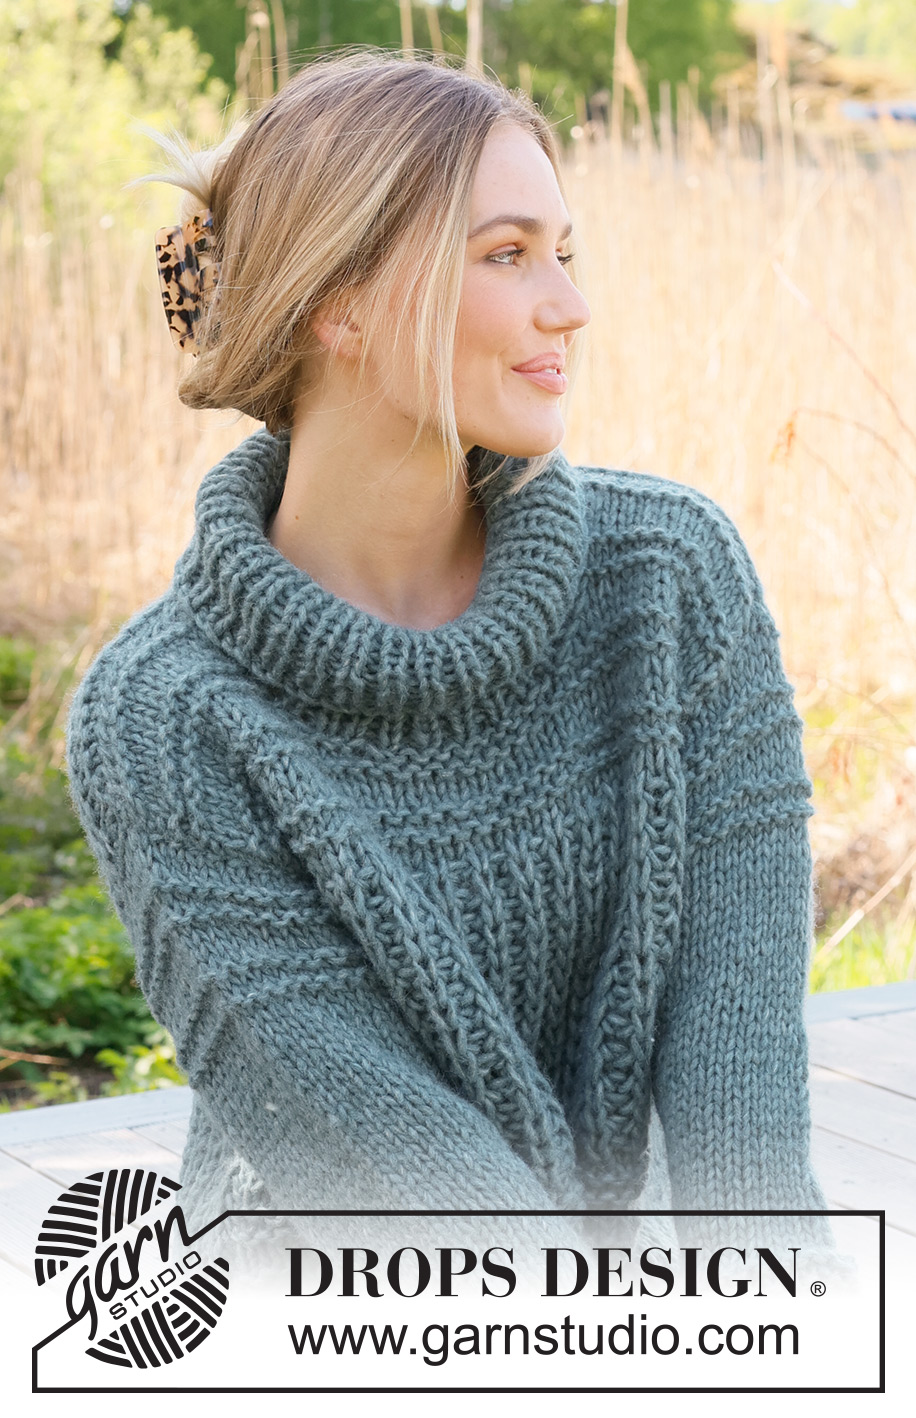
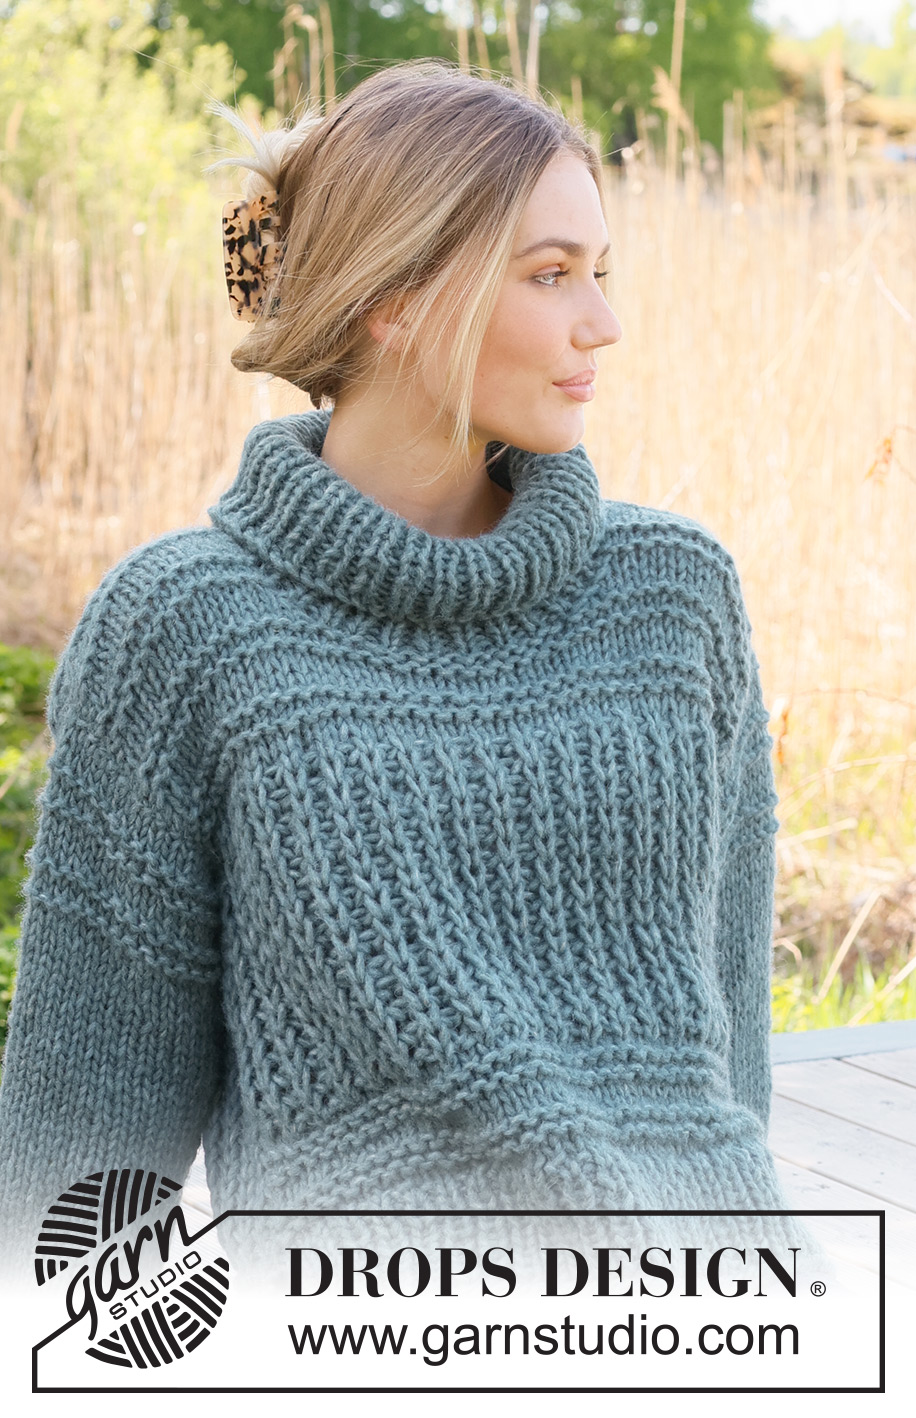
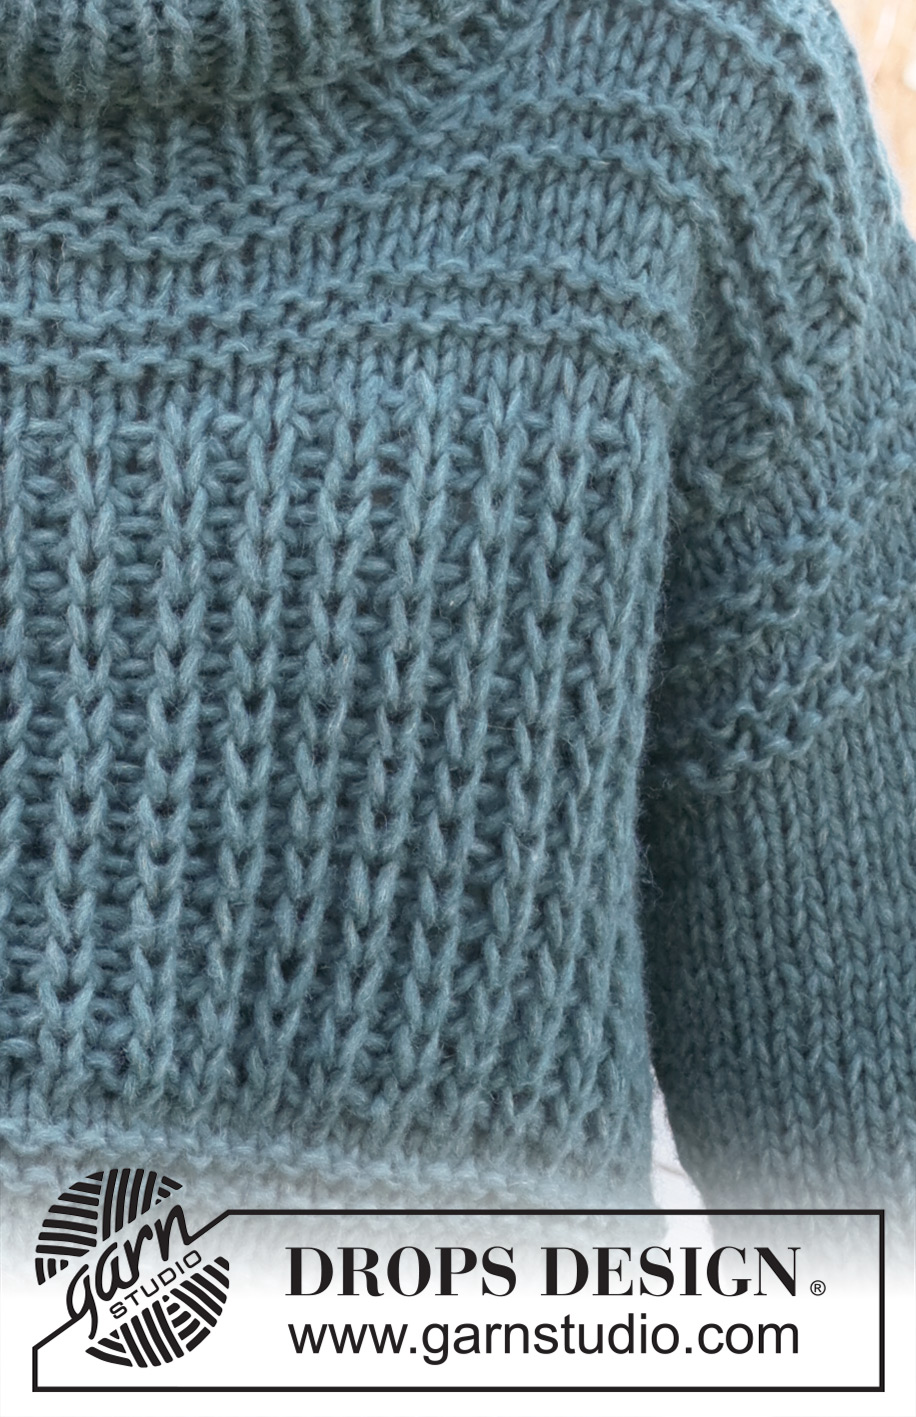
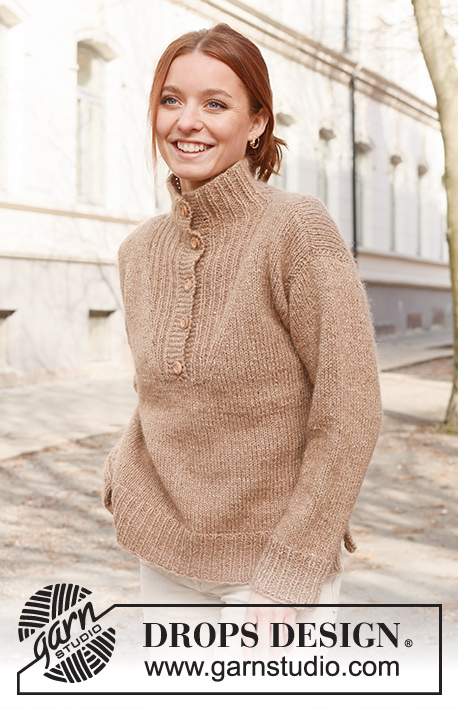
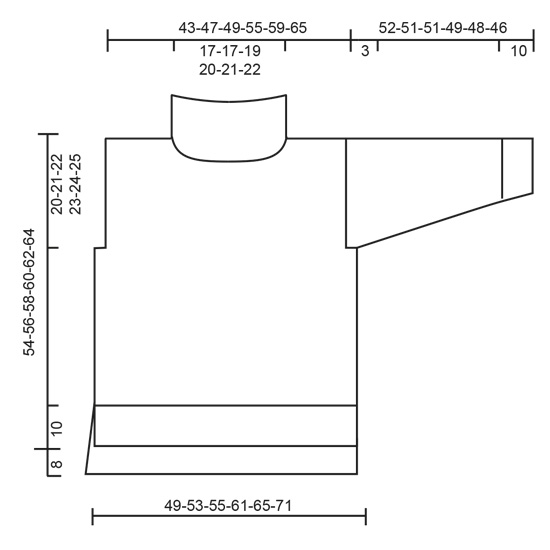
Jersey de punto en DROPS Wish. La pieza está tejida de abajo hacia arriba con punto inglés, punto musgo abierto y abertura en los lados. Tallas S – XXXL.
DROPS 236-9 |
||||||||||||||||
|
------------------------------------------------ EXPLICACIONES PARA REALIZAR EL PATRÓN: ------------------------------------------------ PATRÓN: Ver diagramas A.1 y A.2. Los diagramas muestran todas las hileras del patrón por el lado derecho. SURCO/PUNTO MUSGO (tejido de ida y vuelta): Tejer todas las hileras de derecho. 1 surco = tejer 2 hileras de derecho. TIP PARA AUMENTAR (aplicar a las mangas): Tejer hasta que reste 1 punto antes del hilo marcador, 1 lazada, tejer 2 puntos derechos (el hilo marcador está entre estos puntos), 1 lazada. En la vuelta siguiente, tejer las lazadas retorcidas de derecho para evitar que se formen agujeros. Después tejer los nuevos puntos en punto jersey. ------------------------------------------------ JERSEY – RESUMEN DE LA PIEZA: La pieza se teje en secciones, de ida y vuelta y de abajo hacia arriba, después se cosen entre sí. Las mangas se tejen en redondo con agujas de doble punta/aguja circular corta de abajo hacia arriba. La pieza de la espalda es 8 cm más larga que el frente. ESPALDA: Montar 59-63-67-73-79-85 puntos con aguja circular tamaño 8 mm y 1 hilo DROPS Wish o 2 hilos DROPS Air. Tejer 1 hilera de revés por el lado revés, después tejer el resorte de la manera siguiente por el lado derecho: 2 puntos de orillo en PUNTO MUSGO – leer descripción arriba, * 1 derecho, 1 revés *, tejer de *a* hasta que resten 3 puntos, tejer 1 derecho y 2 puntos de orillo en punto musgo. Continuar este resorte durante 10 cm. Tejer 1 hilera de revés por el lado revés y disminuir 10-10-12-12-14-14 puntos distribuidos equitativamente = 49-53-55-61-65-71 puntos. Cambiar a aguja circular tamaño 9 mm. ¡RECORDAR MANTENER LA MISMA TENSIÓN DE TEJIDO DE LA MUESTRA! Tejer A.1, 2-2-2-3-3-3 veces en altura. Ahora tejer 1 hilera de la manera siguiente por el lado derecho: 1 punto de orillo en punto musgo, * 1 derecho, 1 revés *, tejer de *a* hasta que resten 2 puntos, tejer 1 derecho y 1 punto de orillo en punto musgo. Tejer A.2 (la primera hilera por el lado revés, leyendo el diagrama de izquierda a derecha y el patrón comenzando y terminando con 1 punto derecho en punto inglés en el interior de 1 punto de orillo en punto musgo, visto por el lado derecho). Continuar A.2 en adelante. Cuando la pieza mida 42-43-44-45-46-47 cm, rematar 3 puntos al principio de las 2 hileras siguientes para las sisas = 43-47-49-55-59-65 puntos. Continuar A.2. Cuando la pieza mida 44-46-48-50-52-54 cm, tejer la hilera siguiente de revés por el lado revés. Después tejer de acuerdo a A.1. Cuando la pieza mida 60-62-64-66-68-70 cm, rematar los 13-13-15-15-17-17 puntos centrales para el escote y terminar cada hombro separadamente. Rematar 1 punto en la hilera siguiente a partir del escote = 14-16-16-19-20-23 puntos en el hombro. Rematar cuando la pieza mida 62-64-66-68-70-72 cm. Tejer el otro hombro de la misma manera. FRENTE: Montar y tejer de la misma manera como la pieza de la espalda hasta que el frente mida 34-35-36-37-38-39 cm. Rematar 3 puntos al principio de las 2 hileras siguientes para las sisas = 43-47-49-55-59-65 puntos. Continuar A.2. Cuando la pieza mida 36-38-40-42-44-46 cm, tejer la hilera siguiente de revés por el lado revés. Después tejer de acuerdo a A.1. Cuando la pieza mida 47-49-51-53-55-57 cm, tejer el escote de la manera siguiente: Colocar los 9-9-11-11-13-13 puntos centrales en un hilo y terminar cada hombro separadamente. Rematar para el escote cada 2ª hilera de la manera siguiente: 2 puntos 1 vez, 1 punto 1 vez = 14-16-16-19-20-23 puntos en el hombro. Rematar cuando la pieza mida 54-56-58-60-62-64 cm. Tejer el otro hombro de la misma manera. MANGAS: Montar 30-32-32-34-34-36 puntos con agujas de doble punta tamaño 8 mm y 1 hilo DROPS Wish o 2 hilos DROPS Air. Insertar 1 hilo marcador al principio de la vuelta (centro bajo la manga). Tejer 1 vuelta de derecho, después tejer el resorte en redondo (1 derecho, 1 revés) durante 10 cm. Tejer 1 vuelta de derecho y disminuir 3-3-3-3-3-3 puntos distribuidos equitativamente = 27-29-29-31-31-33 puntos. Cambiar a agujas de doble punta tamaño 9 mm. Tejer A.1 2 veces en altura, después continuar con punto jersey. AL MISMO TIEMPO, cuando la manga mida 12 cm, aumentar 1 punto a cada lado del hilo marcador – leer TIP PARA AUMENTAR. Aumentar así cada 5½-5½-5-4-3½-3½ cm un total de 7-7-7-8-9-9 veces = 41-43-43-47-49-51 puntos. Cuando la manga mida 43-42-42-40-39-37 cm, continuar con A.1. Cuando la manga mida 49-48-48-46-45-43 cm, tejer la copa de la manga de ida y vuelta (a partir del centro bajo la manga) hasta completar las medidas. Rematar cuando la manga mida 52-51-51-49-48-46 cm. Tejer la otra manga de la misma manera. ENSAMBLAJE: Coser las costuras de los hombros. Coser las mangas, en el interior de 1 punto de orillo y coser la parte de abajo de las sisas – ver esquema. Coser las costuras de los lados hasta el resorte (= 10 cm de abertura en la pieza del frente, 18 cm en la espalda), coser en el bucle más externo de los puntos de manera que la costura quede plana. CUELLO: Comenzar en la parte de arriba del hombro derecho y levantar (incluyendo los puntos en el hilo) 60 a 72 puntos con aguja circular corta tamaño 8 mm y 1 hilo DROPS Wish o 2 hilos DROPS Air. El número de puntos debe ser múltiplo de 2. Tejer el resorte en redondo (1 derecho, 1 revés) durante 20-20-20-22-22-22 cm. Rematar. |
||||||||||||||||
Explicaciones del diagrama |
||||||||||||||||
|
||||||||||||||||
 |
||||||||||||||||
 |
||||||||||||||||
 |
||||||||||||||||
¿Terminaste este patrón?Entonces, etiqueta tus fotos con #dropspattern #rainchainsweater o envíalas a la galería #dropsfan. ¿Necesitas ayuda con este patrón?Encontrarás 35 videos tutoriales, un espacio para comentarios/preguntas y más visitando la página del patrón en garnstudio.com © 1982-2026 DROPS Design A/S. Todos los derechos reservados. Este documento, incluyendo todas sus sub-secciones, está protegido por los derechos de autor (copyright). Lee más acerca de lo que puedes hacer con nuestros patrones en la parte de abajo de cada patrón de nuestro sitio. |
||||||||||||||||


Con más de 40 años en el diseño de modelos de punto y de ganchillo, DROPS Design ofrece una de las más vastas colecciones de patrones gratuitos en el internet - traducidos en 17 idiomas. Al día de hoy, contamos con 324 catálogos y 12290 patrones - de los cuales 11685 están traducidos en español.
Nosotros trabajamos con mucho esmero para brindarte lo mejor que las labores de punto y ganchillo tienen para ofrecer,inspiración y consejos, así como hilos de magnífica calidad a precios increíbles! Te gustaría usar nuestros patrones para otro fin además del uso personal? Puedes leer acerca de lo que estás permitida a hacer en el texto de Copyright en la parte de abajo de todos nuestros patrones. Felices labores!
Escribe un comentario sobre DROPS 236-9
¡Nos encantaría saber qué piensas acerca de este patrón!
Si quieres escribir una pregunta referente al patrón, por favor asegúrate de elegir la categoría correcta en el formulario debajo, para acelerar el proceso de respuesta. Los campos obligatorios están marcados con un *.