
Categorías populares
¿Buscas un hilo?


Comentarios / Preguntas (48)
![]() Ria escribió:
Ria escribió:
Ik ben er 'al' achter, het hoort bij teltekening A5,A6 Sorry Groetjes Ria
22.01.2026 - 22:47
![]() Ria escribió:
Ria escribió:
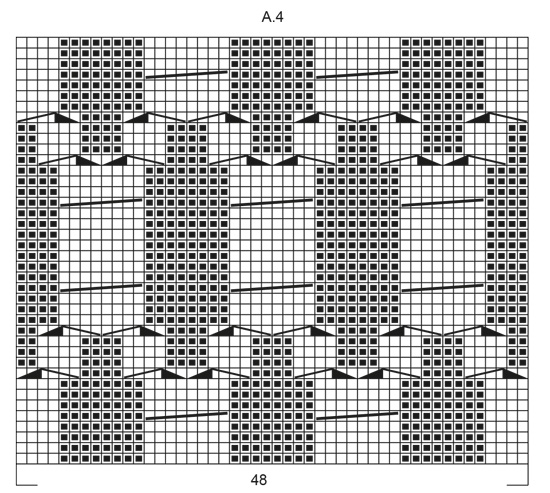
Goedenavond , In teltekening 4A staan in de tekens, een schuine streep naar rechts boven, kabelnld 4 st achter het werk enz. Er staat ook een schuine streep links naar boven, 4 st voor het werk enz. Die word niet in het patroon gebruikt, klopt dat? Zo ja, waarom staat de streep er? Het is nogal verwarrend. ik ben er erg benieuwd naar. Groetjes Ria
22.01.2026 - 22:44DROPS Design respondió:
Dag Ria,
De schuine streep die over acht steken van links boven naar rechts onder loopt wordt in telpatroon A.5 gebruikt.
25.01.2026 - 10:47
![]() Lucia escribió:
Lucia escribió:
Gosto Muito
10.01.2026 - 11:12DROPS Design respondió:
Obrigado em nome da equipa de design DROPS
12.01.2026 - 14:37
![]() Meg escribió:
Meg escribió:
Ciao! Chiedo scusa per la domanda forse banale: nella quantità di lana indicata è compresa quella necessaria per il doppio campione? Oppure va poi disfatto per recuperare il filato? Grazie!
23.12.2025 - 18:25DROPS Design respondió:
Buonasera Meg, la quantità di filato indicata è quella per il capo, non per i campioni. Buon lavoro!
27.12.2025 - 00:52
![]() Maria Tagliavia escribió:
Maria Tagliavia escribió:
C'è un tutorial per la cucitura delle spalle e il giro manica? Grazie
24.11.2025 - 08:57DROPS Design respondió:
Buongiorno Maria, può cucire il lavoro a punto maglia o punto materasso. Buon lavoro!
25.11.2025 - 08:58
![]() Fanjat escribió:
Fanjat escribió:
Ne pas tenir compte de ma question j ai vu la correction merci
09.11.2025 - 20:45
![]() Fanjat escribió:
Fanjat escribió:
Bonjour dans la taille S pour les emmanchures voys dites 0 tous les 2 rangs? Je ne comprends pas merci de m expliquer.
09.11.2025 - 20:43
![]() Marina escribió:
Marina escribió:
Oubliez ma question précédente je crois avoir compris Pour les rangs endroits on suit les diagrammes 1 2 3 4 5 6 1 Pour les rangs envers on tricote les mailles comme elles se présentent endroit sur endroit envers sur envers sauf bien sûr les 20 mailles du début et fin de rang qui se tricotent au point de blé C'est juste? Merci
16.09.2025 - 19:07DROPS Design respondió:
Bonjour Marina, c'est correct. Bon tricot!
17.09.2025 - 08:54
![]() Angela escribió:
Angela escribió:
Has knit now issue 181 made a mistake in this pattern Pattern C has no cable till row 9 and it looks wrong can you help me please
13.08.2025 - 19:06DROPS Design respondió:
Dear Angela, our diagrams are called A.1 to A.6, not sure which one you call "Pattern C", can you help here giving us the name of the diagram online concerned with your question? Thanks for your comprehension.
14.08.2025 - 08:49
![]() Angela escribió:
Angela escribió:
I think Knit now Issue 181 have made a mistake on part C as there is no cable till row 9 and it doesn’t look right, I looked at the picture and there is a cable before that,l have knitted it as instructed but would have been nice to see the proper pattern, please can you explain this to me thank you
13.08.2025 - 18:56
|
|||||||||||||||||||
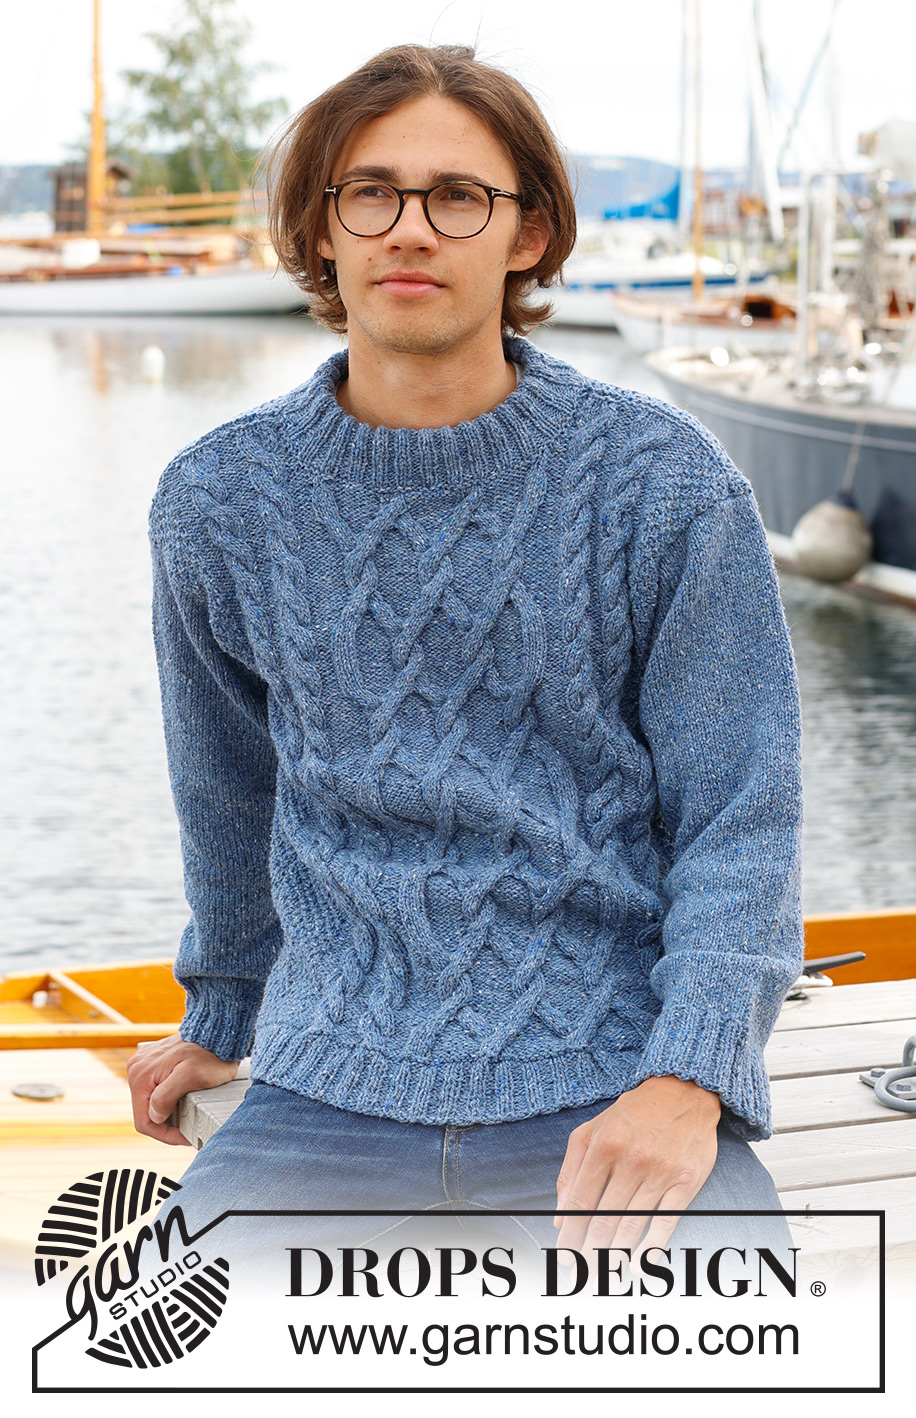
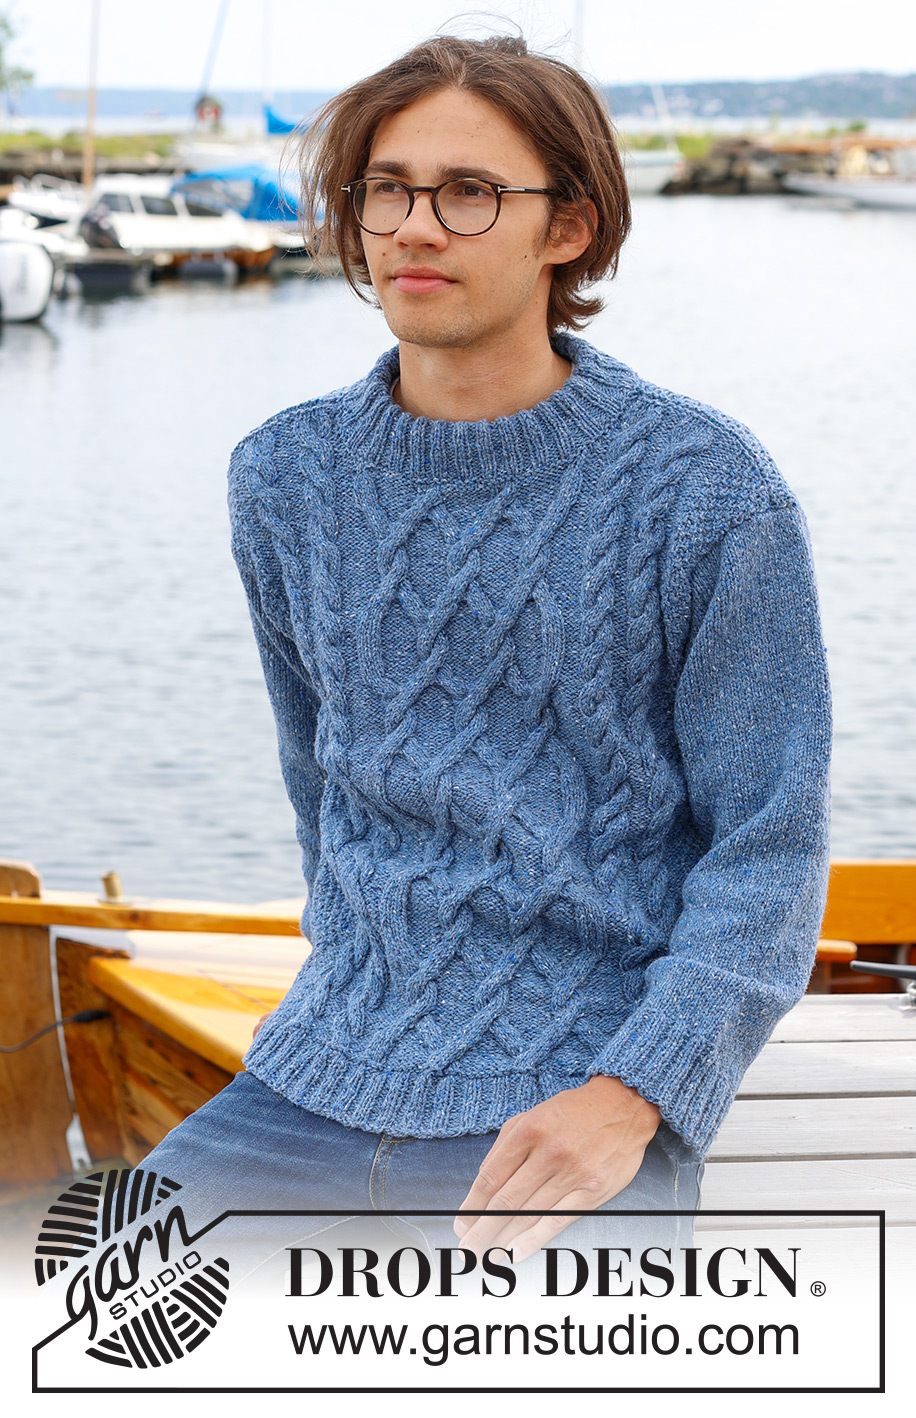
Sailor's Knots#sailorsknotssweater |
|||||||||||||||||||
 |
 |
||||||||||||||||||
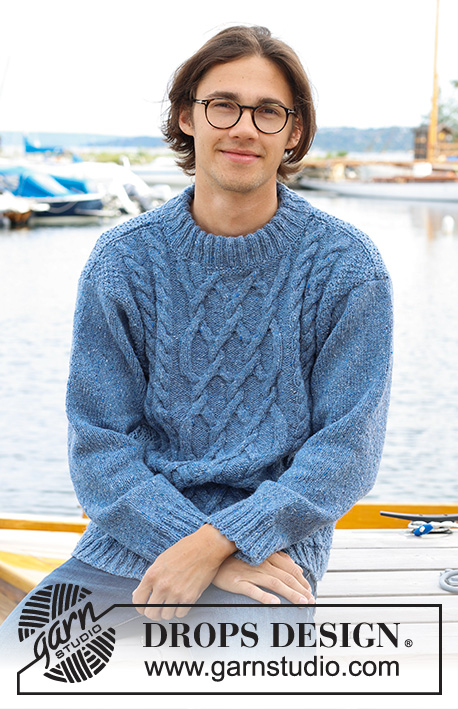
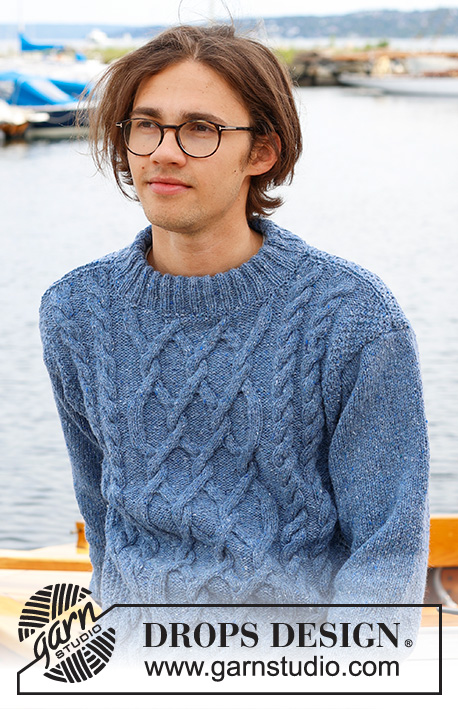
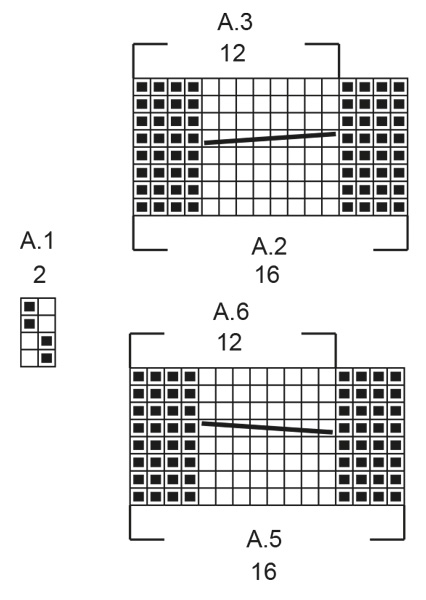
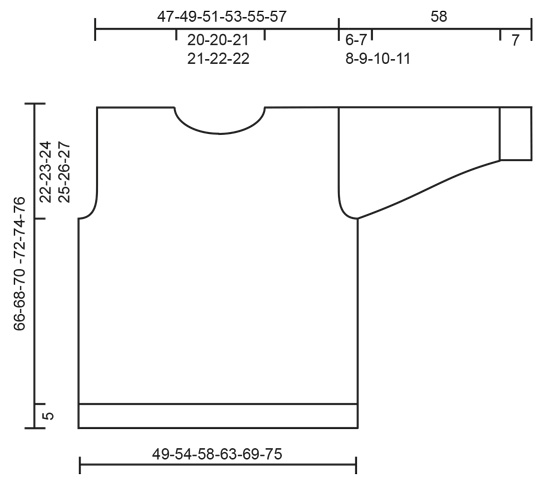
Jersey de punto para hombre en DROPS Soft Tweed o DROPS Daisy. La pieza está tejida de abajo hacia arriba, con torsadas, cuello doble y mangas cosidas. Tallas S – XXXL.
DROPS 233-2 |
|||||||||||||||||||
|
EXPLICACIONES PARA REALIZAR EL PATRÓN: ------------------------------------------------ SURCO/PUNTO MUSGO (tejido de ida y vuelta): Tejer todas las hileras de derecho. 1 surco = tejer 2 hileras de derecho. PATRÓN: Ver diagramas A.1 a A.6. Los diagramas muestran todas las hileras por el lado derecho. TIP PARA AUMENTAR (mangas): ¡Todos los aumentos son hechos por el lado derecho! Hacer 1 lazada en el interior de cada punto de orillo en ambos lados. En la hilera siguiente, tejer las lazadas retorcidas para evitar que se formen agujeros. Después tejer los nuevos puntos en punto jersey. ------------------------------------------------ COMENZAR LA PIEZA AQUÍ: ------------------------------------------------ JERSEY – RESUMEN DE LA PIEZA: La pieza se teje de ida y vuelta en secciones, después se cosen entre sí. El cuello se teje en redondo y se dobla en dos. ESPALDA: Montar 116-124-136-148-160-172 puntos con aguja circular tamaño 3.5 mm y DROPS Soft Tweed o DROPS Daisy. Tejer el resorte de ida y vuelta de la manera siguiente – la primera hilera es por el lado derecho: 1 punto de orillo en PUNTO MUSGO – leer explicación arriba, * 2 derechos, 2 reveses *, tejer de *a* hasta que resten 3 puntos, tejer 2 derechos y 1 punto de orillo en punto musgo. Tejer este resorte durante 5 cm. Cambiar a aguja circular tamaño 4.5 mm. Tejer 1 hilera de derecho por el lado derecho y disminuir 16-14-18-20-20-20 puntos distribuidos equitativamente en la hilera = 100-110-118-128-140-152 puntos. Tejer 1 hilera de derecho por el lado revés. Después tejer el patrón de la manera siguiente por el lado derecho: 1 punto de orillo en punto musgo, tejer el patrón A.1 hasta que reste 1 punto, 1 punto de orillo en punto musgo. ¡RECORDAR MANTENER LA MISMA TENSIÓN DE TEJIDO DE LA MUESTRA! Continuar este patrón. Cuando la pieza mida 44-45-46-47-48-49 cm, rematar al principio de cada hilera para las sisas de la manera siguiente: 3 puntos 1 vez, 2 puntos 0-1-2-2-3-4 veces, 1 punto 0-1-1-4-6-8 veces a cada lado = 94-98-102-106-110-114 puntos. Continuar el patrón. Cuando la pieza mida 64-66-68-70-72-74 cm, rematar los 38-38-40-40-42-42 puntos centrales para el escote y terminar cada hombro separadamente. Rematar 1 punto en la hilera siguiente a partir del escote = 27-29-30-32-33-36 puntos. Continuar el patrón A.1 hasta que la pieza mida 66-68-70-72-74-76 cm. Rematar. Tejer el otro hombro de la misma manera. FRENTE: Montar 116-124-136-148-160-172 puntos con aguja circular tamaño 3.5 mm y DROPS Soft Tweed o DROPS Daisy. Tejer el resorte de ida y vuelta de la manera siguiente – la primera hilera es por el lado derecho: 1 punto de orillo en punto musgo, * 2 reveses, 2 derechos *, tejer de *a* hasta que resten 3 puntos, 2 reveses, 1 punto de orillo en punto musgo. Tejer este resorte durante 5 cm. Cambiar a aguja circular tamaño 4.5 mm. Tejer 1 hilera de derecho por el lado derecho y aumentar 12-14-10-8-8-8 puntos distribuidos equitativamente en la hilera = 128-138-146-156-168-180 puntos. Tejer 1 hilera de derecho por el lado revés. Después tejer el patrón de la manera siguiente por el lado derecho: 1 punto de orillo en punto musgo, tejer el patrón A.1 sobre 11-16-20-25-31-37 puntos, A.2, A.3, A.4, A.5, A.6, tejer 11-16-20-25-31-37 puntos en A.1, 1 punto de orillo en punto musgo. Continuar este patrón. Cuando la pieza mida 44-45-46-47-48-49 cm, rematar al principio de cada hilera para las sisas de la manera siguiente: 3 puntos 1 vez, 2 puntos 0-1-1-2-3-4 veces, 1 punto 0-1-3-4-6-8 veces a cada lado = 122-126-130-134-138-142 puntos. Continuar este patrón. Cuando la pieza mida 58-60-61-63-64-66 cm, disminuir 12 puntos distribuidos equitativamente sobre los puntos derechos en A.4 = 110-114-118-122-126-130 puntos. En la hilera siguiente por el lado derecho, colocar los 32 puntos centrales en un hilo para el cuello y terminar cada hombro separadamente. Rematar en cada hilera a partir del cuello de la manera siguiente: 2 puntos 1 vez y 1 punto 2-2-3-3-3-4 veces = 35-37-38-40-41-43 puntos en el hombro. Cuando la pieza mida 65-67-69-71-73-75 cm, disminuir 4 puntos en las secciones de derechos de cada A.2 y A.3 / A.5 y A.6 = 27-29-30-32-33-35 puntos. Continuar tejiendo hasta que la pieza mida 66-68-70-72-74-76 cm. Rematar. Tejer el otro hombro de la misma manera. MANGAS: Montar 62-62-66-66-70-70 puntos con aguja circular tamaño 3.5 mm y DROPS Soft Tweed o DROPS Daisy. Tejer el resorte de ida y vuelta de la manera siguiente – la primera hilera es por el lado derecho: 1 punto de orillo en punto musgo, * 2 derechos, 2 reveses *, tejer de *a* hasta que reste 1 punto, 1 punto de orillo en punto musgo. Tejer este resorte durante 7 cm. Cambiar a aguja circular tamaño 4.5 mm. Tejer 1 hilera de derecho por el lado derecho y disminuir 8-6-8-8-10-8 puntos distribuidos equitativamente en la hilera = 54-56-58-58-60-62 puntos. Continuar con punto jersey y 1 punto de orillo en punto musgo a cada lado hasta que la manga mida 10 cm. Aumentar 1 punto en el interior de ambos puntos de orillo – leer TIP PARA AUMENTAR. Aumentar así cada 2½-2½-2-1½-1½-1½ cm un total de 15-15-16-19-19-21 veces = 84-86-90-96-98-104 puntos. Cuando la manga mida 52-51-50-49-48-47 cm, rematar 3 puntos a cada lado. Rematar para la copa de la manga al principio de cada hilera de la manera siguiente: 2 puntos 2-2-3-3-4-4 veces, 1 punto 0-1-0-1-0-1 vez a cada lado. Después rematar 2 puntos a cada lado hasta que la manga mida 57 cm en todas las tallas, rematar 3 puntos a cada lado, después rematar los puntos restantes. La manga mide 58 cm en todas las tallas. Tejer la otra manga de la misma manera. ENSAMBLAJE: Coser las costuras de los hombros en el interior de las orillas de remate. Coser las mangas. Coser las costuras de las mangas y de los lados en una, en el interior de 1 punto de orillo. CUELLO: El cuello se teje en redondo, comenzando por el lado derecho en una de las costuras de los hombros. Usar aguja circular corta tamaño 3.5 mm y DROPS Soft Tweed o DROPS Daisy. Levantar 96 a 108 puntos (incluyendo los puntos del hilo en el frente) – el número de puntos debe ser múltiplo de 4. Tejer 1 vuelta de revés y 1 vuelta de derecho. Tejer el resorte (2 derechos, 2 reveses) durante 11 cm. Rematar con derecho sobre derecho y revés sobre revés. Doblar el cuello en dos hacia el lado de adentro y coser. Para evitar que el cuello quede apretado y se enrolle hacia fuera, es importante que la costura sea elástica. |
|||||||||||||||||||
Explicaciones del diagrama |
|||||||||||||||||||
|
|||||||||||||||||||
 |
|||||||||||||||||||
 |
|||||||||||||||||||
 |
|||||||||||||||||||
¿Terminaste este patrón?Entonces, etiqueta tus fotos con #dropspattern #sailorsknotssweater o envíalas a la galería #dropsfan. ¿Necesitas ayuda con este patrón?Encontrarás 27 videos tutoriales, un espacio para comentarios/preguntas y más visitando la página del patrón en garnstudio.com © 1982-2026 DROPS Design A/S. Todos los derechos reservados. Este documento, incluyendo todas sus sub-secciones, está protegido por los derechos de autor (copyright). Lee más acerca de lo que puedes hacer con nuestros patrones en la parte de abajo de cada patrón de nuestro sitio. |
|||||||||||||||||||


Con más de 40 años en el diseño de modelos de punto y de ganchillo, DROPS Design ofrece una de las más vastas colecciones de patrones gratuitos en el internet - traducidos en 17 idiomas. Al día de hoy, contamos con 324 catálogos y 12290 patrones - de los cuales 11675 están traducidos en español.
Nosotros trabajamos con mucho esmero para brindarte lo mejor que las labores de punto y ganchillo tienen para ofrecer,inspiración y consejos, así como hilos de magnífica calidad a precios increíbles! Te gustaría usar nuestros patrones para otro fin además del uso personal? Puedes leer acerca de lo que estás permitida a hacer en el texto de Copyright en la parte de abajo de todos nuestros patrones. Felices labores!
Escribe un comentario sobre DROPS 233-2
¡Nos encantaría saber qué piensas acerca de este patrón!
Si quieres escribir una pregunta referente al patrón, por favor asegúrate de elegir la categoría correcta en el formulario debajo, para acelerar el proceso de respuesta. Los campos obligatorios están marcados con un *.