
Categorías populares
¿Buscas un hilo?


Comentarios / Preguntas (77)
![]() Ghezal Soumaya escribió:
Ghezal Soumaya escribió:
Bonsoir, très joli modèle, très agréable à tricoter, merci beaucoup pour les explications qui sont très claires. Bonne continuation
07.02.2026 - 18:37
![]() Mia escribió:
Mia escribió:
Ik zou graag de trui Scent of Sage (Drops 226-62, patroon nr wi-38) breien. Aangezien Drops Wish niet meer te verkrijgen is, zou ik hem willen breien met Drops Air. Begrijp ik het goed dat ik de trui dan brei met dubbele draad ? En zo ja, klopt het dat ik toch maar even zoveel bollen nodig heb ? Als ik toch een dubbele hoeveelheid garen nodig heb, dan wordt dit wel een dure trui. Bestaat er een ander, gelijkaardig garen uit garengroep C (enkele draad) ? Alvast bedankt voor uw antwoord !
03.02.2026 - 15:08DROPS Design respondió:
Dag Mia,
Ja, dat klopt, je breit dan met dubbele draad. De totale hoeveelheid wol staat al aangegeven, dus je hebt 550-600-650-700-750-800 gram DROPS Air nodig en niet het dubbele daarvan.
03.02.2026 - 21:33
![]() Courtney escribió:
Courtney escribió:
Hello. What size is the sweater in the pattern sample (pictured above)?
20.01.2026 - 08:14
![]() Geneviève escribió:
Geneviève escribió:
Je vous remercie pour votre réponse rapide. Je comprends par rapport aux torsades, mais 14 mailles de différence pour les côtes??? Cordiales salutations
26.11.2025 - 20:07DROPS Design respondió:
Bonjour Geneviève, de la même façon, les côtes sont tricotées différemment sur le devant et le dos, le besoin des mailles sera donc automatiquement aussi différent. Bon tricot!
27.11.2025 - 09:29
![]() Geneviève escribió:
Geneviève escribió:
Bpnjour, je trouve très étonnant la différence de mailles à monter entre le devant et le dos? Pouvez-vous m'éclaircir svpl.?
26.11.2025 - 10:22DROPS Design respondió:
Bonjour Geneviève, volontiers, en voici la raison: il faut, pour la même largeur, plus de mailles pour les torsades que pour le jersey, et comme il n'y a pas de torsades dans le dos, on va avoir besoin de moins de mailles. Bon tricot!
26.11.2025 - 16:19
![]() Michele escribió:
Michele escribió:
Par quoi remplacer la laine drops wish qui est épuisée?Merci
19.11.2025 - 13:59DROPS Design respondió:
Bonjour MIchele, utilisez le convertisseur pour voir les alternatives possibles et les quantités correspondantes. Bon tricot!
19.11.2025 - 16:31
![]() Ajay escribió:
Ajay escribió:
Sorry forgot to also ask - why is circular needle stated for a back and forth pattern. I' m worried im missing something if I use SPNs. Thank you!
16.03.2025 - 12:00DROPS Design respondió:
Dear Ajay, in these cases, if we use circular needles when working back and forth is because the number of stitches is quite big, so it's more confortable to place the stitches in the cable, instead of trying to fit them all in the straight needles. But you can work perfectly fine with the straight needles. Happy knitting!
16.03.2025 - 20:49
![]() Ajay escribió:
Ajay escribió:
Hello - could you tell me what type of Cast on is used in this pattern please? Or what type of cast on is recommended for this sweater? Thank you!
16.03.2025 - 11:58DROPS Design respondió:
Dear Ajay, we recommend using the Continental Method but you can use whichever one that you prefer. Happy knitting!
16.03.2025 - 22:45
![]() Ana escribió:
Ana escribió:
Hi, Silly question time but I am confused with the quantity of yarn required - Drops Air states 650g the same as Drops Wish but two different yarn groups. Do I need to double up to 1300 of Air as the pattern requires two strands knitted together. Thanks
14.02.2025 - 16:27DROPS Design respondió:
Dear Ana, you need the same amount of yarn in gr, but you need to take into account that each yarn has a different meterage. DROPS Wish is 50gr = 70m; DROPS Air: 50g = 150m. So you have double the meterage in a ball of Air than a ball of Wish. For the indicated size you need 910m (650/50gr per ball = 13 balls x 70m each ball = 910) of DROPS Wish and you would need 910+910 of DROPS Air. Which, according to the gauge, should be: 1820m total/150m per ball = approx. 13 balls of DROPS Air total. Happy knitting!
16.02.2025 - 23:00
![]() Eleanor escribió:
Eleanor escribió:
Hello! Silly question: When working on the front piece and beginning the post-ribbing section on the right side, I see that A2 and A3 have their cabling on the wrong side. I've made this before and don't remember being confused then, but I'm a little confused doing these cables on the wrong side. Should I pull 6 stitches to the side, purl them, and then purl the 6 stitches pulled? Thanks!
18.01.2025 - 00:10DROPS Design respondió:
Dear Elenor, the diagrams ALWAYS show the pattern as you would see it from the right side. So, if ypu have to "place 6 stitches on cable needle behind the piece, knit 6, knit 6 from cable needle" from the right side, then from the wrong side you will have to : place 6 stitches on cable needle at the front the piece, purl 6, purl 6 from cable needle. Happy Knitting!
18.01.2025 - 01:49
|
||||||||||
Scent of Sage#scentofsagesweater |
||||||||||
 |
 |
|||||||||
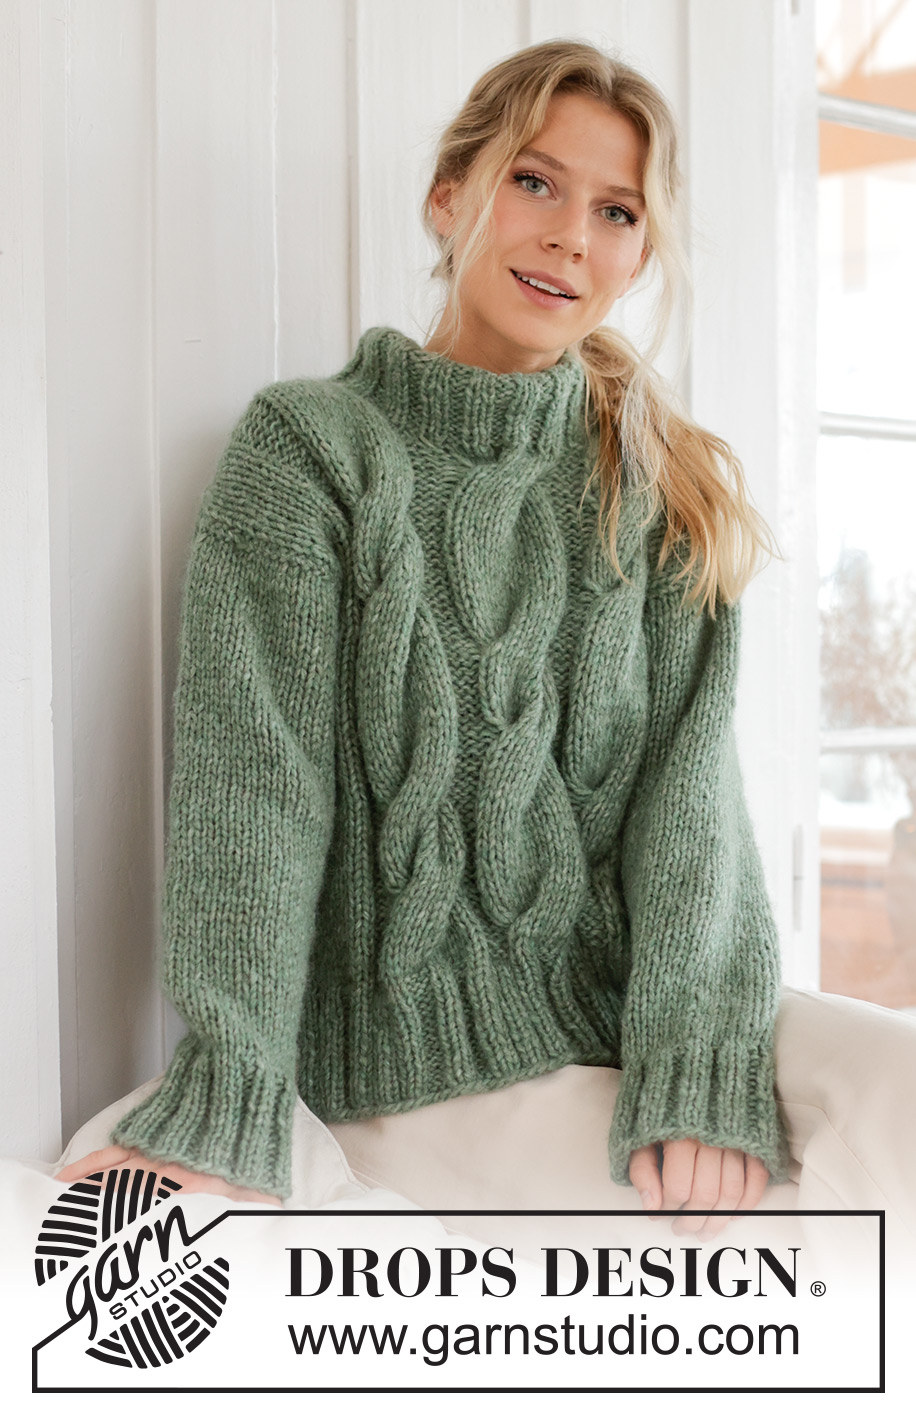
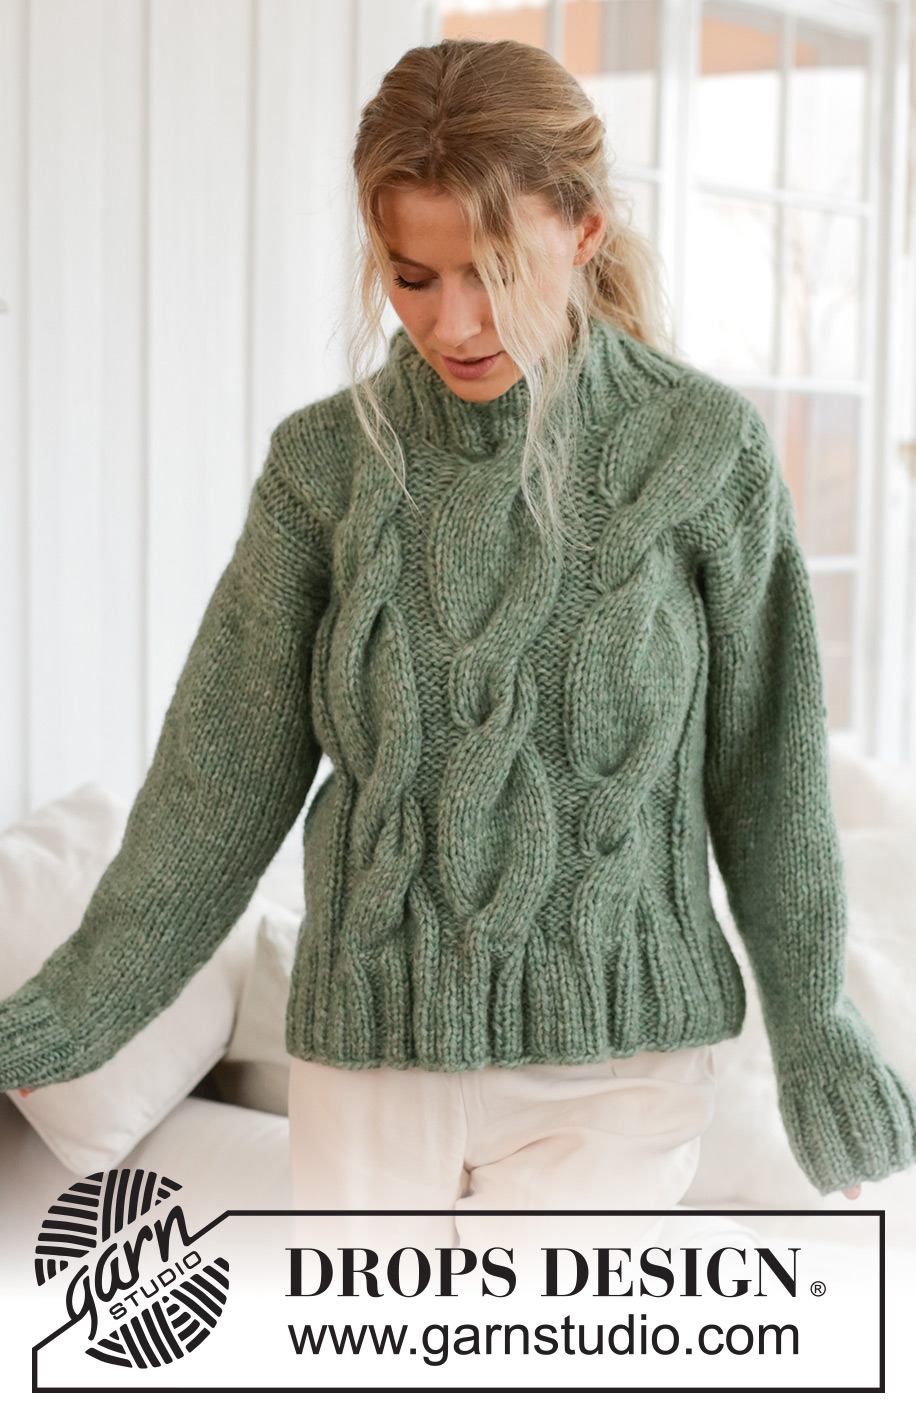
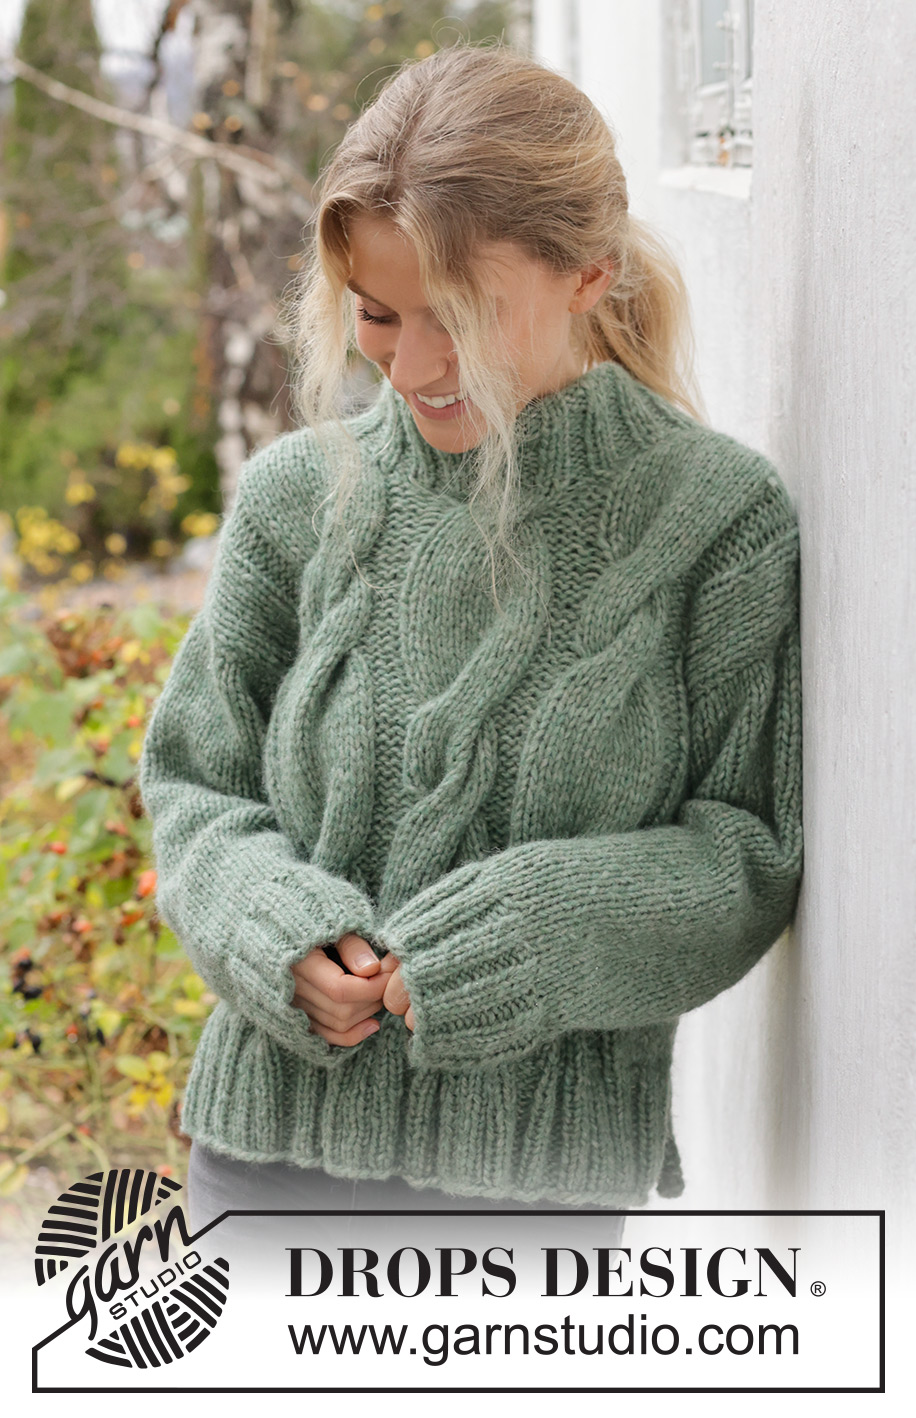
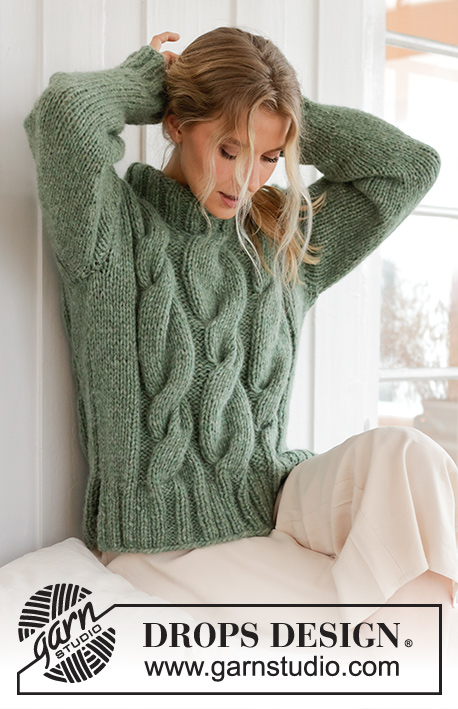
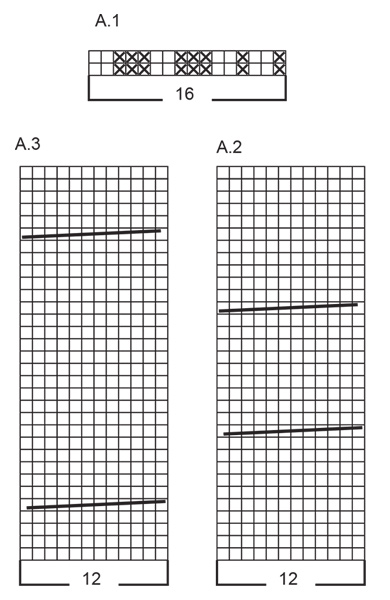
Jersey de punto en 1 hilo DROPS Wish o 2 hilos DROPS Air. La pieza está tejida con torsadas y cuello doble. Tallas S – XXXL.
DROPS 226-62 |
||||||||||
|
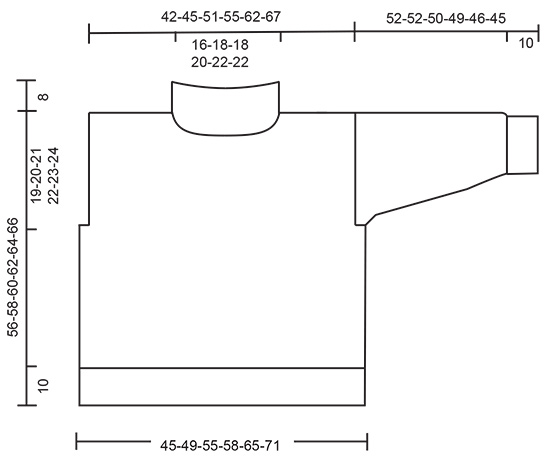
EXPLICACIONES PARA REALIZAR EL PATRÓN: ------------------------------------------------ SURCO/PUNTO MUSGO (tejido de ida y vuelta): Tejer todas las hileras de derecho. 1 surco = tejer 2 hileras de derecho. PATRÓN: Ver diagramas A.1 a A.3. Los diagramas muestran todas las hileras del patrón por el lado derecho. TIP PARA DISMINUIR (escote): Disminuyendo al principio de la hilera (hombro derecho): Tejer 1 punto derecho, deslizar 1 punto como de derecho, tejer 2 puntos juntos de derecho y pasar el punto deslizado por encima de los puntos tejidos juntos. Disminuyendo al final de la hilera (hombro izquierdo): Tejer hasta que resten 4 puntos, tejer 3 puntos juntos de derecho, tejer 1 punto derecho. TIP PARA AUMENTAR (mangas): Tejer hasta que reste 1 punto antes del marcador, 1 lazada, tejer 2 puntos derechos (el marcador está entre estos 2 puntos), 1 lazada. En la vuelta siguiente, tejer las lazadas retorcidas de derecho para evitar que se formen agujeros. Después tejer los nuevos puntos en punto jersey. ------------------------------------------------ COMENZAR LA PIEZA AQUÍ: ------------------------------------------------ JERSEY – RESUMEN DE LA PIEZA: La pieza de la espalda y la pieza del frente se tejen separadamente de ida y vuelta y de abajo hacia arriba, con aguja circular. Las mangas se tejen en redondo con agujas de doble punta/aguja circular corta. Las secciones son cosidas entre sí y el cuello se teje al final. FRENTE: Montar 74-74-82-90-98-98 puntos con aguja circular tamaño 7 mm y 1 hilo DROPS Wish o 2 hilos DROPS Air. Tejer 1 hilera de revés por el lado revés. Después tejer de la manera siguiente por el lado derecho: 1 punto de orillo en PUNTO MUSGO – leer descripción arriba, tejer 2 derechos, * 2 reveses, 2 derechos *, tejer de *a* 2-2-3-4-5-5 veces, tejer A.1 tres veces, después los primeros 4 puntos de A.1, tejer 2 derechos, * 2 reveses, 2 derechos *, tejer de *a* 2-2-3-4-5-5 veces, 1 punto de orillo en punto musgo. Continuar este resorte durante 10 cm. Cambiar a aguja circular tamaño 8 mm y tejer de la manera siguiente por el lado derecho: Tejer punto jersey sobre los primeros 11-11-15-19-23-23 puntos, AL MISMO TIEMPO que se disminuyen 3-1-2-4-4-1 puntos distribuidos equitativamente, 4 reveses, A.2, 4 reveses, A.3, 4 reveses, A.2, 4 reveses, punto jersey sobre los últimos 11-11-15-19-23-23 puntos, AL MISMO TIEMPO que se disminuyen 3-1-2-4-4-1 puntos distribuidos equitativamente = 68-72-78-82-90-96 puntos. Continuar este patrón. ¡RECORDAR MANTENER LA MISMA TENSIÓN DE TEJIDO DE LA MUESTRA! Cuando la pieza mida 37-38-39-40-41-42 cm, rematar 2 puntos al principio de las 2 hileras siguientes para las sisas = 64-68-74-78-86-92 puntos. Continuar el patrón hasta que la pieza mida 50-52-53-55-56-58 cm. En la hilera siguiente, colocar los 20-22-22-24-26-26 puntos centrales en un hilo para el cuello y terminar cada hombro separadamente. Disminuir de la manera siguiente en cada hilera por el lado derecho del lado del escote: 2 puntos 4 veces – leer TIP PARA DISMINUIR = 14-15-18-19-22-25 puntos en el hombro. Tejer punto jersey sobre las torsadas cuando no haya espacio suficiente para la torsada a lo ancho. Tejer hasta que la pieza mida 56-58-60-62-64-66 cm, rematar. Tejer el otro hombro de la misma manera. ESPALDA: Montar 56-60-68-72-80-88 puntos con aguja circular tamaño 7 mm y 1 hilo DROPS Wish o 2 hilos DROPS Air. Tejer 1 hilera de revés por el lado revés. Después tejer de la manera siguiente por el lado derecho: 1 punto de orillo en punto musgo, 2 derechos, * 2 reveses, 2 derechos *, tejer de *a* hasta que reste 1 punto, 1 punto de orillo en punto musgo. Continuar este resorte durante 10 cm. Cambiar a aguja circular tamaño 8 mm. Tejer 1 hilera disminuyendo 6-6-8-8-8-10 puntos distribuidos equitativamente = 50-54-60-64-72-78 puntos. Tejer punto jersey sobre todos los puntos. Cuando la pieza mida 37-38-39-40-41-42 cm, rematar 2 puntos al principio de las 2 hileras siguientes para las sisas = 46-50-56-60-68-74 puntos. Continuar con punto jersey hasta que la pieza mida 54-56-58-60-62-64 cm. En la hilera siguiente, rematar los 16-18-18-20-22-22 puntos centrales para el escote y terminar cada hombro separadamente. Después rematar 1 punto en la hilera siguiente a partir del escote = 14-15-18-19-22-25 puntos en el hombro. Tejer hasta que la pieza mida 56-58-60-62-64-66 cm, rematar. Tejer el otro hombro de la misma manera. MANGAS: Montar 36-40-40-44-44-48 puntos con agujas de doble punta/aguja circular corta tamaño 7 mm y 1 hilo DROPS Wish o 2 hilos DROPS Air. Tejer 1 vuelta de derecho, después tejer en resorte (2 derechos, 2 reveses) en redondo durante 10 cm. Cambiar a agujas de doble punta tamaño 8 mm. Tejer 1 vuelta de derecho disminuyendo 4-6-4-6-4-6 puntos distribuidos equitativamente = 32-34-36-38-40-42 puntos. Insertar un marcador al principio de la vuelta = centro bajo la manga. Tejer punto jersey hasta que la pieza mida 11 cm. Ahora aumentar 1 punto a cada lado del marcador – leer TIP PARA AUMENTAR. Aumentar así a cada 9½-9½-9-9-8½-8 cm un total de 5 veces = 42-44-46-48-50-52 puntos. Rematar cuando la manga mida 52-52-50-49-46-45 cm. Tejer la otra manga de la misma manera. ENSAMBLAJE: Coser las costuras de los hombros. Coser las costuras de los lados en el bucle más externo del punto más externo, hasta el resorte (abertura de 10 cm en la parte de abajo). Coser las mangas. CUELLO DOBLE: Comenzar por el lado derecho en uno de los hombros y levantar 60 a 76 puntos alrededor del escote (incluyendo los puntos en el hilo), con aguja circular corta tamaño 7 mm y 1 hilo DROPS Wish o 2 hilos DROPS Air. El número de puntos debe ser múltiplo de 4. Tejer en resorte (2 derechos, 2 reveses) en redondo durante 16 cm. Rematar. Doblar el cuello en dos hacia el lado de adentro y coser. Para evitar que el cuello quede apretado y se enrolle hacia fuera, es importante que la costura sea elástica. |
||||||||||
Explicaciones del diagrama |
||||||||||
|
||||||||||
 |
||||||||||
 |
||||||||||
¿Terminaste este patrón?Entonces, etiqueta tus fotos con #dropspattern #scentofsagesweater o envíalas a la galería #dropsfan. ¿Necesitas ayuda con este patrón?Encontrarás 34 videos tutoriales, un espacio para comentarios/preguntas y más visitando la página del patrón en garnstudio.com © 1982-2026 DROPS Design A/S. Todos los derechos reservados. Este documento, incluyendo todas sus sub-secciones, está protegido por los derechos de autor (copyright). Lee más acerca de lo que puedes hacer con nuestros patrones en la parte de abajo de cada patrón de nuestro sitio. |
||||||||||


Con más de 40 años en el diseño de modelos de punto y de ganchillo, DROPS Design ofrece una de las más vastas colecciones de patrones gratuitos en el internet - traducidos en 17 idiomas. Al día de hoy, contamos con 324 catálogos y 12290 patrones - de los cuales 11685 están traducidos en español.
Nosotros trabajamos con mucho esmero para brindarte lo mejor que las labores de punto y ganchillo tienen para ofrecer,inspiración y consejos, así como hilos de magnífica calidad a precios increíbles! Te gustaría usar nuestros patrones para otro fin además del uso personal? Puedes leer acerca de lo que estás permitida a hacer en el texto de Copyright en la parte de abajo de todos nuestros patrones. Felices labores!
Escribe un comentario sobre DROPS 226-62
¡Nos encantaría saber qué piensas acerca de este patrón!
Si quieres escribir una pregunta referente al patrón, por favor asegúrate de elegir la categoría correcta en el formulario debajo, para acelerar el proceso de respuesta. Los campos obligatorios están marcados con un *.