
Categorías populares
¿Buscas un hilo?


Comentarios / Preguntas (24)
![]() Rena escribió:
Rena escribió:
Hello. "Work in stockinette stitch without increases until piece measures 8-8-9 cm = 3 1/8"-3 1/8"-3 1/2" from marker for measurement.'" Does it mean 8 cm from the first marker for measure BEFORE increasing stitches or just right after I finish increase and start stockinette stitches on 168-176-184 stitches? Thank you!
10.02.2022 - 10:36DROPS Design respondió:
Dear Rena, you should measure these -8-9 cm = 3 1/8"-3 1/8"-3 1/2" from marker added after the folded edge to measure from, ie from where you start to work with needle size 3 MM/US2.5. Happy knitting!
10.02.2022 - 13:19
![]() Lucyfly escribió:
Lucyfly escribió:
Bonjour, J’ai par erreur fait la bordure en 3, est que je peux faire la suite en 2,5? Puis 3 comme indiqué, qu’en pensez-vous ? Merci
17.01.2022 - 08:16DROPS Design respondió:
Bonjour Lucyfly, votre bordure risque d'être trop large si vous l'avez tricotée en 3, on ne fait que monter les mailles en 3 (pour éviter que le montage ne soit trop serré), puis on tricote la bordure en 2,5 pour qu'elle soit suffisamment serrée, et on reprend ensuite la 3 pour continuer le béret. Bon tricot!
17.01.2022 - 09:37
![]() Karen escribió:
Karen escribió:
Hi I'm at the stage now where I have 8cm from marker and ready to start decreasing my only problem is that I'm running out of wool I have a second ball I can use but is it possible to connect that second ball or what do you suggest when running low. I made a mistake at my first attempt so I had to throw away a small amount of wool.
11.12.2021 - 14:07DROPS Design respondió:
Dear Karen, you can watch this video to see how to join new yarn: https://www.garnstudio.com/video.php?id=490&lang=en Happy knitting!
11.12.2021 - 20:54
![]() Filiz Çelik escribió:
Filiz Çelik escribió:
Hello thank you
25.10.2021 - 11:27
![]() Filiz Çelik escribió:
Filiz Çelik escribió:
Hello thank you
25.10.2021 - 11:26
![]() Karen escribió:
Karen escribió:
I have a question on this section On next round knit yarn over twisted to avoid holes is this for every stitch or just one after the marker. Increase like this every other round 7 times in total vertically = 168 where do we get this 168 stitch count from? Work in stocking stitch without increases until piece measures 8-8-9 cm from marker for measurement which marker is the pattern talking about because I have just 7 in the pattern now
21.10.2021 - 00:41DROPS Design respondió:
Dear Karen, you cast on 112 sts and insert after the folded hem 8 markers; you then increase 1 stitch at each marker (= 8 sts increased) on every other round a total of 7 times (= 56 sts will be increased in total), so that you get: 112+56= 168 sts. After folding edge, you continue with circular needle size 3 mm and insert a marker on this round, this is the round you should measure from afterwards. Happy knitting!
21.10.2021 - 07:16
![]() Karen escribió:
Karen escribió:
Hi I have a question about the stitch markers. So I have placed first stitch marker after one stitch at the beginning of the round and 7 more markers 14 stitches apart I'm now left with 17 stitches at the end of after the last stitch marker is this correct or have I gone wrong somewhere.
17.10.2021 - 23:15DROPS Design respondió:
Dear Karen, you should have 14 stitches after the last marker at the end of the round again (112 : 8 = 14) - so it looks like you have three more sts. When knitting with double stranded yarn, it sometimes happens that we accidentally split the strands and create a new stitch by mistake - please check you sts in round, maybe that's where the snag is. Happy knitting!
18.10.2021 - 05:20
![]() Karen Pryal escribió:
Karen Pryal escribió:
I have a question about this section stocking stitch in the round for 2cm purl 1 round. Does this mean I do stocking stitch until its 2cm I length when I measure and then purl 1 round or is this Knit 1 purl 1 for 2cm.
06.10.2021 - 00:08DROPS Design respondió:
Dear Mrs Pryal, you work the hem as follows: 2 cm stocking stitch, purl 1 round (folding edge), 2 cm stocking stitch. Happy knitting!
06.10.2021 - 07:54
![]() Karen escribió:
Karen escribió:
Hi there currently knitting this hat is there any tutorial on changing the needle size as it asks at the beginning after casting to switch to a smaller needle size just wondering why you wouldn't start off on the smaller needle size
04.10.2021 - 22:32DROPS Design respondió:
Dear Karen, you cast on the stitches with a larger needle so that the cast on edge won't be too tight, then just work with the smaller needle, just take the smaller needle and work the stitches on the other needle, then join and continue in the round. Happy knitting!
05.10.2021 - 07:18
![]() Hanne escribió:
Hanne escribió:
Moet de hele muts met twéé draden gebreid worden? Is die van 25 gram dan genoeg?
03.10.2021 - 20:02DROPS Design respondió:
Dag Hanne,
Ja, dat klopt helemaal, je breit de muts met 1 draad alpaca en 1 draad Kid-Silk. Voor Kid-Silk heb je dan genoeg aan 1 bol van 25 gram.
07.10.2021 - 11:22
|
|
Streets of Paris#streetsofparishat |
|
 |
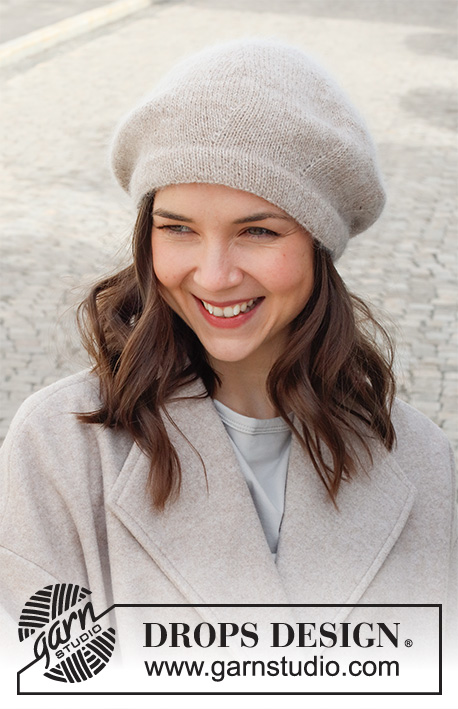 |
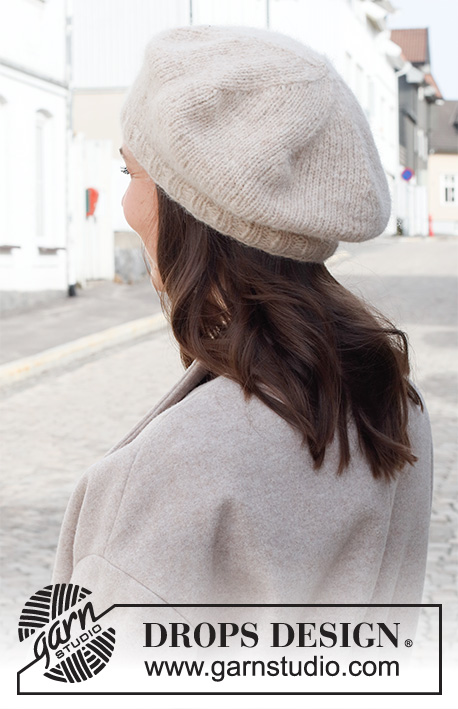
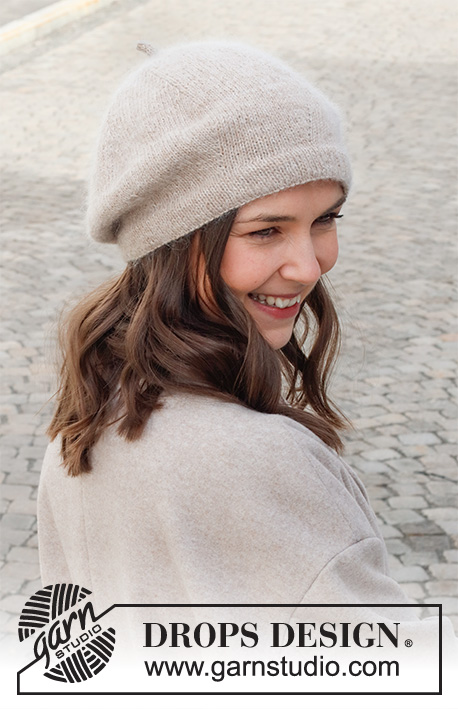
Boina/gorro en DROPS Alpaca y DROPS Kid-Silk.
DROPS 225-41 |
|
|
EXPLICACIONES PARA REALIZAR LA LABOR: ---------------------------------------------------------- TIP PARA LOS AUMENTOS: Aumentar 1 punto haciendo 1 hebra. En la siguiente vuelta trabajar las hebras de derecho retorcido para evitar que se formen agujeros. TIP PARA LAS DISMINUCIONES: Disminuir 1 punto trabajando 2 puntos juntos después del marcapuntos. ---------------------------------------------------------- COMENZAR LA LABOR AQUÍ: ---------------------------------------------------------- GORRO - RESUMEN DE LA LABOR: Trabajar en redondo con una aguja circular corta, de abajo arriba. Cambiar a agujas de doble punta al disminuir. GORRO: Montar 112-120-128 puntos con una aguja circular corta de 3 mm con 1 hilo del color nougat claro DROPS Alpaca y 1 hilo del color lanco hueso de DROPS Kid-Silk (= 2 hilos). Cambiar a una aguja circular corta de 2.5 mm y trabajar en punto jersey en redondo 2 cm, trabajar 1 vuelta de revés (= borde de doblaje), y después trabajar en punto jersey en redondo 2 cm. Cambiar a una aguja circular corta de 3 mm. Insertar 1 marcapuntos en la vuelta – ahora medir la labor desde este marcapuntos! Trabajar 1 vuelta en punto jersey. En la siguiente vuelta insertar 8 nuevos marcapuntos en la labor como se explica debajo. Usar estos marcapuntos al aumentar y disminuir en la labor. Los marcapuntos deberían ser de diferente color al marcapuntos para las medidas. Insertar el primer marcapuntos al inicio de la vuelta, después insertar los siguientes 7 marcapuntos con 14-15-16 puntos entre ellos. Trabajar en punto jersey en redondo, y al mismo tiempo aumentar 1 punto después de cada marcapuntos - leer TIP- 1 PARA LOS AUMENTOS (= 8 puntos aumentados). Aumentar de esta manera cada 2ª vuelta 7 veces en total en vertical = 168-176-184 puntos. Trabajar en punto jersey sin aumentos hasta que la labor mida 8-8-9 cm desde el marcapuntos para las medidas. En la siguiente vuelta comenzar las disminuciones - disminuir 1 punto después de cada marcapuntos - leer TIP PARA LAS DISMINUCIONES (= 8 puntos disminuidos). Disminuir de esta manera cada 2ª vuelta 20-21-22 veces en total = quedan 8 puntos. En la siguiente vuelta disminuir 3 puntos repartidos = quedan 5 puntos. El gorro mide aprox. 22-23-25 cm desde arriba hacia abajo hasta el marcapuntos. Trabajar la parte superior del gorro como sigue: Usar 2 agujas de doble punta de 3 mm. Deslizar los 5 puntos en una aguja de doble punta y trabajar con la otra. * 5 derechos, mover los puntos delante de la aguja de nuevo, estirar el hilo *, trabajar de * a * hasta que la parte superior mida aprox. 2 cm. Cortar el hilo y pasar el hilo por los 5 puntos, estirar el hilo y asegurar. TERMINACIÓN: Doblar el borde en la parte inferior del gorro por la mitad hacia el lado revés y asegurar, pero dejar una pequeña abertura para pasar la cinta elástica - asegurarse de esto para evitar que la costura quede tensa. Pasar la cinta elástica y ajustar el largo. Coser la abertura en el borde de doblaje. |
|
¿Terminaste este patrón?Entonces, etiqueta tus fotos con #dropspattern #streetsofparishat o envíalas a la galería #dropsfan. ¿Necesitas ayuda con este patrón?Encontrarás 16 videos tutoriales, un espacio para comentarios/preguntas y más visitando la página del patrón en garnstudio.com © 1982-2026 DROPS Design A/S. Todos los derechos reservados. Este documento, incluyendo todas sus sub-secciones, está protegido por los derechos de autor (copyright). Lee más acerca de lo que puedes hacer con nuestros patrones en la parte de abajo de cada patrón de nuestro sitio. |
|


Con más de 40 años en el diseño de modelos de punto y de ganchillo, DROPS Design ofrece una de las más vastas colecciones de patrones gratuitos en el internet - traducidos en 17 idiomas. Al día de hoy, contamos con 324 catálogos y 12290 patrones - de los cuales 11675 están traducidos en español.
Nosotros trabajamos con mucho esmero para brindarte lo mejor que las labores de punto y ganchillo tienen para ofrecer,inspiración y consejos, así como hilos de magnífica calidad a precios increíbles! Te gustaría usar nuestros patrones para otro fin además del uso personal? Puedes leer acerca de lo que estás permitida a hacer en el texto de Copyright en la parte de abajo de todos nuestros patrones. Felices labores!
Escribe un comentario sobre DROPS 225-41
¡Nos encantaría saber qué piensas acerca de este patrón!
Si quieres escribir una pregunta referente al patrón, por favor asegúrate de elegir la categoría correcta en el formulario debajo, para acelerar el proceso de respuesta. Los campos obligatorios están marcados con un *.