
Popular categories
Looking for a yarn?


Comments / Questions (57)
![]() Bianca wrote:
Bianca wrote:
Hallo, ich arbeite Größe L, Rundenanfang (RA) ist in der Mitte hinten. Wenn ich ab da 84 M für den Rückteil stricke und dann weiter wie beschrieben aufteile verschiebt sich doch der RA, oder verstehe ich das falsch? Müsste ich die 84 M für das Rückenteil nicht halbieren damit der RA erhalten bleibt? Also 42 M, 60 für Ärmel links, 84 M Vorderteil, 60 M Ärmel rechts und dann die restlichen 42 M für die insgesamt 84 M RT? Vielen Dank!
01.03.2026 - 17:46DROPS Design answered:
Liebe Bianca, Rundenanfang ist bei diesem Modell nicht in der hintere Mitte, sondern am Anfang Rückenteil, so stricken Sie die Aufteilungsrunde nur einfach wie beschrieben, dan die ersten 84 Maschen für das Rückenteil sind. Viel Spaß beim Stricken!
02.03.2026 - 10:30
![]() Sue wrote:
Sue wrote:
Asking again as not sure anyone saw my original question; “Hello, Please can you tell me which colour is closest to 28 Red Brick, which is no longer available? Thank you”
28.02.2026 - 18:07DROPS Design answered:
Dear Sue, check the current shadecard and find the best appropriate colour that you would like. Your Store can also make you some suggestions, even per mail or telephone. Happy knitting!
02.03.2026 - 11:46
![]() Manuela wrote:
Manuela wrote:
Liebes Drops-Team, wenn ich die Diagramme richtig verstehe, wird das Muster immer in zwei anderen Farben gearbeitet. Wie lege ich fest, welche Farbe die Kontrastfarbe und welche die Hauptfarbe ist? Also welche Farbe halte ich links / unten und welche rechts / oben? Ich kenne das sonst nur mit einer Hauptfarbe und einer Muster / Kontrastfarbe. Vielen Dank und ich hoffe es ist verständlich was gemeint ist.
26.02.2026 - 19:02
![]() Jutta Sowka wrote:
Jutta Sowka wrote:
Ich habe gerade die Arbeit aufgeteilt. Habe auch die 6 Machen neu aufgenommen. Jetzt passt das Muster aber nicht mehr. Wie stricke ich dann weiter?
21.02.2026 - 09:08DROPS Design answered:
Liebe Jutta, Sie stricken bis zur Mitte der Seite (d.h. bis zur Mitte zwischen den neu angeschlagenen Maschen) im Muster, auch wenn es nicht aufgeht. Dann stricken Sie die gleiche Anzahl an Maschen, die nicht im Muster aufgegangen sind, gegengleich, d.h. spiegelverkehrt und kommen dann wieder in den normalen Rhythmus des Musters. Sie setzen also das Muster der Passe richtig fort und stricken die neuen Maschen so weit es geht im Muster, auch wenn das nicht aufgeht. Viel Spaß beim Weiterstricken!
23.02.2026 - 09:24
![]() Sue wrote:
Sue wrote:
Hello, Please can you tell me which colour is closest to 28 Red Brick, which is no longer available? Thank you
11.02.2026 - 17:22
![]() Erna Jensen wrote:
Erna Jensen wrote:
Hej er ved at strikke denne model, men kan ikke på mønster tegnene se forskel på salvie grøn og rubinrød på mønstret er de ens, har også prøvet med en lup og kan kun se de er salvie grøn allesammen på mønstret ???
26.01.2026 - 19:44DROPS Design answered:
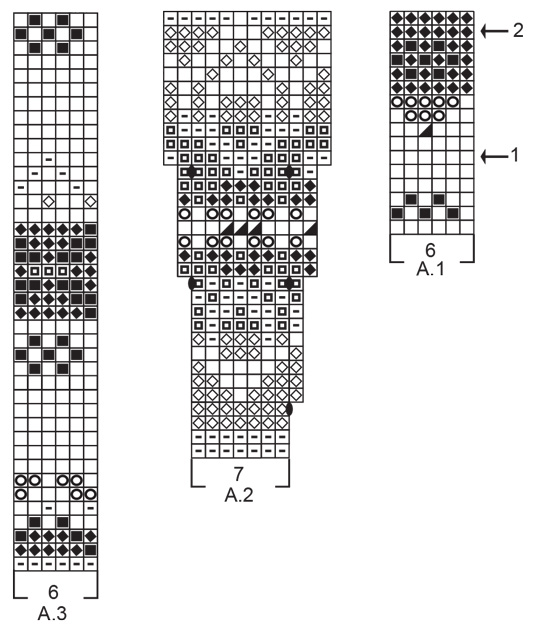
Hei Erna. Man ser forskjell på salviegrønn (firkant med en sirkel i) og rubinrød (firkant med en mindre firkant i). Man ser det tydligere i diagrammene enn ikonene i diagramteksten. Om du ikke ser forskjell, er det fint mulig å forstørre diagrammene og skrive det ut, og da kan du evnt fargelegge ikonene. Om man ikke ønsker å skrive ut diagrammene, er det enkelt å forstørre diagrammene både på PC/nettbrett/mobiltelefon. mvh DROPS Design
30.01.2026 - 12:44
![]() Ravhel wrote:
Ravhel wrote:
Please can you tell me what are the measurements of the sizes S-M-L etc.
20.01.2026 - 19:03DROPS Design answered:
Hi Mrs Ravhel, please see the lesson DROPS HERE. Happy knitting!
20.01.2026 - 20:30
![]() Susan Orton wrote:
Susan Orton wrote:
Your pattern, Mistletoe Muse is being sold on Etsy by another person who obviously isn't you. If you do a Google Image search on your sweater, it will pop up under Etsy and it isn't a DROPS account who is posting it. Sorry, it wouldn't allow me to post a link here.
05.12.2025 - 16:32
![]() Edyta wrote:
Edyta wrote:
Planuję wykonać sweter w rozmiarze M.
16.10.2025 - 12:43DROPS Design answered:
Witaj Edyto, używając Alaski otrzymasz dużo cięższy sweter. Potrzebować będziesz 9 motków w podstawowym kolorze (tutaj pszeniczny) i po 2 motki pozostałych kolorów. Pozdrawiamy!
16.10.2025 - 12:51
![]() Edyta wrote:
Edyta wrote:
Hi. I'm going to knit a sweater with Alaska yarn. Can you tell me please what amount of yarn should I use for each colour?
16.10.2025 - 11:19DROPS Design answered:
Witaj Edyto, jaki rozmiar wykonujesz?
16.10.2025 - 11:26
|
|||||||||||||||||||||||||||||||
Mistletoe Muse#mistletoemusesweater |
|||||||||||||||||||||||||||||||
 |
 |
||||||||||||||||||||||||||||||
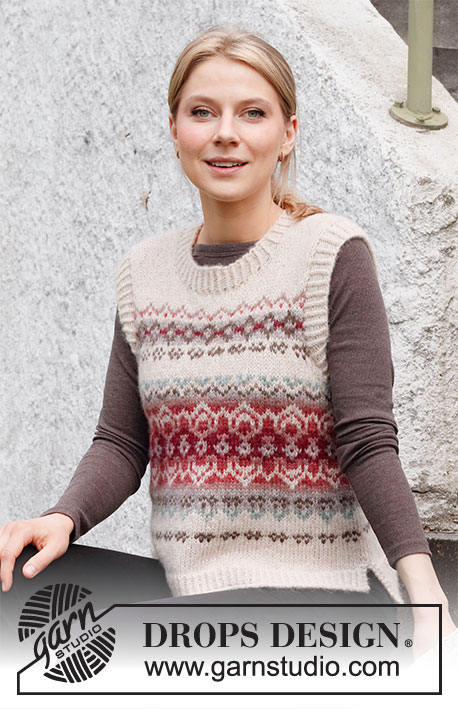
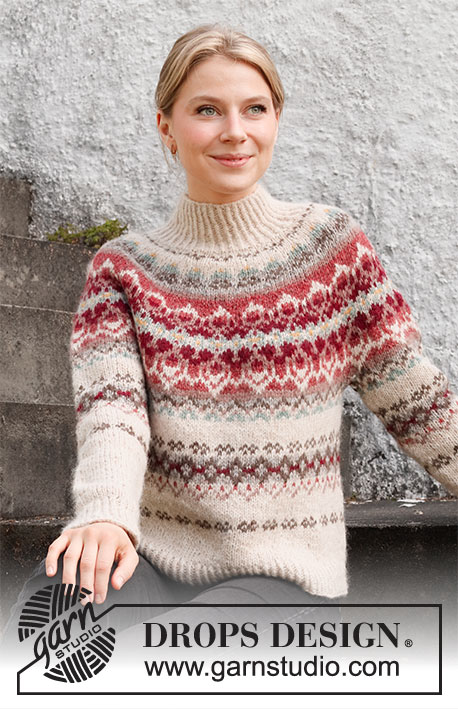
Knitted jumper in DROPS Air. The piece is worked top down, with round yoke and Nordic pattern. Sizes S - XXXL.
DROPS 217-1 |
|||||||||||||||||||||||||||||||
|
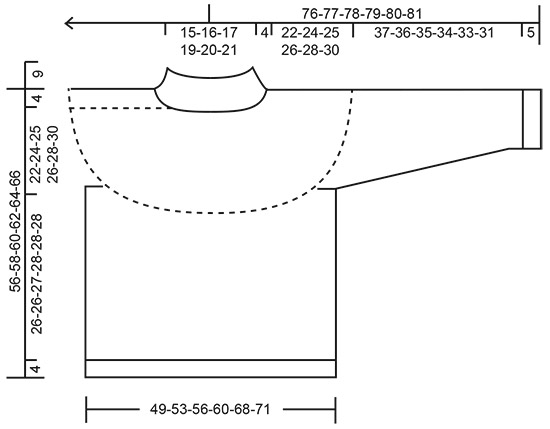
------------------------------------------------------- EXPLANATIONS FOR THE PATTERN: ------------------------------------------------------- PATTERN: See diagrams A.1 to A.3. The whole pattern is worked in stocking stitch. KNITTING TIP: To avoid the knitting tension becoming tighter when working pattern, it is important that the strands at the back are not tight. Use a size larger needle when working pattern if this is a problem. If the knitting tension is not correct in height and you work too tightly, the garment will be short and the armholes too small – you can correct for this by regularly working an extra row in the 1-coloured sections. If you work loosely, the garment will be too long – you can correct for this by regularly working 1 round less in the 1-coloured sections. INCREASE TIP (evenly spaced): To work out how to increase evenly, count the total number of stitches on the needle (e.g. 80 stitches) and divide by the number of increases to be made (e.g. 22) = 3.6. In this example, increase by making 1 yarn over after alternately each 3rd and 4th stitch. On the next round, knit the yarn overs twisted to avoid holes. DECREASE TIP (for mid under sleeve): Decrease 1 stitch on either side of the marker thread as follows: Work until there are 3 stitches left before the marker thread, knit 2 together, knit 2 (marker thread sits between these 2 stitches), slip 1 stitch as if to knit, knit 1 and pass the slipped stitch over the knitted stitch. CASTING-OFF TIP: To avoid the cast-off edge being tight you can cast off with a larger size needle. If the edge is still tight, make 1 yarn over after approx. each 4th stitch at the same time as casting off; the yarn overs are cast off as normal stitches. ------------------------------------------------------- START THE PIECE HERE: ------------------------------------------------------- JUMPER – SHORT OVERVIEW OF THE PIECE: The neck and yoke are worked in the round with circular needle, from the transition between the left sleeve and the back piece and top down. The yoke is divided for the body and sleeves and the body continued in the round with circular needle. The sleeves are worked in the round with short circular needle/double pointed needles, top down. NECK: Cast on 80-84-88-94-96-102 stitches with circular needle size 4.5 mm and wheat. Knit 1 round then work rib (= knit 1 twisted / purl 1) in the round for 9 cm. When the rib is finished, knit 1 round where you increase 22-24-26-26-30-36 stitches evenly spaced – read INCREASE TIP = 102-108-114-120-126-138 stitches. Change to circular needle size 5.5 mm and insert 1 marker at the beginning of the round; the yoke is measured from this marker! YOKE: Work pattern A.1 (= 6 stitches) a total of 17-18-19-20-21-23 times on the round – read KNITTING TIP. On the rounds with arrows, increase as follows - remember INCREASE TIP: Arrow-1: Increase 24-24-30-30-30-30 stitches evenly spaced = 126-132-144-150-156-168 stitches. There is now room for 21-22-24-25-26-28 repeats of A.1 on the round. Arrow-2: Increase 14-22-24-18-19-21 stitches evenly spaced = 140-154-168-168-175-189 stitches. REMEMBER THE KNITTING TENSION! Now continue in the different sizes as described below: Sizes S and M: Work A.2 (= 7 stitches) a total of 20-22 times on the round. When the piece measures 22-24 cm, sizes S-M are finished. If the knitting tension is correct there are 4-0 rounds left in A.2 and 240-264 stitches on the round. If the piece is shorter than 22-24 cm, continue with the remaining rounds in A.2 and then A.3 over A.2 (there is room for 2 repeats of A.3 over the 12 stitches in A.2) to the correct length. Sizes L and XL Work A.2 (= 7 stitches) a total of 24-24 times on the round. When the diagram has been worked in height there are 288-288 stitches on the round. If the knitting tension is correct the piece measures 24-24 cm from the marker. Continue with A.3 over A.2 (there is room for 2 repeats of A.3 over the 12 stitches in A.2) until the piece measures 25-26 cm from the marker. Sizes XXL and XXXL: Work A.2 (= 7 stitches) a total of 25-27 times on the round. When the diagram has been worked in height there are 300-324 stitches on the round. If the knitting tension is correct the piece now measures 24-24 cm from the marker. Continue with A.3 over A.2 (there is room for 2 repeats of A.3 over the 12 stitches in A.2) until the piece measures 28-30 cm from the marker; at the same time on row 8 in A.3 increase 12-12 stitches evenly spaced = 312-336 stitches. All sizes: Now divide the piece for the body and sleeves. To give a symmetric pattern on the front and back pieces, the beginning of the round is moved back 3 stitches in sizes M and XXXL (i.e., cut the strand and place the first stitches on the right needle onto the left needle before continuing). In sizes S, L, XL and XXL keep the beginning of the round where it is. Work the next round in pattern as before and as follows: Work the first 72-78-84-84-96-102 stitches (= back piece), place the next 48-54-60-60-60-66 stitches on a thread for the sleeve and cast on 6-6-6-12-12-12 new stitches (= in side under sleeve), work the next 72-78-84-84-96-102 stitches (= front piece) and place the next 48-54-60-60-60-66 stitches on a thread for the sleeve and cast on 6-6-6-12-12-12 new stitches (= in side under sleeve). Body and sleeves are finished separately. THE PIECE IS NOW MEASURED FROM HERE! BODY: = 156-168-180-192-216-228 stitches. Continue in the different sizes as follows: Size S: Insert a marker thread in the middle of the 6 new stitches cast on under each sleeve (= 3 stitches on each side of the thread). Continue with A.2 as before until the diagram has been completed in height – NOTE: The pattern does not fit under the sleeves; work as many stitches of pattern that there is room for under sleeves. Work A.3 (= 6 stitches) a total of 26 times on the round. When A.3 has been completed go to ALL SIZES. Sizes M, L, XL, XXL and XXXL: Continue with A.3 (= 6 stitches) a total of 28-30-32-36-38 times on the round. When A.3 has been completed go to ALL SIZES. ALL SIZES: After A.3 continue with wheat to finished length. When the piece measures 26-26-27-28-28-28 cm from the division, knit 1 round where you increase 28-30-32-32-36-38 stitches evenly spaced = 184-198-212-224-252-266 stitches. Change to circular needle size 4.5 mm and work rib (= knit 1 twisted, purl 1) for 4 cm. Cast off with knit over knit and purl over purl - read CASTING-OFF TIP. The jumper measures approx. 56-58-60-62-64-66 cm from the shoulder down. SLEEVE: Place the 48-54-60-60-60-66 stitches from the thread on the one side of the piece on double pointed needles/short circular needle size 5.5 mm and knit up 1 stitch in each of the 6-6-6-12-12-12 stitches cast on under the sleeve = 54-60-66-72-72-78 stitches. Insert a marker thread in the middle of the 6-6-6-12-12-12 stitches under the sleeve. Allow the thread to follow your work onwards; it will be used when decreasing under the sleeve. Continue in the round with pattern, in the same way as on the body – the pattern will not fit under the sleeve. When the sleeve measures 5-3-3-3-3-3 cm from the division, decrease 1 stitch on either side of the marker thread - read DECREASE TIP. Decrease like this every 3½-3-2½-2-2-1½ cm a total of 9-11-13-15-14-17 times = 36-38-40-42-44-44 stitches. Continue working until the sleeve measures 37-36-35-34-33-31 cm (shorter measurements in larger sizes due to longer yoke). Knit 1 round where you increase 6-6-6-6-8-8 stitches evenly spaced = 42-44-46-48-52-52 stitches. Change to double pointed needles size 4.5 mm and work rib (= knit 1 twisted, purl 1) for 5 cm. Cast off with knit over knit and purl over purl - remember CASTING-OFF TIP. Work the other sleeve in the same way. |
|||||||||||||||||||||||||||||||
Diagram explanations |
|||||||||||||||||||||||||||||||
|
|||||||||||||||||||||||||||||||
 |
|||||||||||||||||||||||||||||||
 |
|||||||||||||||||||||||||||||||
Have you finished this pattern?Tag your pictures with #dropspattern #mistletoemusesweater or submit them to the #dropsfan gallery. Do you need help with this pattern?You'll find 27 tutorial videos, a Comments/Questions area and more by visiting the pattern on garnstudio.com. © 1982-2026 DROPS Design A/S. We reserve all rights. This document, including all its sub-sections, has copyrights. Read more about what you can do with our patterns at the bottom of each pattern on our site. |
|||||||||||||||||||||||||||||||


With over 40 years in knitting and crochet design, DROPS Design offers one of the most extensive collections of free patterns on the internet - translated to 17 languages. As of today we count 324 catalogues and 12290 patterns translated into English (UK/cm).
We work hard to bring you the best knitting and crochet have to offer, inspiration and advice as well as great quality yarns at incredible prices! Would you like to use our patterns for other than personal use? You can read what you are allowed to do in the Copyright text at the bottom of all our patterns. Happy crafting!
Post a comment to pattern DROPS 217-1
We would love to hear what you have to say about this pattern!
If you want to leave a question, please make sure you select the correct category in the form below, to speed up the answering process. Required fields are marked *.