Comments / Questions (40)
![]() Katrina wrote:
Katrina wrote:
Hallo, ich habe meinem Liebsten den Lagoon-Männerpullover in L gestrickt und möchte mir jetzt das Damenmodell ebenfalls in L machen. Dabei habe ich gesehen, dass die Maschenzahl exakt die selbe ist, bei gleicher Nadelstärke. Das erscheint mir ein bisschen seltsam. Normalerweise trage ich 40/42, würde dann M ausreichen? Liebe Grüße Katrina
23.01.2026 - 23:30DROPS Design answered:
Liebe Katrina, die beiden Herren- und Damenpullover unterscheiden sich in der Länge und in der Ärmellänge. Für die Weite können Sie vielleicht den Herrenpullover anprobieren und prüfen, wie er Ihnen in der Breite passt. Schauen Sie auch auf die Maße in der Maßskizze. Sie können auch einen Ihnen gut passenden Pulli nehmen und mit den Maßen in der Maßskizze vergleichen. Viel Spaß beim Stricken!
25.01.2026 - 21:47
![]() Loredana wrote:
Loredana wrote:
Ho risolto, è stato un errore mio. Grazie lo stesso
11.12.2025 - 18:58
![]() Loredana wrote:
Loredana wrote:
Ciao, sto realizzando la taglia M, mi dice di avviare 102 maglie per il bordo dopodiché diminuire 18. Ho 84 maglie ma quando vado a posizionare i marcapunti mi ritrovo con 4 maglie in più. Ho controllato questo passaggio nella taglia S e nella L e le maglie corrispondono. Potete fare una verifica per la taglia M? Grazie
11.12.2025 - 17:57DROPS Design answered:
Buonasera Loredana, le 4 maglie in più corrispondono alle maglie in cui inserire i segnapunti. Siamo liete che abbia risolto. Buon lavoro!
12.12.2025 - 22:16
![]() Giulia wrote:
Giulia wrote:
Non ho capito bene come fare gli aumenti a Raglan. Per l’aumento dovrei lavorare 3 maglie in una maglia+gettato con 1dir 1gettato 1dir. Ma così ho una sequenza delle coste inglesi sbagliata: 2 dir di seguito, quello della maglia prima dell’aumento e poi la prima dell’aumento. Sul video drops 212 14 ho visto degli aumenti simili ma con 1rov + 1get + 1rov, corretto così?
10.11.2025 - 16:17DROPS Design answered:
Buongiorno Giulia, per gli aumenti deve seguire le indicazioni riportate nel paragrafo all'inizio delle spiegazioni. Tenga conto che non ci sono gettati durante gli aumenti. Buon lavoro!
17.01.2026 - 11:37
![]() Lovisa wrote:
Lovisa wrote:
Hej ! Görs raglanökningarna på VARV 2 ( där omslag & lyft maska stickas avigt) eller på VARV 3 (där omslag & lyft maska stickas rätt)
01.08.2025 - 15:42DROPS Design answered:
Hei Lovisa. Alla ökningarna görs på 2:a varvet i patentmönstret (= * 1 omslag, lyft 1 maska som om den skulle stickas avig, sticka omslaget och den lyfta maskan aviga tillsammans *, sticka *-* ). mvh DROPS Design
25.08.2025 - 11:49
![]() Dilara wrote:
Dilara wrote:
Hi! I'm confused about decreasing the neck edge, if I have 96 stitches and want to decrease 16 stitches, it says I should decrease by knitting every 5th and 6th stitch together. But on a rib pattern I'd be knitting a purl and a knit stitch together and this would mess up the knit-purl stitch line up for the next row. Am i missing something? Thank you.
26.04.2025 - 01:26DROPS Design answered:
Dear Dilara, you won't be knitting the rib in the next round; you decrease in the last round of the rib, after 3cm of rib. Then you will purl 1 round (so you will purl instead of work in rib). And in the yoke you will work in English rib. So you can work the purl and knit stitches together, it won't mess up the following pattern. Happy knitting!
27.04.2025 - 12:25
![]() Bianca Richter wrote:
Bianca Richter wrote:
Hi Wie stricke ich die Masche, in der der Markierer ist? Ich habe ja auf der einen Markiereseite den Umschlag und auf der anderen die Masche. Oder kan ich vor und nach der Masche einen Markierer setzen und wie wäre die Masche dann zu stricken? Einfach rechts? Vielen Dank für die Hilfe
25.12.2024 - 15:59DROPS Design answered:
Liebe Frau Richter, die Maschen mit je einer Markierung sind die Maschen, die man bei der 2. Runde vom Patentmuster links zusammen mit dem Umschlag gestrickt werden. Gerne können Sie die Markierungen vor diesen Maschen legen, aber nicht vergessen, wo die Zunahmen gestrickt werden sollen. Viel Spaß beim Stricken!
02.01.2025 - 11:21
![]() Susan wrote:
Susan wrote:
Is there any ease to this pattern or do you make it to the chest size listed, I couldn't find it listed in the sizing? Thank you.
21.12.2024 - 15:42DROPS Design answered:
Dear Susan, the measurements in the size chart (and in the materials section for the US version) are the final measurements of the garment. Taking into account your own measurements, you can check which size you need to have the desired fit (so you can choose how much ease you want). Happy knitting!
22.12.2024 - 20:12
![]() Bärbel Nagel wrote:
Bärbel Nagel wrote:
Die Anleitung ist nicht zu verstehen . Nach der Halsblende habe ich 92 Maschen und nicht 88.\\r\\nDie Makierer sind völlig falsch gesetzt. ergibt keinen Sinn. Ich habe mich im Handarbeitsladen beraten lassen . Die Damen konnten mir auch nicht helfen , denn sie fanden die Anleitung auch völlig missverständlich. Vielleicht können Sie ja eine verständliche Anleitung mit den richtigen Zahlen in Deutsch veröffentlichen.
10.03.2023 - 12:57DROPS Design answered:
Liebe Frau Nagel, in 3. + 4. Grösse haben Sie 106-110 Maschen , man nimt 18-22 Maschen ab = es sind nur noch 88 M in beiden Grössen, dann wird die Arbeit so geteilt: 15 M (1/2 Rückenteil), 1 M mit Markierer, 13 M (Ärmel), 1 M mit Markierer, 29 M (Vorderteil), 1 M mit Markierer, 13 M (Ärmel), 1 M mit Markierer, 14 M (1/2 Rückenteil) = 15+1+13+1+29+1+13+1+14= 88 Maschen. Viel Spaß beim stricken!
10.03.2023 - 13:48
![]() Esther wrote:
Esther wrote:
Mij is het stuk tekst bij RAGLAN niet duidelijk als het gaat over het meerderen. 4 steken voor de markeerdraad en 7 steken breien lijkt mij niet overeenkomend met het filmpje wat erbij staat qua uitleg? Ik kom er niet uit hoe dit bedoeld wordt. Graag wacht ik jullie antwoord af om verder te kunnen!
17.12.2022 - 21:42DROPS Design answered:
Dag Esther,
Je begint 4 steken voor de steek met de markeerdraad. Wanneer je meerdert in die steek heb je daarna nog 3 steken voor de steek met de markeerdraad, dan de markeerdraadsteek zelf en 3 steken na de markeerdraadsteek. Dit zijn in totaal 7 steken.
18.12.2022 - 15:07
Lagoon#lagoonsweater |
|
 |
 |
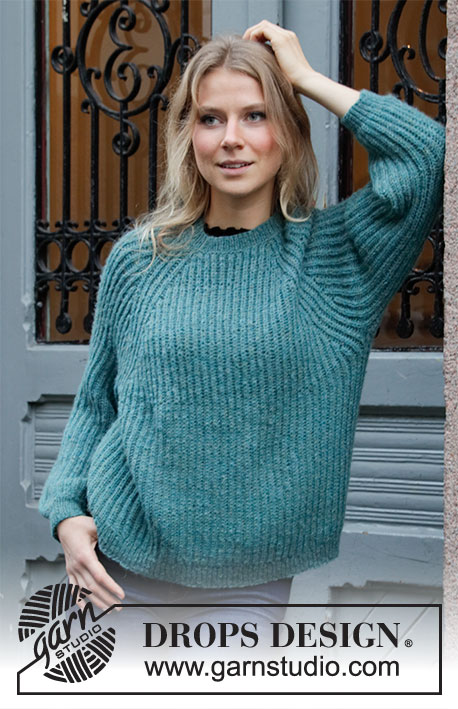
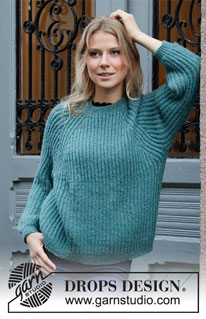
Knitted jumper with raglan in DROPS Sky. Piece is knitted top down with English rib. Size: S - XXXL
DROPS 207-40 |
|
|
---------------------------------------------------------- EXPLANATION FOR THE PATTERN: ---------------------------------------------------------- ENGLISH RIB: ROUND 1: * Knit 1, 1 yarn over, slip 1 stitch as if to purl *, work from *-*. ROUND 2: * 1 yarn over, slip 1 stitch purlwise, purl together yarn over and slipped stitch *, work from *-*. ROUND 3: * Knit together yarn over and slipped stitch, 1 yarn over, slip 1 stitch as if to purl *, repeat from *-*. Repeat rounds 2 to 3. ENGLISH RIB STITCH: When counting the stitches, the yarn overs are not counted as stitches. RAGLAN: All increases are done on 2 round in English rib pattern! NOTE! If the knitting tension is not correct vertically the raglan increase will be too short/long vertically. Raglan increase is written in both number of round and cm. If the knitting tension is incorrect vertically, work raglan increase in cm. Increase as follows: Work until 4 stitches remain before stitch with marker. Increase 2 stitches in next stitch (one purl stitch + yarn over) as follows: Knit yarn over and stitch together but wait to slip stitch and yarn over off the needle, make 1 yarn over on right needle, knit stitch and yarn over together 1 more time = 3 stitches (= 2 stitches increased). Work the next 7 stitches in English rib as before. Increase 2 stitches in next stitch (one purl stitch + yarn over) as follows: Knit yarn over and stitch together but wait to slip stitch and yarn over off the needle, make 1 yarn over on right needle, knit stitch and yarn over together 1 more time = 3 stitches (= 2 stitches increased). Repeat at each of the remaining markers (= 16 stitches increased in total on round). On next round work the increased stitches in English rib pattern - there are no English rib yarn overs in increase, so on next round in English rib pattern work stitch to be worked together yarn over, without yarn over. DECREASE TIP-1 (evenly): To calculate how to decrease evenly, use the total number of stitches on row (e.g. 96 stitches) and divide stitches by number of decreases to be done (e.g. 16) = 6. In this example decrease by knitting every 5th and 6th stitch together. DECREASE TIP-2 (applies to sleeves): All decreases are done on 2 round in English rib pattern. Decrease as follows: Work like this until 2 stitches remain before stitch with marker, slip the next 3 stitches (+ yarn overs that belongs to stitches) loosely over on to right needle as if to knit together, knit the next 2 stitches (+ yarn over that belongs to stitch) together, pass the 3 slipped stitches over stitches knitted together (= 4 stitches decreased). NOTE! On next round do not work any English rib stitch together with middle stitch under sleeve, then on next round in English rib pattern, work stitch together with yarn over, without yarn over. INCREASE TIP (evenly): To calculate how to increase evenly, use the total number of stitches on row (e.g. 164 stitches) and divide stitches by number of increases to be done (e.g. 70) = 2.3. In this example increase by making 1 yarn over after approx. every other stitch. On next round work yarn overs twisted to avoid holes. ---------------------------------------------------------- START THE PIECE HERE: ---------------------------------------------------------- JUMPER - SHORT OVERVIEW OF THE PIECE: Worked in the round on circular needle, top down. Work sleeves in the round on a short circular needle/double pointed needles. NECK EDGE: Cast on 96-102-106-110-114-118 stitches on a short circular needle size 3 mm with Sky. Knit 1 round, then work rib = knit 1/purl 1 for 3 cm. Knit 1 round while decreasing 16-18-18-22-22-26 stitches evenly - read DECREASE TIP-1 (evenly) = 80-84-88-88-92-92 stitches. Purl 1 round. Insert a marker here (= beginning of round approx. mid back). NOW MEASURE PIECE FROM HERE! YOKE: Switch to circular needle size 4.5 mm. Then work ENGLISH RIB - read explanation above. When 1 round has been worked with English rib, insert 4 markers in piece without working (insert all markers in a purl stitch) - read ENGLISH RIB STITCH: Skip the first 13-13-15-15-15-15 stitches, insert a marker in next stitch (= in transition between half back piece and right sleeve), skip the next 13 stitches, insert a marker in next stitch (= in transition between right sleeve and front piece), skip the next 25-27-29-29-31-31 stitches, insert a marker in next stitch (= in transition between front piece and left sleeve), skip the next 13 stitches, insert a marker in next stitch (= in transition between left sleeve and half back piece), there are now 12-14-14-14-16-16 stitches between last marker and beginning of round. REMEMBER THE KNITTING TENSION! There is now a marker in every transition between body and sleeves. Move the markers upwards when working. Continue in the round with English rib, AT THE SAME TIME on next round (= 2nd round in English rib) begin increase for RAGLAN - read explanation above. Increase like this every 6th round (approx. every 1½ cm), 1-2-4-5-6-8 times in total and every 8th round (approx. every 2 cm) 10 times in all sizes = 256-276-312-328-348-380 stitches. When all increases are done, continue with English rib until piece measures 22-24-26-28-30-32 cm from marker, finish after 2nd round in English rib. Work next round as follows: Work the first 37-39-47-49-53-59 stitches (= approx. half back piece), slip the next 55-59-63-67-67-71 stitches on a stitch holder for sleeve and cast on 9 new stitches on needle (= in the side under sleeve), work the next 73-79-93-97-107-119 stitches (= front piece), insert the next 55-59-63-67-67-71 stitches on a stitch holder for sleeve and cast on 9 new stitches on needle (= in the side under sleeve), work the last 36-40-46-48-54-60 stitches on round (= approx. half back piece). Finish body and sleeves separately. NOW MEASURE PIECE FROM HERE! BODY: There are now 164-176-204-212-232-256 stitches on round. Continue in the round with English rib until piece measures 24 cm - adjust to finish after 2nd round in English rib. Switch to circular needle size 3 mm. Work next round as follows: * Knit yarn over and slipped stitch together, purl 1 *, work from *-* the entire round, AT THE SAME TIME increase 70-76-90-92-104-112 stitches - read INCREASE TIP = 234-252-294-304-336-368 stitches. Work rib (knit 1/purl 1) in the round for 4 cm. Cast off stitches with knit over knit and purl over purl. Jumper measures approx. 54-56-58-60-62-64 cm from shoulder and down. SLEEVE: Slip the 55-59-63-67-67-71 stitches from stitch holder in one side of piece back on a short circular needle/double pointed needles size 4.5 mm and pick in addition up 1 stitch in each of the 9 new stitches cast on in the side under sleeve = 64-68-72-76-76-80 stitches. Continue in the round with English rib. When sleeve measures 4 cm – adjust so that next round is 2nd round in English rib, insert a marker in the middle stitch under sleeve (= one knit stitch). On next round, decrease 4 stitches under sleeve - read DECREASE TIP-2. Decrease like this every 8-8-5-4-4-3 cm 4-4-5-6-6-6 times in total = 48-52-52-52-52-56 stitches. When sleeve measures 38-37-35-34-32-31 cm – adjust so that next round is 3rd round in English rib pattern, switch to double pointed needles size 3 mm. Work next round as follows: * Knit yarn over and slipped stitch together, purl 1 *, work from *-* the entire round = 48-52-52-52-52-56 stitches. Now work rib (= knit 1/purl 1) for 4 cm. Cast off stitches with knit over knit and purl over purl. Sleeve measures 42-41-39-38-36-35 cm from division. Work the other sleeve the same way. |
|
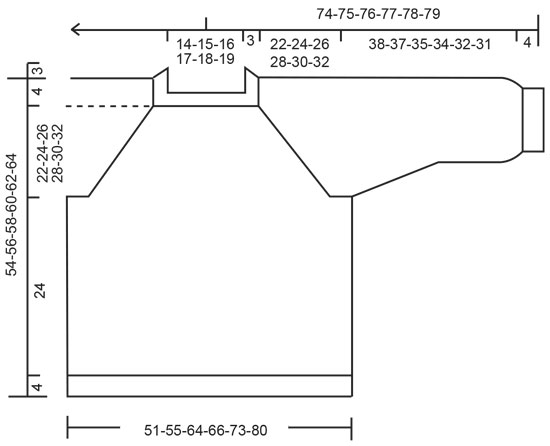 |
|
Have you finished this pattern?Tag your pictures with #dropspattern #lagoonsweater or submit them to the #dropsfan gallery. Do you need help with this pattern?You'll find 17 tutorial videos, a Comments/Questions area and more by visiting the pattern on garnstudio.com. © 1982-2026 DROPS Design A/S. We reserve all rights. This document, including all its sub-sections, has copyrights. Read more about what you can do with our patterns at the bottom of each pattern on our site. |
|





Post a comment to pattern DROPS 207-40
We would love to hear what you have to say about this pattern!
If you want to leave a question, please make sure you select the correct category in the form below, to speed up the answering process. Required fields are marked *.