
Popular categories
Looking for a yarn?


Comments / Questions (118)
![]() Helen wrote:
Helen wrote:
What do the big T 's mean in the pattern
19.10.2012 - 01:04Anders wrote:
Down below. It´s called scrolling!
21.08.2012 - 19:24
![]() Caye Fulcher wrote:
Caye Fulcher wrote:
I would like to make this sweater, light as a feather, what is pattern 1, 2,&3? I can't find it in the directions. Thanks.....Caye
03.08.2012 - 03:27
![]() Barbara A Drury wrote:
Barbara A Drury wrote:
What makes up Patterns 1, 2, & 3, as referred to in the body of the pattern?
29.07.2012 - 21:24DROPS Design answered:
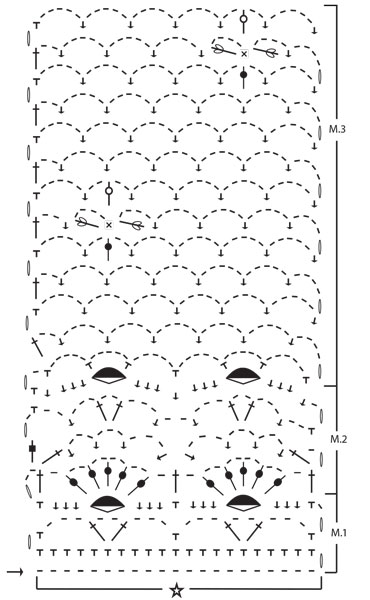
Dear Mrs Drury, M.1, M.2 and M.3 refer to the diagram at the very bottom of the page. Happy Crocheting!
29.11.2012 - 17:17
![]() Ann Marie wrote:
Ann Marie wrote:
I want to make this 68-15 but what is pattern 1, pattern2,and pattern3?
29.07.2012 - 19:33DROPS Design answered:
These are the charts printed below the pattern text.
28.08.2012 - 03:50
![]() Mette Winther wrote:
Mette Winther wrote:
1. omgang i M.2 forstår jeg ikke. Kan I beskrive den detaljeret, altså noget med 1 lm, 1 halv stm, eller hvad jeg nu skalkalde den. Og hvordan når der er vist 5 fm de skal ned i og man skal gentage 3 gange til der ialt er seks masker. det bliver jo mere end 6 masker. Håber I vil skrive med bogstaver hvordan jeg skal gøre.
19.07.2012 - 22:14DROPS Design answered:
Du starter M.2 med 1 luftm til at vende arb med, 2 lm, 1 stangm, 1 lm, 1 boble + 2 lm 4 gange og 1 boble, 1 lm, 1 stangm, 1 lm og gentag boblerne igen osv. Du slutter med 1 lm og 1 stangm i den 1 fm fra den foregaaende raekke
07.01.2013 - 15:54
![]() Karin wrote:
Karin wrote:
Ik ben inmiddels met de mouwen begonnen maar het meerderen is mij niet helemaal duidelijk. Als je aan het einde van elke derde/vierde toer vier lossen meerdert (met een vaste), is het dan de bedoeling dat je in de volgende toer daarop vervolgens met vijf lossen weer een extra boogje haakt?
11.07.2012 - 16:04DROPS Design answered:
Ja, met de 4 lossen krijg je een nieuwe herhaling van het boogjespatroon erbij.
12.07.2012 - 11:52
![]() Frida Van Der Biezen wrote:
Frida Van Der Biezen wrote:
Ik kan er maar niet achter komen hoe je de steek maakt ..pijltje met 1 nopje.. ik begrijp hem niet zoals hij is uitgelegd. en het pijltje met 2 nopjes..
19.05.2012 - 13:30DROPS Design answered:
Wij hebben helaas geen video van de gehaakte nopjes, maar ik zal het doorgeven. Ik kan alleen aanraden om precies te doen als er staat (maak misschien eerst een paar proefjes). Voor het nopje: herhaal de werkwijze tussen de * - * 3 keer en je hebt dan 6 lussen = of draden op de haaknld. Maak nog een omslag en haal door alle lussen op de nld. Bij het blaadje ook doen precies zoals er staat (vaak is het even uitproberen). Maar de beschrijving klopt.
22.05.2012 - 14:44
![]() Mirjan wrote:
Mirjan wrote:
Wat wordt er bedoeld dat je het moet delen in tweeen en dan apart verder haken?
14.04.2012 - 19:10DROPS Design answered:
Je hebt eerst alle panden (voorpanden en achterpand) in één deel gehaakt. Bij een hoogte van 32-35 deel je het werk door alleen heen en weer te haken op eerst het voorpand (2 herhalingen), vervolgens achterpand en dan het tweede voorpand. De openingen tussen voorpanden en achterpand = armsgaten.
16.04.2012 - 12:21
![]() JENNIFER SINGLETON wrote:
JENNIFER SINGLETON wrote:
I am unable to manage to work the petal as you explain.
19.02.2012 - 16:39DROPS Design answered:
If you please explain where it goes wrong we will try to help.
29.02.2012 - 00:46
|
|||||||||||||||||||||||||||||||||||||
Midnight Lace |
|||||||||||||||||||||||||||||||||||||
|
|
|||||||||||||||||||||||||||||||||||||
Crocheted Cardigan in DROPS Muskat. Piece is worked bottom up with lace pattern and flower pattern. Size M-L/XL.
DROPS 68-15 |
|||||||||||||||||||||||||||||||||||||
|
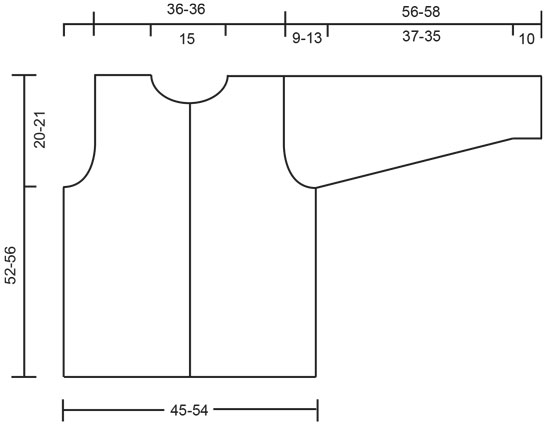
Tension: 1 diagram = approx. 9 cm in width. 12 rows of Pattern 2 = approx. 10 cm in height. Pattern: See chart. The pattern is seen from the right side. «1 rapport» = «1 repeat». Note: All measurements in pattern refer to the garment when held up or worn, because the pattern pulls in and lengthens. Body: Ch 201-241 loosely. Turn and crochet Pattern 1 once across row (10-12 repeats = 60-72 ch-st bows). Then crochet Pattern 2 on the next row and repeat a total of 5 times, the piece measures approx. 20 cm. Crochet Pattern 3. At the same time when the piece measures approx. 32-35 cm divide and crochet each part of Body separately. Each front = 2 repeats; back = 4 repeats, bind off 1-2 repeats at each side for armhole. Right front: Continue with Pattern 3 over 2 repeats starting at center front. When the piece measures approx. 42-46 cm adjust to finish after 1 flower) continue with Pattern 3 but do not make flowers. At the same time shape the neck as follows: Crochet until 2 ch-st bows remain at center front. Turn and crochet back. Then crochet over 1 less ch-st bow at neck edge of every other row 3 times. Continue to crochet in pattern until the piece measures 52-56 cm, fasten off. Left front: Crochet the same as right front, reversing all shaping. Back: Continue to crochet Pattern 3 until piece measures approx. 42-46 cm, then crochet the rest without flowers (as on front). When the piece measures approx. 49-53 cm crochet the next row as follows: 7 ch-st bows = shoulder, dc over the following 10 ch-st bows = neck (crochet 1 dc in every ch-st bow and 1 dc in every dc between bows), 7 ch-st bows = shoulder. Finish with 1 row of ch-st bows on each shoulder. The piece measures approx. 52-56 cm, fasten off. Sleeve: Ch 51-51 loosely. Turn and crochet Pattern 1 once across row (2.5 repeats = 15 ch-st bows), then crochet Pattern 2 twice, then continue in Pattern 3. When the piece measures approx. 10 cm inc 1 ch-st bow at end of row on alternately right and left side of piece a total of 8-10 times, inc at the end of every 3rd and 4th rows - make inc by ch 4, then 1 dc in the last sc from previous row = 23-25 ch-st bows on row. Continue until piece measures approx. 52-54 cm. Then crochet over 1 less ch-st bow at end of every row until the piece measures 56-58 cm, fasten off. Assembly: Crochet together shoulder seams as follows: * 1 dc in first ch-st bow on front, ch 1, 1 dc in first ch-st bow on back, ch 1 *, repeat from * - * on each shoulder. Crochet together the sleeve as follows from bottom edge: * 1 dc in one side, ch 2, 1 dc in *, repeat from * - * until approx. 5-9 cm remains. Crochet sleeves to Body in the same way as sleeves were crocheted together. Crochet 1 row dc along both button bands and around the neck - crochet snugly around the neck so that the neckline will not sag. Buttonhole loops: Make 3 buttonhole loops along right front. Start at top edge: * 1 dc, ch 3, fasten with 1 dc 1 cm below, sl st approx. 8-9 cm lower on band * repeat from * - * until there are 3 loops. Sew on buttons on left front. |
|||||||||||||||||||||||||||||||||||||
Diagram explanations |
|||||||||||||||||||||||||||||||||||||
|
|||||||||||||||||||||||||||||||||||||
 |
|||||||||||||||||||||||||||||||||||||
 |
|||||||||||||||||||||||||||||||||||||
Have you finished this pattern?Tag your pictures with #dropspattern or submit them to the #dropsfan gallery. Do you need help with this pattern?You'll find 7 tutorial videos, a Comments/Questions area and more by visiting the pattern on garnstudio.com. © 1982-2026 DROPS Design A/S. We reserve all rights. This document, including all its sub-sections, has copyrights. Read more about what you can do with our patterns at the bottom of each pattern on our site. |
|||||||||||||||||||||||||||||||||||||


With over 40 years in knitting and crochet design, DROPS Design offers one of the most extensive collections of free patterns on the internet - translated to 17 languages. As of today we count 325 catalogues and 12298 patterns translated into English (UK/cm).
We work hard to bring you the best knitting and crochet have to offer, inspiration and advice as well as great quality yarns at incredible prices! Would you like to use our patterns for other than personal use? You can read what you are allowed to do in the Copyright text at the bottom of all our patterns. Happy crafting!
Post a comment to pattern DROPS 68-15
We would love to hear what you have to say about this pattern!
If you want to leave a question, please make sure you select the correct category in the form below, to speed up the answering process. Required fields are marked *.