
Popular categories
Looking for a yarn?


Comments / Questions (118)
![]() Gerrie wrote:
Gerrie wrote:
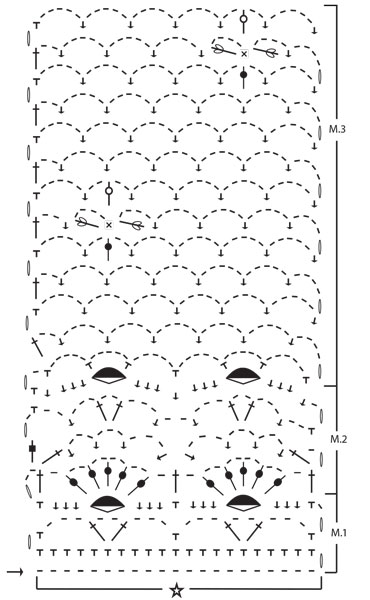
WElke steek word er boven het nopje gebruikt in patroongedeelte 2? Het zijn zulke lange strepen...zijn dit gewoon vasten?
14.07.2013 - 17:52DROPS Design answered:
Hoi Gerrie de "gewone" strepen zijn altijd lossen, de lange strepen met schuine streep doorheen zijn stokjes en de "T" zijn vasten. Zie beschrijving van de symbolen.
15.07.2013 - 20:27
![]() Leandra wrote:
Leandra wrote:
I read comments, but still not clear on the "arrow and pull up yarn" directions for petal. Is there a * missing in directions? Sorry for my ignorance, I'm better at following a picture of actual stitches than reading a pattern. (I learn visually, lol) Can you please give this one more try? I really love this sweater. THANKS!
18.05.2013 - 19:35DROPS Design answered:
Dear Leandra, on the 6th symbol, you should insert the hook where you see the tip of the arrow, then repeat from *-* a total of 3 times, you will have a total of 7 loops on the hook, make 1 more yo and pull through all loops on the hook. Happy crocheting!
21.05.2013 - 09:11
![]() Sir Napsalot wrote:
Sir Napsalot wrote:
This little cardigan would look good with the dense crochet fan pattern (M.2) on top and the mesh pattern (M.3) on the bottom, too. I'll just need to figure out the math first.
18.05.2013 - 19:28
![]() Marieke wrote:
Marieke wrote:
Even een vraag over de bloemetjes. Worden deze er later opgehaakt of tijdens het haken van patroon 3? Alvast bedankt!
09.05.2013 - 20:20DROPS Design answered:
Hoi Marieke. Je breit de bloemetjes in het patroon - niet later. Zie ook teltekening onderaan.
10.05.2013 - 16:28
![]() Donna Sue wrote:
Donna Sue wrote:
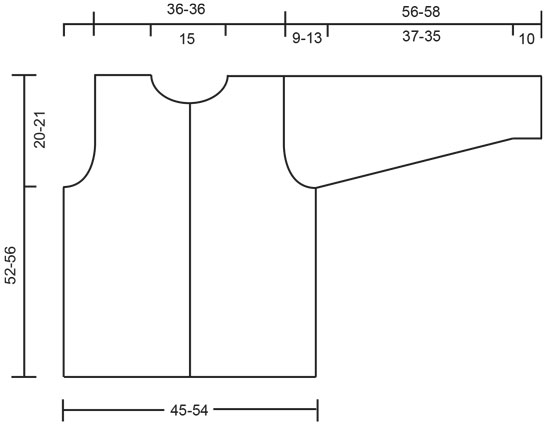
If you chain 241 this would wrap around me 3 times this is what I pattern says 241
26.03.2013 - 19:59DROPS Design answered:
Dear Mrs Sue, in size L/XL, you cast on 241 ch and work 12 times diagramm 1, if 1 diagram 1 = 9 cm as stated in gauge, you should have 108 cm for 12 diagramms 1 in width. Remember the crochet tension. Happy crocheting!
27.03.2013 - 09:33
![]() Donna Sue wrote:
Donna Sue wrote:
I have crocheted 12 rows onto the 241 chains. This wraps around me 3 times why
26.03.2013 - 18:29DROPS Design answered:
Dear Mrs Sue, do you have the recommanded gauge of 1 diagram = approx 9 cm in width + 12 rows of Pattern 2 = approx 10 cm in height ? Please think to check your gauge and the measurements in the chart below (all in cm). Happy crocheting!
26.03.2013 - 18:47
![]() Donna Charles wrote:
Donna Charles wrote:
Just to start this project I have a question. If I'm a large how many chains do I start with ? Ch 201-241 loosely. Turn and crochet Pattern 1 once across row (10-12 repeats).
25.03.2013 - 12:34DROPS Design answered:
Dear Mrs Charles, in size L, you'll crochet loosely 241 ch and crochet 12 repeats of Pattern 1. Happy crocheting!
25.03.2013 - 14:11
![]() Jeanne wrote:
Jeanne wrote:
Mijn vraag is hoe haak ik de bloemetjes in het voorpand?Ik heb al diverse pogingen gedaan maar het wil maar niet lukken en zitten er ook bloemetjes op de mouwen?Ik hoop dat U mij kunt helpen bij voorbaat hartelijk dank Jeanne
15.03.2013 - 12:22DROPS Design answered:
De bloemen maken onderdeel uit van patroon 3 en ze worden dus ook op de mouwen gehaakt. Om de bloemen te haken, volgt u het telpatroon M.3 en de uitleg die erboven staat. 1 bloemetje bestaat uit 4 blaadjes, zoals beschreven staat.
16.03.2013 - 08:01
![]() Marie wrote:
Marie wrote:
I try to make the Drops68-15 light as a feather cardigan can you please tell me what is pattern 1and pattern 2 and patter 3 where are those instructions.
11.03.2013 - 21:23DROPS Design answered:
Dear Marie, pattern 1,2 and 3 = diagrams M.1, M.2 and M.3 at the bottom of the page. Happy crocheting!
12.03.2013 - 09:40
![]() Isobel wrote:
Isobel wrote:
How much wool does the pattern for this cardigan need please. ???
11.03.2013 - 13:58DROPS Design answered:
Dear Isobel, required materials is indicated on the right side of the picture : 500 g Drops Muskat for size M and 550 g Drops Muskat for size L/XL. Click on the link to shadecards for Drops Muskat to read more about this yarn. Happy crocheting !
11.03.2013 - 14:04
|
|||||||||||||||||||||||||||||||||||||
Midnight Lace |
|||||||||||||||||||||||||||||||||||||
|
|
|||||||||||||||||||||||||||||||||||||
Crocheted Cardigan in DROPS Muskat. Piece is worked bottom up with lace pattern and flower pattern. Size M-L/XL.
DROPS 68-15 |
|||||||||||||||||||||||||||||||||||||
|
Tension: 1 diagram = approx. 9 cm in width. 12 rows of Pattern 2 = approx. 10 cm in height. Pattern: See chart. The pattern is seen from the right side. «1 rapport» = «1 repeat». Note: All measurements in pattern refer to the garment when held up or worn, because the pattern pulls in and lengthens. Body: Ch 201-241 loosely. Turn and crochet Pattern 1 once across row (10-12 repeats = 60-72 ch-st bows). Then crochet Pattern 2 on the next row and repeat a total of 5 times, the piece measures approx. 20 cm. Crochet Pattern 3. At the same time when the piece measures approx. 32-35 cm divide and crochet each part of Body separately. Each front = 2 repeats; back = 4 repeats, bind off 1-2 repeats at each side for armhole. Right front: Continue with Pattern 3 over 2 repeats starting at center front. When the piece measures approx. 42-46 cm adjust to finish after 1 flower) continue with Pattern 3 but do not make flowers. At the same time shape the neck as follows: Crochet until 2 ch-st bows remain at center front. Turn and crochet back. Then crochet over 1 less ch-st bow at neck edge of every other row 3 times. Continue to crochet in pattern until the piece measures 52-56 cm, fasten off. Left front: Crochet the same as right front, reversing all shaping. Back: Continue to crochet Pattern 3 until piece measures approx. 42-46 cm, then crochet the rest without flowers (as on front). When the piece measures approx. 49-53 cm crochet the next row as follows: 7 ch-st bows = shoulder, dc over the following 10 ch-st bows = neck (crochet 1 dc in every ch-st bow and 1 dc in every dc between bows), 7 ch-st bows = shoulder. Finish with 1 row of ch-st bows on each shoulder. The piece measures approx. 52-56 cm, fasten off. Sleeve: Ch 51-51 loosely. Turn and crochet Pattern 1 once across row (2.5 repeats = 15 ch-st bows), then crochet Pattern 2 twice, then continue in Pattern 3. When the piece measures approx. 10 cm inc 1 ch-st bow at end of row on alternately right and left side of piece a total of 8-10 times, inc at the end of every 3rd and 4th rows - make inc by ch 4, then 1 dc in the last sc from previous row = 23-25 ch-st bows on row. Continue until piece measures approx. 52-54 cm. Then crochet over 1 less ch-st bow at end of every row until the piece measures 56-58 cm, fasten off. Assembly: Crochet together shoulder seams as follows: * 1 dc in first ch-st bow on front, ch 1, 1 dc in first ch-st bow on back, ch 1 *, repeat from * - * on each shoulder. Crochet together the sleeve as follows from bottom edge: * 1 dc in one side, ch 2, 1 dc in *, repeat from * - * until approx. 5-9 cm remains. Crochet sleeves to Body in the same way as sleeves were crocheted together. Crochet 1 row dc along both button bands and around the neck - crochet snugly around the neck so that the neckline will not sag. Buttonhole loops: Make 3 buttonhole loops along right front. Start at top edge: * 1 dc, ch 3, fasten with 1 dc 1 cm below, sl st approx. 8-9 cm lower on band * repeat from * - * until there are 3 loops. Sew on buttons on left front. |
|||||||||||||||||||||||||||||||||||||
Diagram explanations |
|||||||||||||||||||||||||||||||||||||
|
|||||||||||||||||||||||||||||||||||||
 |
|||||||||||||||||||||||||||||||||||||
 |
|||||||||||||||||||||||||||||||||||||
Have you finished this pattern?Tag your pictures with #dropspattern or submit them to the #dropsfan gallery. Do you need help with this pattern?You'll find 7 tutorial videos, a Comments/Questions area and more by visiting the pattern on garnstudio.com. © 1982-2026 DROPS Design A/S. We reserve all rights. This document, including all its sub-sections, has copyrights. Read more about what you can do with our patterns at the bottom of each pattern on our site. |
|||||||||||||||||||||||||||||||||||||


With over 40 years in knitting and crochet design, DROPS Design offers one of the most extensive collections of free patterns on the internet - translated to 17 languages. As of today we count 325 catalogues and 12298 patterns translated into English (UK/cm).
We work hard to bring you the best knitting and crochet have to offer, inspiration and advice as well as great quality yarns at incredible prices! Would you like to use our patterns for other than personal use? You can read what you are allowed to do in the Copyright text at the bottom of all our patterns. Happy crafting!
Post a comment to pattern DROPS 68-15
We would love to hear what you have to say about this pattern!
If you want to leave a question, please make sure you select the correct category in the form below, to speed up the answering process. Required fields are marked *.