
Popular categories
Looking for a yarn?


Comments / Questions (118)
James wrote:
US here. The increase on the sleeve is giving me trouble too. No problem on 3rd row, but 4th row increase on a half ch-st loop doesn't make sense. Can you help clear this up or am I misreading this? Thank you in advance.
23.05.2015 - 06:13DROPS Design answered:
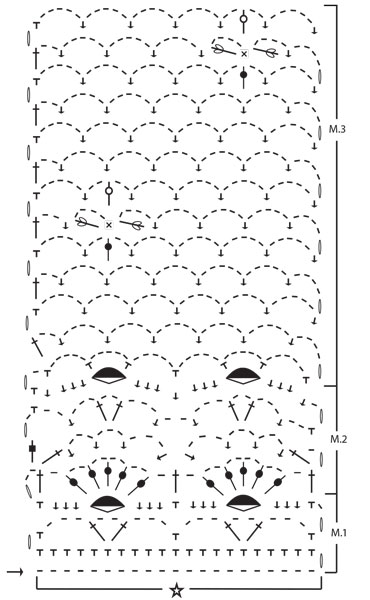
Dear James, you inc at the end of 3rd row + at the end of 4th row the same way: crochet ch 4, 1 sc in the last sc from previous row => you have inc 1 ch-space each side. Happy crocheting!
23.05.2015 - 13:57
![]() Janice Kern wrote:
Janice Kern wrote:
Thank you! I especially find the videos of the pattern extremely helpful. I would not have figured it out on my own. Muskat keeps splitting when I am doing the bobbles on the 4th row. Ouch! Thanks for your help. :)
15.05.2015 - 20:17
![]() Janice Kern wrote:
Janice Kern wrote:
Hello. Trying this pattern. Size is way off, my gauge is correct. I'm on first 2 rows and it is 11" off. Do you have a size small pattern? Do you also have "multiple of....." stitches? I am going to try 180 (?) for chain cast-on and maybe a little tighter? Thanks SOOO much for your instructional videos! That's why I've decided to do this! Very helpful! Thx
13.05.2015 - 19:21DROPS Design answered:
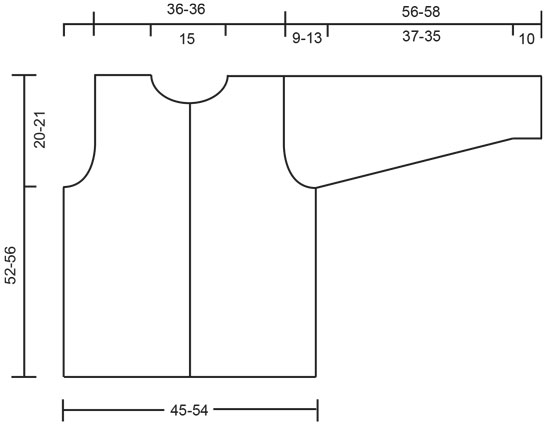
Dear Mrs Kern, you will find at the bottom of the pattern a measurement chart with all measurements in cm taken flat from side to side. Keep your gauge to get the same measurements. Diagram shows 1 repeat, if you need any adjustment you can work 1 or more repeat less (check your own measurements to check before). Happy crocheting!
15.05.2015 - 10:04
![]() Trudy wrote:
Trudy wrote:
This pattern DROPS 68-15 by DROPS Design does not say how much yarn is needed for this sweater pattern. Please advise...thanks!
17.03.2015 - 20:06DROPS Design answered:
Dear Trudy, you will find requested amount of yarn for each size at the right side of the picture under tab "Materials", ie in first size, you need 500 g Muskat / 50 g a ball Muskat = 10 balls Muskat are required in size M. Happy crocheting!
18.03.2015 - 09:40
![]() Roswitha Gerlach wrote:
Roswitha Gerlach wrote:
Liebes Team, danke für die Videaoanleitung. Ich habe eine Anmerkung zur Erklärung der Noppe und des Blattes: meiner Meinung nach müßte es lauten: *1 Umschlag um die Nadel, die Nadel in die fM unterhalb stecken und den Faden nach oben ziehen* von *-* 2 Mal (und nicht 3 Mal, dann hätten wir statt 6+1 nämlich 8+1 Schlingen auf der Nadel) wiederholen = 6 Schlingen + 1 Masche auf der Nadel. Vorschlag Name für das tolle Modell: "Himmelstraum". Viele Grüße, Roswitha Gerlach
11.01.2015 - 15:27DROPS Design answered:
Die Beschreibung ist korrekt so, wie sie dort steht. Sie haben ja pro Einstich 2 Schlingen auf der Nadel - den Umschlag und die nach oben geholte M. Wenn Sie das ingesamt 3 x machen, haben Sie 6 Schlingen auf der Nadel plus die Schlinge vom Anfang.
06.03.2015 - 14:17Ineke wrote:
Ik heb de rand met bloemen af en ben nu 5 toeren verder met de lossen (boogjes) mijn werk wordt alleen maar breder en gaat golven. ik heb 58 boogjes .Heb alle comments gelezen en zie 1 comment met hetzelfde probleem. Helaas kan ik geen foto meesturen in dit formulier. Help!!! Anders trek ik het hele geval uit. Ben zeer teleurgesteld.
01.09.2014 - 10:37DROPS Design answered:
Hoi Ineke. Ik kan helaas niet zeggen waarom het werk bij jouw breeder lijkt te worden. Als je steeds hetzelfde aantal boogen hebt en de juiste stekenverhouding, dan zou het niet breder moeten worden. Probeer eventueel langs een winkel te gaan, ze kunnen het werk bekijken en misschien zien of er iets mis is. Ik kan het zo helaas niet beoordelen. Succes.
04.09.2014 - 11:45
![]() Val wrote:
Val wrote:
Bonjour, je bloque pour les augmentation de manches(3 et 5 rangs non?) et à combien de cm commence t on l'encolure du devant
01.08.2014 - 13:44DROPS Design answered:
Bonjour Val, on augmente pour les manches à la fin de chaque 3ème + à la fin de chaque 4ème rang (= 1 augm de chaque côté, les augm. se font en fin de rang à chaque fois). L'encolure devant se forme à 42-46 cm de hauteur totale (cf taille). Bon crochet!
01.08.2014 - 14:10
![]() Cindy wrote:
Cindy wrote:
I have gotten to pattern 3 and I am noticing that the width of the piece has increased quite a bit. Is this normal or am I crocheting too loose?
14.06.2014 - 12:17DROPS Design answered:
Dear Cindy, check your measurements in width when piece is held up and remember to keep the same tension as for your swatch. Happy crocheting!
16.06.2014 - 09:51
![]() Claudie wrote:
Claudie wrote:
Bonjour, Pouvez-vous me dire ce que signifie "un rapport" ? C'est suivi de : = un motif à répéter (ça je comprends !) Merci de votre réponse et bonne journée
26.03.2014 - 12:36DROPS Design answered:
Bonjour Claudie, un rapport est un motif a répéter en largeur, comme dans la partie encadrée en bas du diagramme. Bon crochet!
26.03.2014 - 13:40Claudie wrote:
Merci beaucoup pour votre réponse, effectivement c'est mieux sans le son et en + les explications sont très claires J'ai hâte d'avoir un peu de temps pour refaire ces super points Merci !
26.03.2014 - 12:33
|
|||||||||||||||||||||||||||||||||||||
Midnight Lace |
|||||||||||||||||||||||||||||||||||||
|
|
|||||||||||||||||||||||||||||||||||||
Crocheted Cardigan in DROPS Muskat. Piece is worked bottom up with lace pattern and flower pattern. Size M-L/XL.
DROPS 68-15 |
|||||||||||||||||||||||||||||||||||||
|
Tension: 1 diagram = approx. 9 cm in width. 12 rows of Pattern 2 = approx. 10 cm in height. Pattern: See chart. The pattern is seen from the right side. «1 rapport» = «1 repeat». Note: All measurements in pattern refer to the garment when held up or worn, because the pattern pulls in and lengthens. Body: Ch 201-241 loosely. Turn and crochet Pattern 1 once across row (10-12 repeats = 60-72 ch-st bows). Then crochet Pattern 2 on the next row and repeat a total of 5 times, the piece measures approx. 20 cm. Crochet Pattern 3. At the same time when the piece measures approx. 32-35 cm divide and crochet each part of Body separately. Each front = 2 repeats; back = 4 repeats, bind off 1-2 repeats at each side for armhole. Right front: Continue with Pattern 3 over 2 repeats starting at center front. When the piece measures approx. 42-46 cm adjust to finish after 1 flower) continue with Pattern 3 but do not make flowers. At the same time shape the neck as follows: Crochet until 2 ch-st bows remain at center front. Turn and crochet back. Then crochet over 1 less ch-st bow at neck edge of every other row 3 times. Continue to crochet in pattern until the piece measures 52-56 cm, fasten off. Left front: Crochet the same as right front, reversing all shaping. Back: Continue to crochet Pattern 3 until piece measures approx. 42-46 cm, then crochet the rest without flowers (as on front). When the piece measures approx. 49-53 cm crochet the next row as follows: 7 ch-st bows = shoulder, dc over the following 10 ch-st bows = neck (crochet 1 dc in every ch-st bow and 1 dc in every dc between bows), 7 ch-st bows = shoulder. Finish with 1 row of ch-st bows on each shoulder. The piece measures approx. 52-56 cm, fasten off. Sleeve: Ch 51-51 loosely. Turn and crochet Pattern 1 once across row (2.5 repeats = 15 ch-st bows), then crochet Pattern 2 twice, then continue in Pattern 3. When the piece measures approx. 10 cm inc 1 ch-st bow at end of row on alternately right and left side of piece a total of 8-10 times, inc at the end of every 3rd and 4th rows - make inc by ch 4, then 1 dc in the last sc from previous row = 23-25 ch-st bows on row. Continue until piece measures approx. 52-54 cm. Then crochet over 1 less ch-st bow at end of every row until the piece measures 56-58 cm, fasten off. Assembly: Crochet together shoulder seams as follows: * 1 dc in first ch-st bow on front, ch 1, 1 dc in first ch-st bow on back, ch 1 *, repeat from * - * on each shoulder. Crochet together the sleeve as follows from bottom edge: * 1 dc in one side, ch 2, 1 dc in *, repeat from * - * until approx. 5-9 cm remains. Crochet sleeves to Body in the same way as sleeves were crocheted together. Crochet 1 row dc along both button bands and around the neck - crochet snugly around the neck so that the neckline will not sag. Buttonhole loops: Make 3 buttonhole loops along right front. Start at top edge: * 1 dc, ch 3, fasten with 1 dc 1 cm below, sl st approx. 8-9 cm lower on band * repeat from * - * until there are 3 loops. Sew on buttons on left front. |
|||||||||||||||||||||||||||||||||||||
Diagram explanations |
|||||||||||||||||||||||||||||||||||||
|
|||||||||||||||||||||||||||||||||||||
 |
|||||||||||||||||||||||||||||||||||||
 |
|||||||||||||||||||||||||||||||||||||
Have you finished this pattern?Tag your pictures with #dropspattern or submit them to the #dropsfan gallery. Do you need help with this pattern?You'll find 7 tutorial videos, a Comments/Questions area and more by visiting the pattern on garnstudio.com. © 1982-2026 DROPS Design A/S. We reserve all rights. This document, including all its sub-sections, has copyrights. Read more about what you can do with our patterns at the bottom of each pattern on our site. |
|||||||||||||||||||||||||||||||||||||


With over 40 years in knitting and crochet design, DROPS Design offers one of the most extensive collections of free patterns on the internet - translated to 17 languages. As of today we count 325 catalogues and 12298 patterns translated into English (UK/cm).
We work hard to bring you the best knitting and crochet have to offer, inspiration and advice as well as great quality yarns at incredible prices! Would you like to use our patterns for other than personal use? You can read what you are allowed to do in the Copyright text at the bottom of all our patterns. Happy crafting!
Post a comment to pattern DROPS 68-15
We would love to hear what you have to say about this pattern!
If you want to leave a question, please make sure you select the correct category in the form below, to speed up the answering process. Required fields are marked *.