
Popular categories
Looking for a yarn?


Comments / Questions (118)
![]() Denise wrote:
Denise wrote:
I did OK until I reached the part in the 'Body' under Crochet Pattern 3 where it states "divide and crochet part of the Body separately. Then under 'Right front' - "at the same time shape the neck. Any assistance would be appreciated - great sweater by the way!
15.06.2016 - 21:44DROPS Design answered:
Dear Denise, when working on right front, continue with pattern 3 until piece measures 16.5" - 18 1/8" (after 1 flower), continue then pattern 3 without flowers (= only ch-spaces) and dec for neck from WS: crochet row until 2 ch-spaces remain towards mid front, turn and work return row. On next row from WS, work until 1 ch-space remain (= a total of 3 ch-spaces unworked towards neckline) and repeat this dec a total of 3 times = 7 ch-spaces remain for shoulder, continue until finished measurements and fasten off. Happy crocheting!
16.06.2016 - 08:47
![]() Béatrice wrote:
Béatrice wrote:
Rebonjour, Je me suis mal exprimée, je voulais savoir le nombre d'arceaux restant à la fin de la manche ?,(j'ai mes 25 arceaux avant de diminuer )
26.05.2016 - 10:59DROPS Design answered:
Bonjour Béatrice, tout dépendra de votre tension en hauteur, diminuez 1 arceau à la fin de chaque rang de chaque côté jusqu'à ce que la manche mesure 56-58 cm de hauteur totale. Bon crochet!
26.05.2016 - 12:43
![]() Béatrice wrote:
Béatrice wrote:
Bonjour, Combien d'arceaux reste-t-il après les diminutions de l'épaule ? merci
26.05.2016 - 10:30DROPS Design answered:
Bonjour Béatrice, il doit vous rester 7 arceaux pour l'épaule: 12 arceaux (2 x M.3) - 2 arceaux pour l'encolure - 3x1 arceau pour l'encolure = 12-5=7. Bon crochet!
26.05.2016 - 10:54
![]() Ella Giesbertz wrote:
Ella Giesbertz wrote:
Is er geen telpatroontje hoe je precies moet meerderen in de mouwen. Wat ik ook probeer het is en blijft lelijk. Ik ben er uren mee aan het puzzelen geweest maar het is dus niks geworden,
12.05.2016 - 00:38DROPS Design answered:
Hoi Ella. Ik kan hier helaas alleen verwijzen naar de beschrijving: "meerder 1 l-boogje aan het eind van elke 3e en 4e tr – meerder door 4 l te haken en haak dan 1 v in de laatste v van de vorige tr". Ik heb geen video om de meerdering te maken, maar ik zal het op ons lijstje zetten.
12.05.2016 - 10:19
![]() Béatrice wrote:
Béatrice wrote:
Bonjour, Est il préférable de prendre un crochet plus petit pour faire la partie M3 (qui est moins serré à cause des arceaux), mes parties M1 et M2 sont plus serrées et en passant au M3 ,çà "gondole"
08.05.2016 - 11:52DROPS Design answered:
Bonjour Béatrice, vous pouvez ajuster la taille de votre crochet si nécessaire pour conserver les bonnes mesures (cf schéma). Bon crochet!
09.05.2016 - 10:44
![]() Pat wrote:
Pat wrote:
Bonjour,ma question est pour rabattre 1 motif pour les emmanchures c'est 6 arceaux( 1 rapport) et es-ce que je rabat aussi pour le dos où pas. Pouvez vous me dire si je suis obligé de faire les fleurs pour le bon fonctionnement de l'ouvrage Merci beaucoup pour vos réponse.
29.03.2016 - 09:14DROPS Design answered:
Bonjour Pat, en fait, on n'a pas besoin de vraiment rabattre, on va seulement laisser 1 rapport pour les emmanchures et crocheter chaque devant sur 2 motifs et le dos sur 4 motifs seulement - en laissant donc "non travaillé" 1 motif sur les côtés pour former les emmanchures. Continuez/ajuster le motif comme vous préférez avant les emmanchures. Bon crochet!
29.03.2016 - 11:31
![]() Pat wrote:
Pat wrote:
Bonjour j'ai bien mes 10 motifs mais pour diviser l'ouvrage je ne trouve pas comme vous je ne dois pas bien comprendre. Et faut t' il diminuer le dos et les devants ? merci d'avance pour votre réponse.
12.03.2016 - 20:23DROPS Design answered:
Bonjour Pat, sur les 10 motifs, les 2 motifs de chaque côté (= début et fin de rangs) seront pour les devants, et les 4 motifs du milieu pour le dos, il reste entre chaque devant et le dos 1 motif qui forme l'emmanchure. Crochetez maintenant le devant droit sur les 2 premiers motifs à partir du bord devant, puis le devant gauche sur les 2 premiers motifs de l'autre côté, et enfin le dos sur les 4 motifs du milieu. Bon crochet!
14.03.2016 - 08:39
![]() Sinikka wrote:
Sinikka wrote:
Ohjeessa sanottu lankamäärä ei riittänyt alkuunkaan, eikä vielä yksi ylimääräinenkään lankakerä! Hihat oli jätettävä lyhyemmiksi. Muuten tein aivan ohjeen mukaan.
24.10.2015 - 13:20
![]() A. Wisselink wrote:
A. Wisselink wrote:
Bij de panden verdelen jullie in tweeën, moet vlgs mij in drieen zijn. Als je engels goed vertaald naar Nederlands is het duidelijker. Kijk engelse versie nog maar eens goedna.
04.10.2015 - 14:13DROPS Design answered:
Hallo. Wij hebben het patroon nagekeken en aangepast waar nodig.
12.10.2015 - 15:23
![]() LE PLEUX wrote:
LE PLEUX wrote:
Bonjour, Je crois comprendre qu'il faut monter 201 mailles, ensuite 1er rang de la maille serrée, sur le 2 eme rang combien dois-je avoir d'arcades entre les brides ? cela me paraît bien trop grand en tour de taille, peut-être n'ai-je pas compris l'explication ? modèle en muskat, drops 68-15, si vous pouvez m'aider, merci.
10.08.2015 - 15:57DROPS Design answered:
Bonjour Mme Le Pleux, On monte une chaînette de 201 ml et on crochète 1 fois M1 en hauteur soit 10 fois en largeur (21 ms x 10) et on a un total de 60 arceaux au rang 2. Pensez à bien vérifier et conserver la bonne tension soit 1 fois le diagramme en largeur = 9 cm de large environ. Bon crochet!
10.08.2015 - 18:55
|
|||||||||||||||||||||||||||||||||||||
Midnight Lace |
|||||||||||||||||||||||||||||||||||||
|
|
|||||||||||||||||||||||||||||||||||||
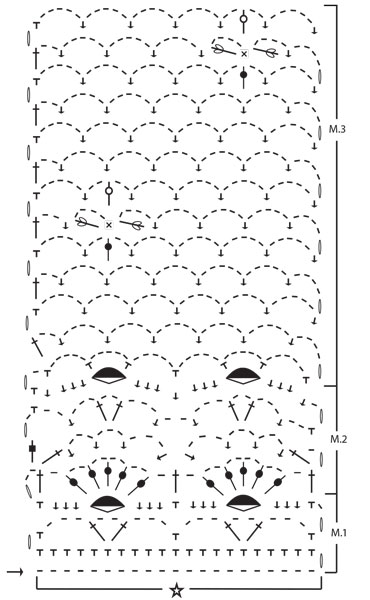
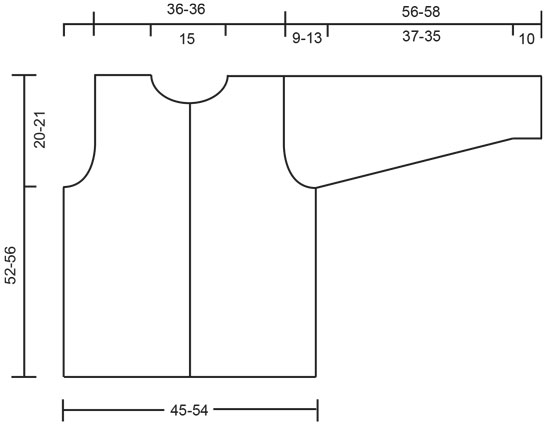
Crocheted Cardigan in DROPS Muskat. Piece is worked bottom up with lace pattern and flower pattern. Size M-L/XL.
DROPS 68-15 |
|||||||||||||||||||||||||||||||||||||
|
Tension: 1 diagram = approx. 9 cm in width. 12 rows of Pattern 2 = approx. 10 cm in height. Pattern: See chart. The pattern is seen from the right side. «1 rapport» = «1 repeat». Note: All measurements in pattern refer to the garment when held up or worn, because the pattern pulls in and lengthens. Body: Ch 201-241 loosely. Turn and crochet Pattern 1 once across row (10-12 repeats = 60-72 ch-st bows). Then crochet Pattern 2 on the next row and repeat a total of 5 times, the piece measures approx. 20 cm. Crochet Pattern 3. At the same time when the piece measures approx. 32-35 cm divide and crochet each part of Body separately. Each front = 2 repeats; back = 4 repeats, bind off 1-2 repeats at each side for armhole. Right front: Continue with Pattern 3 over 2 repeats starting at center front. When the piece measures approx. 42-46 cm adjust to finish after 1 flower) continue with Pattern 3 but do not make flowers. At the same time shape the neck as follows: Crochet until 2 ch-st bows remain at center front. Turn and crochet back. Then crochet over 1 less ch-st bow at neck edge of every other row 3 times. Continue to crochet in pattern until the piece measures 52-56 cm, fasten off. Left front: Crochet the same as right front, reversing all shaping. Back: Continue to crochet Pattern 3 until piece measures approx. 42-46 cm, then crochet the rest without flowers (as on front). When the piece measures approx. 49-53 cm crochet the next row as follows: 7 ch-st bows = shoulder, dc over the following 10 ch-st bows = neck (crochet 1 dc in every ch-st bow and 1 dc in every dc between bows), 7 ch-st bows = shoulder. Finish with 1 row of ch-st bows on each shoulder. The piece measures approx. 52-56 cm, fasten off. Sleeve: Ch 51-51 loosely. Turn and crochet Pattern 1 once across row (2.5 repeats = 15 ch-st bows), then crochet Pattern 2 twice, then continue in Pattern 3. When the piece measures approx. 10 cm inc 1 ch-st bow at end of row on alternately right and left side of piece a total of 8-10 times, inc at the end of every 3rd and 4th rows - make inc by ch 4, then 1 dc in the last sc from previous row = 23-25 ch-st bows on row. Continue until piece measures approx. 52-54 cm. Then crochet over 1 less ch-st bow at end of every row until the piece measures 56-58 cm, fasten off. Assembly: Crochet together shoulder seams as follows: * 1 dc in first ch-st bow on front, ch 1, 1 dc in first ch-st bow on back, ch 1 *, repeat from * - * on each shoulder. Crochet together the sleeve as follows from bottom edge: * 1 dc in one side, ch 2, 1 dc in *, repeat from * - * until approx. 5-9 cm remains. Crochet sleeves to Body in the same way as sleeves were crocheted together. Crochet 1 row dc along both button bands and around the neck - crochet snugly around the neck so that the neckline will not sag. Buttonhole loops: Make 3 buttonhole loops along right front. Start at top edge: * 1 dc, ch 3, fasten with 1 dc 1 cm below, sl st approx. 8-9 cm lower on band * repeat from * - * until there are 3 loops. Sew on buttons on left front. |
|||||||||||||||||||||||||||||||||||||
Diagram explanations |
|||||||||||||||||||||||||||||||||||||
|
|||||||||||||||||||||||||||||||||||||
 |
|||||||||||||||||||||||||||||||||||||
 |
|||||||||||||||||||||||||||||||||||||
Have you finished this pattern?Tag your pictures with #dropspattern or submit them to the #dropsfan gallery. Do you need help with this pattern?You'll find 7 tutorial videos, a Comments/Questions area and more by visiting the pattern on garnstudio.com. © 1982-2026 DROPS Design A/S. We reserve all rights. This document, including all its sub-sections, has copyrights. Read more about what you can do with our patterns at the bottom of each pattern on our site. |
|||||||||||||||||||||||||||||||||||||


With over 40 years in knitting and crochet design, DROPS Design offers one of the most extensive collections of free patterns on the internet - translated to 17 languages. As of today we count 325 catalogues and 12298 patterns translated into English (UK/cm).
We work hard to bring you the best knitting and crochet have to offer, inspiration and advice as well as great quality yarns at incredible prices! Would you like to use our patterns for other than personal use? You can read what you are allowed to do in the Copyright text at the bottom of all our patterns. Happy crafting!
Post a comment to pattern DROPS 68-15
We would love to hear what you have to say about this pattern!
If you want to leave a question, please make sure you select the correct category in the form below, to speed up the answering process. Required fields are marked *.