
Popular categories
Looking for a yarn?


Comments / Questions (118)
![]() Paula Snow wrote:
Paula Snow wrote:
I am beginning an advanced project for me, the midnight lace cardigan. I do not see instructions for Pattern 1, 2, 3, 4. Where will I find these please?
25.10.2017 - 22:56DROPS Design answered:
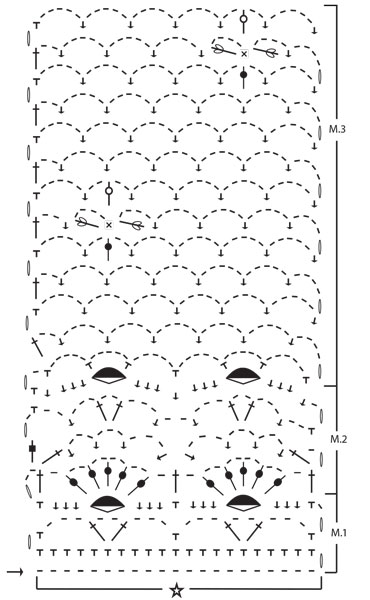
Dear Mrs Snow, you will find diagrams to pattern 1, 2 and 3 at the bottom of the page: Pattern 1 = M1, pattern 2 = M2, pattern 3 = M3. Scroll down the page to find also 2 videos showing how to work the diagrams. Happy crocheting!
26.10.2017 - 09:55
![]() Paula wrote:
Paula wrote:
I am ready to start crocheting the fronts, back and I don't understand How to decrease for the armholes and the shaping of the neck. are there more clear directions
01.08.2017 - 21:27DROPS Design answered:
Dear Paula, for armholes, work each front piece over 2 repeats from each side and leaving unworked 1-2 repeats after right front piece and before left front piece, work back piece over the remaining middle repeats for back piece. To shape neck on front piece, work row from shoulder towards neck leaving 2 ch-spaces unworked towards neck (at the end of row from WS for right front piece), work next row from RS and at the end of next row from WS leave 1 ch-space unworked towards neck, turn and repeat the last 2 rows 2 more times. Happy crocheting!
02.08.2017 - 09:07Norma Frost wrote:
Hello from Canada and thank you for such a lovely pattern. I received it with picture but no pattern. I do not know what stitches of crochet I would have to use also the rows. I received the pictures of the graphes were not numbered 1 2 or 3. Where to go for that as well. Any information would be really appreciated. With blessings Norma
14.05.2017 - 20:06DROPS Design answered:
Dear Mrs Frost, you'll find the pattern in US-English here - you'll also find videos showing how to work the diagrams M.1 & M.2 + M.3 at the very bottom of the page. Happy crocheting!
15.05.2017 - 09:41
![]() Rianne wrote:
Rianne wrote:
Ik wil dit vestje graag gaan halen, maar twijfel door het lezen over de 'lubber-problemen'. Kan er iemand melden hoe het uiteindelijke resultaat is geworden?
05.05.2017 - 21:47
![]() Betsy Schoormans wrote:
Betsy Schoormans wrote:
Hallo, nog even over mijn vorige vraag over patroon 3. In de handwerkwinkel waar ik net geweest ben adviseerden ze mij om met 1 naald maat dunner te haken. Dus met 3 i.p.v. 4. Boogjes van 4 had ik inderdaad ook al aan gedacht. Ik ga het nu eerst op naald nr. 3 proberen. Bedankt voor uw snelle reactie.
19.04.2017 - 13:45DROPS Design answered:
Hoi Betsy, Dat is ook een goed idee. Bedankt voor het doorgeven van de tip en veel haakplezier!
19.04.2017 - 21:47
![]() Betsy Schoormans wrote:
Betsy Schoormans wrote:
Bij patroon 3 wordt het bij mij ook veel wijder, deze opmerking heb ik hierboven al meer gelezen, maar geen oplossing gevonden. Hebt u hier inmiddels een oplossing voor? Is het voldoende als ik i.p.v 5 losse, 4losse boogjes maak? Ik zou graag een foto meesturen maar dat kan hier helaas niet.
19.04.2017 - 06:54DROPS Design answered:
Hoi Betsy, Het klopt dat M3 veel wijder wordt tijdens het haken. Bij dit patroon gelden de afmetingen voor als het vest gedragen wordt. Als het mogelijk is probeer het vest hangend op te meten of een beetje uitgerekt. Je bent natuurlijk vrij om het patroon voor jezelf aan tepassen en lossenboogjes van 4 te maken, ipv 5.
19.04.2017 - 11:11
![]() Lois Nordling wrote:
Lois Nordling wrote:
The directions say to use Pattern 1, Pattern 2 and Pattern 3. No where on the pages does it explain these patterns. What am I missing?
15.04.2017 - 21:01DROPS Design answered:
Dear Lois, the patterns are not written out, but you find the charts at the bottom of the pattern. You have to follow the chart. I hope this helps. Happy knitting.
15.04.2017 - 22:42
![]() Cathy Van Beek wrote:
Cathy Van Beek wrote:
Ik haak met Muskat en de stekenverhouding is iets anders, maar dat kwam goed uit omdat ik de maat iets wilde aanpassen. En ik heb de stekenverhouding uitgeprobeerd met de patronen 1 en 2, maar niet met patroon 3. Ik zou nu ipv 5 lossen per boogje, 4 of misschien wel 3 haken. Dat ga ik waarschijnlijk alsnog proberen, dan komt het beter uit, denk ik.
29.08.2016 - 12:12DROPS Design answered:
Hoi Cathy. Succes en veel haakplezier verder.
30.08.2016 - 12:14
![]() Cathy Van Beek wrote:
Cathy Van Beek wrote:
Ik ben het vestje aan het haken en ben bezig met het voorpand. Vanaf dat ik bezig ben met patroon 3 lubbert het haakwerk wel heel erg. Er staat ergens dat het haakweerk in de lengte uitrekt door de zwaarte van de rand. Maar hoever rekt het uit en hoe moet ik meten? Moet ik het werk meten als het op tafel ligt of moet ik het 'uitgerekt' meten? Ik heb nu het gevoel dat ik pas, als ik klaar ben, weet of het goed is.
27.08.2016 - 12:01DROPS Design answered:
Hoi Cathy. Haak je misschien een beetje losser dan de stekenverhouding of met een ander soort garen, dat zou het lubberen veroorzaken. Ik zou meten als je het garen ophoudt, en als je dat niet kan, leg op tafel en rek lichtjes.
29.08.2016 - 11:50
![]() Elise Terhorst wrote:
Elise Terhorst wrote:
K ben bezig met het vestje te haken: Drops 68 patroonnr 15. Ik weet niet hoe ik het met de armsgaten moet doen. Er staat niet duidelijk omschreven wanneer en op welke hoogte je moet beginnen met de armsgaten. Kunnen jullie mij dit misschien uitleggen? Ook bij welke breedte je moet beginnen met de armsgaten? Met vriendelijke groet,Elise
21.07.2016 - 17:13DROPS Design answered:
Hoi Elise. In het patroon staat: Splits het werk bij een hoogte van ca. 32-35 cm en haak de voorpanden en het achterpand afzonderlijk verder = hier begint dus de armsgaten op het lijf.
22.07.2016 - 11:06
|
|||||||||||||||||||||||||||||||||||||
Midnight Lace |
|||||||||||||||||||||||||||||||||||||
|
|
|||||||||||||||||||||||||||||||||||||
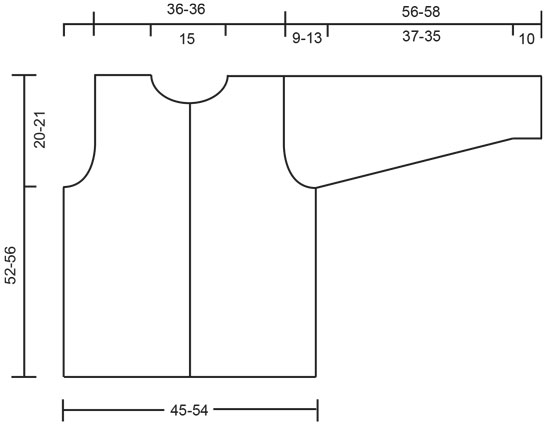
Crocheted Cardigan in DROPS Muskat. Piece is worked bottom up with lace pattern and flower pattern. Size M-L/XL.
DROPS 68-15 |
|||||||||||||||||||||||||||||||||||||
|
Tension: 1 diagram = approx. 9 cm in width. 12 rows of Pattern 2 = approx. 10 cm in height. Pattern: See chart. The pattern is seen from the right side. «1 rapport» = «1 repeat». Note: All measurements in pattern refer to the garment when held up or worn, because the pattern pulls in and lengthens. Body: Ch 201-241 loosely. Turn and crochet Pattern 1 once across row (10-12 repeats = 60-72 ch-st bows). Then crochet Pattern 2 on the next row and repeat a total of 5 times, the piece measures approx. 20 cm. Crochet Pattern 3. At the same time when the piece measures approx. 32-35 cm divide and crochet each part of Body separately. Each front = 2 repeats; back = 4 repeats, bind off 1-2 repeats at each side for armhole. Right front: Continue with Pattern 3 over 2 repeats starting at center front. When the piece measures approx. 42-46 cm adjust to finish after 1 flower) continue with Pattern 3 but do not make flowers. At the same time shape the neck as follows: Crochet until 2 ch-st bows remain at center front. Turn and crochet back. Then crochet over 1 less ch-st bow at neck edge of every other row 3 times. Continue to crochet in pattern until the piece measures 52-56 cm, fasten off. Left front: Crochet the same as right front, reversing all shaping. Back: Continue to crochet Pattern 3 until piece measures approx. 42-46 cm, then crochet the rest without flowers (as on front). When the piece measures approx. 49-53 cm crochet the next row as follows: 7 ch-st bows = shoulder, dc over the following 10 ch-st bows = neck (crochet 1 dc in every ch-st bow and 1 dc in every dc between bows), 7 ch-st bows = shoulder. Finish with 1 row of ch-st bows on each shoulder. The piece measures approx. 52-56 cm, fasten off. Sleeve: Ch 51-51 loosely. Turn and crochet Pattern 1 once across row (2.5 repeats = 15 ch-st bows), then crochet Pattern 2 twice, then continue in Pattern 3. When the piece measures approx. 10 cm inc 1 ch-st bow at end of row on alternately right and left side of piece a total of 8-10 times, inc at the end of every 3rd and 4th rows - make inc by ch 4, then 1 dc in the last sc from previous row = 23-25 ch-st bows on row. Continue until piece measures approx. 52-54 cm. Then crochet over 1 less ch-st bow at end of every row until the piece measures 56-58 cm, fasten off. Assembly: Crochet together shoulder seams as follows: * 1 dc in first ch-st bow on front, ch 1, 1 dc in first ch-st bow on back, ch 1 *, repeat from * - * on each shoulder. Crochet together the sleeve as follows from bottom edge: * 1 dc in one side, ch 2, 1 dc in *, repeat from * - * until approx. 5-9 cm remains. Crochet sleeves to Body in the same way as sleeves were crocheted together. Crochet 1 row dc along both button bands and around the neck - crochet snugly around the neck so that the neckline will not sag. Buttonhole loops: Make 3 buttonhole loops along right front. Start at top edge: * 1 dc, ch 3, fasten with 1 dc 1 cm below, sl st approx. 8-9 cm lower on band * repeat from * - * until there are 3 loops. Sew on buttons on left front. |
|||||||||||||||||||||||||||||||||||||
Diagram explanations |
|||||||||||||||||||||||||||||||||||||
|
|||||||||||||||||||||||||||||||||||||
 |
|||||||||||||||||||||||||||||||||||||
 |
|||||||||||||||||||||||||||||||||||||
Have you finished this pattern?Tag your pictures with #dropspattern or submit them to the #dropsfan gallery. Do you need help with this pattern?You'll find 7 tutorial videos, a Comments/Questions area and more by visiting the pattern on garnstudio.com. © 1982-2026 DROPS Design A/S. We reserve all rights. This document, including all its sub-sections, has copyrights. Read more about what you can do with our patterns at the bottom of each pattern on our site. |
|||||||||||||||||||||||||||||||||||||


With over 40 years in knitting and crochet design, DROPS Design offers one of the most extensive collections of free patterns on the internet - translated to 17 languages. As of today we count 325 catalogues and 12298 patterns translated into English (UK/cm).
We work hard to bring you the best knitting and crochet have to offer, inspiration and advice as well as great quality yarns at incredible prices! Would you like to use our patterns for other than personal use? You can read what you are allowed to do in the Copyright text at the bottom of all our patterns. Happy crafting!
Post a comment to pattern DROPS 68-15
We would love to hear what you have to say about this pattern!
If you want to leave a question, please make sure you select the correct category in the form below, to speed up the answering process. Required fields are marked *.