
Popular categories
Looking for a yarn?


Comments / Questions (27)
![]() Bonnie Robinson wrote:
Bonnie Robinson wrote:
Beautiful!
30.05.2015 - 20:18
![]() Carmen Vallée wrote:
Carmen Vallée wrote:
Belles lignes dorsales
30.05.2015 - 16:14
![]() Kerstin Lundqvist wrote:
Kerstin Lundqvist wrote:
Som vanligt många fina mönster.
28.05.2015 - 17:21
![]() Marianne Diehl wrote:
Marianne Diehl wrote:
Sehr schönes Model auch wenn man nicht mehr 20 ist. Werde ich sehr gerne nachstricken. Wirkung auch durch den schönen Farbverlauf
28.05.2015 - 15:16
![]() Dagmar Dow wrote:
Dagmar Dow wrote:
I like the pattern, but I would make it into a sweater.
28.05.2015 - 05:45
![]() Elisabeth Dyndale wrote:
Elisabeth Dyndale wrote:
Flotte farger og artig fasong. Lekker.
27.05.2015 - 21:33
![]() Eva Pihlgrne wrote:
Eva Pihlgrne wrote:
Nått nytt , KUL
27.05.2015 - 14:03
|
||||||||||||||||
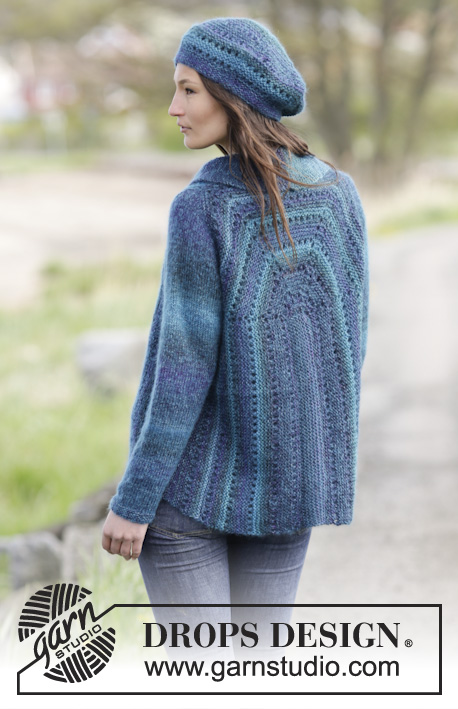
Blue Danube#bluedanubecardigan |
||||||||||||||||
 |
 |
|||||||||||||||
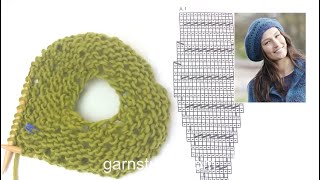
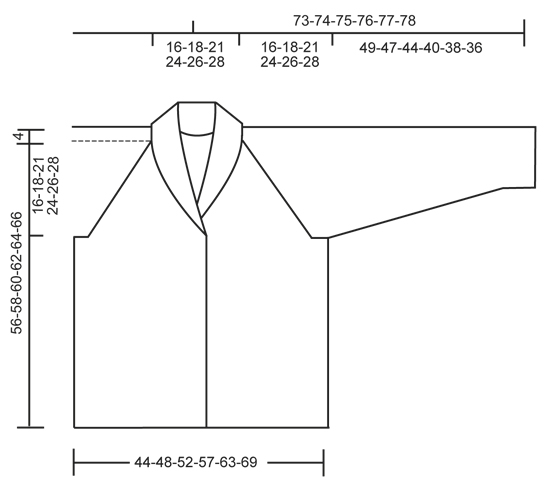
Set consists of: Knitted DROPS jacket and hat in garter st with eyelet rows in ”Delight” and ”Kid-Silk”. Size: S - XXXL.
DROPS 166-34 |
||||||||||||||||
|
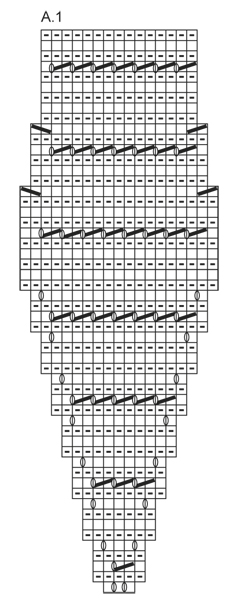
GARTER ST (back and forth): K all rows. 1 ridge = 2 rows K. EYELET PATTERN: Work 1 row from RS as follows: * K 2 tog, 1 YO *, repeat from *-*. K 1 row from WS. Work 5 ridges. Repeat these 12 rows. ---------------------------------------------------------- BACK PIECE: Worked back and forth on circular needle from the middle and outwards. Work in GARTER ST and EYELET PATTERN- see explanation above. Cast on 68-68-66-64-64-64 sts on circular needle size 5 mm with 1 strand Delight and 1 strand Kid-Silk (= 2 strands). Work 7 ridges. Work next row as follows - from RS: Work 68-68-66-64-64-64 sts, pick up 1 st in every ridge along short side, and pick up 1 st in every st from cast-on edge = 143-143-139-135-135-135 sts. K 1 row from WS. Work next row as follows - from RS. Work 68-68-66-64-64-64 sts, 1 YO, K 1, 1 YO, K 2, 1 YO, K 1, 1 YO, K 2, 1 YO, K 1, 1 YO, K 68-68-66-64-64-64. K 3 rows over all sts (K YOs to make holes). Work next row as follows - from RS: Work 68-68-66-64-64-64 sts, 1 YO, K 3, 1 YO, K 2, 1 YO, K 3, 1 YO, K 2, 1 YO, K 3, 1 YO, K 68-68-66-64-64-64. K 1 row over all sts (K YOs to make holes). Then work EYLET PATTERN - see explanation above. NOTE: Do not work eyelet pattern over the 2 sts worked K between YOs - these are always worked in garter st and if you have an odd number of stitches to work the eyelet pattern on, work the last stitch as K 1. Work the first 2 rows in eyelet pattern, then inc as before, there are now 5 sts between YOs – this number of sts increases as the inc continue, inc on every 4th row 11-13-15-17-19-21 more times (= 6 inc per time). K YOs to make holes. Continue with eylet pattern and inc. REMEMBER THE KNITTING TENSION After all inc are done there are 227-239-247-255-267-279 sts on needle. Now work as follows from RS. Slip the first 68-68-66-64-64-64 sts on a stitch holder (work them first), cast off the next 91-103-115-127-139-151 sts = 68-68-66-64-64-64 sts remain on row. Work 3 ridges over these sts. Cast off. Slip the 68-68-66-64-64-64 sts from stitch holder back on needle, work 3 ridges over these sts. Cast off. LEFT FRONT PIECE: Cast on 68-68-66-64-64-64 sts on circular needle size 5 mm with 1 strand Delight and 1 strand Kid-Silk (= 2 strands). Work 9 ridges. Work next row as follows - from RS: Work 68-68-66-64-64-64 sts, pick up 1 st in every ridge along short side = 77-77-75-73-73-73 sts. K 1 row from WS. Work next row as follows - from RS: Work 68-68-66-64-64-64 sts, 1 YO, K 1, 1 YO, K 2, 1 YO, K 1, K 5 (= band). K 3 rows over all sts (K YOs to make holes). Work next row as follows - from RS: Work 68-68-66-64-64-64 sts, 1 YO, K 3, 1 YO, K 2, 1 YO, K 2, K 5. K 1 row over all sts (K YOs to make holes). Then work EYELET PATTERN - see explanation above. NOTE: Do not work eyelet pattern over the 2 sts worked K between YOs or the last 5 sts on needle - these are always worked in garter st and if you have an odd number of stitches to work the eyelet pattern on, work the last stitch as K 1. Work the first 2 rows in eyelet pattern, then inc as before, there are now 5 sts between the first 2 YOs and 3 sts between the last YO and band – this no inc as inc continue, inc on every 4th row 11-13-15-17-19-21 more times (= 3 inc per time). K YOs to make holes. Continue with eyelet pattern and inc. After all inc are done there are 119-125-129-133-139-145 sts on needle. Now work as follows from WS. Slip the first 22-24-26-28-30-32 sts on a stitch holder, cast off the next 29-33-37-41-45-49 sts = 68-68-66-64-64-64 sts remain on row. Work 3 ridges over these sts. Cast off. Slip the 22-24-26-28-30-32 sts from stitch holder on needle. Continue in garter st and short rows over collar as follows: * 1 ridge over all sts, 1 ridge over the outermost 11-12-13-14-15-16 sts towards mid front *, repeat from *-* until collar measures 12-14-15-16-17-18 cm on the shorter side. Loosely cast off. RIGHT FRONT PIECE: Cast on 68-68-66-64-64-64 sts on circular needle size 5 with 1 strand Delight and 1 strand Kid-Silk (= 2 strands). Work 3 ridges. On next row from RS cast off for button holes as follows: K 6 sts, * K 2 tog, 1 YO, K 10 *, repeat from *-* 3 times, K 2 tog, 1 YO, K 24-24-22-20-20-20. Continue in garter st until 9 ridges have been worked. K 1 row from RS, thereafter K next row from WS as follows: K 68-68-66-64-64-64, knit up 1 st in each ridge along the shortside = 77-77-75-73-73-73 sts. Work next row as follows from RS: 5 sts in garter st (= band), K 1, 1 YO, K 2, 1 YO, K 1, 1 YO, K the last 68-68-66-64-64-64 sts. Continue from here as on left front piece but reversed. SLEEVES: Worked in the round on double pointed needles. Cast on 36-38-40-42-44-46 sts on double pointed needles size 5 mm with 1 strand Delight and 1 strand Kid-Silk (= 2 strands). Work 4 ridges in GARTER ST – see explanation above, then work stocking st. Insert 1 marker at beg of round = mid under sleeve. When piece measures 8 cm, inc 1 st on each side of marker, repeat inc every 3-3-2½-2-2-1½ cm 11-11-12-13-14-14 more times = 60-62-66-70-74-76 sts. When piece measures 49-47-44-40-38-36 cm, cast off 6 sts mid under sleeve (= cast off 3 sts on each side of marker) = 54-56-60-64-68-70 sts. Now dec 1 st in each side as follows: Dec every 4th row 0-0-0-2-3-4 times, every other row 16-19-23-23-24-24 times, then every row 4-2-0-0-0-0 times = 14 sts. Cast off. ASSEMBLY: Sew side seams. Sew in sleeves, they should be sewn as a raglan against the diagonal sides on front and back piece. Sew the openings under the sleeves. Sew the collar tog mid back and sew it to the neckline. Sew the buttons on to the left band. ---------------------------------------------------------- HAT: GARTER ST (worked in the round): * K 1 round and P 1 round *, repeat from *-*. 1 ridge = 2 rounds. PATTERN: See diagram A.1. ---------------------------------------------------------- HAT: Worked in the round, top down. Work first double pointed needles, then on circular needle. Cast on 18 sts on double pointed needles size 5 mm with 1 strand Delight and 1 strand Kid-Silk (= 2 strands). Work according to diagram A.1 (= 6 repetitions in width). Switch to circular needle when needed. REMEMBER THE KNITTING TENSION When A.1 has been worked 1 time vertically, there are 90 sts on needle. Switch to circular needle size 4 mm. Work in GARTER ST – see explanation above – over all sts until piece measures 21 cm. Cast off. Use a needle and thread, baste the hole at the top of the hat. Tighten and fasten. To shape the hat place it in water when finished and thread it over a plate. Leave to dry on plate. Repeat the process when it has been washed. |
||||||||||||||||
Diagram explanations |
||||||||||||||||
|
||||||||||||||||
 |
||||||||||||||||
 |
||||||||||||||||
Have you finished this pattern?Tag your pictures with #dropspattern #bluedanubecardigan or submit them to the #dropsfan gallery. Do you need help with this pattern?You'll find 23 tutorial videos, a Comments/Questions area and more by visiting the pattern on garnstudio.com. © 1982-2026 DROPS Design A/S. We reserve all rights. This document, including all its sub-sections, has copyrights. Read more about what you can do with our patterns at the bottom of each pattern on our site. |
||||||||||||||||


With over 40 years in knitting and crochet design, DROPS Design offers one of the most extensive collections of free patterns on the internet - translated to 17 languages. As of today we count 324 catalogues and 12290 patterns translated into English (UK/cm).
We work hard to bring you the best knitting and crochet have to offer, inspiration and advice as well as great quality yarns at incredible prices! Would you like to use our patterns for other than personal use? You can read what you are allowed to do in the Copyright text at the bottom of all our patterns. Happy crafting!
Post a comment to pattern DROPS 166-34
We would love to hear what you have to say about this pattern!
If you want to leave a question, please make sure you select the correct category in the form below, to speed up the answering process. Required fields are marked *.