
Popular categories
Looking for a yarn?


Comments / Questions (156)
![]() Ines Schleicher wrote:
Ines Schleicher wrote:
Ja es bezieht sich auf Teil 1 & 2. Wo sitzt die Naht mit dem 2. Markierer (an der Links und rechts davon ein Umschlag gemacht wird).
08.08.2016 - 09:24Ines Schleicher answered:
Sorry für meine Frage heute Morgen, ich habe die Antwort auf meinen Fehler gefunden. Ich habe die Umschläge falsch gesetzt, hinter und nicht vor dem Markierer. Dadurch lief die Zunahme zur Brust und nicht zum Bauch. Sorry!
08.08.2016 - 18:08
![]() Ines Schleicher wrote:
Ines Schleicher wrote:
Guten Morgen, Ich habe Teil 1 & 2 fertig gestrickt. Komme jetzt nicht weiter, da ich irgendetwas falsch gemacht habe. Bei mir neigen die Zunahmen vom 1. und 3. Markierer Richtung Halsausschnitt und die Masche mit dem Markierer an der Seite aussen. Eigentlich dürften laut Schnittmuster nur 2 Zunahmen sein, da dass Mittelteil zum Schluss gestrickt wird. Oder? Mit freundlichen Grüßen I. Schleicher
08.08.2016 - 08:22DROPS Design answered:
Liebe Ines, bezieht sich Ihre Frage auf Teil 1 und Teil 2? An den Markierern wird dort zugenommen wie oben in der Anleitung unter "DOMINOQUADRAT" beschrieben.
08.08.2016 - 08:47
![]() Anna De La Motte wrote:
Anna De La Motte wrote:
Hej ! Jag har börjat sticka 161-25 och börjat med dominoruta del 1 varv 1 till 3 går bra men hur gör man varv 4 det står att man ska sticka som varv 2 men ska jag sticka nästa omslag före det omslag på varv 2 innan markör 1 ?.Anna
03.07.2016 - 11:42
![]() Paula Heiskanen wrote:
Paula Heiskanen wrote:
Kun kirjoitat, että etureunassa ei neulota enää lyhennettyjä kerroksia ja radoitusta, ymmärrän, että tarkoitat viimeistä 4 cm eli nappilistaa. Mutta sitä ennen on tuo raidoituspätkä ja sèn neulomista olen näillä lukuisilla kysymyksilläni yrittänyt selvittää.
26.05.2016 - 17:43
![]() Paula Heiskanen wrote:
Paula Heiskanen wrote:
Onkohan ongelman ydin nyt se, että tuo raidoitusosuus sekä etukappaleessa että helmassa olisi pitänyt neuloa erikseen? Kuvassa näyttää siltä, että raidoitus on neulottu koko etureunan matkalle(=etukappale ja helma) samalla kerroksella. Koko ajan olen yrittänyt selvittää miten tuo raidoitus tehdään, mutta tuntuu ettemme ymmärrä toisiamme.
26.05.2016 - 17:38DROPS Design answered:
Nyt ymmärrän mitä tarkoitat! En ole varma milloin nuo raidat tehdään, näyttää siltä että ne eivät olisi ohjeessa mukana. Selvitän asian Norjan kautta ja palaan vastauksella piakkoin. Teemme tarvittaessa ohjeeseen korjauksen.
01.06.2016 - 16:37
![]() Paula Heiskanen wrote:
Paula Heiskanen wrote:
Hei,kokeilin niin, että aloitin etukappaleen oikealta puolelta, tein oikean ja sitten nurjan kierroksen ocean view -värillä. Jatkoin nurjalta puolelta helmaan ja neuloin lyhennetyt kierrokset. Palasin lyhennettyjen kerrosten jälkeen helman ja etukappaleen yhtymäkohtaan ja vaihdoin värin. Nyt käy niin, että tuo värin vaihtotekee helmaan sen nurjan kerrokmsen oikealle puolelle. Kerrotko mistä oikean puolen etukappale aloitetaan ja missä värin vaihto tapahtuu?
26.05.2016 - 09:27DROPS Design answered:
Kun neulot ensimmäisen kerroksen oikealta puolelta, aloitat sen neulomisen helmasta. Etureunassa ei siis enää neulota lyhennettyjä kerroksia, eikä myöskään raidoitusta.
26.05.2016 - 14:26
![]() Paula Heiskanen wrote:
Paula Heiskanen wrote:
Kiitos kärsivällisyydestäsi kysymysteni osalta. Eli tarkoittaako tämä oikealta puolelta aloittaminen sitä, että aloitan neulomisen helmasta, muutoinhan en ymmärtääkseni voi neuloa etukappaletta oikealta puolelta ja saa värinvaihtoa oikealle kerrokselle. Tässä tapauksessa taas lyhennettyjen kerrosten kanssa tulee onglema, miten ne neulotaan?
26.05.2016 - 08:41
![]() Paula Heiskanen wrote:
Paula Heiskanen wrote:
Kyllä olen yhdistänyt kappaleet ja neulonut lyhennetyt kerrokset. Vasen etureuna ongelmitta. Oikeaan etureunaan muodostuu etupuolelle nurja kerros, jos ohjeen mukaan aloitetaan nurjalta puolelta ja jatketaan ensin raidoitusta ja sen jälkeen nappilista. Raidoituksen värin vaihto tekee sen, että tuo nurja kerros tuleekin nyt etupuolelle. Miten tuo oikea etureuna tulee tehdä?
23.05.2016 - 14:42DROPS Design answered:
Tuossa ohje on hieman epäselvä, koska siinä ei lue että oikean etukappaleen viimeinen krs tulisi olla oikean puolen krs. Sinun tulee kuitenkin jatkaa ainaoikein -neuletta siten, että työhön ei muodostu tuo nurja krs. Eli jos neuloit etukappaleen viimeisen kerroksen nurjalta puolelta, sinun tulee nyt etureunassa jatkaa ainaokeinneuletta oikealta puolelta. Neuloisin tuon ensimmäisenkin kerroksen ocean view -langalla.
24.05.2016 - 14:08
![]() Paula Heiskanen wrote:
Paula Heiskanen wrote:
Hei,kiitos, mutta vastaus ei auttanut minua. Ongelma on juurikin se, että ohje tältä osin on puutteellinen. Jatkan ilmeisesti raidoitusta. Ovatko viimeiset 4 cm pelkällä ocean view värillä? Jatketaanko helmassa (=dominoruudun kohdalla) edelleen lyhennettyjä kerroksia? Pikaista selvennystä toivoen.
21.05.2016 - 21:58DROPS Design answered:
Oletko jo yhdistänyt kappaleet ja neulonut tämän vaiheen yhteydessä olevat lyhennetyt kerrokset? (Tämä on nappilistojen vieressä oleva raidoitettu osuus.) Kunhan olet yhdstänyt kaikki kappaleet ohjeen mukaan, voit ottaa etukappaleen apulangalla odottavat silmukat takaisin työhön ja neulo viimeiset 4 cm ocean view värillä. Näiden 4 cm:n kohdalla ei enää neulota lyhennettyjä kerroksia.
23.05.2016 - 14:26
![]() Paula Heiskanen wrote:
Paula Heiskanen wrote:
Olen edennyt vas. ja oik. etureunaan asti ongelmitta, kiitos hyvistä ohjeista. Nyt en pääse eteenpäin. Ohjeen mukaan jatketaan ocean view värisellä langalla, mutta kuvan mukaan etureunassa jatkuu ensin raidoitus ja vasta nappilista olisi yksivärinen. Onko näin? Ohjeessa ei mainita raidoitusta
17.05.2016 - 21:37DROPS Design answered:
Hei! Etureunat, eli nappilistat, neulotaan kokonaan ocean view värisellä langalla. Jatkat vaan neulomista ohjeen mukaan, niin jakusta tulee kuvan mukainen.
18.05.2016 - 15:59
|
||||||||||||||||
Lady Grey#ladygreyjacket |
||||||||||||||||
 |
 |
|||||||||||||||
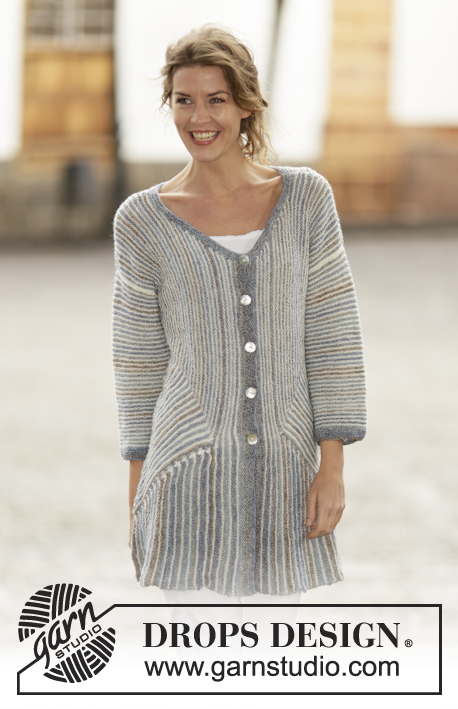
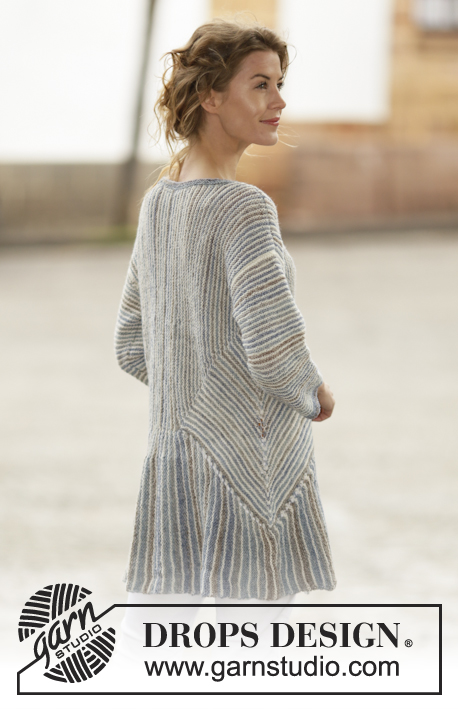
Knitted DROPS jacket in garter st with stripes and domino squares in ”Fabel”. Size: S - XXXL.
DROPS 161-25 |
||||||||||||||||
|
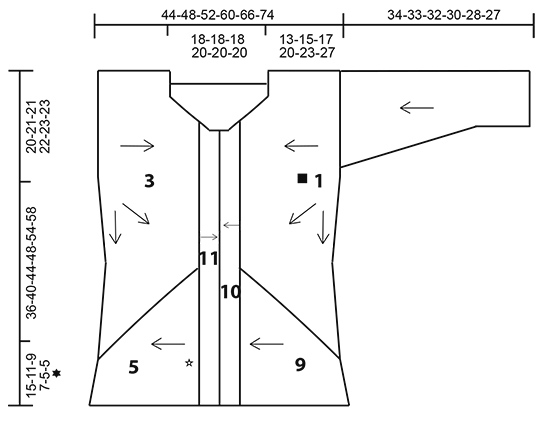
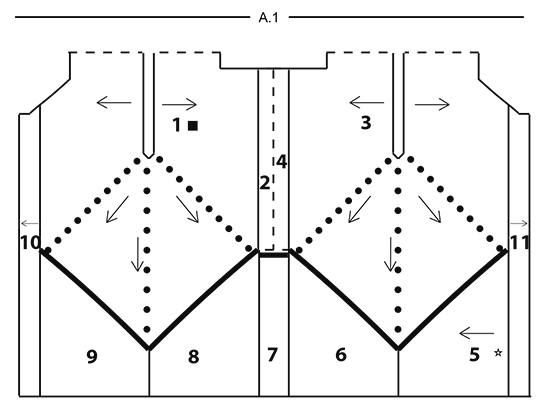
RIDGE/GARTER STITCH (worked back and forth): 1 ridge = knit 2 rows. STRIPES: Work stripes as follows (first row in each stripe = from right side): 1 RIDGE – see description above – with ocean view. 1 ridge with off white. DOMINO SQUARE: ROW 1 AND ALL OTHER ROWS FROM WRONG SIDE: Knit. ROW 2 (= right side): Knit to the stitch with the first marker, 1 yarn over, knit stitch with first marker, knit to stitch with 2nd marker, 1 yarn over, knit stitch with 2nd marker, 1 yarn over, knit to the stitch with the 3rd marker, knit stitch with 3rd marker, 1 yarn over, knit to end of row (= 4 stitches increased). The yarn overs are then knitted to allow holes. ROW 4: Knit and increase as in row 2. ROW 6: Knit to the stitch with the first marker, 1 yarn over, knit the stitch with the first marker, knit to 1 stitch before the stitch with the 2nd marker, 1 yarn over, knit 1, 1 yarn over, knit the stitch with the 2nd marker, 1 yarn over, knit 1, 1 yarn over, knit to the stitch with the 3rd marker, knit the stitch with the 3rd marker, 1 yarn over, knit to end of row (= 6 stitches increased). ROW 8: Knit and increase as for row 2. ROW 10: Knit and increase as for row 2. Repeat rows 1 to 10. BUTTONHOLE: 1 BUTTONHOLE = Knit 2 stitches together and make 1 yarn over. Make 4-4-4-5-5-5 buttonholes on the right band when the band (= part-11) measures 2-2-2-4-4-6 cm. The first hole is worked 7-7-7-8-8-8 cm from the neckline, the others with approx. 8-8-8-9-9-9 cm between them. The 5th-5th-5th-6th-6th-6th buttonhole is worked when working the neckline, make it above the others. ---------------------------------------------------------- JACKET: The jacket is worked as follows (see A.1): Left part (= part-1 and part-2) is worked as one, right part (= part-3 and part-4) is worked as one, then an edge is worked around the whole jacket (= part-5 to part-9). The bands are worked to finish (= part-10 and part-11). The broken lines in A.1 show the seams on the jacket. Then the sleeves are worked separately and sewn onto the jacket. PART-1 (left front piece and back piece): Cast on 87-91-91-95-99-99 stitches with circular needle size 4 mm and off white (= the armhole of the garment. The shoulder seam is sewn later). Work STRIPES – see description above. On row 1 (= right side) insert 3 markers in the piece as follows: Work 42-44-44-46-48-48 stitches, work the next stitch and insert the first marker in that stitch, work 1 stitch and insert the 2nd marker in that stitch (= the side of the jacket and the point of the domino), work 1 stitch and insert the 3rd marker in that stitch, work 42-44-44-46-48-48 stitches. The markers sit in the middle 3 stitches in the piece. The markers are to follow the piece as you work. Continue working DOMINO SQUARE – see description above (first row is worked with off white from wrong side). REMEMBER THE KNITTING TENSION! Work until the piece measures 13-15-17-20-23-27 cm measured at the shortest at the end/beginning of the row. The last row should be from wrong side. Cast off for the neck as follows: ROW 1 (= Right side): Cast off the first 12-12-14-14-16-16 stitches for the neck on the front piece and work domino to the end of the row as before. ROW 2 (= wrong side): Cast off the first 6 stitches for the neck on the back piece and work domino to the end of the row as before. ROW 3: Knit the first 2 stitches twisted together (= 1 stitch decreased for the neck on the front piece), work domino to the end of the row as before. ROW 4: Work domino. Repeat rows 3 and 4 until the piece measures 18-20-22-24-27-29 cm at the shortest – finish with 1 whole stripe with ocean view. Now divide the piece into 4 parts. Work with ocean view from the right side as follows: Knit to and including the stitch with the first marker, place these stitches on 1 thread (= stitches towards mid front – here the band will be worked = part-10), knit to and including the stitch with the 2nd marker, place these stitches on a 2nd thread (= diagonal line on the front piece from mid front to the side, these stitches will be worked together with an edge = part-9), knit to and including the stitch with the 3rd marker, place these stitches on a 3rd thread (= diagonal line on the back piece from the side up to mid back, these stitches will be worked together with an edge = part-8), change to off white and knit to end of the row (= stitches mid back, you will now continue working these stitches back and forth = part-2). There are now stitches on 3 different threads and the remaining stitches are on the needle. Now part-2 is worked back and forth over the stitches on the needle. PART-2 (left mid back): Continue to work stripes (row 1 = wrong side) until the piece measures 22-24-26-30-33-37 cm measured from the cast-on edge and horizontally towards mid back. Finish with 1 whole stripe with ocean view. Cast off loosely with ocean view (this is mid back and here part-2 will later be sewn together with part-4). Lay the piece to one side and work the right part of the jacket as follows: PART-3 (right front piece and back piece): Cast on and work as for part-1 until the piece measures 13-15-17-20-23-27 cm at the shortest. The last row is from the wrong side. Now cast off for the neck as follows: ROW 1 (= right side): Cast off the first 6 stitches for the neck on the back piece and work domino to end of the row as before. ROW 2 (= wrong side): cast off the first 12-12-14-14-16-16 stitches for the neck on the front piece and work domino to end of row as before. ROW 3: Work domino. ROW 4: Knit the first 2 stitches twisted together (= 1 stitch decreased for the neck on the front piece), work domino to end of row as before. Repeat rows 3 and 4 until the piece measures 18-20-22-24-27-29 cm at the shortest – make sure that length and stripes match part-1. Cut the strands. Now divide the piece into 4 parts. Work with off white from the right side as follows: Knit to and including the stitch with the first marker (= stitches mid back, you will continue to work back and forth over these stitches = part-4), change to ocean view, knit to and including the stitch with the 2nd marker, place these stitches on 1 thread (= diagonal line on the back piece from mid back to the side, these stitches will be worked together with an edge = part-6, the marker marks the side of the jacket), knit to and including the stitch with the 3rd marker, place these stitches on a 2nd thread (= diagonal line on the front piece from the side to mid front, these stitches will be worked together with an edge = part-5), knit to end of row and then place these stitches on a 3rd thread (= stitches towards mid front – here you will work a band = part-11). The stitches are now on 3 different threads and the remaining stitches are on the needle. PART-4 (right mid back): Continue working as for part-2. ASSEMBLY: Sew part-2 together with part-4 with ocean view – see the broken line in A.1, in the outermost loop of the outermost stitch. EDGE OF JACKET: The edge at the bottom is started mid front and is worked along the right front piece (part-5), right back piece (part-6) and continued along mid back (part-7), left back piece (part-8) and left front piece (part-9). Cast on 52-54-60-66-72-82 stitches with circular needle size 4 mm and off white. PART-5 (edge on right front piece): The edge is worked together with the stitches between the 3rd and 2nd marker on part-3 (i.e. from mid front and down to the tip of the domino). Work as follows: ROW 1 (= right side): Knit 1, 1 yarn over, knit 2 twisted together, knit 2 twisted together and knit to end of row (= 1 stitch decreased). ROW 2 (= wrong side): Knit until there is 1 stitch left on the needle, place the first/next 2 stitches from the thread back on the needle, knit 3 stitches together. The edge is now worked together with the first/next 2 stitches from part-3. Change to ocean view. ROW 3: Work as for row 1. Work short rows over the edge as follows: ROW 4 (= wrong side): Knit until there are 8 stitches left on the needle, turn the piece. ROW 5 (= right side): Knit. ROW 6 (= wrong side): Knit until there are 2 stitches left on the needle, turn the piece. ROW 7 (= right side): Knit. ROW 8: Work as for row 2. Change to off white. Repeat rows 1-8 until all the stitches from mid front and down to the tip have been worked to the edge. PART-6 (edge on right back piece): The edge is worked to the stitches between the 2nd and first markers on part-3 (i.e. from the tip of the domino and up to mid back). Work as follows with off white: ROW 1 (= right side): Knit 1, 1 yarn over, knit to end of row (= 1 stitch increased). ROW 2 (= wrong side): Knit until there is 1 stitch left on the needle, place the first/next 2 stitches from the thread back on the needle and knit 3 stitches together. The edge is now worked together with the first/next 2 stitches from the right back piece. Change to ocean view. ROW 3: Work as for row 1. Work short rows over the edge as follows: ROW 4 (= wrong side): Knit until there are 8 stitches left on the needle, turn the piece. ROW 5 (= right side): Knit. ROW 6 (= wrong side): Knit until there are 2 stitches left on the needle, turn the piece. ROW 7 (= right side): Knit. ROW 8: Work as for row 2. Change to off white. Repeat rows 1-8 until all the stitches from the tip to mid back have been worked together with the edge. PART-7 (edge mid back): Place 1 marker in the piece. THE PIECE IS NOW MEASURED FROM HERE! Now work short rows back and forth over the stitches from the edge as follows (i.e. they are not worked together with stitches from part-1 or part-3): Continue with stripes as before, adjust colour according to the stripes. Change to ocean view. ROW 1 (= right side): Knit. Knit short rows over the edge as follows: ROW 2 (= wrong side): Knit until there are 8 stitches left on the needle, turn the piece. ROW 3 (= right side): Knit. ROW 4 (= wrong side): Knit until there are 2 stitches left on the needle, turn the piece. ROW 5 (= right side): Knit. ROW 6: Knit. Change to off white. ROWS 7 AND 8: Knit. Repeat rows 1-8 until the piece measures 8-8-8-12-12-16 cm at the shortest, adjust the measurement with part-2 and part-4, they will be sewn together later. PART-8 (edge on left back piece): The edge is worked together with the stitches between the 3rd and 2nd marker on part-1 (i.e. from mid back and down to the tip of the domino). Work as for part-5 until all the stitches from mid back and down to the tip of the domino have been worked together with the edge. PART-9 (edge on the left front piece): The edge is worked together with the stitches between the 2nd and first marker on part-1 (i.e. from the tip of the domino and up to mid front). Work as for part-6 until all the stitches from the tip to mid front have been worked together with the edge. PART-10 (rest of left front piece and left band): Place the stitches from the first thread on part-1 (= left front piece mid front) back on the needle (i.e. there are now stitches from the edge and stitches from the thread on the needle). Insert 1 marker in the piece. THE PIECE IS NOW MEASURED FROM HERE! Work band as follows in the different sizes (the jacket in the picture shows size XL): SIZES S-M-L: Work garter stitch with ocean view until the piece measures 4 cm. Loosely cast off. SIZES XL-XXL-XXXL: Continue with stipes and decrease for the neck (as for part-1) at the beginning of every row from the right side, by knitting the 2 first stitches twisted together. Repeat the decreases until the piece measures 2-2-4 cm. Work garter stitch with ocean view for 4 cm (= band). Loosely cast off. PART-11 (the rest of the right front piece and right band): Insert 1 marker in the piece. THE PIECE IS NOW MEASURED FROM HERE! Work stripes as for part-3. Knit up 52-54-60-66-72-82 stitches along part-5 (= the edge on the right front piece) from the right side with ocean view, work the stitches from the thread mid front on part-3 (= right front piece mid front) back onto the needle. Knit 1 row from the wrong side – read BUTTONHOLE. Knit band as follows in the different sizes: SIZES S-M-L: Work as for part-10. SIZES XL-XXL-XXXL: Work as for part-10, but decrease for the neck at the start of each row from the wrong side. SLEEVE: The piece is worked back and forth in garter stitch and stripes. Cast on 54-54-56-56-58-58 stitches with circular needle size 4 mm and ocean view (including 1 edge stitch in each side of the piece). When the piece measures 6-5-6-8-6-6 cm increase 1 stitch with 1 yarn over inside the 1 edge stitch in each side of the piece. On the next row knit the yarn overs twisted. Increase in this way every 1½-1½-1½-1-1-1 cm a total of 16-18-17-19-20-20 times = 86-90-90-94-98-98 stitches. Work until the piece measures 34-33-32-30-28-27 cm (shorter measurements in larger sizes due to broader shoulder width), adjust so that the last stripe is with off white. Cast off. Work another sleeve. ASSEMBLY: See broken lines in A.1. Sew the shoulder seams. Sew the sleeve seams and sew the sleeves into the armholes. Sew part-7 together with part-2 and part-4 (= 8-8-8-12-12-16 cm horizontal seam). NECKLINE: Pick up 160-180 stitches with circular needle size 4 mm and ocean view. Work 3 ridges back and forth on the needle – remember BUTTONHOLE. Cast off. Sew the buttons onto the left band. |
||||||||||||||||
Diagram explanations |
||||||||||||||||
|
||||||||||||||||
 |
||||||||||||||||
 |
||||||||||||||||
Have you finished this pattern?Tag your pictures with #dropspattern #ladygreyjacket or submit them to the #dropsfan gallery. Do you need help with this pattern?You'll find 20 tutorial videos, a Comments/Questions area and more by visiting the pattern on garnstudio.com. © 1982-2026 DROPS Design A/S. We reserve all rights. This document, including all its sub-sections, has copyrights. Read more about what you can do with our patterns at the bottom of each pattern on our site. |
||||||||||||||||


With over 40 years in knitting and crochet design, DROPS Design offers one of the most extensive collections of free patterns on the internet - translated to 17 languages. As of today we count 324 catalogues and 12290 patterns translated into English (UK/cm).
We work hard to bring you the best knitting and crochet have to offer, inspiration and advice as well as great quality yarns at incredible prices! Would you like to use our patterns for other than personal use? You can read what you are allowed to do in the Copyright text at the bottom of all our patterns. Happy crafting!
Post a comment to pattern DROPS 161-25
We would love to hear what you have to say about this pattern!
If you want to leave a question, please make sure you select the correct category in the form below, to speed up the answering process. Required fields are marked *.