
Popular categories
Looking for a yarn?


Comments / Questions (156)
![]() Jeanette Matzau wrote:
Jeanette Matzau wrote:
Hi all knitters ... we have now rewritten this pattern so it will easyer to see where on the garment you are knitting :) happy knitting
27.04.2017 - 14:22
![]() Jeanette Matzau wrote:
Jeanette Matzau wrote:
Hei alle strikkere ... denne opsk har vi nå omformulert slik den vil være lettere å få oversikt :) go strikking
27.04.2017 - 14:18
![]() Edith Hoekstra wrote:
Edith Hoekstra wrote:
Ik wil graag dit vest gaan breien, maar begrijp de stekenverhouding niet. Fabel heeft 24 st x 32 nld en wordt gebreid met nld. 3, uw patroon gebruikt dit garen, maar u gebruikt nld. 4 en hanteert een stekenverhouding van 21 st x 40 nld. Komt dit verschil door de naalden nr. 4 ? komt het patroon dan wel goed uit? Bij voorbaat dank voor uw reactie!
25.04.2017 - 20:53DROPS Design answered:
Hallo Edith, De stekenverhouding is ietsje anders in dit geval, omdat er ribbelsteek gebruikt wordt in plaats van tricotsteek.
28.04.2017 - 17:36
![]() Gun-Britt Persson wrote:
Gun-Britt Persson wrote:
Det funkar INTE att sticka ihop höger framstycke till höger baks o vidare.stårbatt man skall sticka från mitt fram o ner till dominospetsen och börja från rätan om jag skall börja från rätan måste jag börja vid dominospetsen o sticka uppåt till mitt fram Har stickat mycket i mitt liv.Men aldrig träffat på något mönstet som är så krångligt och inte går att följa
02.04.2017 - 18:04DROPS Design answered:
Hej Gun-Britt, jo uppe från höger framstycke (höger som när du har på dig jackan) från rätsidan och ner, du stickar mot dominospetsen i sidan.
03.04.2017 - 15:01
![]() GunBritt Persson wrote:
GunBritt Persson wrote:
Skall sticka ihop arbetet från höger framstycke till höger bakstycke o vidare Står att man skall börja vid markör 3 o ner tili markör 2. och från rätsidan.om jag skall sticka från rätan måste jag börj vid markör 2 och sticks uppåt mot markör 3.Tycker jag har följt beslrivningen vad göra?
16.03.2017 - 11:43DROPS Design answered:
Hej GunBritt, Du lägger upp m som det står under Hopstickning, børjar från rätsiden och följer Varv 1 enligt beskrivningen, på varv 2 sticar du ihop m från avigsidan i slutet av varvet helt enligt beskrivningen. Lycka till!
29.03.2017 - 10:52
![]() Neyens Jacqueline wrote:
Neyens Jacqueline wrote:
Bonjour, j'aurais souhaité savoir si on change de coloris tous les rangs ou tous les 2 rangs. Merci d'avance
07.03.2017 - 08:01DROPS Design answered:
Bonjour Mme Neyens, on change de couleur à chaque côte mousse, soit 1 côte mousse (= 2 rangs endroit) d'une couleur, 1 côte mousse (= 2 rangs endroit) de l'autre couleur. Bon tricot!
07.03.2017 - 09:01
![]() Helen Hansen wrote:
Helen Hansen wrote:
Hej nu har jeg starter på arbejdet på trøjens del 1 for 5. Gang. Det er lidt som at strikke i blinde med denne opskrift. Det lader ikke til at jeg kan få hjælp og vil derfor gerne levere garn retur uden omkostninger for mig. Er det muligt?
09.01.2017 - 21:35
![]() Helen Hansen wrote:
Helen Hansen wrote:
Hej Begyndte at lave denne flotte trøje i går - men har desværre som jeg kan se mange andre har problemer med domino rudens udtagninger - jeg kan simpelthen ikke forstå hvor jeg skal slå om og hvordan markeringstråden skal følge med op i arbejdet - jeg blev desværre heller ikke klogere af at læse kommentarerne fra andre herinde. Kan man få et nærbillede af hvordan hullerne/udtagningerne er placeret i dominoruden? vh Helen Hansen
05.01.2017 - 13:11DROPS Design answered:
Hej Helen. Vi har desvaerre ikke noget naerbillede. Du skal slaa om praecis som der staar i opskriften under DOMINOFIRKANT:Strik ret til 1.mærke, slå om, strik ret til m med 2.mærke, slå om, osv. Dvs, du slaar om för maerket. Og maerket forbliver hele tiden paa den samme plads, men fordi du slaar om faar du hele tiden flere masker mellem maerketraadene.
11.01.2017 - 12:43
![]() Petra Rydgren wrote:
Petra Rydgren wrote:
Min fråga får inte plats för att bli begriplig. Hur ska jag göra?
20.08.2016 - 10:14DROPS Design answered:
Hej Petra. Du kan skrive fortsaettelse i en ny kommentar.
25.08.2016 - 15:58Yvonne Luoto wrote:
Har just börjat sticka och fastnat. Man ska sticka 44 msk och lägga ut 3 markörer. Då blir det 45 mask kvar, inte 44. Vad tänker jag fel?
11.08.2016 - 17:38DROPS Design answered:
Hej Yvonne. Sticka 44 rm, sätt 1:a markören (mellan m), sticka 1 rm, sätt 2:a markören i nästa m, sticka 1 rm, sätt 3:e markören (mellan m), sticka 44 rm. 44+1+1+1+44=91 m. Lycka till!
16.03.2017 - 11:53
|
||||||||||||||||
Lady Grey#ladygreyjacket |
||||||||||||||||
 |
 |
|||||||||||||||
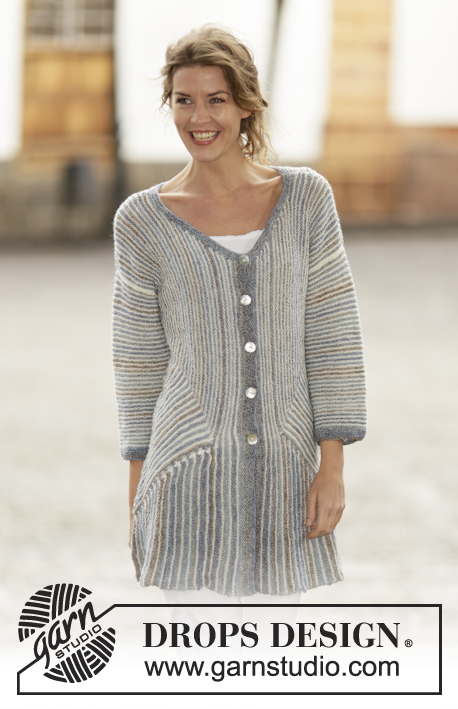
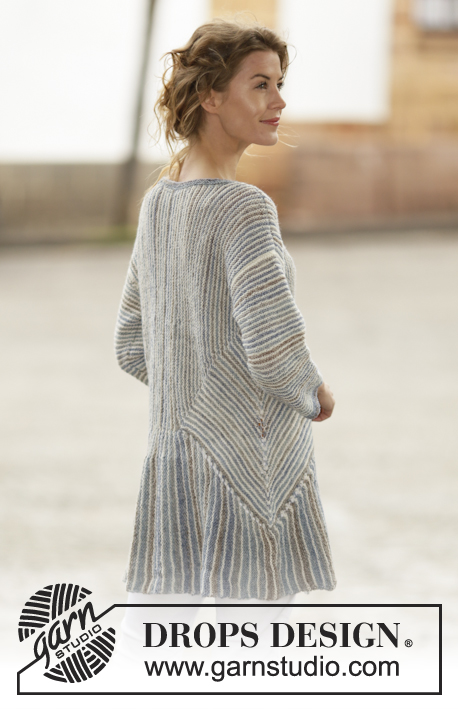
Knitted DROPS jacket in garter st with stripes and domino squares in ”Fabel”. Size: S - XXXL.
DROPS 161-25 |
||||||||||||||||
|
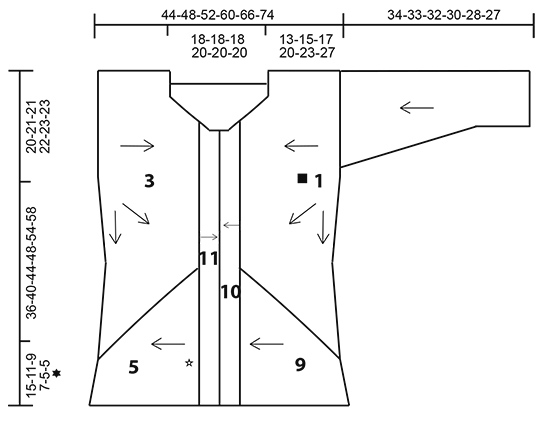
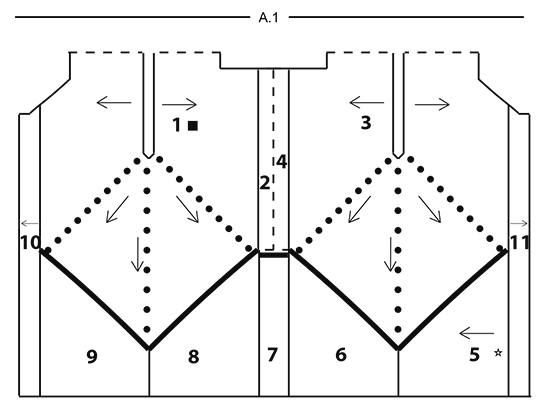
RIDGE/GARTER STITCH (worked back and forth): 1 ridge = knit 2 rows. STRIPES: Work stripes as follows (first row in each stripe = from right side): 1 RIDGE – see description above – with ocean view. 1 ridge with off white. DOMINO SQUARE: ROW 1 AND ALL OTHER ROWS FROM WRONG SIDE: Knit. ROW 2 (= right side): Knit to the stitch with the first marker, 1 yarn over, knit stitch with first marker, knit to stitch with 2nd marker, 1 yarn over, knit stitch with 2nd marker, 1 yarn over, knit to the stitch with the 3rd marker, knit stitch with 3rd marker, 1 yarn over, knit to end of row (= 4 stitches increased). The yarn overs are then knitted to allow holes. ROW 4: Knit and increase as in row 2. ROW 6: Knit to the stitch with the first marker, 1 yarn over, knit the stitch with the first marker, knit to 1 stitch before the stitch with the 2nd marker, 1 yarn over, knit 1, 1 yarn over, knit the stitch with the 2nd marker, 1 yarn over, knit 1, 1 yarn over, knit to the stitch with the 3rd marker, knit the stitch with the 3rd marker, 1 yarn over, knit to end of row (= 6 stitches increased). ROW 8: Knit and increase as for row 2. ROW 10: Knit and increase as for row 2. Repeat rows 1 to 10. BUTTONHOLE: 1 BUTTONHOLE = Knit 2 stitches together and make 1 yarn over. Make 4-4-4-5-5-5 buttonholes on the right band when the band (= part-11) measures 2-2-2-4-4-6 cm. The first hole is worked 7-7-7-8-8-8 cm from the neckline, the others with approx. 8-8-8-9-9-9 cm between them. The 5th-5th-5th-6th-6th-6th buttonhole is worked when working the neckline, make it above the others. ---------------------------------------------------------- JACKET: The jacket is worked as follows (see A.1): Left part (= part-1 and part-2) is worked as one, right part (= part-3 and part-4) is worked as one, then an edge is worked around the whole jacket (= part-5 to part-9). The bands are worked to finish (= part-10 and part-11). The broken lines in A.1 show the seams on the jacket. Then the sleeves are worked separately and sewn onto the jacket. PART-1 (left front piece and back piece): Cast on 87-91-91-95-99-99 stitches with circular needle size 4 mm and off white (= the armhole of the garment. The shoulder seam is sewn later). Work STRIPES – see description above. On row 1 (= right side) insert 3 markers in the piece as follows: Work 42-44-44-46-48-48 stitches, work the next stitch and insert the first marker in that stitch, work 1 stitch and insert the 2nd marker in that stitch (= the side of the jacket and the point of the domino), work 1 stitch and insert the 3rd marker in that stitch, work 42-44-44-46-48-48 stitches. The markers sit in the middle 3 stitches in the piece. The markers are to follow the piece as you work. Continue working DOMINO SQUARE – see description above (first row is worked with off white from wrong side). REMEMBER THE KNITTING TENSION! Work until the piece measures 13-15-17-20-23-27 cm measured at the shortest at the end/beginning of the row. The last row should be from wrong side. Cast off for the neck as follows: ROW 1 (= Right side): Cast off the first 12-12-14-14-16-16 stitches for the neck on the front piece and work domino to the end of the row as before. ROW 2 (= wrong side): Cast off the first 6 stitches for the neck on the back piece and work domino to the end of the row as before. ROW 3: Knit the first 2 stitches twisted together (= 1 stitch decreased for the neck on the front piece), work domino to the end of the row as before. ROW 4: Work domino. Repeat rows 3 and 4 until the piece measures 18-20-22-24-27-29 cm at the shortest – finish with 1 whole stripe with ocean view. Now divide the piece into 4 parts. Work with ocean view from the right side as follows: Knit to and including the stitch with the first marker, place these stitches on 1 thread (= stitches towards mid front – here the band will be worked = part-10), knit to and including the stitch with the 2nd marker, place these stitches on a 2nd thread (= diagonal line on the front piece from mid front to the side, these stitches will be worked together with an edge = part-9), knit to and including the stitch with the 3rd marker, place these stitches on a 3rd thread (= diagonal line on the back piece from the side up to mid back, these stitches will be worked together with an edge = part-8), change to off white and knit to end of the row (= stitches mid back, you will now continue working these stitches back and forth = part-2). There are now stitches on 3 different threads and the remaining stitches are on the needle. Now part-2 is worked back and forth over the stitches on the needle. PART-2 (left mid back): Continue to work stripes (row 1 = wrong side) until the piece measures 22-24-26-30-33-37 cm measured from the cast-on edge and horizontally towards mid back. Finish with 1 whole stripe with ocean view. Cast off loosely with ocean view (this is mid back and here part-2 will later be sewn together with part-4). Lay the piece to one side and work the right part of the jacket as follows: PART-3 (right front piece and back piece): Cast on and work as for part-1 until the piece measures 13-15-17-20-23-27 cm at the shortest. The last row is from the wrong side. Now cast off for the neck as follows: ROW 1 (= right side): Cast off the first 6 stitches for the neck on the back piece and work domino to end of the row as before. ROW 2 (= wrong side): cast off the first 12-12-14-14-16-16 stitches for the neck on the front piece and work domino to end of row as before. ROW 3: Work domino. ROW 4: Knit the first 2 stitches twisted together (= 1 stitch decreased for the neck on the front piece), work domino to end of row as before. Repeat rows 3 and 4 until the piece measures 18-20-22-24-27-29 cm at the shortest – make sure that length and stripes match part-1. Cut the strands. Now divide the piece into 4 parts. Work with off white from the right side as follows: Knit to and including the stitch with the first marker (= stitches mid back, you will continue to work back and forth over these stitches = part-4), change to ocean view, knit to and including the stitch with the 2nd marker, place these stitches on 1 thread (= diagonal line on the back piece from mid back to the side, these stitches will be worked together with an edge = part-6, the marker marks the side of the jacket), knit to and including the stitch with the 3rd marker, place these stitches on a 2nd thread (= diagonal line on the front piece from the side to mid front, these stitches will be worked together with an edge = part-5), knit to end of row and then place these stitches on a 3rd thread (= stitches towards mid front – here you will work a band = part-11). The stitches are now on 3 different threads and the remaining stitches are on the needle. PART-4 (right mid back): Continue working as for part-2. ASSEMBLY: Sew part-2 together with part-4 with ocean view – see the broken line in A.1, in the outermost loop of the outermost stitch. EDGE OF JACKET: The edge at the bottom is started mid front and is worked along the right front piece (part-5), right back piece (part-6) and continued along mid back (part-7), left back piece (part-8) and left front piece (part-9). Cast on 52-54-60-66-72-82 stitches with circular needle size 4 mm and off white. PART-5 (edge on right front piece): The edge is worked together with the stitches between the 3rd and 2nd marker on part-3 (i.e. from mid front and down to the tip of the domino). Work as follows: ROW 1 (= right side): Knit 1, 1 yarn over, knit 2 twisted together, knit 2 twisted together and knit to end of row (= 1 stitch decreased). ROW 2 (= wrong side): Knit until there is 1 stitch left on the needle, place the first/next 2 stitches from the thread back on the needle, knit 3 stitches together. The edge is now worked together with the first/next 2 stitches from part-3. Change to ocean view. ROW 3: Work as for row 1. Work short rows over the edge as follows: ROW 4 (= wrong side): Knit until there are 8 stitches left on the needle, turn the piece. ROW 5 (= right side): Knit. ROW 6 (= wrong side): Knit until there are 2 stitches left on the needle, turn the piece. ROW 7 (= right side): Knit. ROW 8: Work as for row 2. Change to off white. Repeat rows 1-8 until all the stitches from mid front and down to the tip have been worked to the edge. PART-6 (edge on right back piece): The edge is worked to the stitches between the 2nd and first markers on part-3 (i.e. from the tip of the domino and up to mid back). Work as follows with off white: ROW 1 (= right side): Knit 1, 1 yarn over, knit to end of row (= 1 stitch increased). ROW 2 (= wrong side): Knit until there is 1 stitch left on the needle, place the first/next 2 stitches from the thread back on the needle and knit 3 stitches together. The edge is now worked together with the first/next 2 stitches from the right back piece. Change to ocean view. ROW 3: Work as for row 1. Work short rows over the edge as follows: ROW 4 (= wrong side): Knit until there are 8 stitches left on the needle, turn the piece. ROW 5 (= right side): Knit. ROW 6 (= wrong side): Knit until there are 2 stitches left on the needle, turn the piece. ROW 7 (= right side): Knit. ROW 8: Work as for row 2. Change to off white. Repeat rows 1-8 until all the stitches from the tip to mid back have been worked together with the edge. PART-7 (edge mid back): Place 1 marker in the piece. THE PIECE IS NOW MEASURED FROM HERE! Now work short rows back and forth over the stitches from the edge as follows (i.e. they are not worked together with stitches from part-1 or part-3): Continue with stripes as before, adjust colour according to the stripes. Change to ocean view. ROW 1 (= right side): Knit. Knit short rows over the edge as follows: ROW 2 (= wrong side): Knit until there are 8 stitches left on the needle, turn the piece. ROW 3 (= right side): Knit. ROW 4 (= wrong side): Knit until there are 2 stitches left on the needle, turn the piece. ROW 5 (= right side): Knit. ROW 6: Knit. Change to off white. ROWS 7 AND 8: Knit. Repeat rows 1-8 until the piece measures 8-8-8-12-12-16 cm at the shortest, adjust the measurement with part-2 and part-4, they will be sewn together later. PART-8 (edge on left back piece): The edge is worked together with the stitches between the 3rd and 2nd marker on part-1 (i.e. from mid back and down to the tip of the domino). Work as for part-5 until all the stitches from mid back and down to the tip of the domino have been worked together with the edge. PART-9 (edge on the left front piece): The edge is worked together with the stitches between the 2nd and first marker on part-1 (i.e. from the tip of the domino and up to mid front). Work as for part-6 until all the stitches from the tip to mid front have been worked together with the edge. PART-10 (rest of left front piece and left band): Place the stitches from the first thread on part-1 (= left front piece mid front) back on the needle (i.e. there are now stitches from the edge and stitches from the thread on the needle). Insert 1 marker in the piece. THE PIECE IS NOW MEASURED FROM HERE! Work band as follows in the different sizes (the jacket in the picture shows size XL): SIZES S-M-L: Work garter stitch with ocean view until the piece measures 4 cm. Loosely cast off. SIZES XL-XXL-XXXL: Continue with stipes and decrease for the neck (as for part-1) at the beginning of every row from the right side, by knitting the 2 first stitches twisted together. Repeat the decreases until the piece measures 2-2-4 cm. Work garter stitch with ocean view for 4 cm (= band). Loosely cast off. PART-11 (the rest of the right front piece and right band): Insert 1 marker in the piece. THE PIECE IS NOW MEASURED FROM HERE! Work stripes as for part-3. Knit up 52-54-60-66-72-82 stitches along part-5 (= the edge on the right front piece) from the right side with ocean view, work the stitches from the thread mid front on part-3 (= right front piece mid front) back onto the needle. Knit 1 row from the wrong side – read BUTTONHOLE. Knit band as follows in the different sizes: SIZES S-M-L: Work as for part-10. SIZES XL-XXL-XXXL: Work as for part-10, but decrease for the neck at the start of each row from the wrong side. SLEEVE: The piece is worked back and forth in garter stitch and stripes. Cast on 54-54-56-56-58-58 stitches with circular needle size 4 mm and ocean view (including 1 edge stitch in each side of the piece). When the piece measures 6-5-6-8-6-6 cm increase 1 stitch with 1 yarn over inside the 1 edge stitch in each side of the piece. On the next row knit the yarn overs twisted. Increase in this way every 1½-1½-1½-1-1-1 cm a total of 16-18-17-19-20-20 times = 86-90-90-94-98-98 stitches. Work until the piece measures 34-33-32-30-28-27 cm (shorter measurements in larger sizes due to broader shoulder width), adjust so that the last stripe is with off white. Cast off. Work another sleeve. ASSEMBLY: See broken lines in A.1. Sew the shoulder seams. Sew the sleeve seams and sew the sleeves into the armholes. Sew part-7 together with part-2 and part-4 (= 8-8-8-12-12-16 cm horizontal seam). NECKLINE: Pick up 160-180 stitches with circular needle size 4 mm and ocean view. Work 3 ridges back and forth on the needle – remember BUTTONHOLE. Cast off. Sew the buttons onto the left band. |
||||||||||||||||
Diagram explanations |
||||||||||||||||
|
||||||||||||||||
 |
||||||||||||||||
 |
||||||||||||||||
Have you finished this pattern?Tag your pictures with #dropspattern #ladygreyjacket or submit them to the #dropsfan gallery. Do you need help with this pattern?You'll find 20 tutorial videos, a Comments/Questions area and more by visiting the pattern on garnstudio.com. © 1982-2026 DROPS Design A/S. We reserve all rights. This document, including all its sub-sections, has copyrights. Read more about what you can do with our patterns at the bottom of each pattern on our site. |
||||||||||||||||


With over 40 years in knitting and crochet design, DROPS Design offers one of the most extensive collections of free patterns on the internet - translated to 17 languages. As of today we count 324 catalogues and 12290 patterns translated into English (UK/cm).
We work hard to bring you the best knitting and crochet have to offer, inspiration and advice as well as great quality yarns at incredible prices! Would you like to use our patterns for other than personal use? You can read what you are allowed to do in the Copyright text at the bottom of all our patterns. Happy crafting!
Post a comment to pattern DROPS 161-25
We would love to hear what you have to say about this pattern!
If you want to leave a question, please make sure you select the correct category in the form below, to speed up the answering process. Required fields are marked *.