
Popular categories
Looking for a yarn?


Comments / Questions (52)
![]() Nasreen wrote:
Nasreen wrote:
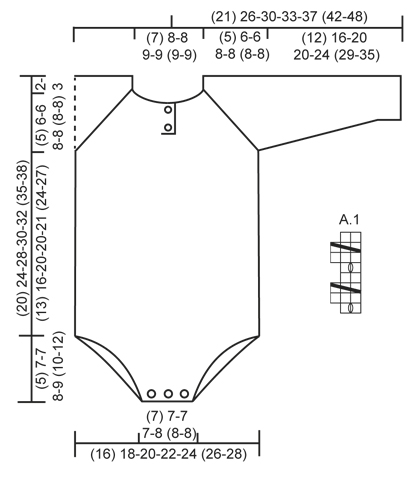
Sorry still can't understand the diagram A1 if u can specifically tell me how it is worked I'll appreciate meaning what do you mean by 2 stitches 8 rows are they being knitted or they are purl stitches it's not clearly indicated
14.11.2015 - 01:29DROPS Design answered:
Dear Nasreen, A.1 is worked either back and forth or in the round - following the pattern- as follows : Row1(from RS= = Round1): K1, YO, K1 Row 2 = from WS (Round 2): P3 (K3) Row 3 = from RS = Round3 = dec 1 st as in diagram text Row 4 from WS (Rond 4): P2 (K2) Repeat these 4 rows (from RS + WS when working back and forth) or these 4 rounds (= from RS when working in the round). Happy knitting!
16.11.2015 - 09:04
![]() Nasreen wrote:
Nasreen wrote:
It's me again Nasreen about the simply sweet pattern. Where it says A1 in the bracket it =2 what does that mean what r we doing to this 2 And the markers where r we putting them between the knit 2 and purl 2 I will really appreciate the answers I am stuck and my first grand child is about to be born Thanks
13.11.2015 - 10:04DROPS Design answered:
Dear Nasreen, diagram A.1 - see at the very bottom of the pattern - is worked over 2 sts and 8 rows. Start reading diagram at the bottom corner on the right side from the left every row from RS/every round - and from the left towards the right from WS. Happy knitting!
13.11.2015 - 14:35
![]() Nasreen wrote:
Nasreen wrote:
In this pattern the simply sweet by drop design what is A1 the diagram I don't understand and the markers for raglan how many stitches r there between the band stitches and the marker Will appreciate your answer This pattern is really confusing me
13.11.2015 - 09:53DROPS Design answered:
Dear Nasreen, see about A.1 under next question - markers for yoke are inserted between K2 worked on yoke, between 2 x P2 - see number of sts for each size. These K2 are the raglan line and marker should be inserted like this: K1, marker, K1. Happy knitting!
13.11.2015 - 14:32
![]() Bente Jakobsen wrote:
Bente Jakobsen wrote:
Hej. Er kørt fast på side 3 hvor jeg har 86 masker(str 1/3 mdr) og skal dele dem op i mønster og raglan, der er ikke masker nok, eller misforstår jeg det.... synes at det er lidt forvirrende...
10.09.2015 - 19:17
![]() Manuela wrote:
Manuela wrote:
Ich halte gerade diesen frischgemachten Body in Händen und bin einfach hingerissen! Weiter so!
15.06.2015 - 10:50
![]() Christine wrote:
Christine wrote:
Fehler gefunden! Die Angabe für die Frühchen habe ich übersehen und bin davon ausgegangen, dass die jeweils zweite Angabe für die Größe 1/3 gilt... So passt alles auch wieder :)
06.10.2014 - 19:16
![]() Christine wrote:
Christine wrote:
Liebes Drops-Team, ich möchte nochmal Bezug auf die Frage von Rana nehmen. Auch ich habe das Problem, dass die Musterfolge nicht aufgeht bei Größe 1/3 Monate. Ihre damalige Rechnung mit der Summe 102 ist korrekt, nur habe ich bei Befolgen der Anleitung 86 Maschen auf der Nadel - wie es die Anleitung auch vorsieht. Ich nehme an, dass man die Musterfolge von Größe 0/1 Monate befolgen muss? Diese hat nach den Zunahmen die gleiche Maschenanzahl wie Größe 1/3 Monate. Viele Grüße, Christine
06.10.2014 - 19:13DROPS Design answered:
Schön, dass sich Ihr Problem gelöst hat! :-) Bei so vielen verschiedenen Größen kann es hilfreich sein, sich die Anleitung auszudrucken und sich vorher jede Angabe für die gewünschte Größe mit einem Textmarker anzustreichen, denn gerade bei dieser Anleitung kann man wirklich leicht "verrutschen". Viel Spaß beim Weiterstricken und gutes Gelingen!
07.10.2014 - 14:38
![]() Danielle COllec wrote:
Danielle COllec wrote:
Enfin des modèles pour prématurés. Je fais des modèle prématurés pour les maternités
07.09.2014 - 13:50
![]() Nadege Armour wrote:
Nadege Armour wrote:
Size 2 error - when dividing and placing markers, after the second sleeve marker has been placed between the 2 knit stitches should read: p2k2 p2k2 p2 (kok) p2 k2 then k6 button band stitches.
02.07.2014 - 15:24DROPS Design answered:
Dear Mrs Armour, we have checked the pattern and cannot see anything wrong. Happy knitting!
31.07.2014 - 13:02
![]() Rana wrote:
Rana wrote:
Ich habe versucht, die Anleitung in Größe 1/3 zu stricken. Nach den verkürzten Reihen in dem Teil in dem es heißt '7* wiederholen' kommt es nicht hin. Das wären 7*4 = 28 Maschen, ich hätte wenn ich die beiden Seiten abziehe aber nurnoch 14 Maschen.
24.05.2014 - 23:26DROPS Design answered:
Liebe Rana, es passt. Sie haben ja für Größe 1/3 Monate 102 M auf der Nadel. Dann ergibt sich rechnerisch Folgendes: 6 M kraus re + 14 M + 3x4 M + 4 M + 7x4 M + 4 M + 3x4 M + 16 M + 6 M kraus re = 102 M.
25.05.2014 - 13:31
|
||||||||||
Simply Sweet#simplysweetonesie |
||||||||||
|
|
||||||||||
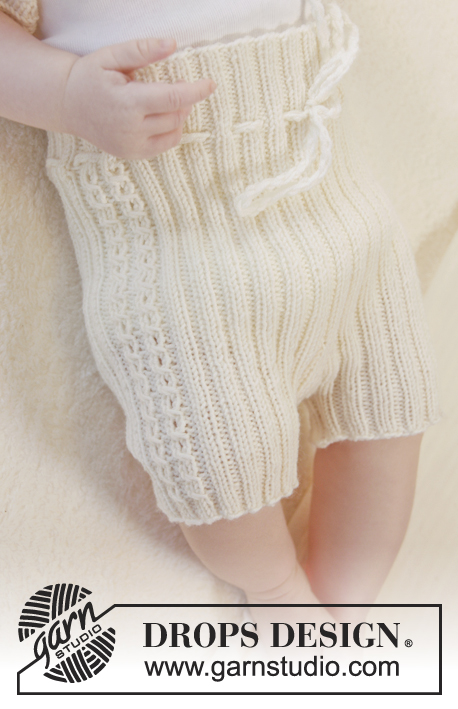
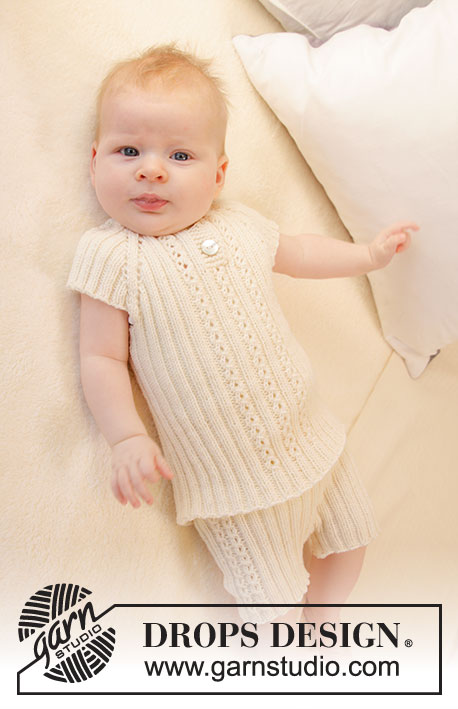
Knitted baby body in rib, worked top down in DROPS BabyMerino. Size premature – 4 years.
DROPS Baby 25-30 |
||||||||||
|
GARTER ST (back and forth on needle): K all rows. 1 ridge = 2 rows K. PATTERN: See diagram A.1. The diagram shows all rows in pattern seen from RS. RAGLAN: All inc are done from RS. Inc 1 st on each side of the 4 raglan lines by making 1 YO on each side of the 2 sts K in each raglan line (seen from RS). Work YOs into rib, i.e. P the first 2 sts from WS, K the next 2 sts from WS etc. – NOTE: Do not work YOs twisted (i.e. there should be holes on each side of the 2 K sts in raglan line). BUTTONHOLES: Dec for buttonholes on right band. 1 buttonhole = K tog third and fourth st from edge and make 1 YO (dec for buttonholes from WS). Dec for buttonholes when piece measures: SIZE (premature): 1 and 3 cm. SIZE 0/1 month + 1/3 months: 1 and 4 cm. SIZE 6/9 months + 1218 months: 1 and 4½ cm. SIZE (2 years + 3/4 years): 1 and 5 cm. DECREASE TIP 1 (applies to leg opening): Dec inside 3 edge sts in garter st. FROM RS: Dec after 3 sts in garter st as follows: P 2 twisted tog. Dec as follows before 3 sts in garter st (beg when 5 sts remain on row): P 2 tog. FROM WS: Dec after 3 sts in garter st as follows: K 2 twisted tog. Dec as follows before 3 sts in garter st (beg when 5 sts remain on row): K 2 tog. DECREASE TIP 2 (applies to sleeves): Work until 3 sts remain before marker, work 2 sts tog (in rib), work 2 sts (marker is between these 2 sts) and then work 2 sts twisted tog (in rib). ---------------------------------------------------------- BODY: The piece is worked top down. Work back and forth on circular needle to after neck vent, then work piece in the round on double pointed needles/circular needles before dividing for legs. Work sleeves in the round on double pointed needles. YOKE: Cast on (54) 60-60-64-74 (74-74) sts (incl 6 band sts in each side towards mid front) on circular needle size 3.5 mm with off white Baby Merino. Work 2 RIDGES in garter st - see explanation above (1st row = RS). Then work an elevation in the back of neck as follows (1st row = RS): K until (6) 8-8-8-10 (10-10) sts remain, turn, tighten yarn and work until (6) 8-8-8-10 (10-10) sts remain in the other side. Turn piece, tighten yarn and work until (12) 16-16-16-20 (20-20) sts remain, turn piece, tighten yarn and work back until (12) 16-16-16-20 (20-20) sts remain. Turn piece, tighten yarn and work until (18) 24-24-24-30 (30-30) sts remain, turn, tighten yarn and work until (18) 24-24-24-30 (30-30) sts remain in the other side. Turn piece, tighten yarn and work the rest of the row. Work next row as follows from WS: K 6 band sts, P the next (42) 48-48-52-62 (62-62) sts AT THE SAME TIME inc (32) 26-42-38-44 (60-60) sts evenly over these sts and finish with K 6 band sts (remember BUTTONHOLES on band – see explanation above) = (86) 86-102-102-118 (134-134) sts on needle. WORK NEXT ROW AS FOLLOWS FROM RS: SIZE (premature) + 0/1 month: 6 band sts in GARTER ST – see explanation above, K 2, P 2, A.1 (= 2 sts), P 2, K 2 (insert 1 marker in the middle of these 2 sts = raglan line), * P 2, K 2 *, repeat from *-* 3 times in total, P 2, K 2 (insert 1 marker in the middle of these 2 sts = raglan line), * P 2, K 2 *, repeat from *-* 5 times in total, P 2, K 2 (insert 1 marker in the middle of these 2 sts = raglan line), * P 2, K 2 *, repeat from *-* 3 times in total, P 2, K 2 (insert 1 marker in the middle of these 2 sts = raglan line), P 2, A.1 (= 2 sts), P 2, K 2 and 6 band sts in GARTER ST. SIZE 1/3 months + 6/9 months + 12/18 months: 6 band sts in GARTER ST – see explanation above, K 2, P 2, A.1 (= 2 sts), P 2, K 2, P 2, K 2 (insert 1 marker in the middle of these 2 sts = raglan line), * P 2, K 2 *, repeat from *-* 3-3-5 times in total, P 2, K 2 (insert 1 marker in the middle of these 2 sts = raglan line), * P 2, K 2 *, repeat from *-* 7 times in total, P 2, K 2 (insert 1 marker in the middle of these 2 sts = raglan line), * P 2, K 2 *, repeat from *-* 3-3-5 times in total, P 2, K 2 (insert 1 marker in the middle of these 2 sts = raglan line), P 2, K 2, P 2, A.1 (= 2 sts), P 2, K 2 and 6 band sts in GARTER ST. SIZE (2 years + 3/4 years): 6 band sts in GARTER ST – see explanation above, ** K 2, P 2, A.1 (= 2 sts), P 2 **, repeat from **-** 2 times in total, K 2 (insert 1 marker in the middle of these 2 sts = raglan line), * P 2, K 2 *, repeat from *-* 5 times in total, P 2, K 2 (insert 1 marker in the middle of these 2 sts = raglan line), * P 2, K 2 *, repeat from *-* 9 times in total, P 2, K 2 (insert 1 marker in the middle of these 2 sts = raglan line), * P 2, K 2 *, repeat from *-* 5 times in total, P 2, K 2 (insert 1 marker in the middle of these 2 sts = raglan line), ** P 2, A.1 (= 2 sts), P 2, K 2 **, repeat from **-** 2 times in total and finish with 6 band sts in GARTER ST. ALL SIZES: Continue pattern like this back and forth. AT THE SAME TIME on next row from RS inc for RAGLAN – see explanation above (= 8 sts inc). Repeat inc every other row/round (i.e. every row from RS) (7) 7-7-11-11 (11-11) more times (= (8) 8-8-12-12 (12-12) inc in total on each side of every raglan line). AT THE SAME TIME when piece measures (4) 5-5-6-6 (7-7) cm, band ends and piece is worked in the round on needle as follows (adjust so that next row is worked from RS): Place piece tog with sts from right band at the top (so that bands are on top of each other and buttonholes are at the edge). Work 1 round in the round AT THE SAME TIME K tog the 6 sts from right and left band 2 by 2, work the rest of round, cut the yarn and beg next round mid back. Continue rib and pattern in the round AT THE SAME TIME continue inc for raglan as before but work the 6 sts mid front as follows: P 2, A.1 (= 2 sts) and P 2. After last inc for raglan there are (144) 144-160-192-208 (224-224) sts on needle. Work (0) 2-2-2-2 (2-2) more rounds as before, piece measures approx. (7) 8-8-10-11 (11-11) cm from shoulder. On next round slip the (32) 32-32-40-48 (48-48) sts between each marker over sleeve on stitch holders (work sts before slipping them on stitch holder) = (40) 40-48-56-56 (64-64) sts remain on front and back piece. BODY: = (80) 80-96-112-112 (128-128) sts. On next round cast on (8) 16-12-12-16 (16-20) LOOSE sts under each sleeve = (96) 112-120-136-144 (160-168) sts on body – NOW MEASURES PIECE FROM HERE. Place a marker each side. Continue rib in the round as before (= K 2/P 2) with A.1 at the front as before. When piece measures (13) 16-20-20-21 (24-27) cm from armhole, divide at the markers in each side and finish front and back piece separately. BACK PIECE: = (48) 56-60-68-72 (80-84) sts. Work rib back and forth as before but work the outermost 3 sts in each side in garter st. AT THE SAME TIME dec 1 st inside the 3 edge sts in each side – READ DECREASE TIP 1 (= 2 sts dec). Repeat dec on every row (i.e. from both RS and WS) (6) 10-12-16-14 (18-14) more times (= (7) 11-13-17-15 (19-15) times in total) and then every other row (i.e. every row from RS) (5) 5-5-5-7 (7-11) times in total = (24) 24-24-24-28 (28-32) sts remain on needle. K 1 row from RS while AT THE SAME TIME dec (8) 8-8-8-10 (10-12) sts evenly = (16) 16-16-16-18 (18-20) sts remain on needle. K 10 rows (= 5 ridges) and loosely cast off with K from WS. FRONT PIECE: = (48) 56-60-68-72 (80-84) sts. Work rib back and forth as before but work the outermost 3 sts in each side in garter st. AT THE SAME TIME dec 1 st inside the 3 edge sts in each side – READ DECREASE TIP 1 (= 2 sts dec). Repeat dec on every row (i.e. from both RS and WS) (11) 13-17-21-19 (23-17) more times (= (12) 14-18-22-20 (24-18) times in total) and then every other row (i.e. every row from RS) (0) 2-0-0-2 (2-8) times in total = (24) 24-24-24-28 (28-32) sts remain on needle. K 1 row from RS while AT THE SAME TIME dec (8) 8-8-8-10 (10-12) sts evenly = (16) 16-16-16-18 (18-20) sts on needle. K 1 row from WS. On next row (= RS), dec for 3 buttonholes as follows: K (3) 3-3-3-3 (3-4), * 1 YO, K 2 tog, K (2) 2-2-2-3 (3-3) *, repeat from *-* 1 more time, K 2 tog, 1 YO and K (3) 3-3-3-3 (3-4). K 4 rows (= 2 ridges) and loosely cast off with K from WS. SLEEVE: = (32) 32-32-40-48 (48-48) sts. Cast on (8) 16-12-12-16 (16-20) LOOSE sts under sleeve = (40) 48-44-52-64 (64-68) sts on needle (work in the round on double pointed needles). Insert 1 marker at beg of round (= mid under sleeve) - NOW MEASURE PIECE FROM HERE. Continue rib in the round as before (= K 2/P 2). AT THE SAME TIME when sleeve measures 1 cm, dec 1 st on each side of marker - READ DECREASE TIP 2. Repeat dec every (4) 4-6-6-6 (8-8) rows (3) 7-3-7-7 (7-7) more times (= (4) 8-4-8-8 (8-8) times in total) = (32) 32-36-36-48 (48-52) sts remain on needle. When sleeve measures (12) 16-20-20-24 (29-35) cm, loosely cast off with K over K and P over P. Work the other sleeve the same way. ASSEMBLY: Sew the openings under the sleeves. Sew 2 buttons on to left button band in the neck and 3 buttons at the bottom of body. |
||||||||||
Diagram explanations |
||||||||||
|
||||||||||
 |
||||||||||
Have you finished this pattern?Tag your pictures with #dropspattern #simplysweetonesie or submit them to the #dropsfan gallery. Do you need help with this pattern?You'll find 27 tutorial videos, a Comments/Questions area and more by visiting the pattern on garnstudio.com. © 1982-2026 DROPS Design A/S. We reserve all rights. This document, including all its sub-sections, has copyrights. Read more about what you can do with our patterns at the bottom of each pattern on our site. |
||||||||||


With over 40 years in knitting and crochet design, DROPS Design offers one of the most extensive collections of free patterns on the internet - translated to 17 languages. As of today we count 324 catalogues and 12290 patterns translated into English (UK/cm).
We work hard to bring you the best knitting and crochet have to offer, inspiration and advice as well as great quality yarns at incredible prices! Would you like to use our patterns for other than personal use? You can read what you are allowed to do in the Copyright text at the bottom of all our patterns. Happy crafting!
Post a comment to pattern DROPS Baby 25-30
We would love to hear what you have to say about this pattern!
If you want to leave a question, please make sure you select the correct category in the form below, to speed up the answering process. Required fields are marked *.