
Popular categories
Looking for a yarn?


Comments / Questions (62)
![]() Carla wrote:
Carla wrote:
Scusa ripeto la frase che è venuta male: il segnapunto che metto dove dicono le spiegazioni(maniche) non corrisponde mai con le calature per lo scalfo, ma di tanto.
20.04.2015 - 18:29DROPS Design answered:
Buongiorno Carla. Se capiamo correttamente il problema, potrebbe aver bisogno di aumentare un numero maggiore di m sulle maniche, facendo aumenti più ravvicinati. Ci riscriva se non è questo il problema. Buon lavoro!
21.04.2015 - 09:52
![]() Carla wrote:
Carla wrote:
Una volta finite le maniche, cucio le spalle davanti-dietro e vado a montare le maniche. Il segnapunto che metto dove dicono le spiegazioni, non corrisponde mai con le calzature per lo scaldo, ma di tanto, è come se dovessi finire la manica con il doppio delle maglie rispetto a quelle che mi trovo utilizzando la misura L o XL. Grazie
20.04.2015 - 18:27DROPS Design answered:
Buongiorno Carla. Se capiamo correttamente il problema, potrebbe aver bisogno di aumentare un numero maggiore di m sulle maniche, facendo aumenti più ravvicinati. Ci riscriva se non è questo il problema. Buon lavoro!
21.04.2015 - 09:08
![]() Carla wrote:
Carla wrote:
Buongiorno è il terzo modello che confeziono con i ferri e la taglia(sia L che XL) hanno l'altezza dello scalfo manica che non corrisponde mai alle misure della manica. Stupendo le istruzioni alla virgola quando vado a montare le maniche non corrisponde alle diminuzioni dello scalfo! Come mi regolo? Grazie in anticipo.
19.04.2015 - 11:58DROPS Design answered:
Buonasera Carla, in che senso le misure delle maniche non corrispondono allo scalfo? ci può spiegare in modo più preciso? il suo campione corrisponde a quello indicato? Buon lavoro!!
19.04.2015 - 17:26
![]() Nadine wrote:
Nadine wrote:
Gibt es zu diesen Pullover auch eine richtige Anleitung? Ich denke das es oben eine Zeichenerklärung gibt aber keine Reihenfolge angezeigt ist, wie was wann zu oder abgenommen werden soll! Ich hoffe Sie verstehen was ich meine. Ansonsten ist es mir klar! MfG
19.02.2015 - 09:08DROPS Design answered:
Ja, die Anleitung finden Sie ja über dem Diagramm. Sie beginnt mit "Rückenteil", darüber finden Sie noch einige Hinweise, auf die sich die Anleitung bezieht. In der Anleitung ist alles genau beschrieben. Der Pulli wird im Übrigen von unten nach oben gestrickt, in 2 Teilen (Rückenteil und Vorderteil), die Ärmel werden separat gestrickt und anschließend angenäht.
20.02.2015 - 15:59
![]() Rosita Topp wrote:
Rosita Topp wrote:
Schade das kein deutscher Kommentar dabei ist, ich komme mit der Wollmenge überhaupt nicht hin. Für Größe xxxl brauche ich schon über die Hälfte der Wolle nur für das Vorderteil. Habe alles wieder auf geriffelt, wird mir zu teuer wenn ich noch mal so viel Wolle bestellen muß.
14.02.2015 - 14:33
![]() Marga wrote:
Marga wrote:
Ik zou graag willen weten hoe ik deze trui het beste en mooiste in elkaar kan zetten. Alvast hartelijk bedankt.
12.05.2014 - 19:09DROPS Design answered:
Hoi Marga. Kies de steek dat jij ook zelf het mooiste en beste vindt. Sluit de naden in de uiterste schakel van de kantsteek (= de 1 ribbelst) en zorg ervoor om het werk niet te strak in elkaar te naaien. Veel plezier bij het afwerken.
13.05.2014 - 16:19
![]() Ella wrote:
Ella wrote:
Þessi er alveg dásamlega flott, hálsmálið soldið þröngt svo ég víkkaði það.
13.09.2013 - 17:14
![]() Madeleine Lindblom wrote:
Madeleine Lindblom wrote:
Det verkar som mönstret på framstycket är fel. Avmaskning för halsringningen är för tidigt men min fråga är, när skall den vara? Hur långt från ärmhålet? Jag kommer inte vidare nu! Hjälp!
03.08.2013 - 11:18DROPS Design answered:
Mönstret på framstycket är rättat i beskrivningen på nätet. Se också "rättelse"!
18.09.2013 - 15:45
![]() Greet Bos wrote:
Greet Bos wrote:
Waar vind ik de teltekening A1 van het patroon model 1-114 Everyday. zie wel een klein pictogram met A1maar kan dit niet openen.
25.06.2013 - 15:35DROPS Design answered:
Hoi Greet. Het telpatroon zou op het patroon staan onderaan naast de maattekening. Probeer eventueel op F5 (vernieuwen) te drukken. Veel breiplezier.
25.06.2013 - 16:27
![]() Ulla ärrenberg wrote:
Ulla ärrenberg wrote:
Har precis stickat färdigt i M, och garnet räckte inte.Fick köpa till 2 nystan. Även där jag köpte garnet (Lerdalaboden i Jönköping) tyckte att 7 nyst var för lite. Håller med om mönstret på framstycket är dåligt.
10.06.2013 - 12:58
|
|||||||||||||
Everyday#everydaysweater |
|||||||||||||
 |
 |
||||||||||||
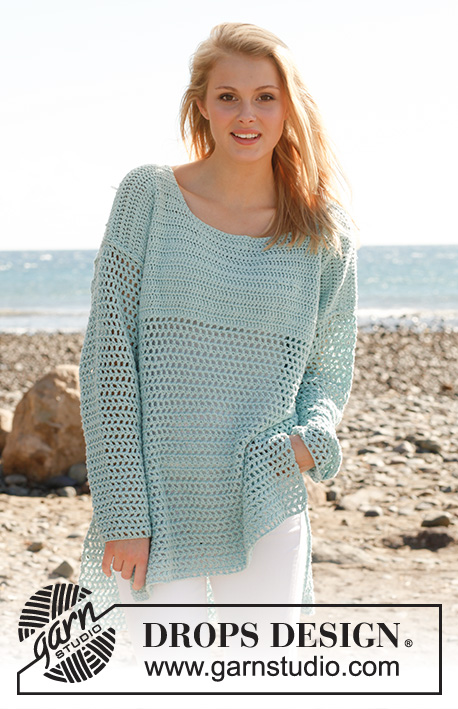
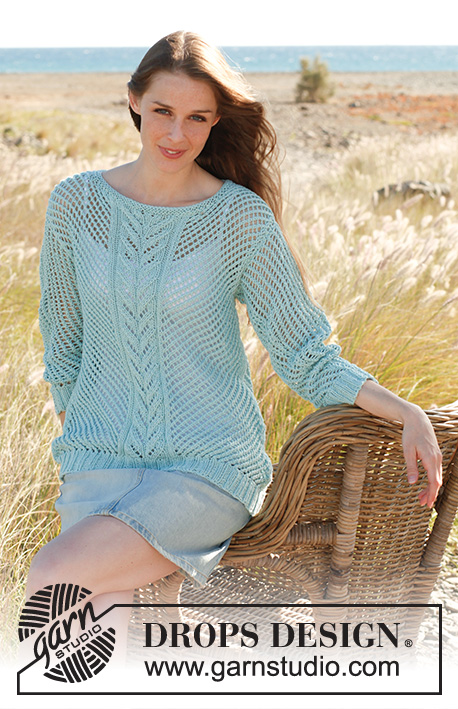
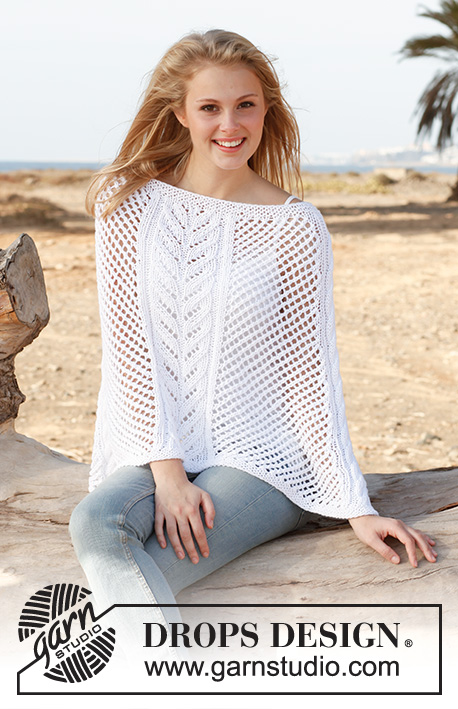
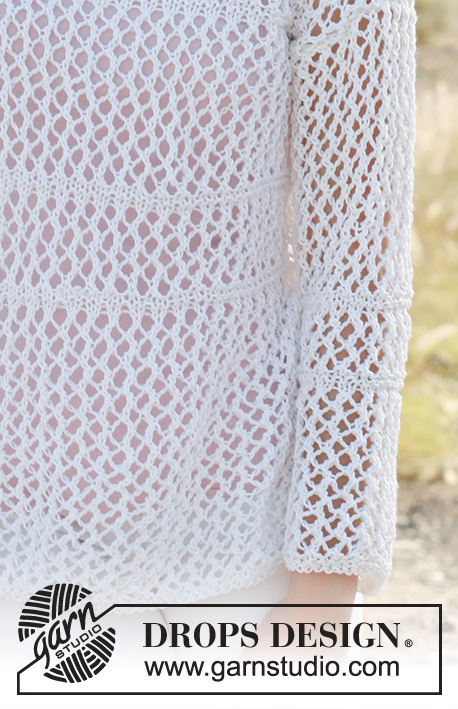
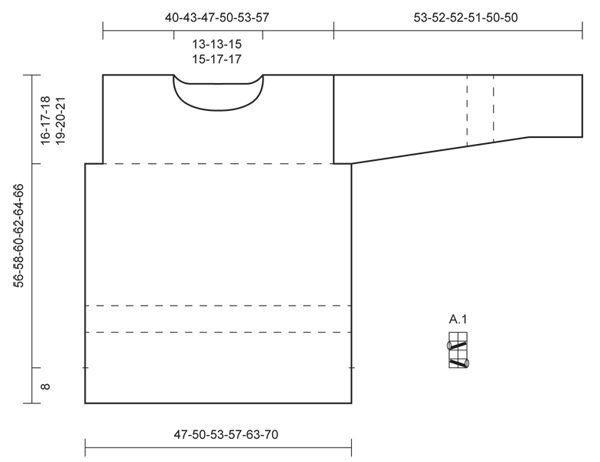
Knitted DROPS jumper with lace pattern in "Bomull Lin" or "Paris". Size: S - XXXL.
DROPS 145-12 |
|||||||||||||
|
GARTER ST (back and forth on needle): K all rows. 1 ridge = 2 rows K. NOTE: All edge sts in the sides are worked in garter st. PATTERN: See diagram A.1, diagram shows all rows in 1 pattern repetition seen from RS. INCREASE TIP: Inc 1 st by making 1 YO inside 1 edge st in each side. Work the new sts gradually in pattern A.1. -------------------------------------------------------- BACK PIECE: Worked back and forth on needle. Cast on 58-62-66-70-78-86 sts on circular needle size 5.5 mm with Bomull-Lin. Work 4 rows in GARTER ST - see explanation above (1st row = RS). Then work A.1 with 1 edge st in garter st in each side. REMEMBER THE KNITTING TENSION! When piece measures 20-21-22-23-24-25 cm, work 4 rows in garter st over all sts. Then work A.1 until piece measures 28-29-30-31-32-33 cm, then work 2 ridges over all sts (= 2 stripes with ridges between pattern A.1). Then work A.1 until piece measures 40-41-42-43-44-45 cm, then K 2 rows (= 1 ridge) over all sts - AT THE SAME TIME cast off for armholes at the beg of these 2 rows as follows: Cast off 4-4-4-4-6-8 sts = 50-54-58-62-66-70 sts. K 2 rows over all sts (= 2 ridges in total), then work A.1 with 1 st in garter st in each side until finished measurements. When piece measures 54-56-58-60-62-64 cm, cast off the middle 12-12-14-14-16-16 sts for neck and finish each shoulder separately. Then cast off 2 sts on next row from neck = 17-19-20-22-23-25 sts remain on the shoulder. Loosely cast off all sts when piece measures 56-58-60-62-64-66 cm. FRONT PIECE: Cast on and work as on back piece until piece measures 46-48-49-51-52-54 cm = 50-54-58-62-66-70 sts on row. On next row from RS, cast off the middle 6-6-8-8-10-10 sts for neck and finish each shoulder separately. Then cast off on every row from neck as follows: Cast off 2 sts 2 times, 1 st 1 time = 17-19-20-22-23-25 sts remain on shoulder. Loosely cast off all sts when piece measures 56-58-60-62-64-66 cm. SLEEVE: Worked back and forth on needle. Cast on 28-30-30-32-34-36 sts on circular needle size 5.5 mm. Work 4 rows in GARTER ST (1st row = RS). Then work A.1 with 1 edge st in garter st in each side. When piece measures 8-8-8-7-7-7 cm, inc 1 st in each side - READ INCREASE TIP, work the new sts gradually in pattern. Repeat inc every 10-8-6½-6½-6-6 cm 4-5-6-6-6-6 more times (5-6-7-7-7-7 times in total) = 38-42-44-46-48-50 sts - AT THE SAME TIME when piece measures approx. 14 cm, work 2 ridges over all sts, continue with A.1 until piece measures 22 cm, then work 2 ridges (= 2 stripes with ridges between pattern A.1). Continue with A.1 with 1 edge st in garter st until piece measures 50-49-49-48-45-43 cm, now insert 1 marker in each side of sleeve (for assembly). Continue until piece measures 53-52-52-51-50-50 cm (shorter measurements in the larger sizes because of broader shoulder width). Loosely cast off all sts. ASSEMBLY: Sew shoulder seams in front loop of outermost sts. Sew in sleeves, sew sleeve seams inside 1 edge st - NOTE: The section worked after the marker at the top of sleeve, should fit the cast off for armhole. Sew side seams from armholes and down, but leave approx 8 cm open at the bottom for vents. NECK EDGE: Worked in the round. Knit up from RS approx. 70 to 80 sts around the neck on circular needle size 5.5 mm (40 cm). P next round - while AT THE SAME TIME adjusting no of sts to 62-62-68-68-74-74. K 1 round and P 1 round (= 2 ridges in total), loosely cast off all sts on next round. |
|||||||||||||
Diagram explanations |
|||||||||||||
|
|||||||||||||
 |
|||||||||||||
Have you finished this pattern?Tag your pictures with #dropspattern #everydaysweater or submit them to the #dropsfan gallery. Do you need help with this pattern?You'll find 16 tutorial videos, a Comments/Questions area and more by visiting the pattern on garnstudio.com. © 1982-2026 DROPS Design A/S. We reserve all rights. This document, including all its sub-sections, has copyrights. Read more about what you can do with our patterns at the bottom of each pattern on our site. |
|||||||||||||


With over 40 years in knitting and crochet design, DROPS Design offers one of the most extensive collections of free patterns on the internet - translated to 17 languages. As of today we count 324 catalogues and 12290 patterns translated into English (UK/cm).
We work hard to bring you the best knitting and crochet have to offer, inspiration and advice as well as great quality yarns at incredible prices! Would you like to use our patterns for other than personal use? You can read what you are allowed to do in the Copyright text at the bottom of all our patterns. Happy crafting!
Post a comment to pattern DROPS 145-12
We would love to hear what you have to say about this pattern!
If you want to leave a question, please make sure you select the correct category in the form below, to speed up the answering process. Required fields are marked *.