
Popular categories
Looking for a yarn?


Comments / Questions (51)
Margaret Black wrote:
Hi again when i have done the pick ups and 2cm how do I knowcwhich is the right side to start stocking st.this is the first boot.would the right side start from 5 garter st side or curved edge,thank you.
23.02.2015 - 12:07Margaret Black wrote:
Where do I put the markers...ie mid toe and heel?help
23.02.2015 - 08:16DROPS Design answered:
Dear Mrs Black, that's correct, put 1 marker on mid toe (= towards the sts worked back and forth before) and 1 mid back - make sure there is the same number between markers. Happy knitting!
23.02.2015 - 10:57
![]() Maureen wrote:
Maureen wrote:
Would appreciate some help. In the foot section, where the 11/13/13 stitches (middle piece) are worked, does this end on a right or wrong sided row? and then do you break off yarn? and start again at the picking up the stitches off the stitch holder? When you're picking up the side stitches, are you picking up and knitting, then continuing in the round with seed stitch? I am using a circular needle. I hope you understand my questions. Thanks for your time.
12.02.2015 - 18:44DROPS Design answered:
Dear Maureen, adjust last row over the 11-13 sts for upper foot to required measurements, cut the yarn and start again from RS: slip sts from st holder back to needle, pick up sts sts along side of middle piece, slip sts from middle piece, pick up sts along other side of middle piece. Happy knitting!
13.02.2015 - 09:23
![]() Iliane wrote:
Iliane wrote:
Ich habe diese Schuhe gestrickt, weil sie so schön aussahen. Leider ist der Schaft viel zu weit und auch wenn ich ihn enger nähe, sitzen die Schuhe überhaupt nicht gut. Ich werde soe wohl auftrennen und normale Socken draus machen. Schade!
23.10.2014 - 10:57DROPS Design answered:
Stimmt denn Ihre Maschenprobe? Das ist ganz wichtig für eine richtige Passform. Wenn Sie nicht die kleinste Größe gestrickt haben, können Sie versuchen, die M-Zahl dieser Größe zu verwenden, aber die Fußrücken-Länge einer größeren Größe zu stricken (und entsprechend die M-Zahl aus dem Rand auffassen), wenn Sie sehr schmale Beine und Füße haben.
23.10.2014 - 13:23
![]() Maria Teresa wrote:
Maria Teresa wrote:
En la traducción del patron he comprobado que hay un error en el número de puntos que hay que montar para la pierna en la talla 35/37: pone 32 puntos, cuando en realidad deben ser 42
02.03.2014 - 12:59
![]() Andie Midbon wrote:
Andie Midbon wrote:
Thank You for the msg. I understand what you recommend for the 2nd slipper but it is not possible to bind off stiches at the end as you end up with 1 stitch left on your needle and the yarn at that end. Please help. Thank You. The slippers are adorable but I want to finish them.
07.02.2014 - 00:48DROPS Design answered:
If you don't want to cut the yarn at the end of row, you can also bind off in the beg of the row from WS instead, work over the middle sts, and put last sts on a holder.
07.02.2014 - 01:28
![]() Andie Midbon wrote:
Andie Midbon wrote:
Please help me with the second slipper. Obviously the buttons go on the outside of the left slipper, but I can't figure out how to reverse the pattern. Thank You.
06.02.2014 - 02:34DROPS Design answered:
Dear Mrs Midbon, on 1st slipper, you cast off first 5 sts, keep then on needle the next 9-11 sts and put on a st holder the remaining 28-30 sts. On 2nd slipper, you will put on a st holder the first 28-30 sts, keep the 9-11 next sts for upper foot on needle and cast off the last 5 sts, and then continue as for 1st slipper. Happy knitting!
06.02.2014 - 08:58
![]() Andie Midbon wrote:
Andie Midbon wrote:
The instructions for the second slipper are too vague....it has taken me a whole day to figure out what you mean and am not even sure I have it right. The keep the last 9 and slip the remaining 28 should be reversed in the instructions....soooo confusing
05.02.2014 - 19:38
![]() Laurel wrote:
Laurel wrote:
Started this pattern but don't see any instructions for the slipper. How many stitches are cast on, etc.
03.12.2013 - 03:50Laurel answered:
Please disregard my question. I have figured out the pattern. Thanks.
03.12.2013 - 03:52
![]() BOURDET wrote:
BOURDET wrote:
Bonsoir, Concernant le Modèle 142-36 Je ne comprends pas bien où mettre les marqueurs. 1 Marqueur milieu devant = milieu des 11 m? Pointe ? et 1 Marqueur milieu dos ? sur les 28 mailles ? où? Car ça fait 2 fois que je recommence Merci
24.10.2013 - 19:46DROPS Design answered:
Bonjour Mme Bourdet, à la fin du chausson, les marqueurs se placent, 1 au milieu devant (côté pointe du pied= dans la 6ème des 11 m du milieu devant) et l'autre au milieu dos (côté talon). Vous diminuez ensuite 1 m de chaque côté des m avec les marqueurs. Bon tricot!
24.10.2013 - 21:29
|
|
St Louis Boots#stlouisbootsslippers |
|
|
|
|
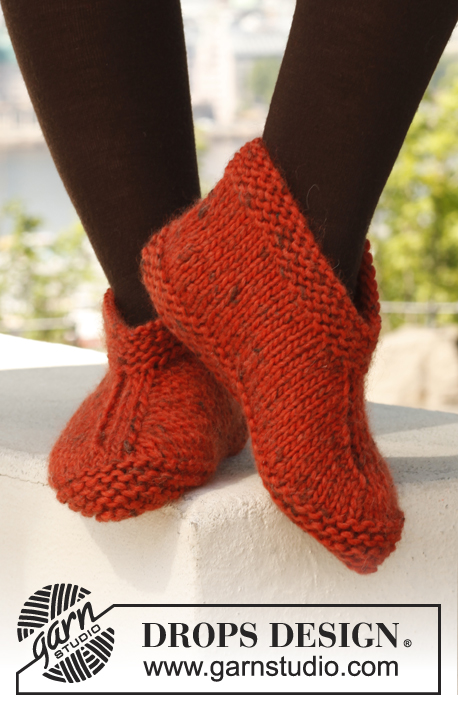
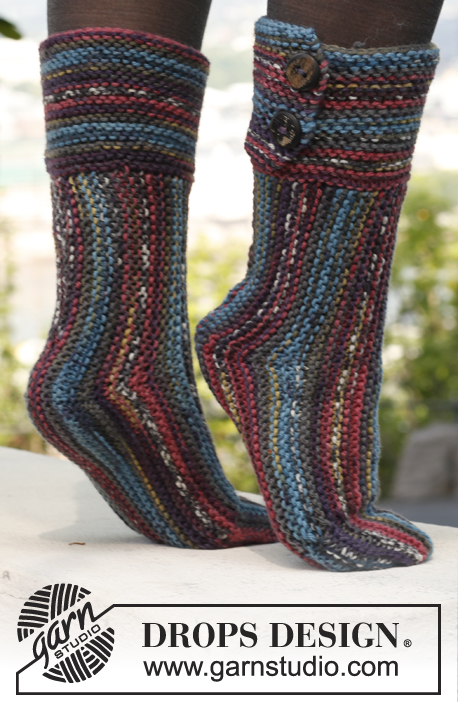
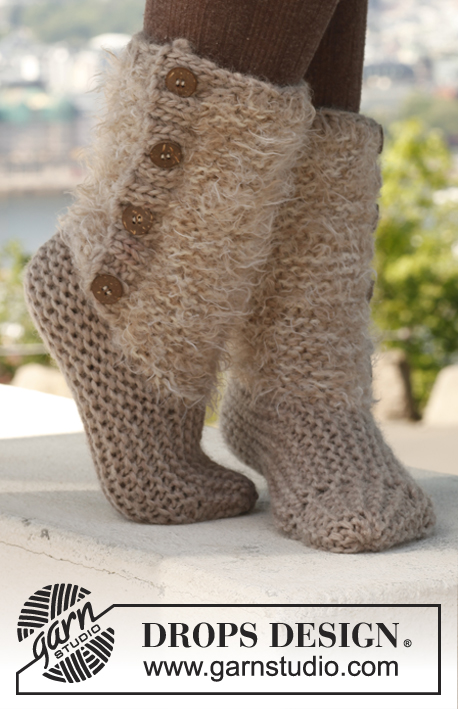
Knitted DROPS slippers in moss st in ”Snow”. Size 35 to 42
DROPS 142-36 |
|
|
GARTER ST (back and forth on needle): K all rows. 1 ridge = 2 rows K. MOSS ST: Row 1: * K 1, P 1 *, repeat from *-*. Row 2: K over P and P over K. Repeat 2nd row. ---------------------------------------------------------- SLIPPERS: Piece is first worked back and forth and then in the round on double pointed needles. LEG: Cast on 42-44-46 sts on needle size 6 mm with Snow. Work 2 ridges in GARTER ST - see explanation above, then work in MOSS ST with 5 sts in garter st in each side - see explanation above. Work back and forth until piece measures 15 cm. Cast off the first 5 sts = 37-39-41 sts. FOOT: Now keep the first 9-11-11 sts on the needle (= middle piece), slip the remaining 28-28-30 sts on a stitch holder. Continue in moss st back and forth over the 9-11-11 sts - AT THE SAME TIME on 1st row cast on 1 new st in each side (edge st) = 11-13-13 sts. When 7-8½-10 cm have been worked, cast off 1 edge st in each side = 9-11-11 sts. Then slip the sts from stitch holder back on double pointed needles size 6 mm and knit up 12-14-16 sts on each side of middle piece inside 1 edge st (do not cast on over the 5 sts in garter st that have been cast off)= 61-67-73 sts on needle. Now measure piece from here and work in the round on double pointed needles. Insert 1 marker mid front of toes and 1 marker mid back on heel. Continue in the round in moss st for 2 cm. Then work in stocking st - AT THE SAME TIME K 2 sts tog on each side of every marker every other round (= 4 sts less per round) continue dec until section in stocking st measures 3-3-4 cm, cast off. Sew tog seam mid under foot in outermost st to avoid a chunky seam. Knit another slipper, but now cast off the last 5 sts, then keep the last 9-11-11 sts on needle, slip the remaining 28-28-30 sts on a stitch holder. Then work as first slipper. ASSEMBLY: Place the 5 sts in garter st on leg on top of each other and sew on three buttons through both layers. |
|
Have you finished this pattern?Tag your pictures with #dropspattern #stlouisbootsslippers or submit them to the #dropsfan gallery. Do you need help with this pattern?You'll find 8 tutorial videos, a Comments/Questions area and more by visiting the pattern on garnstudio.com. © 1982-2026 DROPS Design A/S. We reserve all rights. This document, including all its sub-sections, has copyrights. Read more about what you can do with our patterns at the bottom of each pattern on our site. |


With over 40 years in knitting and crochet design, DROPS Design offers one of the most extensive collections of free patterns on the internet - translated to 17 languages. As of today we count 324 catalogues and 12290 patterns translated into English (UK/cm).
We work hard to bring you the best knitting and crochet have to offer, inspiration and advice as well as great quality yarns at incredible prices! Would you like to use our patterns for other than personal use? You can read what you are allowed to do in the Copyright text at the bottom of all our patterns. Happy crafting!
Post a comment to pattern DROPS 142-36
We would love to hear what you have to say about this pattern!
If you want to leave a question, please make sure you select the correct category in the form below, to speed up the answering process. Required fields are marked *.