
Popular categories
Looking for a yarn?


Comments / Questions (123)
Margaret Pinero wrote:
Please indicate the amount needed for each item.thanks. There are many that I would love to make but there is no indication of yarn needed.please advise. Thanks.
24.07.2017 - 09:42DROPS Design answered:
Dear Mrs Pinero, you will find amount required for each size under each pattern under tab "Materials", example for this topo: 250 g DROPS Cotton Viscose in size S / 50 g a ball = 5 balls DROPS Cotton Viscose are required in size S. Happy crocheting!
24.07.2017 - 09:48
![]() Anita wrote:
Anita wrote:
Salve, chiedo gentilmente un chiarimento: alla fine della seconda riga, dopo aver ripetuto , * 7 catenelle, saltare 3 m.b., 1 m.b. nella m.b. successiva, 3 catenelle, 1 m.b. nella stessa m.b. * faccio 7 catenelle e una maglia bassa nella quarta ed ultima catenella nella riga. In quest'ultima maglia devo fare anche 3 cat. e una ma bassa o giro con le 8 catenelle per la terza riga? La stessa domanda vale per a fine della terza riga.Grazie, buona serata
02.07.2017 - 18:50DROPS Design answered:
Buonasera Anita. Deve finire la riga 2 dopo aver ripetuto una sequenza intera di: 7 catenelle, saltare 3 m.b., 1 m.b. nella m.b. successiva, 3 catenelle, 1 m.b. nella stessa m.b. Gira poi il lavoro con le 8 catenelle. Analogamente per la riga 3. Buon lavoro!
02.07.2017 - 21:17
![]() Michaela Schmidt wrote:
Michaela Schmidt wrote:
Hallo Ich habe gerade die ersten 10 Reihen gehäkelt. Nun fällt mir auf, dass das Shirt nach oben hin breiter wird. Die Anzahl der zu häkelnden Luftmaschenbögen bleibt aber konstant bei 20 (Gr. M). Ist das so gewollt oder mache ich etwas falsch? LG Michaela
22.06.2017 - 18:16DROPS Design answered:
Liebe Michaela, beachten Sie, daß Ihre Maschenproben immer stimmt, dh 4 grosse Lm-Bogen = 10 cm breit. Viel Spaß beim häkeln!
23.06.2017 - 08:13
![]() Karolyn Grady wrote:
Karolyn Grady wrote:
This pattern worked up like a breeze! I selected Cotton Viscose in "Rust" and used a "D" hook for size Medium. Decided to add pearlized beads at neck edging for oomph. Thank you for your free patterns and beautiful yarns!
02.06.2017 - 02:39
![]() Diana wrote:
Diana wrote:
Ik zit met toer 3. Moet ik gewoon in de grote boog insteken of in een steek van de grote boog.
11.05.2017 - 22:22DROPS Design answered:
Hallo Diana, Je kunt inderdaad in de boog insteken (en niet in een steek van de boog).
12.05.2017 - 13:13
![]() Marjon Den Adel wrote:
Marjon Den Adel wrote:
Ik zit maar te tobben met het keren bij de schouders aan de de halskant...hoe keer je daar? Nog wel 3 lossen en dan keren maar met hoeveel? Geen 3 lossen voor het keren? Maar ook dan weer de vraag hoe te keren...met hoeveel? Vasten of lossen? Al vanalles geprobeerd maar ik kom er niet uit....bij keren met 8 lossen blijft er namelijk een grote lus uitsteken omdat je de volgende toer moet minderen en daar dus niet meer haakt.
30.04.2017 - 17:11DROPS Design answered:
Hallo Marjon, Het is inderdaad de bedoeling dat je steeds toer 3 herhaalt en dus begint/keert met 8 lossen. Bij het maken van de halsrand vallen evt uitstekende lossenbogen wel weg.
03.05.2017 - 09:27
![]() Tina wrote:
Tina wrote:
Hallo Drops-Design-Team, habe das Top Florette ( Nr. 136-24) gehäkelt und bin jetzt stecken geblieben beim Ansatz des zweiten Teils des Halsausschnittes! Wie bzw. wo wird der Faden wieder angesetzt, damit das Muster korrekt fortläuft??? Habe schon einige Versuche gemacht, aber ohne Erfolg - bitte also um Ihre Hilfe!!!! Mit freundlichem Gruß Tina
19.08.2016 - 17:16DROPS Design answered:
Liebe Tina, für den 1. Shulter haben Sie in die ersten 7-8-9-10-11 Lm-Bogen gehäkelt, für den 2. Schulter werden Sie in die letzten 7-8-9-10-11 Lm-Bogen häkeln. Die freie Lm-Bogen in der Mitte = Halsausschnitt.
01.11.2016 - 15:16
![]() Candy Rcoll wrote:
Candy Rcoll wrote:
I made the 96 ch. Skiped one and on the second, sc. Then I am told to do 1 in EVERY 4 chain. But then the pattern says to skip one and on the fifth one do a sc, and to repeat this part. How can this be? What do I repeat when I am told first to do 1 every 4th?
18.06.2016 - 01:06DROPS Design answered:
Dear Mrs Rcoll, with the 96 fundation ch, work first 1 sc in 2nd ch from hook, then 1 sc in each of the next 4 ch, then *skip next ch, work 1 sc in each of the next 5 ch*, repeat from *-* a total of 15 times, ie to the end of ch = 80 sc, and you have skipped every 6th ch from ch-row. Happy crocheting!
20.06.2016 - 08:37
![]() Jodie Schossow wrote:
Jodie Schossow wrote:
I have tried to print the pattern, but, for for some reason when I hit print the pattern then it says to go to another page to print the pattern. So you go there and you get a page that you can tell has all of the ads taken out, but there isn't a button to print the pattern on that page. So how do I get the pattern to print.
02.05.2016 - 18:17DROPS Design answered:
Dear Mrs Schossow, when clicking on the "print button" a new window will open, click on "Continue to print the pattern", a new window will open allowing you to choose the settings of your printer. Happy crocheting!
03.05.2016 - 08:38
![]() Alexia wrote:
Alexia wrote:
Hola. Acabo de empezar la labor pero me resulta raro que después de la hilera 1, la tira no sea recta..se curva. Seguro que hay que saltar 1 cadena y después los 5 p.b? o es que así es como debe ser, es decir, que la tira sea algo curva. Gracias y saludos
08.04.2016 - 14:11DROPS Design answered:
Hola Alexia. En los patrones de ganchillo casi siempre la primera cadeneta tiene más puntos que la fila/vta 1 para que el borde no quede demasiado tenso. Si la primera fila se curva - no queda recta - significa que estás trabajando los p.b. demasiado prietos.
09.04.2016 - 20:55
|
|
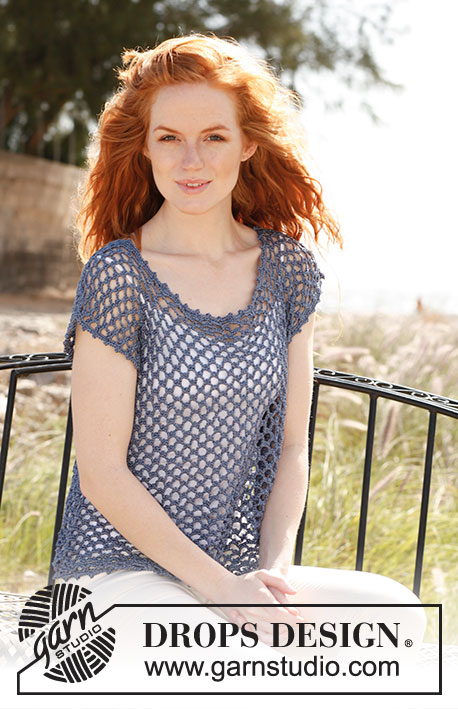
Florette#florettetop |
|
 |
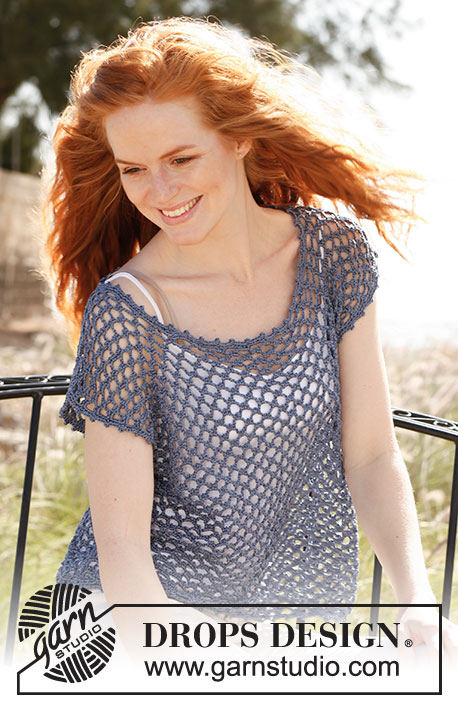 |
Crochet DROPS top in ”Cotton Viscose”. Size: S - XXXL.
DROPS 136-24 |
|
|
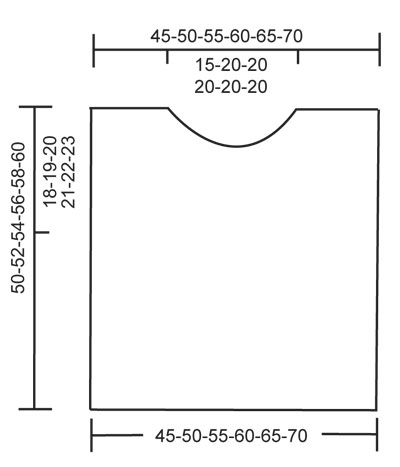
MEASURE TIPS: All length measures are taken holding the piece up. FRONT PIECE: Work 86-96-106-115-125-134 loose ch on hook size 3.5 mm with Cotton Viscose. ROW 1: Work 1 dc in 2nd ch from hook, 1 dc in each of the next 6-4-2-5-3-6 ch, * skip 1 ch, 1 dc in each of the next 5 ch *, repeat from *-* the rest of the ch-row = 72-80-88-96-104-112 dc. ROW 2: Turn piece with 8 ch, skip the first 3 dc, 1 dc in next dc (= 4th dc), 3 ch, 1 dc in same dc, * 7 ch, skip 3 dc, 1 dc in next dc, 3 ch, 1 dc in same dc *, repeat from *-* = 18-20-22-24-26-28 large ch-loops. ROW 3: Turn piece with 8 ch, 1 dc in first large ch-loop, 3 ch, 1 dc in same ch-loop, * 7 ch, 1 dc in next large ch-loop, 3 ch, 1 dc in same ch-loop *, repeat from *-*. Repeat 3rd row upwards. When piece measures approx. 40-42-43-45-46-48 cm, beg dec for neck. Work next row as follows: Work as before over the first 7-7-8-9-10-11 large ch-loops, turn piece. Work back, turn piece, work as before over the first 6-6-7-8-9-10 large ch-loops, turn piece. Then work back and forth over these 6-6-7-8-9-10 ch-loops until piece measures approx. 50-52-54-56-58-60 cm, cut the thread. Repeat the same way in the other side (the middle 6-8-8-8-8-8 ch-loops = neck). BACK PIECE: Work as front piece but do not dec for neck, just continue to work straight up until the same no of ch-loops have been worked vertically as on front piece. Cut the thread. ASSEMBLY: Crochet the shoulder seams tog as follows: 1 dc in first large ch-loop on front piece, 2 ch, 1 dc in first large ch-loop on back piece, * 2 ch, 1 dc in next large ch-loop on front piece, 2 ch, 1 dc in next large ch-loop on back piece *, repeat from *-* along the entire shoulder. Crochet the side seams tog the same way up to armhole (armhole = 18-19-20-21-22-23 cm). NECK EDGE: Work 1 round with dc around the neck, there should be approx. 1 dc in every small ch-loop and 5 dc in every large ch-loop, adjust so that the edge is not too tight (adjust so that no of sts is divisible by 4). Work next round as follows: 1 dc in each of the first 4 dc, * 1 picot (= 3 ch, 1 dc in first ch), 1 dc in each of the next 4 dc *, repeat from *-* the entire round, finish with 1 picot and 1 sl st in first dc. SLEEVE EDGE: Work 2 rounds around the armholes the same way as around the neck. BOTTOM EDGE: Work 1 round with picots around the cast on edge at the bottom, the same way as last round around the neck and armholes. |
|
 |
|
Have you finished this pattern?Tag your pictures with #dropspattern #florettetop or submit them to the #dropsfan gallery. Do you need help with this pattern?You'll find 3 tutorial videos, a Comments/Questions area and more by visiting the pattern on garnstudio.com. © 1982-2026 DROPS Design A/S. We reserve all rights. This document, including all its sub-sections, has copyrights. Read more about what you can do with our patterns at the bottom of each pattern on our site. |
|


With over 40 years in knitting and crochet design, DROPS Design offers one of the most extensive collections of free patterns on the internet - translated to 17 languages. As of today we count 324 catalogues and 12284 patterns translated into English (UK/cm).
We work hard to bring you the best knitting and crochet have to offer, inspiration and advice as well as great quality yarns at incredible prices! Would you like to use our patterns for other than personal use? You can read what you are allowed to do in the Copyright text at the bottom of all our patterns. Happy crafting!
Post a comment to pattern DROPS 136-24
We would love to hear what you have to say about this pattern!
If you want to leave a question, please make sure you select the correct category in the form below, to speed up the answering process. Required fields are marked *.