
Popular categories
Looking for a yarn?


Comments / Questions (98)
![]() Caterina wrote:
Caterina wrote:
Scusate, cerco di spiegare meglio il dubbio che ho: l'unione delle parti anteriori del maglioncino e l'aggiunta delle maglie per lo scollo si esegue in corrispondenza dell'ultimo ferro dell'ultima delle due ripetizioni del grafico M1 del davanti? grazie
31.03.2014 - 17:27DROPS Design answered:
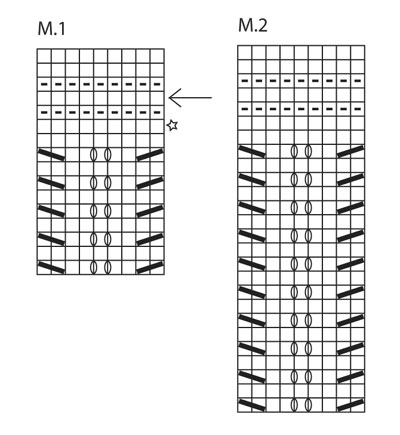
Buonasera Caterina, deve lavorare il davanti sx e dx fino a 46 cm, in modo che l'ultimo f sia dal diritto del lavoro e sia quello indicato dalla freccia nel diagramma M.1; a questo punto deve inserire un segnapunti e continuare a lavorare i 2 f successivi del diagramma M.1. L'unione delle parti è su un ferro dal rovescio del lavoro, l'ultimo del diagramma M.1. Ci riscriva se ha altri dubbi. Buon lavoro!
31.03.2014 - 20:23
![]() Caterina wrote:
Caterina wrote:
Buongiorno; un dubbio:a cm 46 del davanti, il grafico dice di mettere il segnapunti, lavorare l'altro lato anteriore e poi unirli con l'aggiunta dei punti dello scollo posteriore, ma mi ritrovo che in corrispondenza di quei cm 46 mi manca ancora da fare l'ultima ripetizione del diagramma m1del davanti....(m1:2 volte)
30.03.2014 - 09:07DROPS Design answered:
Buonasera Caterina, deve lavorare il davanti sx e dx fino a 46 cm, in modo che l'ultimo f sia dal diritto del lavoro e sia quello indicato dalla freccia nel diagramma M.1; a questo punto deve inserire un segnapunti e continuare a lavorare i 2 f successivi del diagramma M.1. L'unione delle parti è su un ferro dal rovescio del lavoro, l'ultimo del diagramma M.1. Ci riscriva se ha altri dubbi. Buon lavoro!
01.04.2014 - 21:44
![]() Bärbel Sraub wrote:
Bärbel Sraub wrote:
Wenn ich die neuen 34 M.(Nacken)zuerst in 2R.Krausrippe stricke, wo sind dann laut Bild die 3R.re (Halskante). Mit freundlichen Grüßen Bärbel Straub
29.12.2013 - 15:47DROPS Design answered:
Liebe Bärbel, wenn Sie das 3. Foto anklicken sehen Sie eine Vergrösserung dieser Stelle: diese M werden auch kraus weitergestrickt und nach den 2 Krausrippen werden alle M ins Muster integriert.
01.01.2014 - 18:06
![]() Nenny Sprong wrote:
Nenny Sprong wrote:
Bij het breien van dit vestje stuit ik op het volgende probleem. Bij de rughals moet ik 34 steken 4 nld. ribbel breien. Bij de afwerking staat ca. 100 steken opnemen voor de hals. Moet dit aan beide kanten en hoe werk ik de hals dan bij de schouder af?
30.09.2013 - 18:01DROPS Design answered:
Hoi Nenny. Je moet opnemen langs de hele rand van de hals; dus ook langs beide voorpanden (incl. de st van de hulpdraden op de voorpanden). Je moet eerst de schoudernaden sluiten voordat je begint met de halsrand.
30.09.2013 - 20:54
![]() Doncelle wrote:
Doncelle wrote:
Bonjour, j'adore ce modèle mais je suis perdue quand j'arrive aux diminutions(milieu devant) pour le côté droit, comment dois je poursuivre le dessin en tenant compte des mailles à rabattre? j'ai déjà essayé une fois et j'ai trop de points en bout de ligne avec les jetés et autres, pourriez vous m'aider s'il vous plait merci
18.04.2013 - 21:11DROPS Design answered:
Bonjour Madame Doncelle, Lorsque vous diminuez dans un point ajouré, assurez-vous que les jetés du motif sont toujours compensés par 2 m ens. Vous pouvez aussi tricoter en jersey les mailles des rapports du diagramme qui n'ont plus suffisamment de mailles pour être tricotées en point fantaisie. Pour toute aide complémentaire, n'hésitez pas à demander à votre magasin DROPS sur le forum DROPS. Bon tricot !
19.04.2013 - 08:50
![]() Sylvie wrote:
Sylvie wrote:
Bonjour, Je viens de finir le modèle mais j'ai du le faire un peu moins haut sinon je n'avais pas assez de fil. (taille L)
24.07.2012 - 23:31
![]() Jette wrote:
Jette wrote:
Jeg ved ikke om det er mig der "blind" Men jeg kan altså ikke finde en forklaring på stjernen og pilen og jeg kan ikke få opskriften til at passe, suk,suk
24.05.2012 - 23:13DROPS Design answered:
Pilen finder du nederst i højre forstk. Stjernen finder du nederst i rygstykket.
25.05.2012 - 11:29
![]() Canasucre wrote:
Canasucre wrote:
Je viens de recevoir ma laine.J'ai besoin de votre aide pour le commencer que veut dire(tric 49m y compris 1m lisière et 3m bordure? Merci de votre aide
21.04.2012 - 11:48DROPS Design answered:
Bonjour Canasucre. Le nombre de mailles total à monter est de 49 m (en taille S/M), ce nombre comprend la m lis sur le côté et les 3 m de bordure devant. Bon tricot !
23.04.2012 - 09:56
![]() Jutta wrote:
Jutta wrote:
Mit welcher nadelstärke wird die ganze Jacke gestrickt?beim Material ist Nr.4 angegeben und in der anleitung Nr.3.
16.04.2012 - 20:34DROPS Design answered:
Das soll Nr. 4 heissen. Ich habe das gleich geändert.
18.04.2012 - 10:14
![]() Estermarie wrote:
Estermarie wrote:
Ups. Fandt ud af det med stjernen og pilen. Undskyld. Piiiinligt
26.03.2012 - 21:12DROPS Design answered:
Det var godt ;o) God fornöjelse med at strikke!
27.03.2012 - 20:33
|
||||||||||||||||
Mystic River#mysticrivercardigan |
||||||||||||||||
 |
 |
|||||||||||||||
Knitted DROPS jacket with short sleeves and lace pattern in ”Cotton Light” or "Belle". Size: S - XXXL
DROPS 136-6 |
||||||||||||||||
|
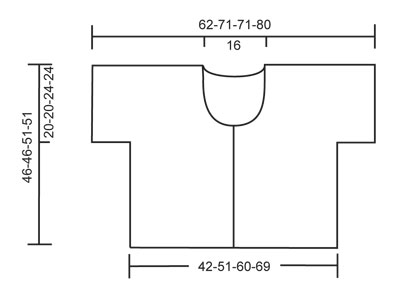
PATTERN: See diagrams M.1 and M.2 – diagrams show pattern from RS. 1 diagram = 1 repetition = 9 sts in width. Work front piece as follows (from bottom up): Diagram M.1: 2-2-3-3 times, diagram M.2: 1 time, diagram M.1: 1 time, diagram M.2: 1 time and diagram M.1: 2 times. Work back piece as follows (top down): Diagram M.1: 2 times, diagram M.2: 1 time, diagram M.1: 1 time, diagram M.2: 1 time and diagram M.1: 2-2-3-3 times. GARTER ST (back and forth on needle): K all rows. -------------------------------------------------------- JACKET: First work right front piece and inc for sleeve, then work left front piece and sleeve, then slip these tog and work down back piece. Worked back and forth on a circular needle to make room for all the sts. RIGHT FRONT PIECE: Cast on 49-58-67-76 sts (incl 1 edge st in the side and 3 band sts towards mid front) on needle size 4 mm with Cotton Light or Belle. K 4 rows (1st row = WS), then P 1 row from WS. Work next row as follows: 3 band sts in GARTER ST - see explanation above, PATTERN - see explanation above - until 1 edge st remains, work this in garter st. Continue like this. REMEMBER THE KNITTING TENSION! At the same time when piece measures 26-26-27-27 cm, cast on 20-20-11-11 new sts for sleeve at the end of next row towards the side (fewer sts in the larger sizes because of broader shoulder width) = 69-78-78-87 sts. READ ALL OF THE FOLLOWING SECTION BEFORE CONTINUING! Work sleeve sts in pattern but work the outermost 3 sts in garter st. AT THE SAME TIME when piece measures 27-27-29-29 cm, cast off for 1 button hole by K tog 2nd and 3rd st from edge and then making 1 YO. Repeat cast off for button hole when piece measures 30-30-32-32 cm. When piece measures 31-31-33-33 cm, slip the outermost 12 sts towards mid front on a stitch holder for neck. Then cast off at beg of every row from mid front: 2 sts 2 times and 1 st 4 times = 49-58-58-67 sts remain on shoulder. Continue to work as before with 1 st towards mid front in garter st until piece measures approx. 46-46-51-51 cm - adjust so that last row is worked from RS and is the row marked with an arrow in diagram M.1. Now insert a marker (= mid on top shoulder). NOW MEASURE PIECE FROM HERE! Work the 2 next to last rows in diagram M.1, put piece aside. LEFT FRONT PIECE: Cast on and work as right piece but reversed. NOTE: Do not cast off for button hole. BACK PIECE: 1st row = WS (= last row in diagram M.1). Work sts from right front piece on to circular needle size 4 mm, cast on 34 new sts (= back of neck) and work sts from left front piece on to circular needle = 132-150-150-168 sts in total. Continue with PATTERN as explained above, but work 4 rows in garter st over the 34 new sts before they are also included into pattern! When piece measures 20-20-24-24 cm from marker on shoulder, cast off the 20-20-11-11 sleeve sts in each side (cast off at beg of the next 2 rows) = 92-110-128-146 sts remain on needle. Continue the pattern with 1 edge st in garter st in each side. When working diagram M.1 for the last time, finish with the row marked with a star. Piece now measures approx. 45-45-50-50 cm from marker on shoulder. Now K 3 rows (1st row = WS). Then LOOSELY cast off with K from RS – NOTE: It is important to avoid a tight cast off edge. NECK EDGE: Knit up approx. 38-41 sts (from RS, incl sts on stitch holders) on circular needle size 4 mm along neckline of RIGHT FRONT PIECE until begin of BACK PIECE (= the 34 new stitches in garter st) . K 3 rows back and forth, then cast off. Repeat along LEFT FRONT PIECE. ASSEMBLY: Sew sleeve and side seams in one inside 1 edge st. Sew on buttons. |
||||||||||||||||
Diagram explanations |
||||||||||||||||
|
||||||||||||||||
 |
||||||||||||||||
 |
||||||||||||||||
Have you finished this pattern?Tag your pictures with #dropspattern #mysticrivercardigan or submit them to the #dropsfan gallery. Do you need help with this pattern?You'll find 12 tutorial videos, a Comments/Questions area and more by visiting the pattern on garnstudio.com. © 1982-2026 DROPS Design A/S. We reserve all rights. This document, including all its sub-sections, has copyrights. Read more about what you can do with our patterns at the bottom of each pattern on our site. |
||||||||||||||||


With over 40 years in knitting and crochet design, DROPS Design offers one of the most extensive collections of free patterns on the internet - translated to 17 languages. As of today we count 324 catalogues and 12290 patterns translated into English (UK/cm).
We work hard to bring you the best knitting and crochet have to offer, inspiration and advice as well as great quality yarns at incredible prices! Would you like to use our patterns for other than personal use? You can read what you are allowed to do in the Copyright text at the bottom of all our patterns. Happy crafting!
Post a comment to pattern DROPS 136-6
We would love to hear what you have to say about this pattern!
If you want to leave a question, please make sure you select the correct category in the form below, to speed up the answering process. Required fields are marked *.