
Popular categories
Looking for a yarn?


Comments / Questions (16)
![]() LAURENT DANIELLE wrote:
LAURENT DANIELLE wrote:
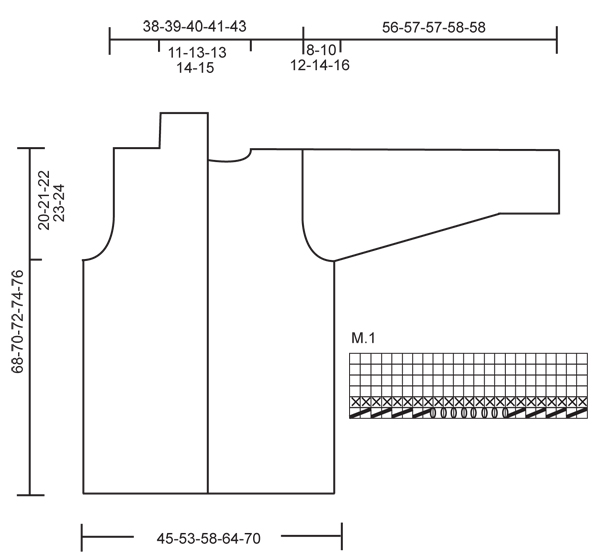
Bonsoir, je ne comprends pas bien ce qu'il faut faire, pouvez vous m'aider svp ? A 42 cm il est dit d'augmenter 1 m de ch. côté, côté milieu devant et de faire ça 4 fois tous les 7 cm (on devrait donc avoir un total de 193 m (avec 16 m au point mousse de ch. côté devant) Or il est dit à 46 cm on a 187 m et répartir 29 diminutions = 158 m (pourquoi pas 164 m)
04.09.2024 - 20:51DROPS Design answered:
Bonjour Mme Laurent, vous augmentez 2 mailles à 42 cm = vous avez ainsi 187 mailles; la prochaine augmentation se fera 7 cm plus loin soit à 49 cm, mais à 46 cm de hauteur totale, vous devez diminuer, à ce moment là vous n'avez augmenté qu'une seule fois, raison pour laquelle vous n'avez encore que 187 mailles sur l'aiguille. Bon tricot!
05.09.2024 - 09:06
![]() VU Anna wrote:
VU Anna wrote:
Bonjour Madame, Pourriez m'indiquer quel endroit je dois prendre en compte lorsque je mesure, quand le point vague a des creux, tel ce modèle. Merci infiniment pour votre aide. Anna
13.10.2017 - 21:13DROPS Design answered:
Bonjour Mme Vu, mesurez à partir du plus long des vagues. Bon tricot!
16.10.2017 - 09:21
![]() Gunvor Bentsen wrote:
Gunvor Bentsen wrote:
Jeg strikker denne jakken i xl. Men jeg får ikke mønstret til å stemme på armene. Får ikke mønstret til å stemme videre oppover Hva gjør jeg galt.?
05.03.2015 - 13:50DROPS Design answered:
Hei Gunvor. Du strikker M.1 over 46 m (48 m i alt inkl kantmaskerne). Det er to gentagelser af mönstret (1 gentagelse er 23 m). Naar du tager ud skal du strikke de nye masker med i mönstret, men paa pinde med kast/strik sammen, skal du strikke rett fra retten over de ökte masker
05.03.2015 - 16:26Kyra wrote:
I am knitting this jacket and I have a problem at the sleeves. I don't understand exactly what do you mean by "Work inc sts into M.1, but on rows with YO and K2 tog K inc sts from RS" Do you mean that the sts increased will be included in M1 when I have a another 8 sts in the side?
20.02.2014 - 17:19DROPS Design answered:
Dear Kyra, you are correct, K inc sts when repeating first row in M.1 until you get enough sts to work 1 more repetition of the diagram. Happy knitting!
21.02.2014 - 08:49Kyra wrote:
Hello! You say on the body part: "When piece measures 42-44-46-48-50 cm inc 1 st each side towards mid front, and repeat the inc on every 7 cm a total of 4 times, work inc sts in garter st". That means that the band of 12 garter stch will increase from 12 sts to 16? Thank you.
07.02.2014 - 07:06DROPS Design answered:
Dear Kyra, you are correct, number of sts for band will inc from 12 to 16 sts. Happy knitting!
07.02.2014 - 09:38
![]() Naomi wrote:
Naomi wrote:
I do not see the number of skeins that this pattern requires under the materials list.
26.08.2013 - 20:00DROPS Design answered:
Dear Naomi, required materials is indicated by weight for each quality and each size. Both Alpaca and Vivaldi are balls 50 g each, divide each amount by 50 to get the number of balls. Your DROPS Store will help you if required. Happy knitting!
28.08.2013 - 10:46
![]() Drops Design wrote:
Drops Design wrote:
Du fortsætter også udtagnignerne mod midt foran efter at du har delt arbejdet.
12.01.2012 - 10:39
![]() BIRGIT Larsen wrote:
BIRGIT Larsen wrote:
Hvordan kan man tage ud på hver 7cm. fra arb. måler 42 til 46 cm.og så skal begynde at tage ind igen håber at jeg har ret i at der er fejl ellers kan jeg ikke forstå opskriften da der står andre længemål på tegningen af trøjen VENLIG HILSEN birgit
12.01.2012 - 10:23
![]() Christien wrote:
Christien wrote:
In 2 weken gebreid en super gelukt
27.11.2010 - 15:25
![]() Catherine wrote:
Catherine wrote:
Encore un très joli modèle, très chic, formes très douces.
24.06.2010 - 19:29
|
|||||||||||||
Simply Amanda |
|||||||||||||
|
|
|||||||||||||
Knitted DROPS jacket with wavy pattern and collar in ”Alpaca” and ”Vivaldi”.
DROPS 123-4 |
|||||||||||||
|
GARTER ST (back and forth on needle): K all rows. PATTERN: See diagram M.1. Diagram shows the pattern from RS. BUTTONHOLES: Make buttonholes on right front band. 1 buttonhole = cast off 3rd front band st from mid front and cast on 1 new st on return row. Make buttonholes when piece measures: SIZE S/M: 29, 37 and 45 cm. SIZE L: 30, 38 and 46 cm. SIZE XL: 31, 39 and 47 cm. SIZE XXL: 32, 40 and 48 cm. SIZE XXXL: 33, 41 and 49 cm. -------------------------------------------------------- -------------------------------------------------------- BODY PIECE: Worked back and forth on circular needle from mid front. LOOSELY cast on 185-208-231-254-277 sts on circular needle size 5.5 mm with 1 thread Alpaca and 1 thread Vivaldi (= 2 threads). Work 2 rows GARTER ST – SEE ABOVE, and continue in M.1 (= 23 sts) with 12 garter sts each side (first row = from RS). REMEMBER THE KNITTING TENSION! Remember BUTTONHOLES on right front band – SEE ABOVE! When piece measures 42-44-46-48-50 cm inc 1 st each side towards mid front, and repeat the inc on every 7 cm a total of 4 times, work inc sts in garter st. Continue in M.1 and garter st on front bands until piece measures 46-47-48-49-50 cm (= 1 inc st each side towards mid front = 187-210-233-256-279 sts on needle). K 1 row from RS, AT THE SAME TIME dec 29-28-35-38-41 sts evenly (do not dec on front bands) = 158-182-198-218-238 sts. Insert a marker 43-49-53-58-63 sts in from each side (back piece = 72-84-92-102-112 sts). Change to circular needle size 5 mm and continue in garter st on all sts. When piece measures 48-49-50-51-52 cm cast off 6 sts each side for armhole (= 3 sts each side of marker) and complete front and back pieces separately. BACK PIECE: = 66-78-86-96-106 sts. Continue in garter st. Cast off for armhole each side at the beg of every row: 3 sts 0-0-0-1-1 times, 2 sts 1-3-4-4-5 times and 1 st 1-2-3-4-6 times = 60-62-64-66-68 sts. When piece measures 66-68-70-72-74 cm cast off the middle 16-18-18-20-22 sts for neck and complete each shoulder separately. Cast off 1 st on neckline on next row = 21-21-22-22-22 sts left on shoulder. Cast off when piece measures 68-70-72-74-76 cm. LEFT FRONT PIECE: Continue in garter st on all sts, AT THE SAME TIME cast off for armhole at the side as described for back piece. Continue inc on front band. When all inc and dec are complete there are 40-41-42-43-44 sts on needle. When piece measures 68-70-72-74-76 cm cast off 21-21-22-22-22 sts from RS for shoulder = 19-20-20-21-22 sts left on needle for collar. Work remaining sts on row. Now work shortened rows on front band (with start from WS) as follows: * K 2 rows on the first 8-9-9-9-10 sts only, K 2 rows on all sts *, repeat from *-* until collar measures approx 6-6-7-7-8 cm on the shorter side (measured from shoulder). Cast off. RIGHT FRONT PIECE: Like left front piece, but mirrored. SLEEVE: Worked back and forth on circular needle. Cast on 40 sts on circular needle size 5 mm with 1 thread of each quality (= 2 threads). Work garter st on all sts, When piece measures 7 cm K 1 row from WS, AT THE SAME TIME inc 8 sts evenly = 48 sts. Change to needle size 5.5 mm and continue in M.1 with 1 edge st each side. AT THE SAME TIME inc 1 st each side, and repeat the inc on every 3-2.5-2-1.5-1.5 cm a total of 13-15-18-20-23 times = 74-78-84-88-94 sts. Work inc sts into M.1, but on rows with YO and K2 tog K inc sts from RS. When piece measures 48-47-45-44-42 cm - NOTE! Less for the larger sizes because of longer sleeve cap and wider shoulder - cast off for sleeve cap each side at the beg of every row as follows: 4 sts 1 time, 3 sts 2 times, 2 sts 2-4-6-8-10 times, then 3 sts each side until piece measures 55-56-56-57-57 cm. NOTE: Make sure to cast off the right number of sts on rows with YO and K2 tog. Now cast off 4 sts 1 time each side and cast off remaining sts. Piece measures approx 56-57-57-58-58 cm. ASSEMBLY: Sew shoulder seams. Set in sleeves and sew under arm seams. Sew collar tog mid back and sew to neckline. Sew on buttons. |
|||||||||||||
Diagram explanations |
|||||||||||||
|
|||||||||||||
 |
|||||||||||||
Have you finished this pattern?Tag your pictures with #dropspattern or submit them to the #dropsfan gallery. Do you need help with this pattern?You'll find 18 tutorial videos, a Comments/Questions area and more by visiting the pattern on garnstudio.com. © 1982-2026 DROPS Design A/S. We reserve all rights. This document, including all its sub-sections, has copyrights. Read more about what you can do with our patterns at the bottom of each pattern on our site. |
|||||||||||||


With over 40 years in knitting and crochet design, DROPS Design offers one of the most extensive collections of free patterns on the internet - translated to 17 languages. As of today we count 324 catalogues and 12290 patterns translated into English (UK/cm).
We work hard to bring you the best knitting and crochet have to offer, inspiration and advice as well as great quality yarns at incredible prices! Would you like to use our patterns for other than personal use? You can read what you are allowed to do in the Copyright text at the bottom of all our patterns. Happy crafting!
Post a comment to pattern DROPS 123-4
We would love to hear what you have to say about this pattern!
If you want to leave a question, please make sure you select the correct category in the form below, to speed up the answering process. Required fields are marked *.