
Popular categories
Looking for a yarn?


Comments / Questions (176)
![]() Carrie wrote:
Carrie wrote:
Salve..mi chiedevo se fosse possibile lavorare questo modello solo con uno dei due filati anzich¨¦ tutti e due Grazie
25.04.2015 - 06:41DROPS Design answered:
Buongiorno Carrie, usando uno solo dei due filati il risultato potrebbe cambiare molto rispetto a quello del modello, però può provare ad esempio ad usare 3 capi di Alpaca (Vivaldi è un filato del gruppo C, che corrisponde a 2 capi di un filato di gruppo A); se invece vuole proprio cambiare filato, deve utilizzarne uno che le permette di lavorare il campione indicato. Buon lavoro!
26.04.2015 - 17:57
![]() Van wrote:
Van wrote:
For a small sized sweater starting from the shortened row section to create extra width for the mid back, every time we slip stitches(starting from 30 then 11(7x)), do we cut the yarn and attach new yarn in order to continue with the rest of the stitches for that row? It seems logical but just want to confirm that there will be a lot of yarn loose ends to weave in for this last section of the sweater. Thank you for your guidance.
11.11.2014 - 03:45DROPS Design answered:
Dear Mrs Van, there is no need to cut the yarn, you work as follows: work the first 30 sts from neck towards bottom edge and put them on a thread and work the remaining sts to the bottom edge. Then *work 11 sts, put them on a thread, work remaining sts, turn and work back row* repeat from *-* a total of 7 times (= 107 sts on the thread) work the remaining 6 sts and work the 107 sts from the thread back. Happy knitting!
11.11.2014 - 09:28
![]() Georgia Shirley wrote:
Georgia Shirley wrote:
Love this pattern. It looks like "Angel Wings".
01.11.2014 - 19:16
![]() Amalia León wrote:
Amalia León wrote:
Creo que las medidas del patrón tiene errores. No soy capaz de salir del punto en el que hay que hacer el huevo para la sisa (quedan pocos puntos en la parte de la espalda)
17.09.2014 - 12:21
![]() Lydia wrote:
Lydia wrote:
Hello, Does anyone have a suggestion for a yarn substitution for the pattern 119-1? I cannot wear mohair or wool at all. I do not have a problem with alpaca. I love the look of this wrap and would love to make one. Could I use two strands of the alpaca? Thank you.
24.05.2013 - 22:27DROPS Design answered:
Dear Lydia, we are used to work with another tension with 2 threads Alpaca (17 sts/10 cm), but what about 1 strand Alpaca+ 1 strand Safran or Cotton Viscose ? Please ask your Drops store that will be sure helpfull. Happy knitting!
25.05.2013 - 09:40
![]() Lillie Checknita wrote:
Lillie Checknita wrote:
Just starting to knit this for my daughter who bought your kit buthas no time orknowledge to knit this
14.04.2013 - 17:08
![]() Ava wrote:
Ava wrote:
Just started this beautiful sweater. I'm a little confused, on the left front piece where you have to bind off the 29 stitches is this done from the inner piece or outer edge when put back on the needles? Do you still do garter stitch on both edges?
21.03.2013 - 14:30DROPS Design answered:
Dear Ava, when you take back the 44 sts (size S) from st holder back, you cast off the first 29 sts from the inner side, turn and on next row, cast on 29 sts at the end of row, then work back the 69 sts from bottom part. Happy knitting!
25.03.2013 - 10:50
![]() Cheryl wrote:
Cheryl wrote:
I really need to know if when you get to the part for the arm hole if after you do the eight rows if you bind off and attach new yarn to work the 54 sts you put on the stitch holder. Then rejoin back to finish the rest of the sweater. Nowhere does it tell you to bind off and reattach when you are doing the arm hole.
02.03.2013 - 20:21DROPS Design answered:
Dear Cheryl, after you have worked the 8 rows for the underarm, you have to cut the thread and join to the 54 sts you put on the st holder. After you have worked the upper part of the armhole, you cast on sts for the armhole and knit the sts from the lower part back. Happy knitting!
04.03.2013 - 09:08
![]() Rosemary Dougherty wrote:
Rosemary Dougherty wrote:
Am interesting in knitting a lovely sweater in this pattern; however, I cannot locate a sizing chart to reference. I am wondering if I am an XL, XXL or XXXL. Please help me locate a sizing chart for this. Thank you so very much :)
20.02.2012 - 21:56DROPS Design answered:
There is a measure chart at the bottom of the pattern. The measures are in centimeters. Compare these measures with your body measures.
29.02.2012 - 00:08Vcjlevt wrote:
?????? |?????? ????? |?????? Sociale netværkssider som . Design Delhi , hvor lanceret for at hjælpe folk bliver forbundet skabt af gamle venner, møde nye venner. ???? |???? |????
29.09.2011 - 11:13
|
|||||||||||||
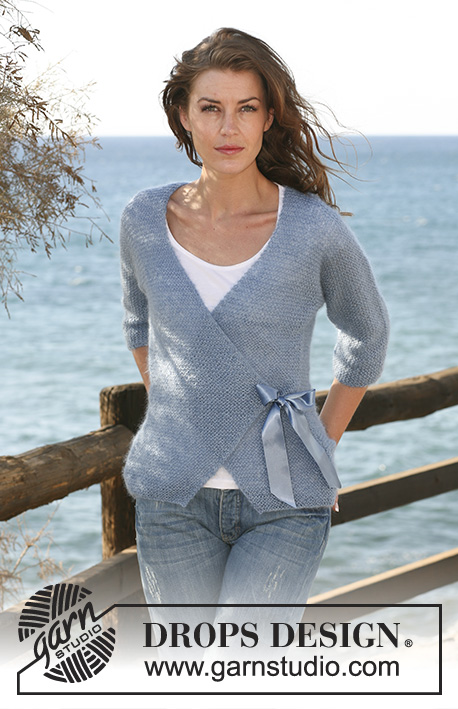
Fly Away#flyawaycardigan |
|||||||||||||
 |
 |
||||||||||||
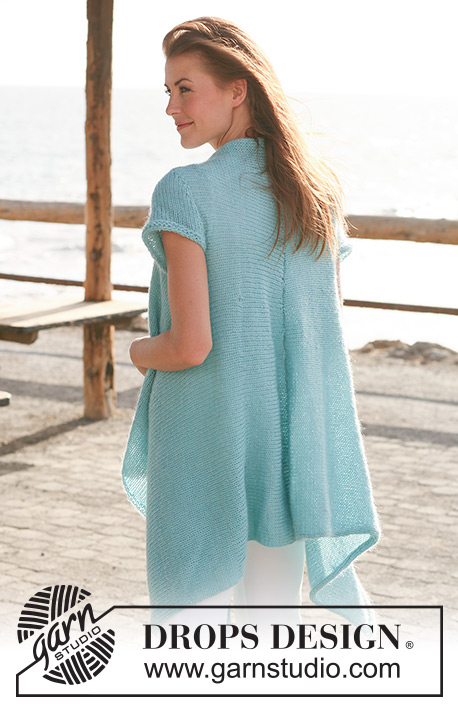
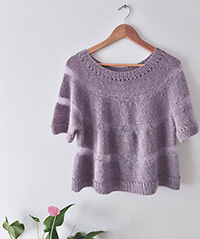
Long DROPS jacket with short sleeves knitted from side to side in Alpaca and Vivaldi or Brushed Alpaca Silk. Size S - XXXL
DROPS 119-1 |
|||||||||||||
|
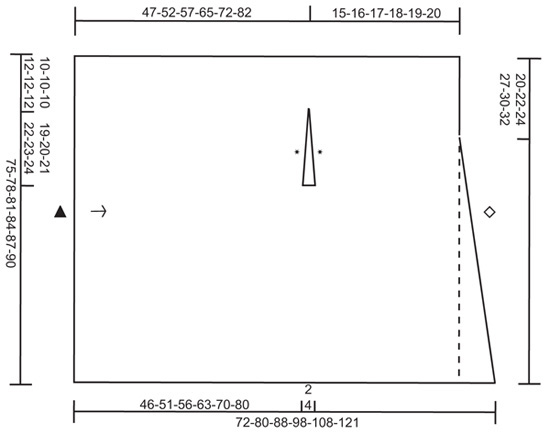
GARTER ST (back and forth on needle): K all rows. --------------------------------------------------------- --------------------------------------------------------- JACKET: Worked back and forth on circular needle in order to fit in all sts. Beg mid front on left front piece and knit towards the side, cast off for armhole and continue to mid back and cast off. Work right front piece in the same way but mirrored and sew tog the 2 pieces mid back. Work the sleeves separately and set in. LEFT FRONT PIECE: LOOSELY cast on 113-117-121-126-130-135 sts on circular needle size 5 mm with Alpaca and Vivaldi or Brushed Alpaca Silk (= 2 threads). Work 4 rows GARTER ST - see above (first row = RS). Change to circular needle size 6 mm and continue in stocking st with 2 garter sts each side. REMEMBER THE KNITTING TENSION! When piece measures approx 46-51-56-63-70-80 cm - adjust so that next row is from RS – slip 44-45-46-51-52-54 sts on left side of piece (as seen from RS) on a stitch holder. Work 4-4-4-8-8-8 rows stocking st with 2 garter sts each side (= 2-2-2-4-4-4 cm) on the remaining 69-72-75-75-78-81 sts on needle. Now slip these sts on a stitch holder. Slip the 44-45-46-51-52-54 sts from the first stitch holder back on circular needle size 6 mm and work armhole as follows from RS: Size S + M + L: Cast off the first 29-30-31 sts at beg of row, work remaining 15 sts on needle as before. Insert a marker in the outermost st on right side of piece (as seen from RS – this marks where sleeve cap is sewn to armhole). Turn piece, work the 15 sts on needle as before and then cast on 29-30-31 sts at the end of row. Size XL + XXL + XXXL: Cast off the first 16-17-18 sts at beg of row, work remaining 35-35-36 sts on needle as before, turn piece. Work the 35-35-36 sts on needle as before, turn piece. Cast off the first 17-17-18 sts at beg of row and work remaining 18 sts as before. Insert a marker in the outermost st on right side of piece (as seen from RS – this marks where sleeve cap is sewn to armhole). Turn piece, work the 18 sts as before, cast on 17-17-18 new sts at the end of row, turn piece. Work the 35-35-36 sts on needle as before, turn piece. Work the 35-35-36 sts on needle as before and cast on 16-17-18 new sts at the end of row. ALL SIZES: Now slip the 69-72-75-75-78-81 sts from stitch holder back on needle and continue in stocking st with 2 garter sts each side on all 113-117-121-126-130-135 sts again. When piece measures 61-67-73-82-90-101 cm (measured on left side of piece as seen from RS, piece measures approx 62-68-74-84-92-103 cm on right side) work shortened rows to create extra width mid back as follows (beg from WS = from neckline): Work the first 30-33-36-41-45-48 sts on needle and then slip these sts on a stitch holder, work the remaining sts on needle, turn piece and work return row, * work the first 11-8-7-7-6-5 sts on needle, slip these sts on the same stitch holder and work remaining sts on needle, turn piece and work return row *, repeat from *-* a total of 7-9-11-11-13-15 times. Turn piece, work the remaining 6-12-8-8-7-12 sts. Now slip the 107-105-113-118-123-123 sts from stitch holder back on needle and work 2 rows garter st on all sts, cast off LOOSELY = mid back. Piece measures approx 62-68-74-83-91-102 cm on left side of piece (as seen from RS) and 72-80-88-98-108-121 cm on right side of piece – measured in the knitting direction. RIGHT FRONT PIECE: Cast on and work like left front piece, but mirrored, i.e. make all measurements on right side of piece - as seen from RS. When working the 4-4-4-8-8-8 rows under sleeve, adjust so that first row is worked from WS (and not RS) and slip the outermost 44-45-46-51-52-54 sts on left side of piece as seen from WS (and not RS) on a stitch holder. Work armhole as described for left front piece, but from WS (and not RS). Beg working shortened rows mid back from RS (and not WS). SLEEVE: Worked back and forth on circular needle. Cast on 41-43-44-47-50-53 sts (includes 1 edge st each side) on circular needle size 5 mm with Alpaca and Vivaldi or Brushed Alpaca Silk (= 2 threads). Work 4 rows garter st, change to circular needle size 6 mm and work stocking st. When piece measure 5 cm dec 1 st at beg of following 2 rows, repeat dec at 10 cm, and now dec 1 st at the beg of every row a total of 4-4-5-6-7-8 times each side. Cast off 4 sts at the beg of the next 2 rows and then cast off remaining sts. Sleeve measures approx 15-15-16-17-18-19 cm. ASSEMBLY: Sew jacket tog mid back inside cast off rows. Set in sleeves - NOTE: Sew sleeve cap to marker on shoulder and set in sleeve each side along the armhole marked by stars in diagram (no seam mid under sleeve, i.e. leave open where the 4-4-4-8-8-8 rows were knitted). |
|||||||||||||
Diagram explanations |
|||||||||||||
|
|||||||||||||
 |
|||||||||||||
Have you finished this pattern?Tag your pictures with #dropspattern #flyawaycardigan or submit them to the #dropsfan gallery. Do you need help with this pattern?You'll find 18 tutorial videos, a Comments/Questions area and more by visiting the pattern on garnstudio.com. © 1982-2026 DROPS Design A/S. We reserve all rights. This document, including all its sub-sections, has copyrights. Read more about what you can do with our patterns at the bottom of each pattern on our site. |
|||||||||||||

With over 40 years in knitting and crochet design, DROPS Design offers one of the most extensive collections of free patterns on the internet - translated to 17 languages. As of today we count 324 catalogues and 12210 patterns translated into English (UK/cm).
We work hard to bring you the best knitting and crochet have to offer, inspiration and advice as well as great quality yarns at incredible prices! Would you like to use our patterns for other than personal use? You can read what you are allowed to do in the Copyright text at the bottom of all our patterns. Happy crafting!
Post a comment to pattern DROPS 119-1
We would love to hear what you have to say about this pattern!
If you want to leave a question, please make sure you select the correct category in the form below, to speed up the answering process. Required fields are marked *.